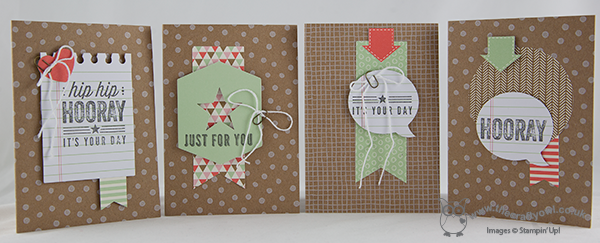
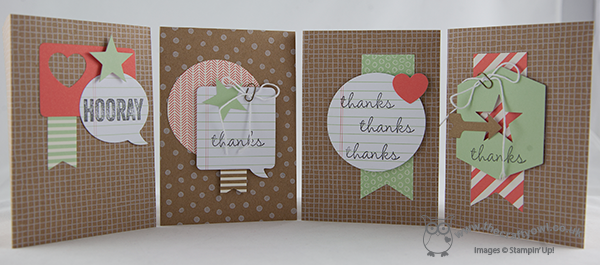
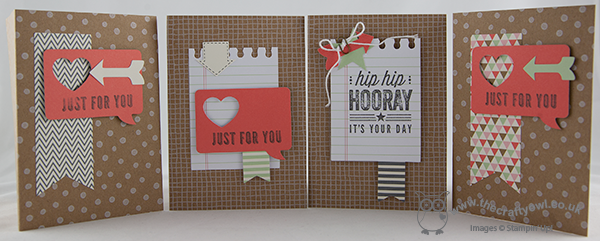
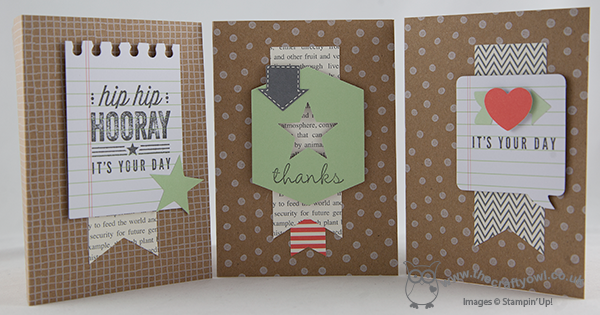
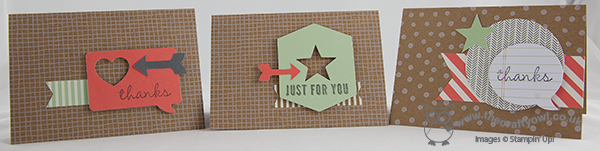
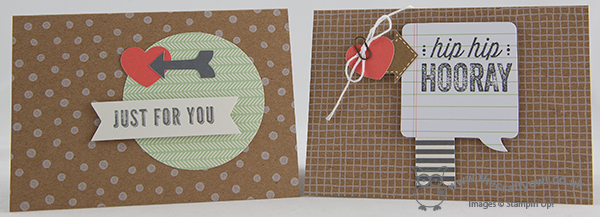
by Joanne James6. May 2014 16:11Today I'm sharing one of the latest additions to the Stampin' Up! range: the Hip Hip Hooray Card Kit. It costs just £17.95 and contains literally EVERYTHING you need to make 20 cards - tags, embellishments, cards, envelopes, stamps, ink, block - yes, everything! This kit is great for seasoned crafters who want to stock up on cards in a hurry and those who are new to crafting - if you've never stamped before, this is the kit for you!
To see just how easy it is, check out my lighthearted video below where I make all 20 cards in under 6 minutes:
Ok, so there was some fast-forwarding in there!! In reality it took me just over an hour to make all 20 cards, which is still a great output for a short time investment. If you would like to purchase a Hip Hip Hooray Card Kit, get in touch or pop on over to my online store and place an order today. This kit would also make a great gift, maybe for a teenager or someone who likes crafting or to try new things - at less than £1 per card, it represents great value.
Better still, why not get together a group of friends and host your very own Hip Hip Hooray Card Party? I'll provide the kits, all you need to provide is the refreshments. I'll be on hand to help and answer any questions and I guarantee that by the end of the session you will have 20 cards to be proud of! Contact me to book your Hip Hip Hooray Card Party today!
And here's one more look at the finished cards:
Back tomorrow with another project; until then, happy stampin'!
Stampin' Up! Supplies Used:
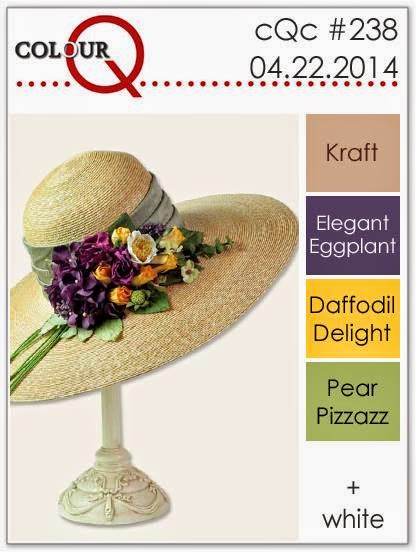
by Joanne James28. April 2014 21:16Good evening blog readers! Today I'm just in time with a card for this week's Colour Q challenge - here is the colour palette:
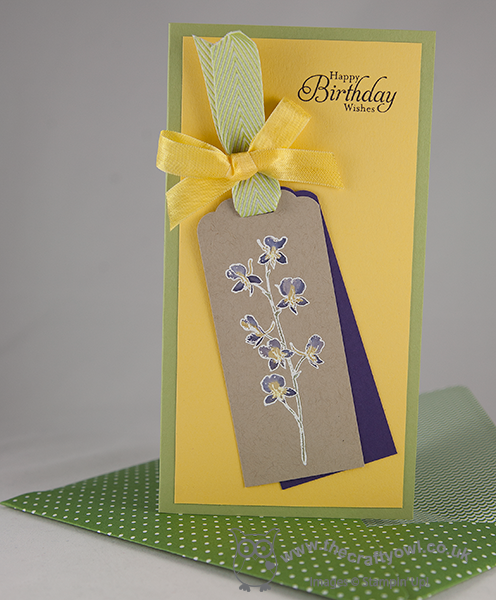
Last week I was chosen as one of the ColourQ Courtiers - you can see my winning card here. I saw this week's colour palette and photo inspiration and decided to make a card using a technique that I'm teaching in my card classes this week - painting on a white watercoloured background within a heat-embossed outline (not sure if there's a more succinct title for this technique, but that's how you do it!). Here is my card:
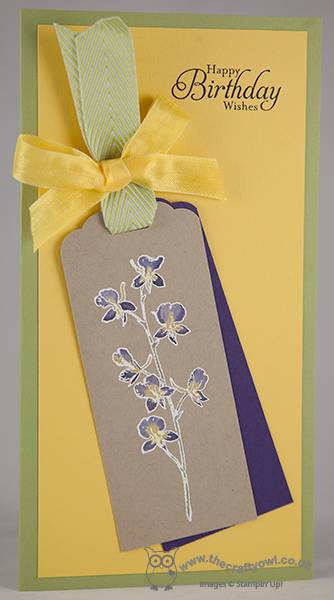
I went for a simple and bright layered background of Daffodil Delight on a Pear Pizzazz base, as I wanted the detail on my tag to take centre stage. I stamped my flower image in white kraft ink onto a piece of Crumb Cake cut with the Scallop Tag Topper Punch, then heat embossed with white embossing powder. Then, using my aquapainter, I painted the whole of the image white using the white craft ink, then when dry used my aquapainter again to over-paint with Daffodil Delight and Elegant Eggplant on the flowers, and Pear Pizzazz for the stems. I backed this tag with a second one cut out of Elegant Eggplant for another splash of colour and finished with a double ribbon bow topper and stamped a simple birthday sentiment.
The stamp that I used on my tag is from the 'Happy Watercolour' set and does require quite a long tag to fit it onto, which doesn't lend itself to a standard A6 card size. So I made a bespoke card, 200mm x 105mm, for which I then needed a bespoke envelope. And so to the exciting news that I hinted at the end of yesterday's post - I have another cool tool for you!
Following on from the huge success of Box Buster from The Crafty Owl, which enables you to make any size box using your Envelope Punch Board, I had so many requests for a similar tool to create an envelope of any size, I thought I had better get on with it - and Envelope Expert from The Crafty owl is the result! In truth I don't make that many unusually sized cards, and therefore envelopes, I didn't appreciate there was such a need to go beyond the 66 standard envelope sizes that come with the board - but having 'busted' boxes, Envelope Expert was pretty straightforward. So for everyone who asked, here it is! you can find this free to use tool at www.thecraftyowl.co.uk/envelopeexpert or simply go to www.thecraftyowl.co.uk and on the menu choose 'Tools' and 'Envelope Expert'. To see Envelope Expert in action, why not watch the short video below:
Now you can make any size card and matching envelope you like, just as easily as you can make an any size box - can you tell how much I love my Envelope Punch Board?!
Back tomorrow with another card; until then, happy stampin' - and envelope-making :-)
Stampin' Up! Supplies Used:
by Joanne James10. April 2014 21:48Good evening everyone! If you are a regular reader of my blog, you will remember the flowerpot card I designed for the Pals Paper Arts Colour Challenge a few weeks ago (click here if you would like to see the card). I was thrilled that this card was chosen as a Pals Paper Arts Top Pick that week (check out my Pinterest Board here if you would like to see which of my other cards are challenge winners!). I made this card with Mother's Day in mind, but it would work equally well for a female birthday card for someone special.
Well, I got so many email requests for a tutorial on how I made this card, I made another card in an alternative colourway and recorded a video tutorial as I made it to show you exactly how it's done. It has taken me a little while to get it online, because although I recorded the video promptly the editing then took a back seat, along with a few other tutorials that are still waiting for the magic touch! Anyway, all done now and better still - the Secret Garden Framelits are available at the bargain discount price of £15.71 this week as part of the Stampin' Up! Wednesday Weekly Deals offers, so if you fancy having a go at making this card now is the time to snap them up! Here is a picture of my second version of my flowerpot card:
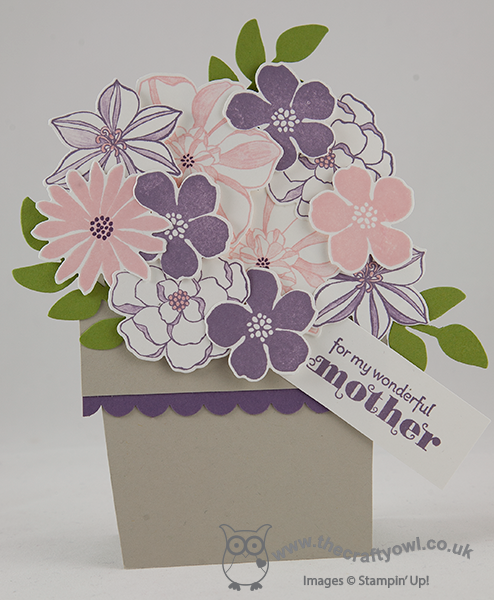
My original card was made in Crumb Cake, Rose Red, So Saffron and Wild Wasabi; this alternative version is made in Sahara Sand, Perfect Plum, Blushing Bride and Old Olive. The finished card measures 6" x 6" square and will fit a standard envelope (make sure you don't stick the central leaf shape too high!). The video also shows what the card looks like on the reverse (especially for you, Cindy B ;-) ) in case you're curious.
So without further ado, here is the video tutorial - enjoy!
Back tomorrow with another project; until then, happy stampin'!
Stampin' Up! Supplies Used:
by Joanne James19. March 2014 20:33Today I want to share with you another use for one of my new favourite punches - the scalloped tag top punch. This really is such a versatile punch that can be used in so many ways. There are lots of variations on how it can be used to make an unusual card closure - today's card is a fun, concertina style Mother's Day card, where the scalloped tag top punch is used to add detail to the closure. I saw a similar card to this on Julie Kettlewell's blog here and liked it so much I decided to create one. This is what the card looks like 'closed':
Ribbon is threaded through the punch out hole and around the card and tied in a bow to keep it shut, then when you undo the ribbon and open the card out, you see the message inside:
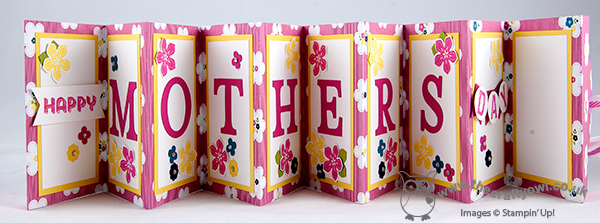
These cards are such fun to make and so easy. All you need is one sheet of 12" x 12" for the basic card. I used a sheet of the Gingham Garden DSP for my card, and layered the inside panels with Whisper White matted on Daffodil Delight. I cut the letters for 'Mothers' with my Typeset Alphabet die, but you could easily use an alphabet stamp set such as Morning Post or Notable Alphabet if you have one instead. I took the word 'Happy' from one of the 'See Ya Later' Sale-A-Bration stamp sets and the letters for 'Day' from my Sketched Alphabet individual stamps before punching out and layering on a mini banner. I then decorated with flowers stamped and punched from the Petite Petals bundle and the Itty Bitty Punches set in colours that co-ordinated with my chosen DSP. The last panel is left blank for you to write your personalised Mother's Day message.
I had intended to shoot a video tutorial on how to make one of these cards to accompany my series of Scalloped Tag Top Punch video tutorials, but time has not been on my side so I haven't managed it yet; I will look to complete one in the next week or so and when I do will update my blog with the link. Updated 8/5/14 - here is my video tutorial on how to make this card:
The best bits about this card: it's one of those projects where you don't have to deliberate over which side of your DSP to use, as you see both sides (dilemma avoided, for once) and also because of the closure, you don't need an envelope - this is a card and envelope in one! This style of card would work for lots of other occasions too - why not have a go and see what you come up with.
Back tomorrow with another project; until then, happy stampin'!
Stampin' Up! Supplies Used:
ea819749-b0b7-4e51-82ac-2f6a767b1ba6|0|.0|96d5b379-7e1d-4dac-a6ba-1e50db561b04
Tags: ABC-123 Sketch Alphabet & Numbers, Banner Punch, circle punch, See Ya Later, Shop online, Stampin' Up, Stampin' Up Card, Stampin' Up Card ideas, Stampin' Up Supplies, Typeset Alphabet, Scalloped Tag Topper Punch, Big Shot, Mother's Day, Gingham Garden
Cards | Stamping | Video Tutorials
by Joanne James11. March 2014 15:13Firstly, thank you to everyone who has left comments on my blog, Facebook page, youTube channel or emailed me in person with comments and praise for my new Box Buster tool - I am genuinely touched that you have gone out of your way to share with me what a great tool you think this is and I'm delighted to be able to share it with you. Today I'm back with another video tutorial showing you a different box that you can make using your Envelope Punch Board - an open topped Easter bunny treat box - made using paper from the lovely Fresh Prints Designer Series Paper stack:
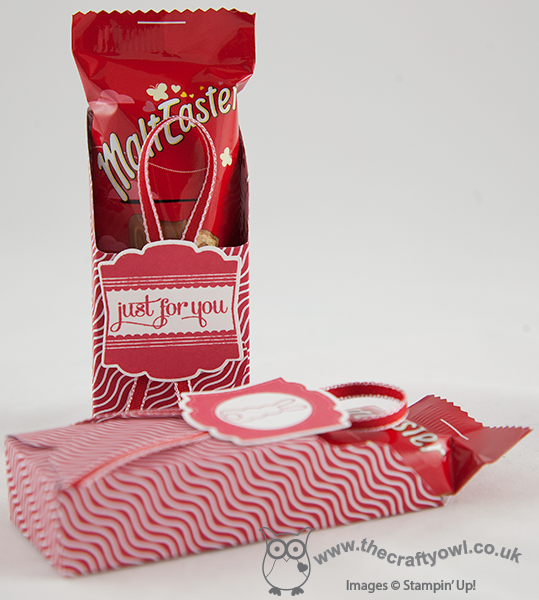
Sometimes you want to be able to see the contents of your box and today's box is just perfect for that. It also means that when you're making your box out of such lovely double-sided designer paper, you get a lovely glimpse of the reverse side too:
I love the Fresh Prints DSP stack - these paper stacks are great for small boxes and perfect if you're a card maker; I always get through several of these each season! Today's boxes were made to fit the Malteser Easter bunnies that are currently on sale in store right now, but as always with the aid of my Box Buster tool you could adapt the same style box to fit any size contents, just by measuring them; Box Buster from The Crafty Owl will do all the hard work for you and tell you what size paper you need and where you should make your punch marks. So, without further ado, here's what you've all been waiting for - the link to today's video:
)
I hope you found the tutorial useful - there's lots more still to come! Don't forget - you can access the Box Buster tool via the button on the right hand side of my blog home page or simply by clicking here.
Back tomorrow with another project; until then, happy box making!
Stampin' Up! Supplies Used:
c5d11fe0-3556-4a4f-8586-67c08127827c|0|.0|96d5b379-7e1d-4dac-a6ba-1e50db561b04
Tags: Box Buster, boxes, Artisan Label Punch, Eggstra Spectacular, Easter, Envelope Punch Board, Fresh Prints DSP Stack, Label Love, Shop online, Stamp-a-ma-jig, Stampin' Up, Stampin' Up Card ideas, Stampin' Up Supplies, video tutorial
Box Buster | Boxes | Envelope Punch Board | Video Tutorials
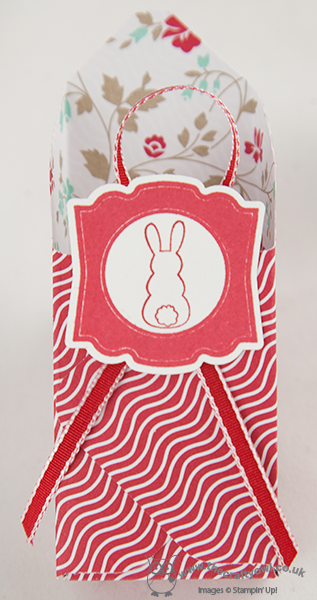
by Joanne James5. March 2014 09:52Good morning blog readers and crafters! Back nice and early this morning with the second of my video tutorial posts showing you how to make any size box using your Envelope Punch Board and my new Box Buster tool. I've started early on my Easter treat boxes, so today's box shows you how to make this cute box:
The finished dimensions of today's box are 100mm x 75mm x 15mm. It was designed to fit a specific Easter treat - but you'll have to watch the video below to find out what it was! My new Box Buster from The Crafty Owl tool is just great for that - you can easily create a box to fit your chosen contents, without any hassle or wasted paper - you just measure the thing you want to put in the box, input the dimensions into the Box Buster tool and it does all the hard work for you: it will tell you exactly what size paper you need and where to make your first and second punch markings.
Today's project was worked out in millimetres, but the Box Buster tool will let you construct your box in either millimetres or inches - you choose! Here's the link to today's video tutorial:
Wasn't that SOOO easy?! Keep following this week as there are more box tutorials to come, showcasing a variety of box types with handy hints and tips for making the most of your Envelope Punch Board and my new Box Buster tool.
Back soon with another project; until then, happy stampin' (and box making!)
Stampin' Up! Supplies Used:
184e6871-6a47-4103-a0a0-0c3eb90de4fd|0|.0|96d5b379-7e1d-4dac-a6ba-1e50db561b04
Tags: 3D Projects, boxes, circle punch, Eggstra Spectacular, Envelope Punch Board, Sale-a-bration, Sale-a-bration 2014, Stampin' Up Card, Stampin' Up, Shop online, scallop circle punch, Sweet Sorbet, video tutorial
3D Projects | Boxes | Envelope Punch Board | Sale-a-bration | Stamping | Video Tutorials
by Joanne James3. March 2014 22:26Good evening readers! Another busy day today with my first class of the month. The ladies in today's class made some great cards using their Happenings Simply Created Card Kits - pop by my Facebook page tomorrow if you would like to see what they created as I will be uploading some photos of their work.
Meanwhile, I promised you a special second blog post today that showed you how to make a box that can be used to hold four of the notelets created from part of the Happenings Simply Created Card Kit - so here it is! I've shot a few videos previously using the Envelope Punch Board, however this is the first box video. The reason I'm excited to share this particular video with you though is that I used a new tool of mine - Box Buster from The Crafty Owl - to work out the dimensions for my box and it was SO easy!!
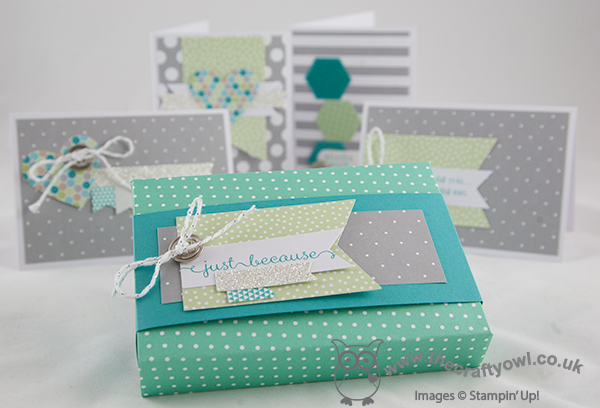
For any of you that have made boxes using your Envelope Punch Board previously, you will know that the trickiest thing is working out where to make your first and second punches in order to create a box of the correct dimensions. It's easy for a square-based box, as the dimensions simply need to be divisible by 3, but what about when you want to create rectangular boxes of different heights, widths and depths? Following many templates and a considerable amount of test paper, I have developed a tool that means you can input your three chosen dimensions, in either millimetres or inches, and the Box Buster will calculate the size of the paper that you require and where you need to make both your first and second punches.
Watch the video to see just how easy it is to use (you will need to make a volume adjustment for sound during the middle section of the video; the section that shows the Box Buster in action uses different recording software to my usual video recordings and the sound volume settings are not only different but I've been unable to edit post-production - I do now know for next time though!):
You can find Box Buster from The Crafty Owl on my website here or via the permanent link on the right hand side of my blog page. Box Buster is a free tool and will be permanently available for anyone to use - why not visit the page now and add it to your 'favourites' so that you can access it quickly and easily the next time you need to make a box using your Stampin' Up! Envelope Punch Board? Whilst you're there, why not also check out the Product Table Builder from The Crafty Owl - a great tool if you are a Stampin' Up! demonstrator with an online store. And if you haven't already got an Envelope Punch Board, what are you waiting for? Click on the link at the bottom of today's post and purchase one from my online store today!
I'll be making more video tutorials this week showing you how easy it is to make boxes in a variety of different shapes and sizes, in both metric and imperial measurements, using Box Buster from The Crafty Owl and The Stampin' Up! Envelope Punch Board; do come back and check them out or subscribe to my YouTube channel.
Back tomorrow with another project; until then, happy stampin'!
Stampin' Up! Supplies Used:
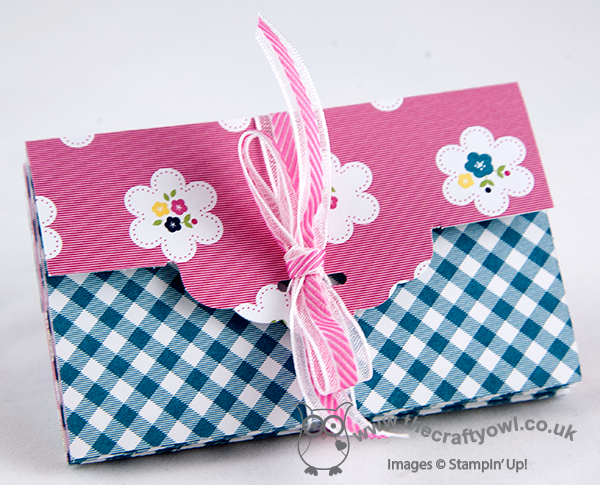
by Joanne James20. February 2014 21:28Good evening everyone! Today I have a video tutorial to share with you that I prepared a couple of weeks ago that shows you how to make an extra-wide pouch using the Scalloped Tag Topper Punch. Here's the finished extra-wide pouch:
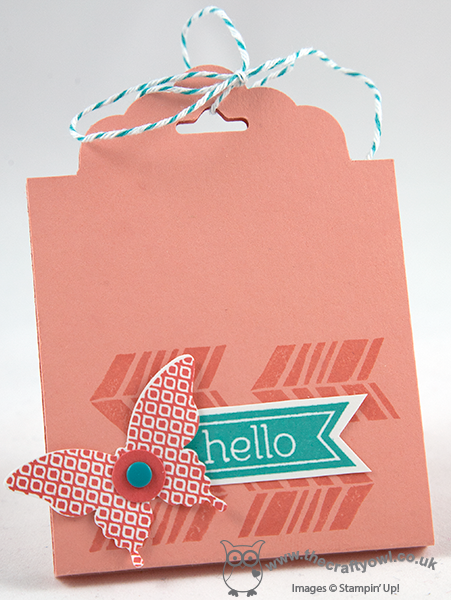
Here is a standard size treat pouch made with the Scalloped Tag Topper Punch - you can find my previous video tutorial on how to make this here:

As you can see, when compared to the standard-size punch, the extra-wide version is about 1" or 2.5cm wider and taller. The video tutorial shows you how to adapt your punch and shares my top tip for a smooth punch every time - go and take a look:
Here are the measurements I used in the video in case you didn't catch them:
Cardstock: 2 3/4" x 7 3/4" or 7cm x 19.5cm
Score at: 3 3/4" and 4" or 9.5cm and 10cm
I hope you found this video tutorial useful - this is such a versatile punch with so many uses beyond a standard tag. The treat pouches make great little wedding favours too.
Back tomorrow with another project; until then, happy stampin'!
Stampin' Up! Supplies Used:
9f056e18-8f7c-4028-927f-66d960295930|0|.0|96d5b379-7e1d-4dac-a6ba-1e50db561b04
Tags: 3D Projects, Papillon Potpourri, Perfect Pennants, Petal Parade, Scalloped Tag Topper Punch, Shop online, Stampin' Up, Stampin' Up Card, Stampin' Up Card ideas, Stampin' Up Supplies, video tutorial, Weddings
3D Projects | Stamping | Video Tutorials
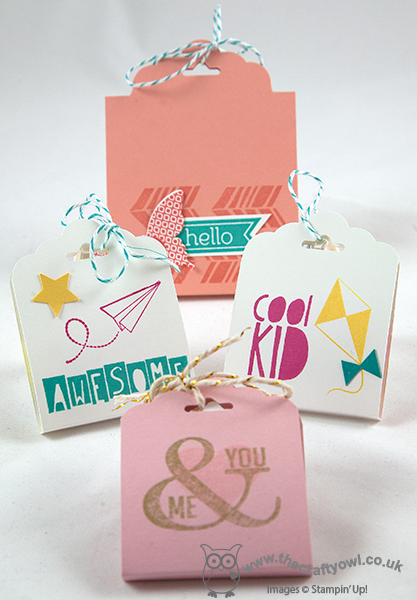
by Joanne James3. February 2014 21:18This week is a busy week for me, with a couple of classes and lots more going on. I held my first class of the week today and we had a lot of fun making cards using all of the items that can be yours free with a £45 spend during Sale-A-Bration. I'll share some of these cards with you later in the week (I don't want to spoil things for those ladies that haven't made them yet!) but today I wanted to share a short video tutorial for the first of the projects I've made using the Scalloped Tag Topper Punch. The Scalloped Tag Topper Punch is new in the Spring-Summer seasonal catalogue and, along with its neighbour the Angled Tag Topper Punch, can be used to make easy gift tags and bookmarks in one simple step, as the top is shaped and the hole punched for you in one easy movement. It is an incredibly versatile punch and can be used to create lots more besides.
I have filmed a series of tutorials that show the versatility of these punches and the first of these shows you how to make a basic treat holder. Here are some of the ones I created:
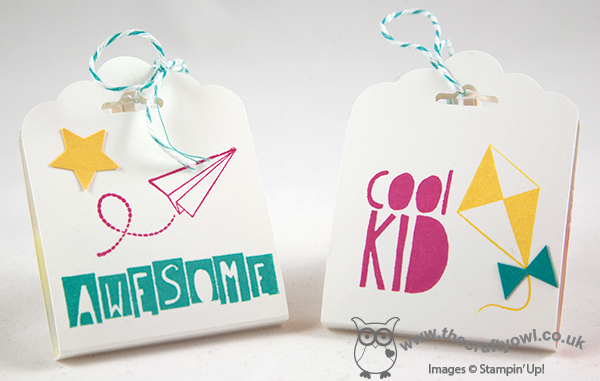
These were for my children as an after-school treat (they always complain I never greet them with sweets at the school gate, so this made a nice change!) and then I also created this more grown-up version:
I think these would make such lovely wedding favours and are so easy to make you could easily put together large quantities with minimal effort. I was inspired by these treat holders made by Mary Fish and adapted mine to suit the chocolate supplies on hand! Also, I have included both metric and imperial measurements in my tutorial, so you can create this treat holder with ease, whichever method you prefer.
So here's the first in my series of Scalloped Tag Topper Punch video tutorials - enjoy!
I hope you found my video useful; if you would like to purchase any of the items featured, please click on the links below and hop on over to my online store or give me a call if you're local to me and would like to save on postage costs. Back soon with news of some product shares that I've put together for those of you who have now had time to browse the new Spring-Summer catalogue and would like a little bit of everything! Until then, happy stampin'!
Stampin' Up! Supplies Used:
by Joanne James29. January 2014 20:50Today I have a little project to show you that is based on something I made using my Flowerfull Heart stamp at the beginning of January, but because I didn't have a voice I wasn't able to shoot a video to show you how to make it! Now that my beloved Flowerfull Heart stamp is no longer available to purchase, I decided to modify my original design and make it using one of the stamps in the new 'Language of Love' set that features in the Spring-Summer seasonal catalogue. I used Stampin' Up!'s Simply Pressed Clay to make an ornamental gift tag embellishment that you could use to decorate a card or package. Here's one on a box with a bow made out of some of the lovely Sale-A-Bration Sweet Sorbet DSP:
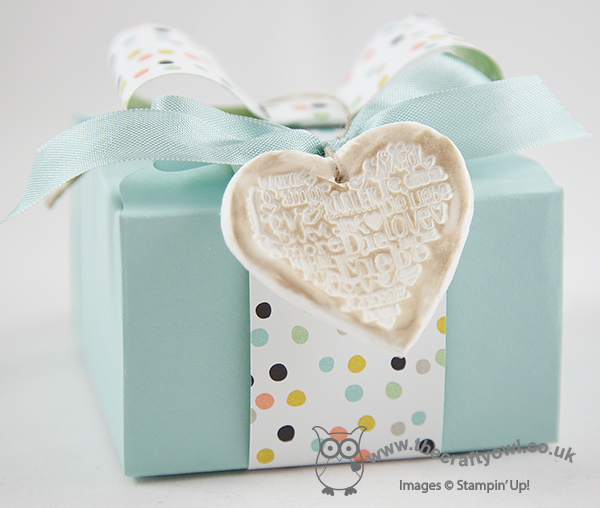
Here's a close-up of the tag, where you can really see the detail of the stamp:
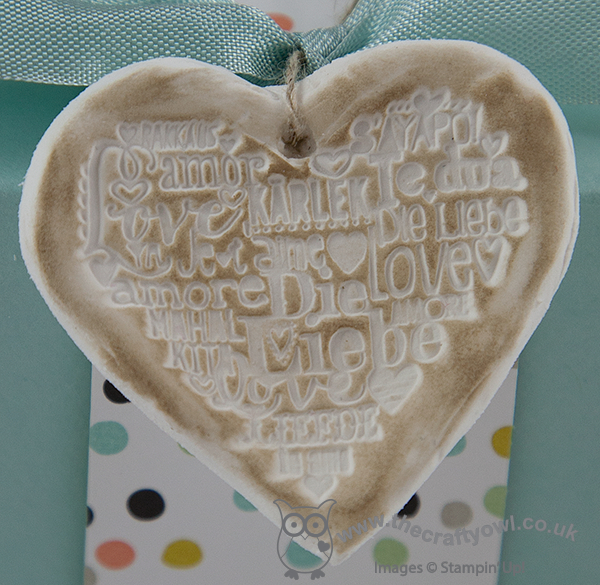
These tags really are quite easy to make, although you need to bear in mind it's a two stage process, as you will need to allow time for the clay to dry before you can colour and finish it. Here's a link to my video tutorial that shows you how it's done - it also includes some larger ornamental hearts made with my Flowerfull Heart (I couldn't resist!) - and some useful hints and tips for working with Simply Pressed Clay:
These tags would look beautiful attached to a wedding gift, or could even be an alternative wedding favour. I hope you found today's video tutorial useful and it inspires you to make interesting things with Stampin' Up!'s Simply Pressed Clay - leave me a comment and let me know what you come up with, or better still share a photo of your work on my Facebook Page!
Back tomorrow with another project; until then, happy stampin'!
Stampin' Up! Supplies Used:
9e5e4fa7-f4d4-4356-ad0b-61ab3a5b9bbc|0|.0|96d5b379-7e1d-4dac-a6ba-1e50db561b04
Tags: 3D Projects, Language of Love, Simply Pressed Clay, Stampin' Up, Stampin' Up Card, Stampin' Up Card ideas, Stampin' Up Supplies, video tutorial, Valentine's, Valentines, Weddings, Shop online
3D Projects | Stamping | Video Tutorials