Colour Me...! Spotlight on Swallowtail

by Joanne James9. July 2014 08:00

Happy Wednesday everyone! Double delights today: new weekly Wednesday Deals - I'll be back with the details on those later  -and more importantly for me my second Colour Me...! Card Challenge Design Team post! This week we are using the striking colour combination of Elegant Eggplant and Soft Sky:

This is an unusual colour combination for me, but I had a clear idea of how I was going to use these contrasting colours - here's the card I came up with this week: 

I decided to use Elegant Eggplant for my base card and then stamped the large Swallowtail stamp in Elegant Eggplant onto Soft Sky cardstock. I then took a rectangular piece of Elegant Eggplant cardstock and punched a circular hole out of the centre and rounded alternating corners with my Project Life corner rounder. I then strategically placed this over my butterfly to include its head and adhered it to my card using dimensionals, having first coloured the portion of the butterfly visible through the circular hole using Elegant Eggplant ink and a blender pen. The top layer is used to create a 'spotlight' onto the butterfly and almost magnify its detail. I finished with a small birthday sentiment from Petite Pairs as I didn't want anything that would overshadow my butterfly, and stamped the inside of the card and the envelope too with the smaller swallowtail from the coordinating Papillion Potpourri stamp set.

I hope you like today's card - please do pop along to the 'Colour Me...!' challenge page this week to check out the work from the other talented designers that I'm working with and to upload your own creations.

Back tomorrow with another project; until then, happy stampin'!


Stampin' Up! Supplies Used:

Table built using Product Table Builder by The Crafty Owl - Independent Stampin' Up! Demonstrator.


Tags: , , , , , , , ,

Cards | Stamping

Smile Says The Mouse!

by Joanne James17. April 2014 10:00

As promised, today I have the second of the cards I made for this week's sketch over at CAS(E) This Sketch - I saw this layout and couldn't resist another interpretation. This time I also combined it with the colour challenge over at Dynamic Duos:

This card is altogether more fun than yesterday's - take a look and you'll see what I mean:

I had the idea that if the squares were circles, the little mouse from the 'Life in the Forest' stamp set could play 'peek a boo' as if he was in a block of Swiss cheese (something of a graphic interpretation, given that the circles are identically sized and placed, but hopefully you can see what I mean!) I stamped the mice onto Whisper White and simply punched out with my 1" circle punch so that only parts of them were showing, and I mounted these onto circles of Wisteria Wonder only slightly larger that I cut with my Circle Framelits. I coloured the mice with my Wisteria Wonder and So Saffron inks and a blender pen and finished the card with the sentiment 'smile' - well, I didn't have one that says 'chuckle', which is what I was doing as I coloured these little fellas so this was the next best thing :-)

I hope you like my fun take-two on the sketch; back tomorrow with my entry for this week's Paper Players challenge (and yes, it was a challenge indeed!) Until then, I'm off to the theatre with Ben this morning whilst Rebecca is on a swimming course and my dear husband is having to monitor the bathroom fitter who is replacing a floor tile that has been booked to do the job for some 14 months - hopefully today is (finally) the day!

Until then, happy stampin'!


Stampin' Up! Supplies Used:

Table built using Product Table Builder by The Crafty Owl - Independent Stampin' Up! Demonstrator.


Video Tutorial: For My Mother Flowerpot Card

by Joanne James10. April 2014 21:48

Good evening everyone! If you are a regular reader of my blog, you will remember the flowerpot card I designed for the Pals Paper Arts Colour Challenge a few weeks ago (click here if you would like to see the card). I was thrilled that this card was chosen as a Pals Paper Arts Top Pick that week (check out my Pinterest Board here if you would like to see which of my other cards are challenge winners!). I made this card with Mother's Day in mind, but it would work equally well for a female birthday card for someone special.

Well, I got so many email requests for a tutorial on how I made this card, I made another card in an alternative colourway and recorded a video tutorial as I made it to show you exactly how it's done. It has taken me a little while to get it online, because although I recorded the video promptly the editing then took a back seat, along with a few other tutorials that are still waiting for the magic touch! Anyway, all done now and better still - the Secret Garden Framelits are available at the bargain discount price of £15.71 this week as part of the Stampin' Up! Wednesday Weekly Deals offers, so if you fancy having a go at making this card now is the time to snap them up! Here is a picture of my second version of my flowerpot card:

My original card was made in Crumb Cake, Rose Red, So Saffron and Wild Wasabi; this alternative version is made in Sahara Sand, Perfect Plum, Blushing Bride and Old Olive. The finished card measures 6" x 6" square and will fit a standard envelope (make sure you don't stick the central leaf shape too high!). The video also shows what the card looks like on the reverse (especially for you, Cindy B ;-) ) in case you're curious.

So without further ado, here is the video tutorial - enjoy!


Back tomorrow with another project; until then, happy stampin'!


Stampin' Up! Supplies Used:

Table built using Product Table Builder by The Crafty Owl - Independent Stampin' Up! Demonstrator.


Flowerpot Fun

by Joanne James17. March 2014 21:45

I've had a great start to my week today with a pleasant morning smelling fragrances and catching up with some good friends. Today I'm sharing my entry for this week's Paper Pal Arts Colour Challenge:

When I saw these colours, I immediately thought how lovely they would be for a spring flower bouquet. I decided to get out my Secret Garden stamp set and framelits and start creating - here's my card:

Not quite a bouquet, granted - I went for a Crumb Cake flowerpot instead! I then stamped a variety of flowers, colouring some of them with ink and a blender pen and layered them, raising some of them on dimensionals, to fill my flowerpot. A few Wild Wasabi leaves to add some green and a 'For my mother' gift tag complete my card. I think this would make a lovely Mother's Day card and the flowers would certainly last longer than the real thing.

Only two more weeks until Mothering Sunday here in the UK, so if you haven't thought about your cards yet, you'd better get started! I hope you liked today's card - back tomorrow with another project; until then happy stampin'!


Stampin' Up! Supplies Used:

Table built using Product Table Builder by The Crafty Owl - Independent Stampin' Up! Demonstrator.


Simply Sketched Male Card FMS122 and CAS C&S 60

by Joanne James10. February 2014 12:28

Today I'm sharing the card that was originally scheduled for yesterday! This card also uses the sketch layout at Freshly Made Sketches this week and I combined it with the colour challenge over at CAS Colours and Sketches this week:

I decided to go with an adult masculine card (it's always good to have a few of these on standby!) and inked up my Simply Sketched hostess set for the focal point of my card:

I stamped the little bird in Chocolate Chip ink and coloured him with a Chocolate Chip marker and blender pen, then used the blue and green to create a simple sponged background. I stamped my sentiment from the same stamp set on the front of the layered banner and used some of the Gingham Garden DSP to add interest without making the card too busy. This piece of Pear Pizzazz DSP seemed to be just right for this card, although you could be forgiven for not even knowing it's there as it isn't typical of the bright pink, indigo and yellow designs that are a key feature of this DSP pack.

I really like the understated finish of this card - and the little bird is perfect for a male card. This is the first time I've used the Simply Sketched stamp set and will definitely be making more with it. It has some lovely sketch stamps and three useful sentiments in a font that works with all kinds of cards. As I mentioned above, this set is an exclusive hostess set that can be yours only when you host a Stampin' Up! party. The current Sale-A-Bration promotion is a great time to host a party - not only will you and your party attendees get a free gift for every £45 you spend, but as the hostess you can earn an additional £25 in hostess benefits for qualifying party sales (£250 or more). If you would like to host a Stampin' Up! party, do give me a call or contact me to book a date.

I hope you like today's card; if you would like to see more ideas for using either today's sketch or the colour scheme, do pop by the Freshly Made Sketches and CAS Colours and Sketches blogs to see what the design teams and participants have created.

Back tomorrow with another project; until then, happy stampin'!


Stampin' Up! Supplies Used:

Table built using Stampin' Up! Product Table Builder from The Crafty Owl.


Best of Christmas Santa Thinlit Card

by Joanne James25. October 2013 19:45

Apologies for the lack of blog posts for the last couple of days: Hubby has had a few days off so with him and the children, I've rather had my hands full! Yesterday however I had a largely child-free day as the James juniors were at Grandma's so, whilst the kiddies were away it was definitely an excuse to play and catch up on some crafting! Today I'm going to share my first Thinlits card with you, featuring the jolly Santa stamp from the 'Best of Christmas' anniversary set:

 I kept the card design quite simple as I wanted the detail on the santa stamp to take centre stage. I coloured him with markers and a blender pen, adding a little Dazzling Details to the fur on his hat for a little sparkle. Here's a close up: 

I then cut him out using the scalloped circle framelit that is one of the pieces that comes with circle thinlit set and adhered him to the card base. A little DSP on the back panel just finishes the card off.

So what do you think? These cards are so easy to make - they take just minutes to cut and roll and have lots of fun extra pieces in addition to the card body. I have another thinlit card to show you tomorrow, with a little video too, so I hope you'll pop back then and take a look. Already prepared as we have family coming for dinner tomorrow, so there will be little time for crafting. Hope to see you tomorrow; until then, happy stampin'!


Stampin' Up! Supplies Used:

Tags: , , , , , , , ,

Cards | Stamping

The Great Outdoors and Other Things!

by Joanne James10. September 2013 19:52

Well, I can't believe it's actually been six days since I last posted a blog entry, but it has! It's not that I've not been 'making', far from it; just that I've had some urgent makes that I sent even before photographing (oops!) and it was my birthday at the weekend and whilst I didn't make myself a card, my parents celebrated their 45th wedding anniversary on the same day and I have two friends who also share my birthday so I was busy sorting cards for them. I have lots of friends and family with birthdays in September, so am still trying to finish these cards before I really get into the Christmas spirit! And this week I have two card classes too, so busy, busy!

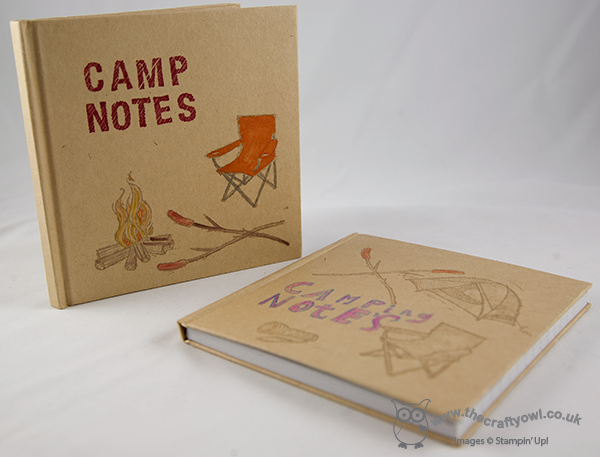
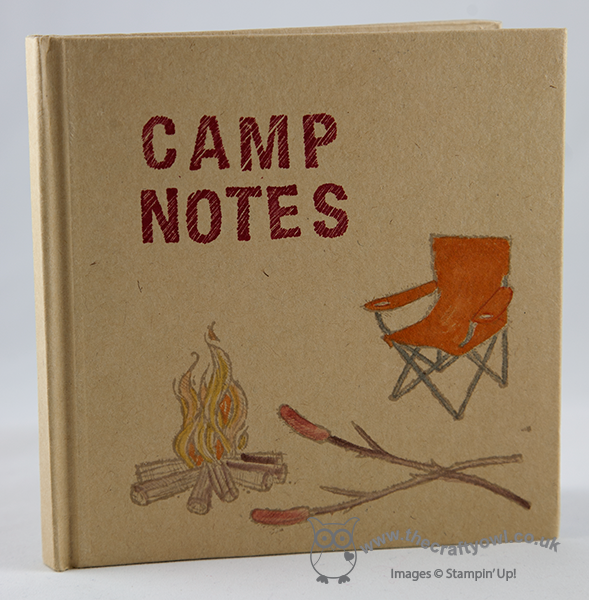
Anyway, today's share is a quick 'make' and birthday card with the 'Great Outdoors' stamp set. I play an active role in the Parents' Association at James Juniors' school and last weekend was the now annual Dads, Lads and Lasses Camping Weekend. No Mums allowed, except to help with the planning, organising and shopping beforehand! The weekend was choc-full of great activities: a treasure hunt, mini beast hunt, stargazing and campfire breadmaking to name but a few. Another of the activities was to create a mini camp journal; everyone had a mini journal to stamp, colour and decorate and the 'Great Outdoors' stamp set was just perfect for this. Here's the simple one I created to give the children some inspiration:

The children created some fantastic journals and filled them with tales and memories of their weekend. The photo at the end of the post shows Rebecca's 'work in progress' (and this is just the outside of the book!) alongside mine.

I have one other photo to show you from the weekend; not a great picture I'm afraid, but it was a last-minute one taken with my phone - shock, horror!! One of the young campers was celebrating his birthday on the Sunday, so I made a themed card for the children to sign collectively as a special way to remember how he spent his 7th birthday. Here it is: 

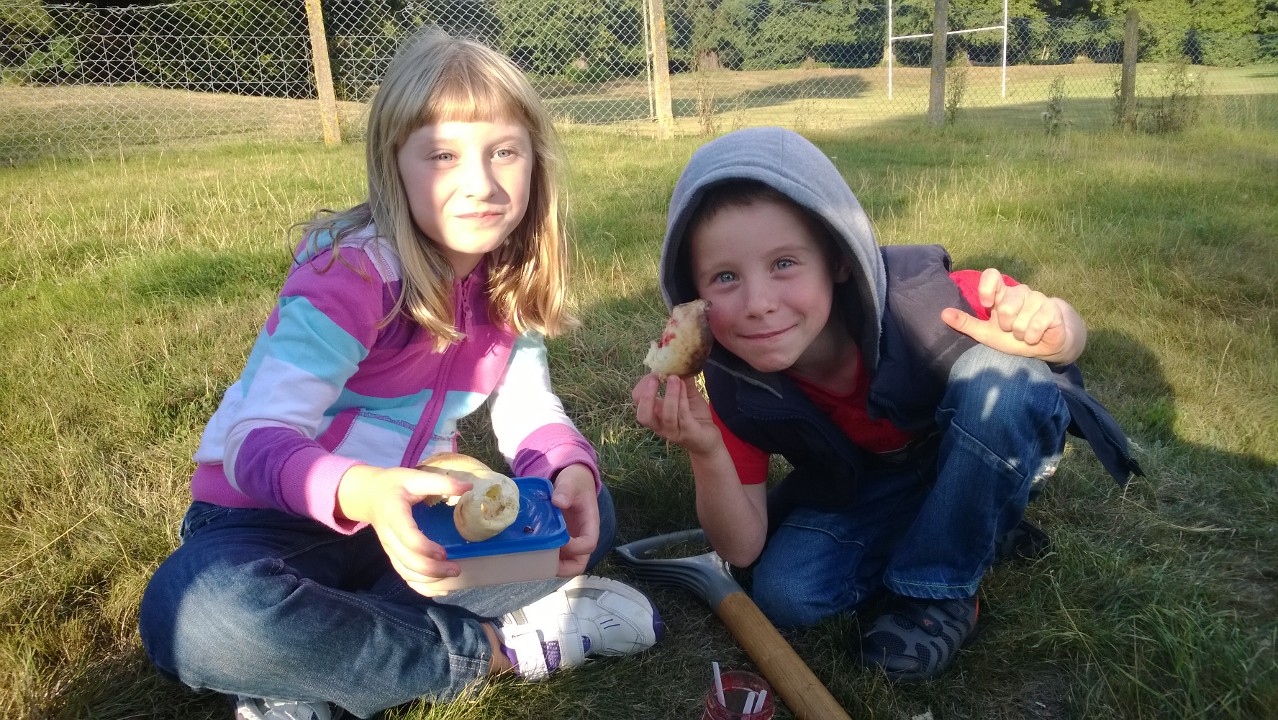
I made a mask to enable me to stamp the tents in a row and fussy-cut the campfire and popped it up on dimensionals. Lastly, here's a picture of my happy campers eating their campfire-baked bread with jam:

I will be back tomorrow with another of my recent cards; hopefully blog normality is about to be restored! Until then, happy stampin'!


Stampin' Up Supplies:

Stamps: The Great Outdoors, ABC-123 Sketch Alphabet, Memorable Moments

Cardstock: Whisper White, Old Olive

Ink/Stampin' Write Markers:  Old olive, Soft Sky, Cherry Cobbler, Pumpkin Pie, Daffodil Delight, Crumb Cake, Chocolate Chip

Tools: Scallop Circle Punch, Circle Punch


Elements of Style Mannequin Tri-Fold Card

by Joanne James30. June 2013 21:06

A busy day today with lots more swimming and family fun in the garden, making the most of the sunshine. Time for a little bit of crafting this evening, but today I'm going to share a card I made a little while ago when I was last playing with my Dress Up framelits that features two retiring products - the Elements of Style stamp set and the lovely Tea for Two DSP. This is a case of a card by Julie Kettlewell, who like me also seems to have had something of a love affair with the Dress Up framelits and has made some fabulous cards with this set: you can check out her card here and look at lots of other great examples of how to get the most from this versatile set. So here is my card:

As my regular blog followers will know, I don't really do 'fussy' and this card is about as vintage as I get! I really like the flower stamping over the newsprint though, and I think the Crumb Cake ribbon really finishes off this card. I used a Calypso Coral marker pen to colour the flowers to echo the colour of the flowers on the designer paper and used a blender pen to get some depth to the colour. The tri-fold design is also just a little different and yet the card still folds flat for postage.

That's all for today - tomorrow is the start of a very busy Stampin' Up! week: a new annual catalogue, a new monthly stamp set and lots of other great news and new products to share in the coming weeks, so lots of planning, making and fun to be had!

Back tomorrow with another project; until then, happy stampin'!


Stampin' Up Supplies:

Stamps: Elements of Style

Cardstock: Crumb Cake, Very Vanilla, Tea for Two DSP, First Edition Specialty DSP

Ink/Stampin' Write Markers: Early Espresso, Calypso Coral, Lucky Limeade

Tools: Dress Up Framelits, Blender Pen

Finishing Touches: Crumb Cake Seam Binding Ribbon

Happy You 2 Minute Thank You Cards

by Joanne James25. June 2013 20:45

A quick post from me today to share some of the thank you cards I made recently to pop into bags with my customer's orders. I used another retiring stamp set: the hostess set "Happy You", available to hostesses when they host a Stampin' Up! party. This is a great set for making 3x3" cards - the perfect size for little note cards or gift tags.

Here are my cards:


I mounted these on a piece of Brights DSP just to give a sharper edge to the design and spent a pleasurable few minutes colouring in the images with my markers and blender pen. A little tip for you when stamping images like this with a view to colouring in - I often stamp my image outlines in Basic Grey as opposed to Black, as I think it makes the image appear less harsh.

These cards are a great example of how no matter how little time you have, a few minutes is all it takes to stamp a quick card. This stamp set has lots of little stamps perfect for every occasion - but you're running out of time to own it! If you would like a fun evening in crafting with friends, please contact me to book a date to host your own party. With the new catalogue launching on July 2nd, be one of the first to play with all the great new products and colours - there's never been a better time to be a Stampin' Up! hostess.


Stampin' Up Supplies:

Stamps: Happy You (Hostess set)

Cardstock: Whisper White, Pacific Point Brights DSP

Ink/Stampin' Write Markers: Basic Grey, Pacific Point, Marina Mist, More Mustard, Real Red, Sahara Sand

Tools: Blender Pen


Tags: , , , , , ,

Cards | Host a Party | Stamping

Scallop Envelope Gift Card Holder Card

by Joanne James24. June 2013 20:11

It's Monday, the start of a new working week and so I thought it would be a great opportunity to remind all you dedicated crafters out there that there are only another 7 days left to order from the retiring stamp and accessories lists before these items are gone for good. Lots of items have gone already but you still have until July 1st to pick up a bargain or two.

With this in mind, I'm back on the retiring products theme today and I'm actually sharing a card that isn't mine but one that I received in a swap at the UK regional training day in Telford last month and which features three retiring products. It's always nice to see what others have created and I received a few swaps that I really loved in their own right and would like to share with you. The first of these is this card by Kerry Newton:

I don't believe Kerry has a blog (she didn't leave details on her swap and I can't find her on an internet search), but if anyone reading this knows different do let me know as I will then update this post with a link to it.

There are so many things I like about this card: the colours (vanilla, crumb cake and indigo), the background stamping and blended colouring on the First Edition DSP, the feature gift card holder made using the Scallop Envelope Die and the little sentiment band and butterfly that just bring the whole design together. I think the card has quite a unique design, but one that is very effective.

Did you spot the retiring products? Yes, it's the Scallop Envelope Bigz Die, the First Edition printed designer series paper and the Very Vanilla Taffeta Ribbon. If you don't own these and would like to recreate this card, you have one week left to place your order before they're gone for good! Back tomorrow with another project; until then, happy stampin'!


Stampin' Up Supplies:

Stamps: Creative Elements, Petite Pairs

Cardstock: Island Indigo, Crumb Cake, Very Vanilla, First Edition DSP

Ink/Stampin' Write Markers: Basic Black, Island Indigo, Crumb Cake

Tools: Elegant Butterfly Punch, Scallop Envelope Bigz Die, Big Shot, Blender Pen

Finishing Touches: Basics Pearls, 1/8" Very Vanilla Taffeta Ribbon

Mini Catalogue

BROWSE THE CATALOGUE

The mini catalogue is now live! Read and download your copy here.

Shop Online

Access my online shop 24 x 7, 365 days of the year:

Current March hostess code:

S9F2XJJW

Shop Online

Join My Team

It's always a great time to join Stampin’ Up! New team members can get £130 worth of products for only £99 + free business supplies + free shipping + all the fun being a part of Stampin’ Up! Stampin' Up! has something for everyone: join my growing team and benefit from my support to enjoy Stampin' Up! however you choose.

If you're interested, call me for a chat to understand how I can help you realise your goals. Alternatively, if you have already decided to sign up and you just can't wait, please click here for the link to the online form where you can sign up and order your starter kit right away! 

Latest Kit!

Stampin Cut and Emboss

The Rock Legend Kit has all you need to make 8 cards with coordinating envelopes. Along with the new Panda Friends Kit, both are available from January 4th for just £14 each - get yours here!

2023-24 Annual Catalogue

BROWSE THE CATALOGUE

Click on the catalogue for a full list of current SU! supplies - if you would like to order any of the items featured, please drop me a line at [email protected] or give me a call on 07773 421446 - I'd be happy to help.

New Online Exclusives

There will be new products available exclusively in the online store from 5 March - check them out here.

About Me

Hi I'm Joanne and live in Northampton and when I'm not looking after my husband and two beautiful children, am an avid crafter with a passion for all things Stampin' Up!

I must confess that I have never been a big rubber stamper - until I discovered Stampin' Up! that is. I love the fact that I can get such great results with co-ordinating stamps, inks, papers and punches - the possibilities are endless! Join me on my stamping journey as I share the things I love and be inspired to create amazing things yourself!

Follow Me

Monthly Newsletter

Box Builder

Click the button above to use Box Buster to create your custom box design using the Envelope Punch Board!

Kits Collection Now Available!

Stampin Cut and Emboss

The new Kits Collection from Stampin' Up! is now available!

Click here to see the current kits available and order yours online today.

I Design For


Stampin' Up Stuff

This is my personal blog and is not endorsed by Stampin’ Up! I hope you find it a plentiful source of ideas and personal inspiration but please don't copy my designs for contest submission or use for classes, publication or sale without express permission.