Minecraft Creeper Pop-Up Birthday Card

by Joanne James17. August 2014 08:00

Today I'm sharing my Design team card for this week's challenge over at The Paper Players. This week LeAnne is hosting and she has a clean and simple challenge to create a child's birthday card this week:

Those of you who follow LeAnne's blog, Wee Inklings, regularly will know that today young Miss Cassidy is celebrating her fourth birthday - hooray! having seen the other Design Team members cards this week, I can vouch for the fact that mine looks quite different to everyone else's! My cards today are not made with four year old girls in mind (nowhere near enough pink for that!) however as the mother of two young children, I make lots of children's cards. Whilst they are sometimes stamped, I am often asked to make something that reflects the current favourite game/toy/theme of the moment. Those of you who follow my blog will know I am partial to Lego and have created some great Lego punch art in the past (see my most recent one here), although this can be time-consuming and not all that clean and simple. Today though I am sharing two of my tried and tested punch art cards for young boys.

First I am sharing another of Ben's birthday cards from last week; this time, the one I made for him from his big sister. Now as is true for most young boys of his age, Minecraft is a game that provides hours of endless entertainment for him. I've made a few creeper cards that I haven't shared previously (creepers are the monsters that come out at night and take your life, so I'm told) - they really are so easy to make! - but I thought I'd share this one, as after a browse on Pinterest I saw this card and decided I wanted to make a creeper card with a difference. Here's the outside of my card:


A simple creeper face made from 1" punched squares, along with 2 pieces of 1" x 1 1/2", one cut in half lengthways, on a background of now retired Gumball Green (I think this is the best creeper colour, but you could substitute with Garden Green if you don't have any), then when you open the card, he really comes to life:


A simple pop-up - how fun is that?! This must be a record in terms of supplies, given that you can make one of these cards with some basic cardstock and not much else; it's also another 'no stamping' card - that's two in a week! Now I have to admit, as cards go it's not really my cup of tea, but then I'm not the target audience. The verdict? Rebecca thought it was awesome and Ben loved it, so if it ticks the box of the now seven year old, it's good enough for me!

I also wanted to share another clean and simple birthday card that I have made so many of, I can't quite believed I've never blogged before! All children seem to love shaped cards, and this cute Angry Bird is so easy to create using a few punches and a base made using the Circle Thinlits and the Big Shot:


A custom envelope from some co-ordinating Brights DSP made using the Envelope Punch Board and you are good to go. Two cards that are really clean and simple, quick and easy. Do pop over to The Paper Players to see what the other designers have come up with - I promise they will be quite different to mine!

It's Sunday and I'm off to town today to collect some frames for a private home décor class I'm teaching tomorrow along with a visit to the shoe shop for new trainers and school shoes for the children in readiness for the new school year. Still two more weeks to go, yet I'm sure it will fly by.

Back tomorrow with another project; until then, happy stampin!


Stampin' Up! Supplies Used:

Table built using Product Table Builder by The Crafty Owl - Independent Stampin' Up! Demonstrator.


Make a Wish Simple Pop-up Card

by Joanne James19. May 2014 19:19

I haven't had any time for crafting today, so I'm going to share with you a simple pop up card designed by Monica Gale that I made at our quarterly training session last month and that I made with my ladies at our recent Fresh Prints All Day Craft Event - here is the outside of the card:

I added a few layers of Fresh Prints papers onto a Coastal Cabana card base, then stamped the 'Make a Wish' stamp from the Perfect Pennants set in Crumb Cake and punched out with a 2 3/8" Scalloped Circle punch layered onto a 2 1/2" circle out of Real Red cardstock, The banner was cut from a scrap of DSP and the 'a' stamped on red card and punched out and popped on a dimensional for added dimension. To decorate, I stamped a star from 'Simply Stars' in Real Red on Whisper White cardstock, added a DSP star using the Merry Minis star punch and secured with a gold glimmer brad with a twist of gold threaded baker's twine behind for a little added sparkle.

Inside the card there is a really simple little pop up made by cutting two short horizontal slits in the liner, which is made out of a notelet:

A few more stars and a simple birthday greeting and it's done - a fun little pop card suitable for either gender. I'm hoping to get into my craft room tomorrow and catch up on my crafting, although there is a big basket of ironing competing for my attention, so might need to get that out of the way first!

Either way, back tomorrow with another project; until then, happy stampin'!


Stampin' Up! Supplies Used:

Table built using Product Table Builder by The Crafty Owl - Independent Stampin' Up! Demonstrator.


This Week's Wednesday Weekly Deals

by Joanne James30. April 2014 09:26

It's Wednesday and they're here: week 4 of Wednesday Weekly Deals! This week's deals are included below - they will be available for one week only, before a new collection of deals is announced.

As always, if you want to take advantage of any of the deals on offer, you can support my business by placing your order online by clicking here or using the link to my store on the right hand side of my blog page where it says 'Shop Online' or with me in person. Don't forget to add the Hostess Code for April (you can find this under the 'Shop Online' section on the right. If you're local to me in Northampton, I'm placing an order tomorrow so if you would like to add anything to this order and save on postage, then give me a call today and I will place your order for you.

Here's a summary of this week's one-week only Wednesday deals - click on each item to go to the online store to purchase:

Table built using Product Table Builder by The Crafty Owl - Independent Stampin' Up! Demonstrator.

As you can see, some great deals this week: in colour stretch ruffle trim and another DSP and some great deals on Big Shot Dies - the Tasteful Trim die and two of my personal favourites - the Pop 'n' Cuts dies. Here's my most popular card made with the Dress Form Pop 'n' cuts - my pop up Lego City Fireman from last August (original post here):

More good news too - Wednesday Deals will continue throughout the month of May! I will post them here every Wednesday, so do make sure you check back each week - there are some great deals to be had!

Back later with today's creative post - until then, happy shopping!

Tags: , , , ,

Pop Ups | Promotions | Shop Online

Merry Christmas Monster Hugs!

by Joanne James25. December 2013 21:05

Well, it's here at last - Merry Christmas lovely blog readers! We've had a lovely day today that has involved much present unwrapping, eating and Lego building - don't you just love Christmas?!

I still have a few Christmas things that I haven't shared with you, so today thought I would share the Christmas cards I made for my little James juniors. I was inspired by Lizy Bartaby's card here - I loved the idea of the Santa Monster Hugs but took my cards a step further by making them into pop-ups using my Pop 'n' Cuts base; I'm always looking for new ways to use this. So I made a co-ordinating pair of his and hers santa monster hugs. Here's the little girl santa monster:

Cute, huh? Here's the little boy monster that is her partner-in-crime:

How cute are these? I made my hats using an oval punch with a section cut out using the word window punch to create the curve of the hat. I made the brim using a 'squashed' scallop circle as I don't own a scalloped oval punch, which would of course make this slightly easier. A pop up card and chocolate coins - I'm not sure which the children thought was best (who I am kidding - the chocolate, of course!)

I'm sure this won't be the last we'll be seeing of these little guys - but for now, I hope you have all had a wonderful Christmas and that Santa brought you everything that was on your wish list.

Back tomorrow with another project; until then, happy stampin'!


Stampin' Up! Supplies Used:

Table built using Stampin' Up! Product Table Builder from The Crafty Owl.


Pop Up Lego City Fireman Birthday Card

by Joanne James11. August 2013 21:36

A busy weekend of birthday celebrations in the James family this weekend: yesterday my brother-in-law celebrated his 40th birthday (I was back too late and had drunk too many cocktails to blog when I arrived home yesterday evening; I will share his cards later in the week!) and today was my 'baby' the not-so-little Benjamin's 6th birthday.

I had something of a quandary when trying to decide what kind of card to make Ben; I needed something special but this birthday featured so many of the things that he loves that choosing was difficult. One of the things that he really wanted for his birthday was a Lego City Coastguard Patrol boat - he loves all kinds of Lego, but his first and enduring love is for the fire brigade - the only reason this wasn't on the wishlist is because I think he must own every mortal piece of the Fire Department and then some! His big sister bought him a Lego City Fire Chief alarm clock for his birthday and this ultimately became the inspiration for my pop-up card. This is the card from the outside:

A Lego brick number 6 (lots of glue dots used to get the pins on the bricks just right!). Then on the inside, this cheery little fellow:

I used my Pop 'n' Cuts base and modified my dress form insert to accommodate my fire chief mini figure in front of his desk. I am very pleased with how he turned out and doubly so when Ben opened it this morning and deemed his card 'totally awesome - the best card you've ever made!' Praise indeed!!

Back tomorrow with another of Ben's birthday cards - from his big sister. Until then, happy stampin'!


Stampin' Up Supplies:

Stamps: Make a Wish

Cardstock: Real Red, Basic Black, Daffodil Delight, Whisper White, Basic Grey, Crumb Cake

Ink: Real Red

Tools: Pop 'n' Cuts Base, Pop 'n' Cuts Dress Form, Big Shot, Stamp-a-ma-jig, Small Oval Punch, 1 1/4" Circle Punch, 1 3/4" Circle Punch, Itty Bitty Shapes Punch (circle), Corner Punch


Angry Birds Spiral Pop-Up Birthday Card

by Joanne James27. July 2013 20:23

Today I have a very special card to share with you. As my regular blog followers are aware, my soon-to-be six year old son and his friends are Angry Bird mad; I swear if we didn't ration access to all touch devices in our house he would turn into one of those little feathered creatures!! Anyway, a friend of his celebrates his birthday today and in addition to the card I made from us, which I will share with you another time, his Mum also asked me if I would make him a special birthday card. I saw a very simple Angry Bird pop up card by Julie Davidson a while ago which I loved (you can see Julie's card that was the inspiration for mine here), but I must confess I had something much more 'explosive' in mind. So this was the front of my card:
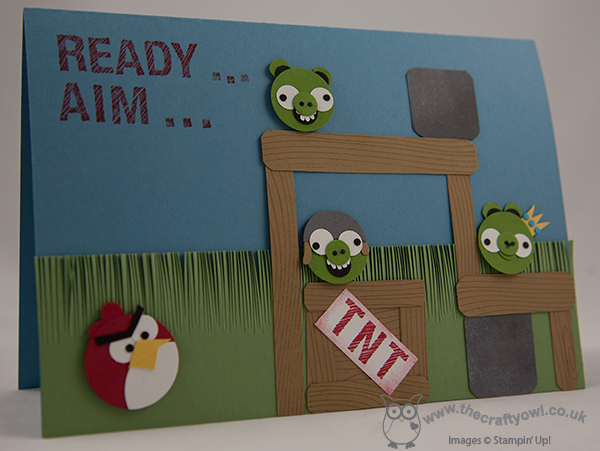
 

Lots of little pigs hiding amidst the wood and boulders, along with a box of TNT for good measure and a red Angry Bird ready for action. Open the card to reveal what happens once there's been a hit:
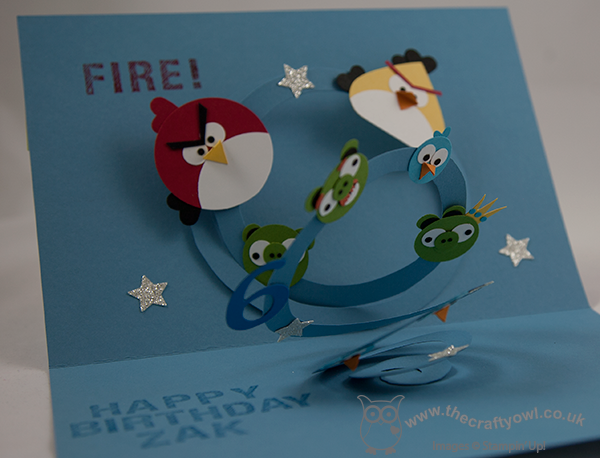
 

Birds, pigs and stars literally 'explode' out of the card. The decoration is all attached to a spiral pop-up, which is simply a large circle cut into a spiral with one end attached to each side of the card. Its really easy to do and if you made the spiral the same colour as the base card, it blends into the background and allows the birds to really 'fly'. Here's a close up of the pigs so that you can see what I mean:
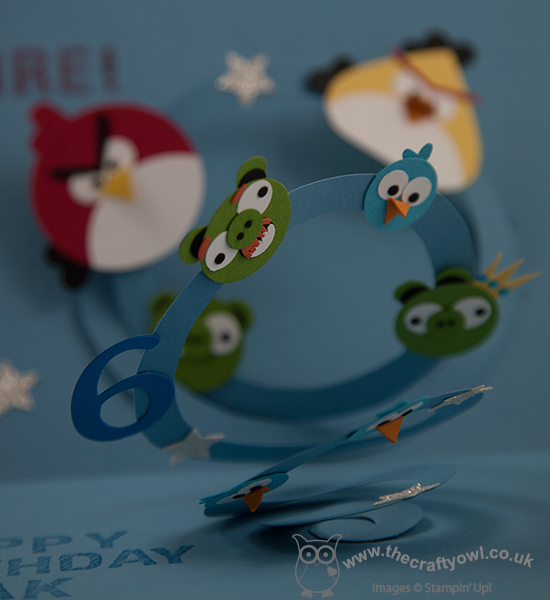
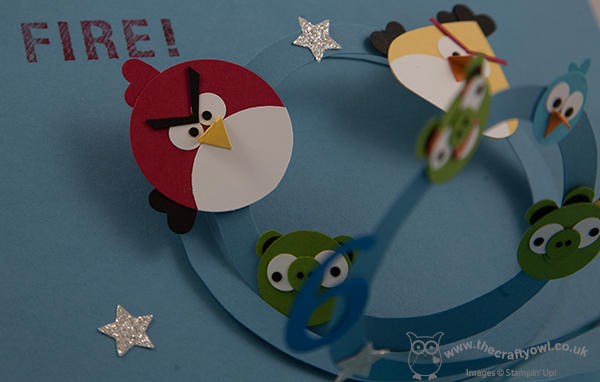
I added a number 6 and some glimmer stars and used the new Simply Sketched alphabet stamps to add the 'Ready, Aim ... Fire!' and a personalised message for the recipient. It has to be said, this card was something of a 'labour of love' - creating all the birds and pigs takes an absolute age, but it was so worth it for the impact of the resulting card, which I am reliably informed was well received!
It sounds like our very own TNT explosion in the garden at the moment; the thunder and lightening is flashing and crashing as I write and whilst lawns and gardens everywhere are I'm sure benefiting from the downpour, I'm personally hoping it is just a brief interlude in the glorious weather we've been having of late.

Back tomorrow with another project; until then, happy stampin'!


Stampin' Up Supplies:

Stamps: ABC-123 Sketch Alphabet & Numbers, Woodgrain

Cardstock: Real Red, Daffodil Delight, Basic Black, Whisper White, Crumb Cake, Gumball Green, Pumpkin Pie, Basic Grey, Marina Mist, Pacific Point, Tempting Turquoise

Inks: Real Red, Pacific Point, Chocolate Chip, Basic Grey, Whisper White

Tools: 1 3/4" Circle Punch, 1 1/4" Circle Punch, 3/4" Circle Punch, Handheld Circle Punch (retired), Small Heart Punch, Full Heart Punch, Owl Punch, Itty Bitty Shapes Punch (circle), Corner Punch, Merry Minis Punch (star), Sponge Dauber, Stamp-a-ma-jig

Finishing Touches: Silver Glimmer Paper


Fashionista Gift Tag Set

by Joanne James3. May 2013 20:49

No stamping today! I have another Dress Up project from last month's quarterly training session: this time a lovely set of gift tags in a nice little pocket holder made using the Pop n' Cuts base again. Here's the outside of the box, decorated with its own dress on a Cute Clip hanger and another of those little filter paper flowers:

Open up the box to reveal a lovely set of dressed mannequin gift tags, each one with its own outfit:

This kind of holder is so easy to make just by adding in a couple of central score lines and box section to hold the tags; it would also make a nice notelet holder. As for the tags - what better way to ensure a gift for someone special is 'all dressed up'? My particular favourite outfit combo is the embossed filter paper sundress with the hot pink patterned bolero cardigan; leave me a comment and let me know which one you prefer, or better still how you would dress yours?

If you would like to get your hands on a gift tag set like the one above, you can do one of three things:

host a party during the month of May - this will be my hostess gift to thank you for booking a party and if you have party sales totally £300 or more, you could use your hostess credits to obtain the Pop 'n' Cuts Card base, Pop 'n' Cuts Dress Form and All Dressed Up framelit and stamps bundle ABSOLUTELY FREE!*

ask me about a class - if I have enough interested crafters, I will run a class featuring the Dress Up framelits and Pop 'n' Cuts base and you can learn how to make this set and more

contact me via joanne@thecraftyowl.co.uk to place your order today

So many choices - I hope one of them tick's your box and I look forward to hearing from you. Back tomorrow with anohter project - until then, happy stampin'!


*Hostess credits for party sales of £300 totalling £75 (£50 plus £25 bonus if you host a party before May 30th) with one item purchased at 50% discount price


Stampin' Up Supplies:

Cardstock: Marina Mist, Sunshine and Sprinkles DSP

Ink: Basic Grey

Tools: Dress Up Framelits, Big Shot, Itty Bitty Punches, Elegant Bouquet Embossing Folder, Fancy Fan Embossing Folder, Heart Punch

Finishing Touches: Basics Rhinestones, 1/4" Stitched Grosgrain Ribbon Basic Grey, Creped Filter Paper, Cute Clips

My First Dress Up Pop Up Card

by Joanne James28. April 2013 20:14

Any of you who saw my Facebook post yesterday will know I am officially 'IN LOVE' with the Dress Up framelits and Pop 'n' Cuts Base in the Spring-Summer catalogue. I've been resisting purchasing them since the catalogue came out - I don't know why, because it really was love at first sight - but having used them at our last training session and spent a fun few hours with my downline Barbara playing fashion designers, I have finally succumbed. I have seen so many great examples of projects made with this set and I'm excited to share these with you in future blog posts.

Today I am going to share a card I made using all three elements: the pop 'n' cuts card base, the dress form and the framelits. So not much stamping today - Big Shot definitely required! I will share some projects later in the week that show how these can be used separately; when used together, they will make a pop up card with a mannequin to be dressed as you wish. For my first card, I used some of my favourite 'More Amore' DSP along with a Pool Party card base. Here's the outside of the card that you see when the card is folded shut:

Then when you open it, the inside looks like this:

How cute is that??! Dressed mannequin, complete with pearls and pretty cardi, in front of a mirror and dresser. What little - or big - girl wouldn't want to get this in the post for their birthday? Here's one last close-up of the mannequin:

This will, I feel, be the first of many such pop-up cards; come back tomorrow to see another use for this great set. Until then, happy stampin'!


Stampin' Up Supplies:

Stamps: One in a Million

Cardstock: Pool Party, Crumb Cake, Very Vanilla, More Amore DSP

Ink: Pool Party

Tools: Pop 'n' Cuts Base, Pop 'n' Cuts Dress Form, Dress Up Framelits, Ovals Framelits, Big Shot, Stamp-a-ma-jig, Small Heart Punch

Finishing Touches: Basics Pearls

Scrapbooking

Stampin' Up! has introduced a new range of 12x12" scrapbooking product and kit - the full range is now available to purchase online. To download a copy of the new digital Scrapbooking Catalogue click here.

Mini Catalogue

BROWSE THE CATALOGUE

'Tis The Season - the new Stampin' Up! Mini Catalogue is here! For more details and to download your copy click here

Shop Online

Access my online shop 24 x 7, 365 days of the year:

Current September hostess code:

JQEHTZGK

Shop Online

2024-25 Annual Catalogue

BROWSE THE CATALOGUE

Click on the image to download your copy of the 2024-25 annual catalogue. For a full list of current SU! supplies, go to my online store. If you would like any help or advice, please drop me a line at joanne@thecraftyowl.co.uk or give me a call on 07773 421446 - I'd be happy to help.

Join My Team

It's always a great time to join Stampin’ Up! New team members can get £130 worth of products for only £99 + free business supplies + free shipping + all the fun being a part of Stampin’ Up! Stampin' Up! has something for everyone: join my growing team and benefit from my support to enjoy Stampin' Up! however you choose.

If you're interested, call me for a chat to understand how I can help you realise your goals. Alternatively, if you have already decided to sign up and you just can't wait, please click here for the link to the online form where you can sign up and order your starter kit right away! 

Latest Kits!

Stampin Cut and Emboss

The Christmas Ornaments Kit and Card Keeper Kit are the latest kits that will be arriving in the online store later this month - get yours here!

New Online Exclusives

There are new products available exclusively in the online store from 3 July - check them out here.

About Me

Hi I'm Joanne and live in Northampton and when I'm not looking after my husband and two beautiful children, am an avid crafter with a passion for all things Stampin' Up!

I must confess that I have never been a big rubber stamper - until I discovered Stampin' Up! that is. I love the fact that I can get such great results with co-ordinating stamps, inks, papers and punches - the possibilities are endless! Join me on my stamping journey as I share the things I love and be inspired to create amazing things yourself!

Follow Me

Monthly Newsletter

Box Builder

Click the button above to use Box Buster to create your custom box design using the Envelope Punch Board!

Kits Collection Now Available!

Stampin Cut and Emboss

The new Kits Collection from Stampin' Up! is now available!

Click here to see the current kits available and order yours online today.

I Design For


Stampin' Up Stuff

This is my personal blog and is not endorsed by Stampin’ Up! I hope you find it a plentiful source of ideas and personal inspiration but please don't copy my designs for contest submission or use for classes, publication or sale without express permission.