by Joanne James29. March 2014 22:13A quick (and late!) post from me today - I have one of the busiest weekends ever today and tomorrow. I've been putting the final touches to my class preparation for next week today and have spent the evening at the swimming pool with Rebecca as she was participating in a swimming gala. We are having a real 'girls versus boys' weekend; we each went to our separate swimming pools today (and Granny came along to watch Rebecca for the first time today too) and tomorrow Rebecca and I are travelling to London so that she can take part in an inter-school music festival with the rest of her school choir, whilst the boys have a fun day doing their own thing at home.
Anyway, with all that in mind there will be a couple of quick posts from me over the next couple of days. Today I'm sharing a gift I made for one of my customers who celebrated her birthday recently. If you follow me on Facebook, you will have see this photograph I posted yesterday of a lovely box I made using the Sweet Sorbet papers (yours free with a £45 spend during Sale-A-Bration - only 2 more days to go to plae a Sale-A-Bration order!)and my Box Buster tool and Envelope Punch Board:
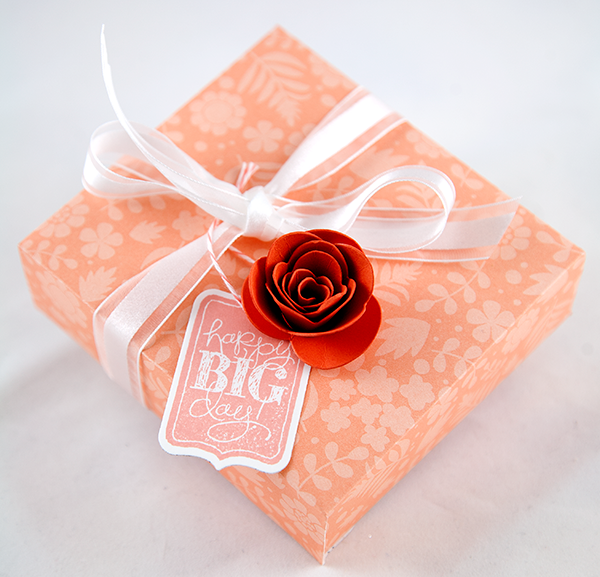
Today I thought I would share what was inside - a sweet little box frame:
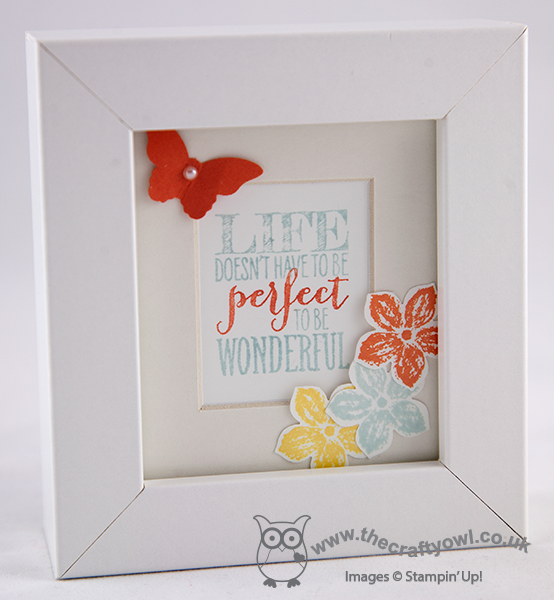
Just a simple stamped sentiment, decorated with a punched butterfly and a few flowers stamped and punched using the Petite Petals stamp set and co-ordinating punch. A decorated frame makes a lovely gift.
Back tomorrow with a card (or two!); until then, happy stampin'!
Stampin' Up! Supplies Used:
65600cd8-bb9b-4ae6-86f9-55f983360d71|0|.0|96d5b379-7e1d-4dac-a6ba-1e50db561b04
Tags: 3D Projects, Box Buster, boxes, Envelope Punch Board, Bitty Butterfly Punch, Petite Petals, Petite Petals Punch, Perfect Pennants, Shop online, Sale-a-bration 2014, Sweet Sorbet, Stamp-a-ma-jig, Stampin' Up, Stampin' Up Card, Stampin' Up Card ideas, Stampin' Up Supplies
3D Projects | Envelope Punch Board | Sale-a-bration | Stamping
by Joanne James5. March 2014 09:52Good morning blog readers and crafters! Back nice and early this morning with the second of my video tutorial posts showing you how to make any size box using your Envelope Punch Board and my new Box Buster tool. I've started early on my Easter treat boxes, so today's box shows you how to make this cute box:
The finished dimensions of today's box are 100mm x 75mm x 15mm. It was designed to fit a specific Easter treat - but you'll have to watch the video below to find out what it was! My new Box Buster from The Crafty Owl tool is just great for that - you can easily create a box to fit your chosen contents, without any hassle or wasted paper - you just measure the thing you want to put in the box, input the dimensions into the Box Buster tool and it does all the hard work for you: it will tell you exactly what size paper you need and where to make your first and second punch markings.
Today's project was worked out in millimetres, but the Box Buster tool will let you construct your box in either millimetres or inches - you choose! Here's the link to today's video tutorial:
Wasn't that SOOO easy?! Keep following this week as there are more box tutorials to come, showcasing a variety of box types with handy hints and tips for making the most of your Envelope Punch Board and my new Box Buster tool.
Back soon with another project; until then, happy stampin' (and box making!)
Stampin' Up! Supplies Used:
184e6871-6a47-4103-a0a0-0c3eb90de4fd|0|.0|96d5b379-7e1d-4dac-a6ba-1e50db561b04
Tags: 3D Projects, boxes, circle punch, Eggstra Spectacular, Envelope Punch Board, Sale-a-bration, Sale-a-bration 2014, Stampin' Up Card, Stampin' Up, Shop online, scallop circle punch, Sweet Sorbet, video tutorial
3D Projects | Boxes | Envelope Punch Board | Sale-a-bration | Stamping | Video Tutorials
by Joanne James19. February 2014 21:02Good evening blog readers! My busy days continue as this week the James juniors are off school as it's half term. Today has been a day of piano and singing practice, book reading and review writing, nail painting and telling the time problems, with a little basketball and a couple of baskets of ironing thrown in! Crafting time is in short supply this week, so today I'm sharing with you a stepped up version of a card that we made in my Sale-A-Bration card class this month. This card was a CASE of this one by Mary Fish, although I tweaked a few things, primarily the colour scheme as I wanted to use the Pistachio Pudding DSP from the Sale-A-Bration set. Here is my card:
I stamped the image twice, once on Whisper White for the label, which I cut out using the Big Shot and Deco label Framelits and once on Summer Starfruit, which is the piece that I used to cut the flowers from. I paper-pieced all four of the flowers on this card and coloured the leaves and stems with a Pistachio Pudding marker, then finished with a few pearls. I think this would make quite a nice Easter card too, with an alternative sentiment.
Back tomorrow with another project; until then, happy stampin'!
Stampin' Up! Supplies Used:
by Joanne James18. February 2014 20:58Good evening blog readers! Today I'm going to share a scrapbook page with you that I made at a recent team training event and designed by the lovely Bekka Prideaux. It features a number of the Sweet Sorbet paper designs and the Petal Parade stamp set - both items that can be yours free during Sale-A-Bration with an order of £45 or more - some new Spring-Summer items and a somewhat overlooked item in the annual catalogue (more on that in a moment). So here is my scrapbook layout:
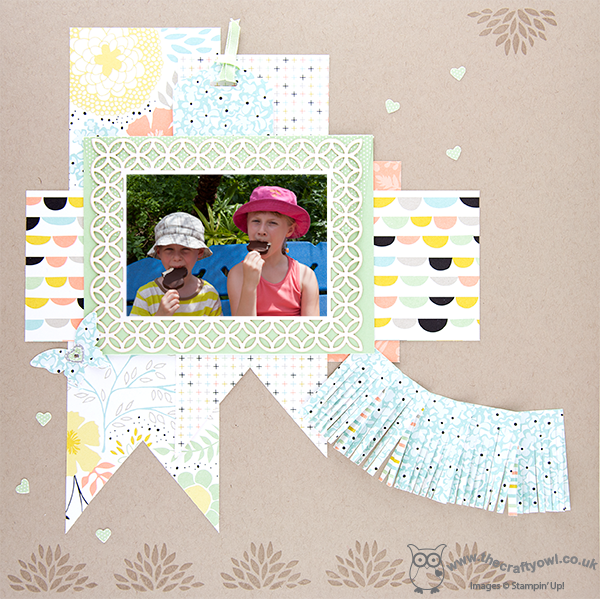
I decided to use one of my summer holiday photos of Rebecca and Ben as the centrepiece; I have so many amazing photographs from our holiday that I have yet to do something with, so this seemed a good opportunity to start. They are participating in one of my favourite activities at a Disney theme park - no not a roller coaster, but the ritual eating of a Mickey ice-cream bar (I am rather partial to these!) - and the concentration on their faces is a concerted attempt to get them eaten before they melt in the extreme heat!
The bright colours and patterns in the papers make a great background for my photo. Did you spot the 'hidden treasure' from the annual catalogue? The photograph is mounted on to one of the Simply Fabulous Simply Sent cards, with another attached to the Scallop tag Topper Punch piece behind for hidden journaling. These cards are great for quick cards but can also be used for journaling or as a photo mount. Lastly, a fringe cut using the new fringe scissors adds texture and draws the eye in to the focal point.
Back tomorrow with another project; until then, happy stampin'!
Stampin' Up! Supplies Used:
by Joanne James8. February 2014 19:56Yay - it's the weekend! We don't have any special plans this weekend, but sometimes that's a nice way to be. Homework, swimming lessons enough of a dry spell to get outside and shoot some hoops this afternoon and some time spent doing jigsaw puzzles - what could be nicer? Today I'm sharing another of the cards we made at this week's card class, featuring the items that can be yours free with a £45 spend. This card uses my favourite of the Sale-A-Bration stamp sets, Petal Parade - here is my card:
This card is a CASE of this one made by the talented Mary Brown; I loved this card when I saw it - the layering and the fussy-cut flowers really make it something special. In addition to which, it features three great Sale-A-Bration items (Petal Parade, Decorative Dots TIEF and some of the lovely baker's twine from the Sweet Sorbet accessory set) and one of my new favourites from the Spring-Summer catalogue - the Scalloped Tag Topper Punch. For my version of this card I wanted to use different colours and a pop of colour on my sentiment banner and offset my tag at a more jaunty angle. I hope you like it!
Back tomorrow with another card; until then, happy stampin'!
Stampin' Up! Supplies Used:
12b1e757-ed9a-4fad-a80d-7451139c1b34|1|4.0|96d5b379-7e1d-4dac-a6ba-1e50db561b04
Tags: Big Shot, Scalloped Tag Topper Punch, Decorative Dots Textured Impressions Embossing Folder, Happy Watercolour, Sale-a-bration 2014, Petal Parade, Sweet Sorbet, Shop online, Stampin' Up, Stampin' Up Card, Stampin' Up Card ideas, Stampin' Up Supplies, Classes
Cards | Classes | Stamping
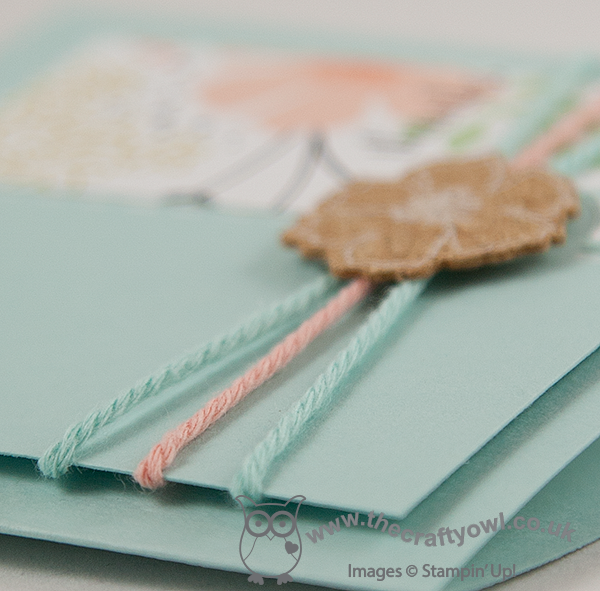
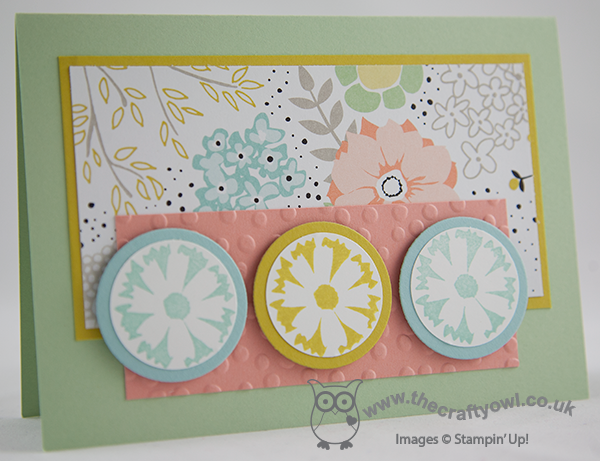
by Joanne James31. January 2014 23:00A quick post from me today using more of the Sale-A-Bration goodies that you can receive with each £45 spend. Today I've made a couple of cards featuring the Sweet Sorbet paper and highlighting some of the lovely items in the Sweet Sorbet accessory pack. The pack contains some handy self-adhesive cork embellishments and some super-chunky baker's twine - here's the first of my cards:
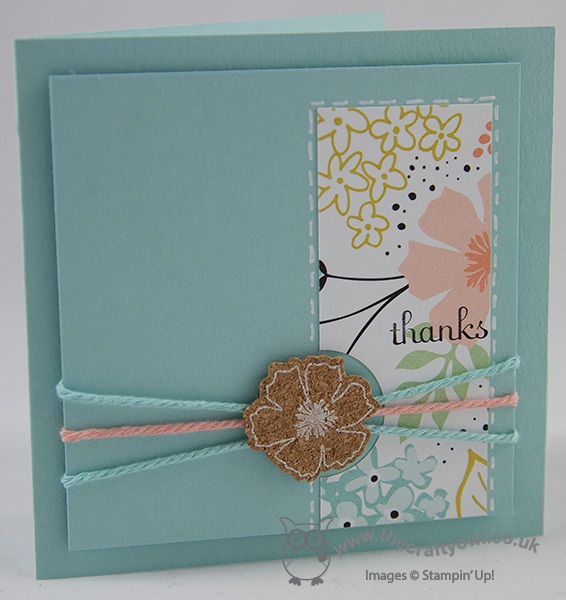
I used a simple panel of DSP on a square layered Pool Party base, with a semi-circle cut out around a cork flower, attached above three pieces of co-ordinating chunky baker's twine. I then simply stamped 'thanks' and outlined my DSP with my white gel pen. For my second card I used the same colourway on a rectangular base and cut a larger semi-circle out of the DSP to accommodate a larger flower which is actually pre-painted white, but as you can see from the photo can be coloured - I coloured mine in Crisp Cantaloupe and Calypso Coral using Stampin' Write markers and added a Pool Party Candy Dot:
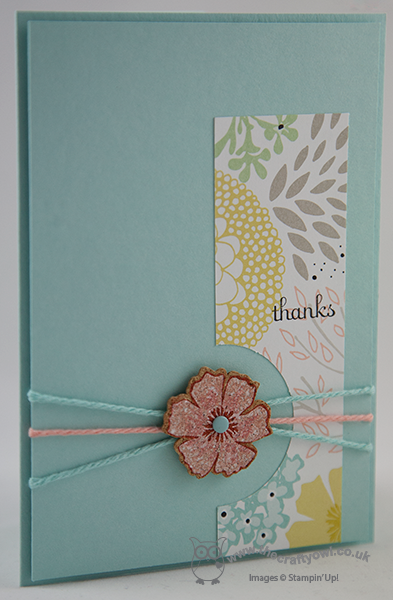
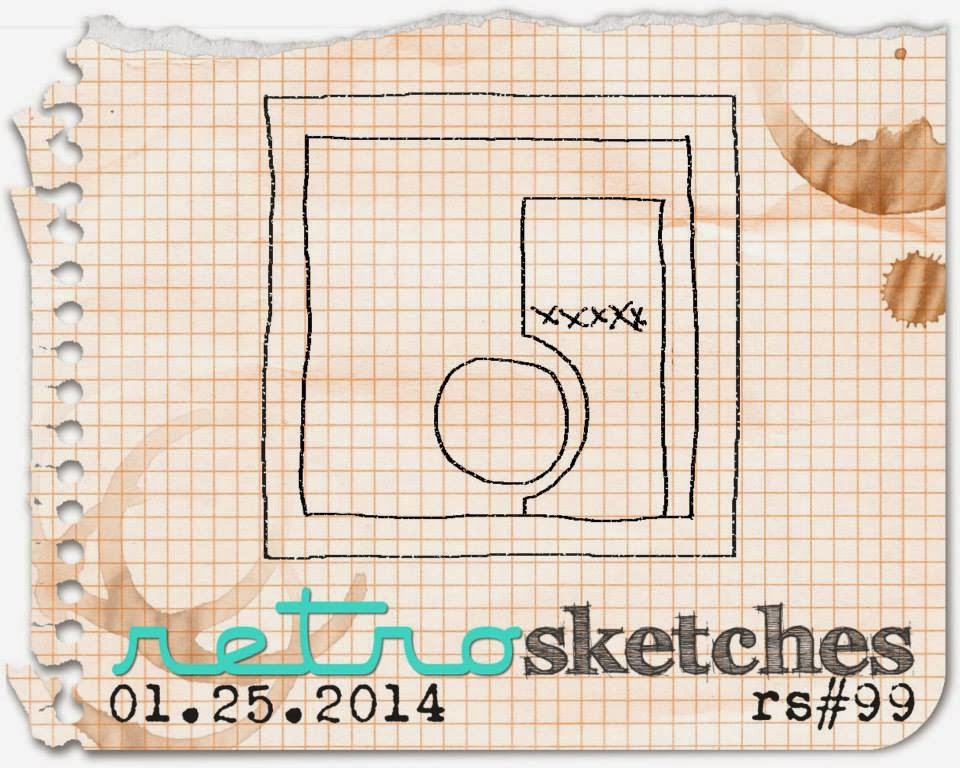
These cork flowers are a fun embellishment for something a little different, with lots of creative possibilities especially if you colour them. I'm linking the first of today's cards up to this week's Retrosketches card challenge - I used this sketch as the inspiration for both of my cards.
Back tomorrow with another fun project; until then, happy stampin'!

Stampin' Up! Supplies Used:
by Joanne James19. January 2014 21:09Once a quarter, my wider upline team get together for a team training day. We craft, we share business tips and ideas and we catch up with friends. It's a fun day devoted to our Stampin' Up! businesses and one of the many benefits of being a part of a wider Stampin' Up! team. One of the important parts of these events is the process of 'swapping'. Everyone prepares a card, scrapbook or 3D sample using current products in line with a chosen theme. Today our theme was the forthcoming Sale-A-Bration campaign; as promised, today I'm sharing the swap I prepared:
This card uses three of the products that you can earn free with a £45 purchase: The Petal Parade stamp set, the Decorative Dots Textured Impressions Embossing Folder, and one of the Sweet Sorbet Designer Series paper designs. I used a 1 1/4" circle punch and my circle framelits to cut out the flowers and mounted them on dimensionals for extra interest.
If you would like to make this card, you have only nine more days to go until Sale-A-Bration is live and these products will be available online or through the Sale-A-Bration mini catalogue - not much longer to wait now! I am already taking party bookings for the Sale-A-Bration period; if you would like to host a party during Sale-A-Bration, then contact me to book a slot. Sale-A-Bration is a great time to join Stampin' Up! too; if you would like to know more about the benefits of becoming a Stampin' Up! demonstrator, then check out the link on the right hand side of my blog page or get in touch for an informal chat; I would be happy to share with you the benefits that being a demonstrator can offer.
Back tomorrow with another project; until then, happy stampin'!
Stampin' Up! Supplies Used:
62e6793d-d5e1-45a9-95f4-cd0426435fd3|0|.0|96d5b379-7e1d-4dac-a6ba-1e50db561b04
Tags: Decorative Dots Textured Impressions Embossing Folder, Stampin' Up, Stampin' Up Card, Stampin' Up Card ideas, Sweet Sorbet, Shop online, Sale-a-bration 2014, join Stampin' Up, Petal Parade, Circles Framelits, circle punch
Cards | Join My Team | Sale-a-bration | Stamping | Swaps
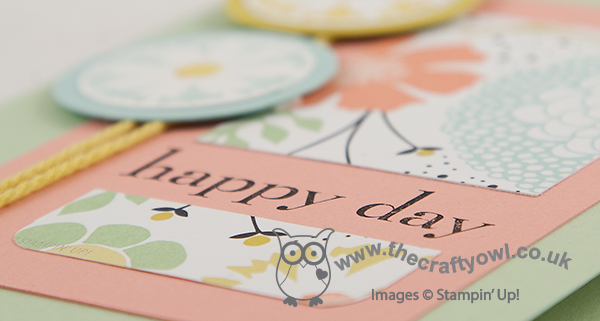
by Joanne James17. January 2014 19:30Good evening blog readers! Today I've been busy putting together my swaps for our team training session on Sunday and watching a couple of netball matches at school this afternoon. The theme for our swaps at training this month is 'Sale-A-Bration' and along with my final swap card, which I'll share with you on Sunday, I've made one or two other cards using some of the items you can earn free with a £45 order during the Sale-A-Bration promotion, which starts on 28th January. Here's another card that I made using one of the flower stamps from the Petal Parade set, that also features one of the papers from the Sweet Sorbet DSP pack:
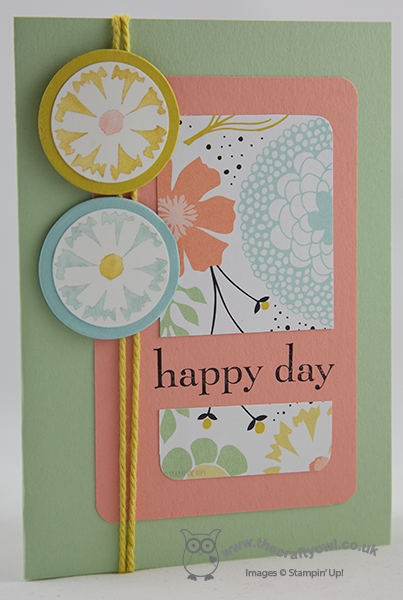
This time I used my Stampin' Write markers to colour the flowers so that I could give them a two-tone look with different coloured centres, and I anchored them to the card with some of the fabby extra-thick baker's twine that is another of the SAB promotional products.
I created a split front to my patterned paper layer and included the 'happy day' sentiment from the stamp set of the same name.
I'm off now to finish my swaps. Back tomorrow with another card; until then, happy stampin'!
Stampin' Up! Supplies Used:
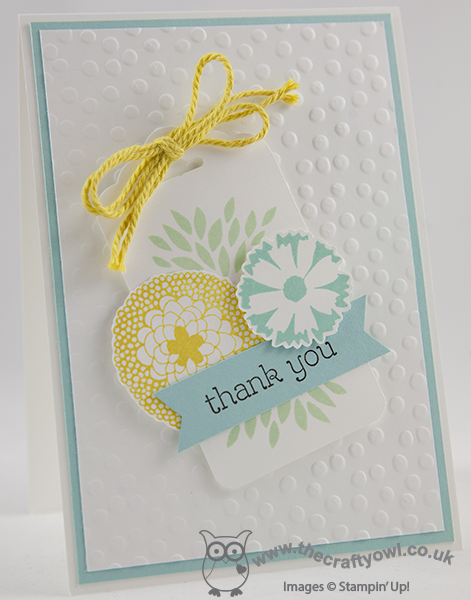
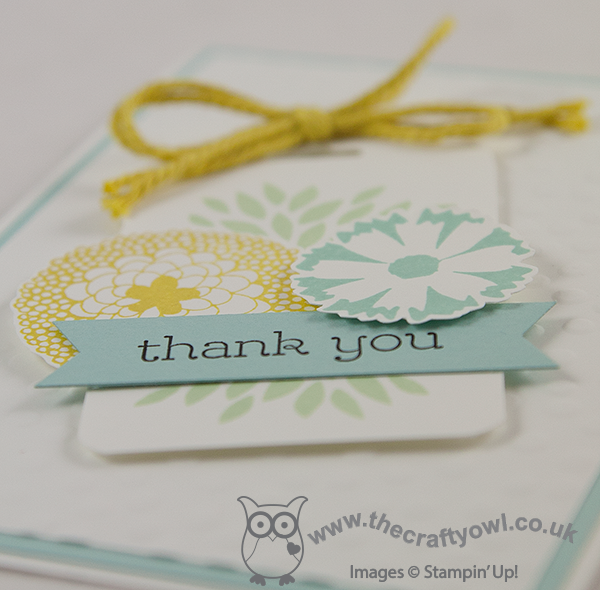
by Joanne James11. January 2014 20:54As promised, I've a change of theme today - I've been having a play with my Sale-A-Bration pre-order and thought I would share one of the cards I made that features a few of the products that will be available free when you spend £45 or more during the Sale-A-Bration 2014 promotion. Here is my card:
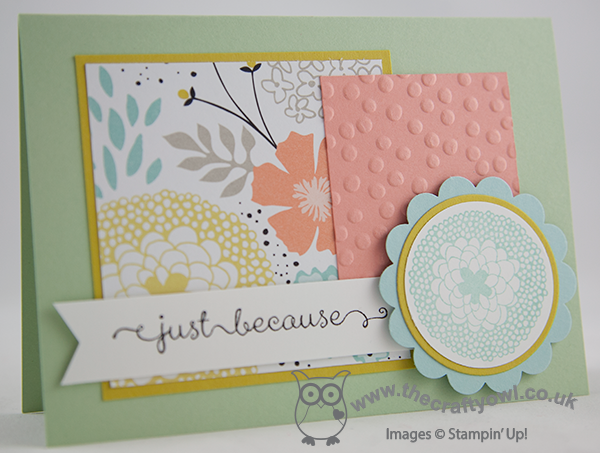
This card features three new products: the lovely Sweet Sorbet Designer Series Paper*, one of the stamps from the 'Petal Parade' stamp set* and the Crisp Cantaloupe cardstock has been embossed with the Decorative Dots Textured Impressions Embossing Folder*. All those layers, teamed with the fresh, pastel colours of the DSP and a simple sentiment, this is a perfect post-Christmas card, 'just because'.
More Sale-A-Bration ideas to come, but for now, start making that wish list! Back tomorrow with another project; until then, happy stampin'!
Stampin' Up! Supplies Used:
* All Sale-A-Bration items - available from 28 January - 31 March 2014
by Joanne James8. January 2014 15:26So for my second post today, I wanted to share with you one of the quick makes from my January classes, which are being held this week. This month we are featuring the Envelope Punch Board. Lots of my customers either purchased one or received one as a Christmas gift, but weren't really sure what to do with it other than make basic envelopes. They were truly inspired by my Easiest Ever Envelope Punch Board Cracker Video that I posted before Christmas, so I was keen to show them the full extent of their boards and just what they could do.
We started off by making square boxes - here's my version of the one we made:
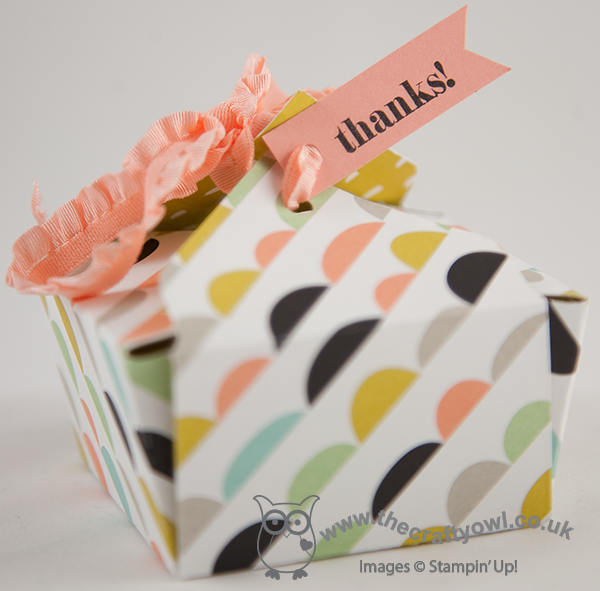
This is a simple 2" square box, made from a 6" x 6" square piece of paper, probably the easiest type of box to make. My class used the Modern Medley DSP for their boxes (there are some pictures over on my Facebook page if you would like to see them), but for my box here I thought I would give you another 'sneak peek' of product that will be available during this year's Sale-A-Bration promotion, starting 28th January. This is a sheet from the 'Sweet Sorbet' DSP collection - lovely fresh, spring colours with black (an unusual, but very workable colour combination). I finished my box with a small 'thanks' tag and some stretch ruffle trim in Crisp Cantaloupe to hold the box closed.
Back tomorrow with another of my class projects. until then, happy stampin'!
Stampin' Up! Supplies Used:
6aa5543d-b2e5-4d14-b8dc-304e99af2e39|0|.0|96d5b379-7e1d-4dac-a6ba-1e50db561b04
Tags: 3D Projects, boxes, Classes, Envelope Punch Board, Sale-a-bration 2014, Shop online, Stampin' Up, Stampin' Up Card, Stampin' Up Card ideas, Stampin' Up Supplies, Sweet Sorbet
3D Projects | Boxes | Envelope Punch Board