Life Is Sweet If You Are A Roller Skating Emu

by Joanne James21. June 2023 09:20

Today I'm sharing a card that was inspired by a new-to-me word that Time Out Challenges introduced me to:


I used the layout from Sketch Saturday to make my card that totally sums up the meaning of the word 'sportive' to me - take a look:


Here's the low-down on today's card:

What could be more playful and lighthearted than a roller skating emu, I wonder?! Whilst I'm not sure roller skating is considered a 'sport', it's certainly fun. I fussy cut my emu from the Zoo Crew designer paper and paired him with some Lemon Lolly stripes and an oversize sentiment from the 'Sweetest Cherries' stamp set: 


A stitched frame and trio of Lemon Lolly solid gems complete today's card. This card makes me smile! I might even send it to one of my oldest friends, who one summer spent our entire summer vacation trying to teach me to roller skate. She was so good at it and even after 6 weeks of what felt like daily practice, I still had all the hallmarks of Bambi on wheels, but we had so much fun in the process it didn't matter. Happy childhood memories!

Here is the visual summary of the key products used on today's project for you to pin for easy reference:


You can see all of my 'How To' summaries on my 'How To - Tips and Techniques' Pinterest board in case you've missed any. 

Remember - today is free shipping day! If you are looking for something to pop in your shopping basket, I would highly recommend a pack or two of the Bright & Beautiful designer series paper - it's so versatile and I've used lots of mine already!

Enjoy your day; I am out and about as both James Juniors have exams today. I'll be back tomorrow with another project. Until then, happy stampin'!


Stampin' Up! Supplies Used:

Table built using Product Table Builder by The Crafty Owl - Independent Stampin' Up! Demonstrator.

Easiest Ever Number Birthday Card PPP638

by Joanne James30. April 2023 08:00

Today it's Sunday and time for this week's new challenge over at The Paper Players! It's the turn of the fabulous Anne Marie to host this week since it is the fifth Sunday of the month we have a tic tac toe challenge to work with:


I went bottom left to top right diagonal with sparkle, diecut and embossing (dry) and it just so happens that my card also fits the right hand coloumn of embossing(dry), patterned paper and birthday to create the easiest ever number birthday card - take a look:


Here's the low-down on today's card:

Do you ever need a number card to celebrate a special birthday? I have so many friends and family celebrating milestone birthdays this year that I find myself making lots of this type of card - and I think this must be my most straightforward, easiest yet!

I embossed a panel of Pacific Point cardstock with the birthday embossing folder, then backed this with some (retired gold glimmer paper, having first cut my number 21 out of the centre. I then added a trio of Pacific Point Brights designer paper banners to my card base followed by my rectangle, before finishing with my sparkly number 21 popped up on foam adhesive sheet and a couple of brushed gold metallic dots: 

Not only was this card really quick to make, but this layout would work in any colour, with any co-ordinating patterned paper and glimmer - perfect, I'm off to make a whole bunch more!

Here is the visual summary of the key products used on today's project for you to pin for easy reference:


You can see all of my Product and 'How To' summaries on my 'How To - Tips and Techniques' Pinterest board in case you've missed any. 


Today's card is also my second entry over at Just Add Ink this week and uses the Try Stamping on Tuesday sketch.

Before you reach for your ink and papers, check out what our amazing team has created to inspire you this week:

Here's a quick recap of our challenge rules:
 
1.  Create a new paper project
2.  Upload your creation to your blog with a link back to us and provide a direct link to the post featuring your challenge submission.
3.  Please link your card to no more than four challenges, TOTAL.
4.  Have FUN!

Enjoy your day; nothing much happening here today, although it is lovely to know that it's a Bank Holiday weekend - an extra day off is always welcome! I'll be back tomorrow with another project. Until then, happy stampin'!


Stampin' Up! Supplies Used: 

Table built using Product Table Builder by The Crafty Owl - Independent Stampin' Up! Demonstrator.

Friendly Gnomes Luck of The Irish FF129

by Joanne James3. March 2023 09:00

Today I have my card for the new challenge over at Festive Friday Card Making and Paper Crafting Challenge


The challenge that we are celebrating this week is 'St Patrick's Day' which is on March 17th. Remember the fun thing is that at Festive Friday you do not need to actually celebrate the occasion; your goal is to simply use three or more items from the inspiration list on your project. I used the sketch layout over at Try Stamping on Tuesday (and their option of stripes) and I used green, gold, clover, gnomes and luck from the inspo board to create my good luck card this week - take a look:


Here's the low-down on today's card:

I used a mix of the sadly now retired Dandy Designs papers for my background and frame - Sale-A-Bration may be over again for another year but I love these papers so don't be surprised to still see me use them from time to time and stamped my girly gnome onto a stitched rectangle and coloured her with my Granny Apple Green and Shaded Spruce Stampin' Blends. I coloured her hair with Pumpkin Pie - I went for a stereotypically Irish look to compliment one of my favourite good luck sentiments, from the retired set 'A Wish For Everything'. An oversized punched four-leaf clover with a gem centre and two gold pearl shoe buckles complete my card:

I just love this cute gnomie and it will be perfect to wish the eldest of the James Juniors good luck when she starts her A Level exams. I am going to have to make another one using a boy gnome in this set since the youngest of the Juniors is also sitting GCSEs at the same time and couldn't possibly be left out, so watch this space!

Here is the visual summary of the key products used on today's project for you to pin for easy reference:


You can see all of my 'How To' summaries on my 'How To - Tips and Techniques' Pinterest board in case you've missed any. 

I'm also linking today's card up with the lovely ladies over at SUO Challenges where they have the theme of shades of green/St Patrick's Day - and my card today has a touch of both!

How does our board inspire you? I can’t wait to see what YOU create! For more inspiration, be sure to visit the rest of the Festive Friday Card Making and Paper Crafting Challenge Design team:


Enjoy your day and I'll be back soon with another project. Until then, happy stampin'!


Stampin' Up! Supplies Used:

Table built using Product Table Builder by The Crafty Owl - Independent Stampin' Up! Demonstrator.


Daffodil Daydream Vellum Daffodils Easter Card AYSI 292

by Joanne James10. February 2023 12:00

Today I'm sharing my design team card for our new challenge over at As you See It where it's time for a seasonal 'fill in the blank' challenge:
 

My favourite thing about Spring - this was an easy one! I always know that spring is on its way when I see daffodils poking their heads through the soil and there is something so cheery about their trumpets nodding in the wind, in their various shades of yellow. I love a tulip too, but as a Welsh person my national flower will always win out. So I grabbed my 'Daffodil Daydream' stamp set and set to work. I have made many cards with this set, and I'm sure that flowers will be a popular choice for Deborah's fill in the blank challenge this week, so I set out to create with mine in a different way. Inspired by a number of cards I'd seen on Pinterest using other kinds of flowers, this is what I came up with - take a look:
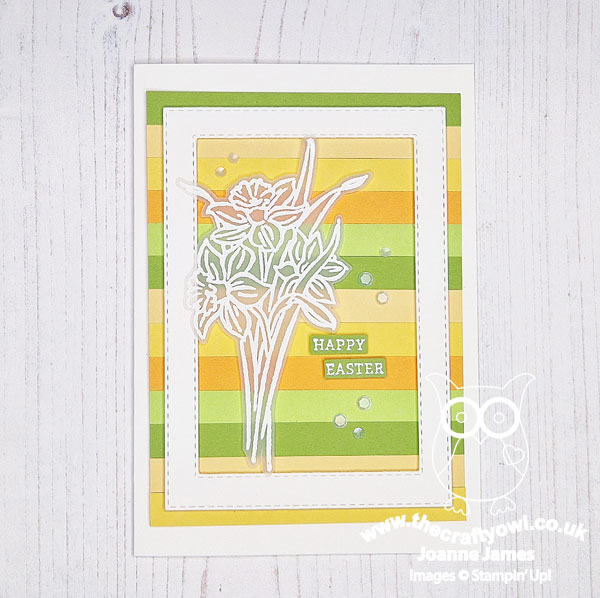
 

Here's the low-down on today's card:

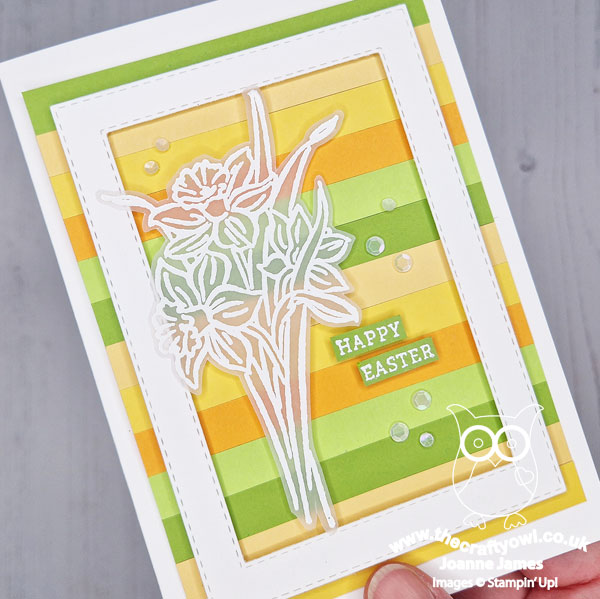
Ring The Changes With Vellum - I decided that instead of stamping and colouring my daffodils, I would heat emboss them in white onto vellum. For those of you that are not big fans of colouring, this is a great alternative way to use those line-drawn stamps. I wanted them to stand away from my background, so used a white frame made using my stitched rectangle dies and carefully adhered the points of my vellum flower to the frame, adding a small foam pad beneath the leaf that sits directly on the background as it can't be seen beneath the embossing.

Use Up Those Scraps - I used a selection of stripes measuring 1cm in width in a repeating pattern to add colour to my card, using the five colours I would have used if I was colouring the image. This is a great way to use up scraps that are leftover from other projects - we all have these random strips, don't we? My top tip for creating this kind of background is to cut a piece of white cardstock slightly smaller than your desired finished size and glue your strips to this before trimming the edges to size to create a neat finish. I added a sentiment combined from the two in the set, along with a scattering of clear sequins to complete my card:
A Daffodil Pair - I loved this card so much, I created a second one using the other daffodil in the set too. This time I rotated it from portrait to landscape, as the single daffodil is smaller:
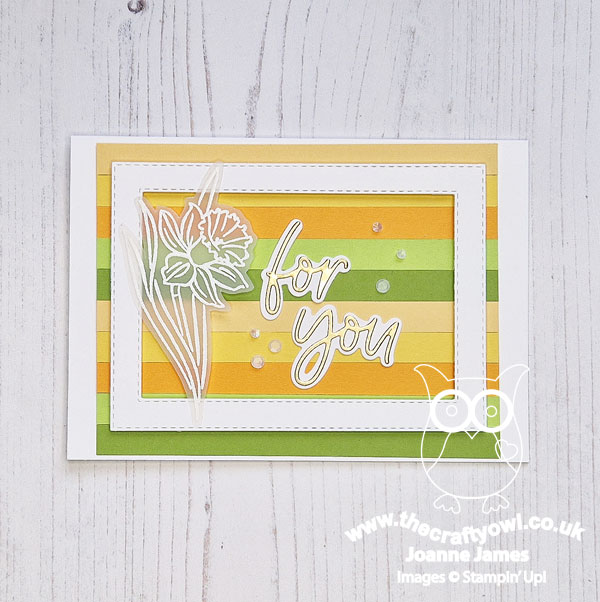
 

I paired this with a layered diecut sentiment from my favourite Love For You Dies, for a card that could work for any occasion - I will probably send it to one of my dearest old school friends for St David's Day on March 1st - I know she will appreciate it! Check out the detail below:
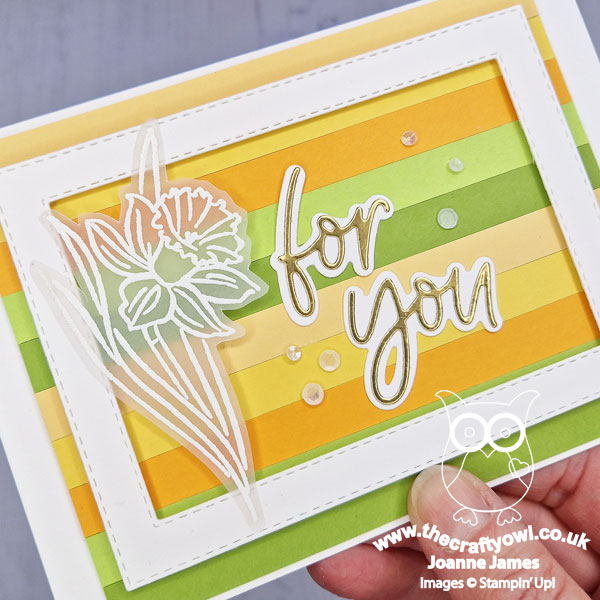
 

Here's a photo of both cards together - which one do you prefer?
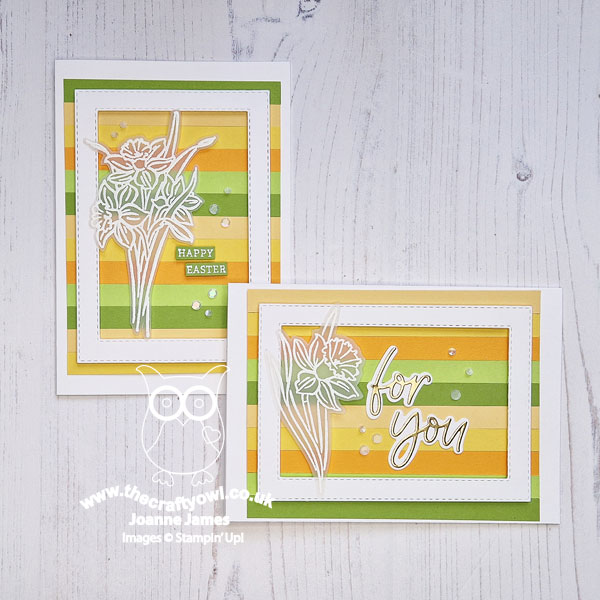
 

I love them both and had so much fun experimenting with this technique. This was such a fun way to bring new life to this much-loved stamp set. 

Here is the visual summary of the key products used on today's project for you to pin for easy reference:
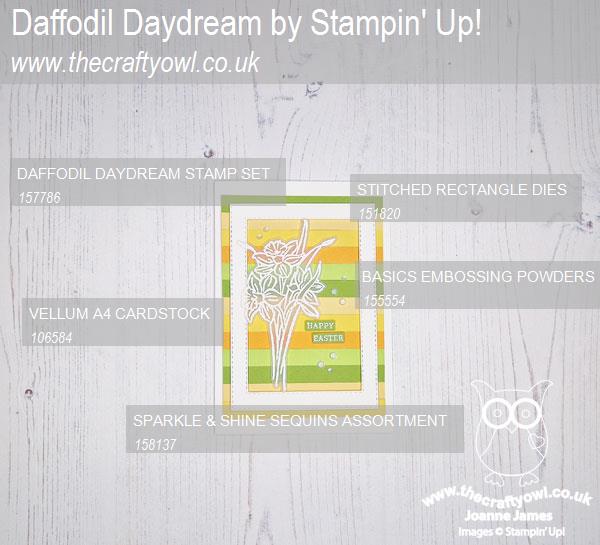
 

You can see all of my 'How To' summaries on my 'How To - Tips and Techniques' Pinterest board in case you've missed any. 

Here's a summary of our challenge rules:

  • Create any card, scrapbooking page, 3D project or packaging project that fits the challenge.
  • Please include the challenge graphic and link back to the challenge in your blog post. Turn off word verification so we can leave you lots of lovely comments. Make sure you link the post not the whole blog to the Linky. Use #AYSIXXX when uploading to a public gallery.
  • If you’re unsure about ‘the rules’, check the details under the Challenge Guidelines tab on the As You See It Challenge homepage.
  • In a Fill in the Blank challenge, complete the sentence in the Challenge Banner with the phrase that is true for you and create your project using the words you used. Tell us what you said in your blog or on your site.
We look forward to seeing your creations in the AYSI gallery.

Enjoy your day and I'll be back tomorrow with another project. Until then, happy stampin'!


Stampin' Up! Supplies Used:
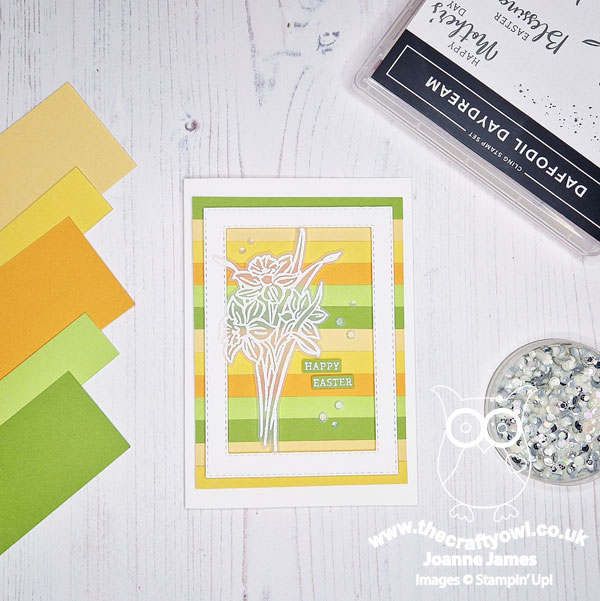
 

Table built using Product Table Builder by The Crafty Owl - Independent Stampin' Up! Demonstrator.

Adorable Owls You're So Cute Valentines Card TTT194

by Joanne James26. January 2023 16:00

It's Thursday and time for a new challenge over at TicTacToe! It's the turn of Team X to host this week and I am the featured designer this week. This is the fun board that we are playing along with: 


I went down the first column with diecut, heart and patterned paper and had another play with those Adorable Owls, taking my inspiration too from the scattering of red hearts in the inspiration photo over at Hand Stamped Sentiments - take a look:


Here's the low-down on today's card:

I went with a similar layout to the card I shared with you previously, as I wanted to create another sentiment using my Alphabet A La Mode Dies. This time I added my 'Hoot!' having stamped a shower of hearts behind the 'O', and finished my sentiment with a heat-embossed one from the Adorable Owls stamp set. I used the other two owls in the set, again coloured with my Stampin' Blends and popped up on dimensionals on wither side of the central panel: 

I used a piece of the Country Lane Floral DSP for my base this time as I wanted even more hearts - it is a Valentine's Day card, after all!

Here is the visual summary of the key products used on today's project for you to pin for easy reference:


You can see all of my Product and 'How To' summaries on my 'How To - Tips and Techniques' Pinterest board in case you've missed any. 

A tictactoe board offers so many creative possibilities - how does this week's board inspire you? Why not have a go? We would love to see you in the gallery and who knows - you might be selected for Designer's Choice and be eligible to be a guest designer on a future challenge. 

Enjoy your day; I'll be back tomorrow with another project. Until then, happy stampin'!


Stampin' Up! Supplies Used: 

Table built using Product Table Builder by The Crafty Owl - Independent Stampin' Up! Demonstrator.

Adorable Owls Time To Party Birthday Cards

by Joanne James21. January 2023 18:30

Today I'm sharing a couple of cards using Jacquie's layout over at Freshly Made Sketches:

Today's cards feature three new products, and two of them can be yours FREE with a qualifying Sale-A-Bration purchase - take a look at the first one:


Here's the low-down on today's card:

Alphabet A La Mode - I used the big open space of the sketch to feature part of my sentiment, diecutting the word 'PARTY' minus the 'A' using the new Alphabet A La Mode Dies. This is a great value set of letters, numbers and punctuation that are perfectly sized to make custom sentiments for your cards. 

Adorable Owls - The star of today's card though is the cutest little owl from the 'Adorable Owls' stamp set - one of the products that can be yours FREE with a £45 purchase during the current Sale-A-Bration promotion. I stamped the owl, complete with party hat, coloured him with my Blends and fussy cut him, before popping him up on dimensionals and adding him to my sentiment in place of the letter 'A':


Dandy Designs - Both cards feature patterns from the Dandy Designs designer series paper for the frame - a great bumper pack of 48 sheets in fresh pastel colours. I loved the first card so much, I made a second one featuring a more girly colour palette, with another of the Dandy Designs patterns as the basis for my colour scheme:


Here's a close up of this card - I went with violet eyes for this little owl:


I love both of these cards - the Adorable Owls are just my favourite Sale-A-Bration freebie during this promotion. They are just so cute!

Here's a photo of both cards together:


Which one do you prefer? Do leave me a comment below - I'd love to hear your thoughts.

Here is the visual summary of the key products used on today's project for you to pin for easy reference:


You can see all of my 'How To' summaries on my 'How To - Tips and Techniques' Pinterest board in case you've missed any. 

It has been freezing here again today - so no hockey at all, although I did enjoy a frosty walk in the countryside as an alternative. The canal that runs close to our house has totally frozen over - all of the ducks were sheltering under the bridges where the water was a little warmer and not yet turned to ice, poor things. Enjoy your day and I'll be back tomorrow with another project. Until then, happy stampin'!


Stampin' Up! Supplies Used:

Table built using Product Table Builder by The Crafty Owl - Independent Stampin' Up! Demonstrator.


Country Floral Lane With Love Stitched Panels Card

by Joanne James14. January 2023 09:00

Today I'm sharing a card showcasing more of the lovely Country Floral Lane and Country Gingham papers for a card made using this week's Try Stamping on Tuesday sketch:

Here's my card:


Here's the low-down on today's card:

There's really not much to say about this card - it features two more designs from packs you've seen me use already; I simply diecut a number of stitched rectangles and layered them as per the sketch, adding in some (retired) white cotton ribbon for the vertical element and a simple heat-embossed sentiment from the Country Bouquet stamp set:


I just love the fresh blue and white colour scheme of this card - I am yearning for spring! - and a great quick and easy card for you to recreate if you have some crafty time this weekend. 

Here is the visual summary of the key products used on today's project for you to pin for easy reference:


You can see all of my 'How To' summaries on my 'How To - Tips and Techniques' Pinterest board in case you've missed any. 

Enjoy your day; both of the James Juniors are playing hockey away today, so hubby and I will be dividing and conquering to ensure everyone gets to where they need to be. I'll be back tomorrow with another project for this week's new challenge over at The Paper Players and will be sharing something new that I think you'll like so you you won't want to miss it. Until then, happy stampin'!


Stampin' Up! Supplies Used:

Table built using Product Table Builder by The Crafty Owl - Independent Stampin' Up! Demonstrator.

Favoured Flowers Coral Thanks Card

by Joanne James12. January 2023 18:00

It's Thursday and time for a new challenge over at TicTacToe! It's the turn of Team X to host this week and the lovely Betty is our featured designer this week. This is the fun board that we are playing along with: 


I went across the middle with florals/free/sparkle to create another card using my free Sale-A-Bration Favoured Flowers designer series paper - take a look:


Here's the low-down on today's card:

Further to this card I created last week using purple shades, I used the coral toned flowers to create another card using the same products and layout. I fussy cut a trio of flower heads, adding in a couple of buds and a few diecut leaves for added interest:


My sparkle is courtesy of my trio of Petal Pink Elegant Faceted Gems; subtle, yet they have a lovely sparkly in real life. Here's one last photo showing this card alongside it's purple 'sister' - which one do you prefer? Do leave me a comment below - I'd love to hear your thoughts. 


The Favoured Flowers papers are just fabulous and so easy to work with - and free!

Here is the visual summary of the key products used on today's project for you to pin for easy reference:


You can see all of my Product and 'How To' summaries on my 'How To - Tips and Techniques' Pinterest board in case you've missed any. 

A tictactoe board offers so many creative possibilities - how does this week's board inspire you? Why not have a go? We would love to see you in the gallery and who knows - you might be selected for Designer's Choice and be eligible to be a guest designer on a future challenge. 

Enjoy your day; I'll be back tomorrow with another project. Until then, happy stampin'!


Stampin' Up! Supplies Used: 

Table built using Product Table Builder by The Crafty Owl - Independent Stampin' Up! Demonstrator.

Favoured Flowers Purple Hello Card

by Joanne James7. January 2023 17:17

Happy Saturday everyone! A quick card from me today as I managed to squeeze in a little extra crafting time (also known as I avoided standing in the rain on the sidelines of two very wet hockey matches today!) so I'm playing along with this week's Freshly Made Sketches layout from Amy:

I spent an evening earlier in the week fussy cutting flowers from my Favoured Flowers designer series paper that I received as one of my free Sale-A-Bration gifts and thought Amy's sketch was perfect to put some of them to good use - take a look:


Here's the low-down on today's card:

First things first: the Favoured Flowers designer series paper is designed to coordinate with the Fragrant Flowers stamp set and die bundle on page 21 of the new mini catalogue, however I did not buy this bundle - but this didn't stop me claiming my free paper! Every time you see me use this paper, I will be co-ordinating with other stamp sets that might be similar. I hope you find this useful and a good way to show that you don't always have to have everything 'matching' to make something work.

I used one of the DSP patterns for the central panel then layered three large flowers for the circles of the sketch, having separated the leaves from the flowers so that I could tuck in a few of those too, along with a couple of diecut ones. I added a sentiment on a label and a trio of the new opaque dots in Fresh Freesia for a little extra sparkle:


The colours of this paper pack are really rich but they are great to work with, especially if you incorporate the lighter tones too. 

Here is the visual summary of the key products used on today's project for you to pin for easy reference:


You can see all of my 'How To' summaries on my 'How To - Tips and Techniques' Pinterest board in case you've missed any. 

Enjoy your day and I'll be back tomorrow with another project. Until then, happy stampin'!


Stampin' Up! Supplies Used:

Table built using Product Table Builder by The Crafty Owl - Independent Stampin' Up! Demonstrator.

Kindest Gnomes and Christmas Blues AYSI 287

by Joanne James4. November 2022 13:00

Today I'm sharing my design team card for our new challenge over at As you See It where it's time for a recipe challenge:


I normally struggle with recipe challenges, but this one came together really easily, especially with the layout over at Atlantic Hearts this week - take a look:


Here's the low-down on today's card:

My starting point for today's card was the Storybook Gnomes designer series paper, and specifically the pattern that I used for the rectangular panels at the back that you can barely see on the finished card! It has a lovely mix of blues and earth tones, so ticked off two of my ingredients. Having layered these panels, I decided to build a scene using a combination of stamped diecut elements (my toadstool - check) and some other elements I'd already cut out from other patterns in this pack, namely the moose and the gnome. I added in a precut snowflake and some smaller snowflakes cut with the Chic Dies, to which I added some glittery gems - even a masculine card can have a little sparkle, right?!


I added a panel with my stamped sentiment and wrapped this in some (retired) white and Early Espresso baker's twine (check) to continue the earthy tones and tick off my final ingredient. 

Here is the visual summary of the key products used on today's project for you to pin for easy reference:


You can see all of my 'How To' summaries on my 'How To - Tips and Techniques' Pinterest board in case you've missed any. 

This is one of those cards that just evolved with a mish-mash of bits and pieces until I felt like I had a cohesive scene. I think I'll send this to an old university friend who has an adorable little boy - I think Mr Gnome will be right up his street!

Here's a summary of our challenge rules:

  • Create any card, scrapbooking page, 3D project or packaging project that fits the challenge.
  • Please include the challenge graphic and link back to the challenge in your blog post. Turn off word verification so we can leave you lots of lovely comments. Make sure you link the post not the whole blog to the Linky. Use #AYSIXXX when uploading to a public gallery.
  • If you’re unsure about ‘the rules’, check the details under the Challenge Guidelines tab on the As You See It Challenge homepage.
We look forward to seeing your creations in the AYSI gallery.

Enjoy your day; I have a helper to complete my chores today as the oldest of the James Juniors is enjoying an extended half-term break. Keep your fingers crossed that the weather stays dry this evening please as we are off to a fireworks display at the school of James Junior number 2. It is usually a fantastic display and as it's within the school grounds, far enough away from residential housing to cause undue trauma to the neighbourhood cats and dogs. I'll be back on Sunday with my project for our new challenge over at The Paper Players. Until then, happy stampin'!


Stampin' Up! Supplies Used:

Table built using Product Table Builder by The Crafty Owl - Independent Stampin' Up! Demonstrator.

Scrapbooking

Stampin' Up! has introduced a new range of 12x12" scrapbooking product and kit - the full range is now available to purchase online. To download a copy of the new digital Scrapbooking Catalogue click here.

Mini Catalogue

BROWSE THE CATALOGUE

'Tis The Season - the new Stampin' Up! Mini Catalogue is here! For more details and to download your copy click here

Shop Online

Access my online shop 24 x 7, 365 days of the year:

Current September hostess code:

JQEHTZGK

Shop Online

2024-25 Annual Catalogue

BROWSE THE CATALOGUE

Click on the image to download your copy of the 2024-25 annual catalogue. For a full list of current SU! supplies, go to my online store. If you would like any help or advice, please drop me a line at joanne@thecraftyowl.co.uk or give me a call on 07773 421446 - I'd be happy to help.

Join My Team

It's always a great time to join Stampin’ Up! New team members can get £130 worth of products for only £99 + free business supplies + free shipping + all the fun being a part of Stampin’ Up! Stampin' Up! has something for everyone: join my growing team and benefit from my support to enjoy Stampin' Up! however you choose.

If you're interested, call me for a chat to understand how I can help you realise your goals. Alternatively, if you have already decided to sign up and you just can't wait, please click here for the link to the online form where you can sign up and order your starter kit right away! 

Latest Kits!

Stampin Cut and Emboss

The Christmas Ornaments Kit and Card Keeper Kit are the latest kits that will be arriving in the online store later this month - get yours here!

New Online Exclusives

There are new products available exclusively in the online store from 3 July - check them out here.

About Me

Hi I'm Joanne and live in Northampton and when I'm not looking after my husband and two beautiful children, am an avid crafter with a passion for all things Stampin' Up!

I must confess that I have never been a big rubber stamper - until I discovered Stampin' Up! that is. I love the fact that I can get such great results with co-ordinating stamps, inks, papers and punches - the possibilities are endless! Join me on my stamping journey as I share the things I love and be inspired to create amazing things yourself!

Follow Me

Monthly Newsletter

Box Builder

Click the button above to use Box Buster to create your custom box design using the Envelope Punch Board!

Kits Collection Now Available!

Stampin Cut and Emboss

The new Kits Collection from Stampin' Up! is now available!

Click here to see the current kits available and order yours online today.

I Design For


Stampin' Up Stuff

This is my personal blog and is not endorsed by Stampin’ Up! I hope you find it a plentiful source of ideas and personal inspiration but please don't copy my designs for contest submission or use for classes, publication or sale without express permission.