Life Doesn't Have To Be Perfect Frame

by Joanne James29. March 2014 22:13

A quick (and late!) post from me today - I have one of the busiest weekends ever today and tomorrow. I've been putting the final touches to my class preparation for next week today and have spent the evening at the swimming pool with Rebecca as she was participating in a swimming gala. We are having a real 'girls versus boys' weekend; we each went to our separate swimming pools today (and Granny came along to watch Rebecca for the first time today too) and tomorrow Rebecca and I are travelling to London so that she can take part in an inter-school music festival with the rest of her school choir, whilst the boys have a fun day doing their own thing at home.

Anyway, with all that in mind there will be a couple of quick posts from me over the next couple of days. Today I'm sharing a gift I made for one of my customers who celebrated her birthday recently. If you follow me on Facebook, you will have see this photograph I posted yesterday of a lovely box I made using the Sweet Sorbet papers (yours free with a £45 spend during Sale-A-Bration - only 2 more days to go to plae a Sale-A-Bration order!)and my Box Buster tool and Envelope Punch Board:

Today I thought I would share what was inside - a sweet little box frame:

Just a simple stamped sentiment, decorated with a punched butterfly and a few flowers stamped and punched using the Petite Petals stamp set and co-ordinating punch. A decorated frame makes a lovely gift.

Back tomorrow with a card (or two!); until then, happy stampin'!


Stampin' Up! Supplies Used:

Table built using Product Table Builder by The Crafty Owl - Independent Stampin' Up! Demonstrator.

Good as Gold ... and then some!

by Joanne James18. March 2014 20:24

So, who's loving Sale-A-Bration 2014? All my customers are for sure - it's the best time of the Stampin' Up! year, with a free gift each and every time you spend £45 and so much to choose from. You can click on the 'Sale-A-Bration' icon on the right of my home page for a complete overview of all the gifts on offer, however today I'm going to share with you one of my favourites if you are short on time, but still want cards that are high on impact: the Good As Gold card kit. The kit comes complete with everything you need to make 8 cards with co-ordinating gold-lined envelopes, even pre-stamped sentiments; here's what the finished cards will look like straight out of the kit:

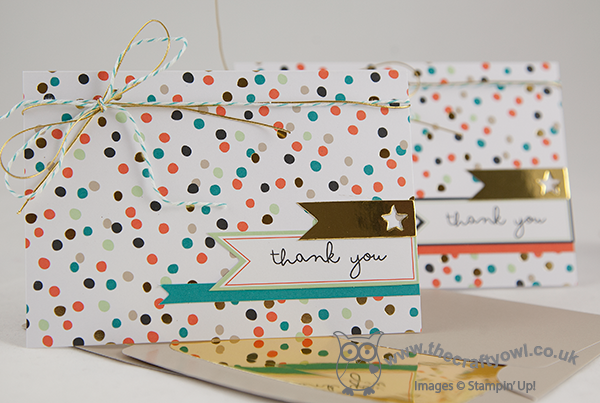
Pretty, right? As is often the way though with Stampin' Up! card kits, the packs are very generous and include lots of bits and pieces, but with a few extra envelopes and card bases, you can make your card kit go even further. Here's an example of a slightly altered version of the basic kit card:

I simply cut the card in half and used it as a piece of DSP, picking out one of the feature colours (in this case Tangerine Tango) and using it for a card base. The pre-stamped tags in the kit come in 3 different languages and you could simply stamp your own additional tags, but since I think everyone is familiar with 'thanks' in both French and German, I figured I would just use the additional pennants in the kit. The stars are those punched out from the gold pennants that come in the pack and the gold banner is cut from an offcut of gold foil and you can even cut down the envelope liners and make two from one, to insert into a standard SU! notecard envelope. I also added some leftover baker's twine from a Tag a Box kit.

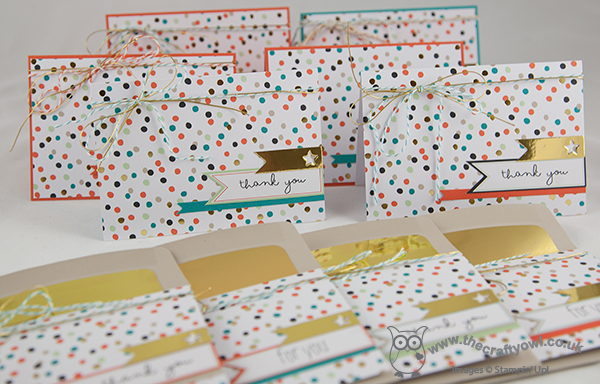
I made 10 cards out of my kit, but if you really wanted to stretch your kit, you could easily make 16 cards with a few extra bits and pieces. Here's my full collection of completed cards: 

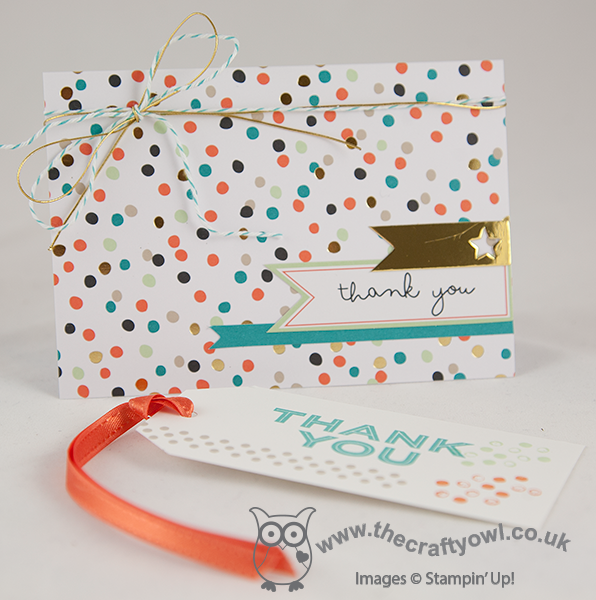
I'm using my cards as thank yous to pop in with my next customer orders; when I went to make my carrier bag labels too, I decided to create my tags using the same colour scheme: 

If you would like to get your hands on a Good As Gold card kit, you have only 13 more days to place a £45 order to get this or one of the other Sale-A-Bration items free. So what are you waiting for? Follow the links below to place an order in my online store or contact me if you live locally - I'm always on hand to help.

Back tomorrow with another card; until then, happy stampin'!


Stampin' Up! Supplies Used:

Table built using Product Table Builder by The Crafty Owl - Independent Stampin' Up! Demonstrator.


Petal Parade Thank You

by Joanne James6. March 2014 22:41

Firstly, I would like to say thank you to everyone who left comments on my blog and Facebook pages in the last couple of days about my new Box Buster from The Crafty Owl tool - I'm so glad that you are all finding this tool useful. Please feel free to share with anyone and everyone you know who likes box making and has an Envelope Punch Board; it takes all the guesswork out of box making! I have another Box Buster video tutorial for you tomorrow, but meanwhile I want to share my card for this week's challenge over at The Paper Players, where Ann's theme challenge this week is to make a 'Thankful for Spring' thank you card. I decided to combine the challenge with the one over at the Fusion Card Challenge, where I used the colours in the photo and the unusual sketch layout as the inspiration for my card:

I've invested in a few new sets of flower stamps lately, so was a little spoilt for choice, but decided that the lovely Sale-A-Bration Petal Parade stamp set would work perfectly with the sketch layout. Lots of my customers have chosen this item as their free Sale-A-Bration gift so I'm keen to share ideas with them on how to use it. Here's my card:

I chose a base od Summer Starfruit, then added a Whisper White layer that I had stamped with the Petal Parade flowers. I then added a top layer in Pool Party with a circle cut using my Circle Framelits to reveal the flowers beneath. I added my simple 'thanks' sentiment to the white layer beneath the curved edge of the top layer and added the Petal Parade border stamp for definition. To finish, I added some of the Summer Starfruit Sale-A-Bration baker's twine, first punching some little notches out of the Pool Party layer with the point of my mosaic punch to ensure the twine sits flat and evenly across the front of my card.

I hope you like my card; check out the links above to see what the respective design teams have created for these challenges for some great inspiration and ideas. Back tomorrow with another Box Buster video tutorial; until then, happy stampin'!


Stampin' Up! Supplies Used:

Table built using Product Table Builder by The Crafty Owl - Independent Stampin' Up! Demonstrator.


Video Tutorial 2: Make Any Size Box Using Your Envelope Punch Board and Box Buster from The Crafty Owl

by Joanne James5. March 2014 09:52

Good morning blog readers and crafters! Back nice and early this morning with the second of my video tutorial posts showing you how to make any size box using your Envelope Punch Board and my new Box Buster tool. I've started early on my Easter treat boxes, so today's box shows you how to make this cute box:

The finished dimensions of today's box are 100mm x 75mm x 15mm. It was designed to fit a specific Easter treat - but you'll have to watch the video below to find out what it was! My new Box Buster from The Crafty Owl tool is just great for that - you can easily create a box to fit your chosen contents, without any hassle or wasted paper - you just measure the thing you want to put in the box, input the dimensions into the Box Buster tool and it does all the hard work for you: it will tell you exactly what size paper you need and where to make your first and second punch markings.

Today's project was worked out in millimetres, but the Box Buster tool will let you construct your box in either millimetres or inches - you choose! Here's the link to today's video tutorial:


Wasn't that SOOO easy?! Keep following this week as there are more box tutorials to come, showcasing a variety of box types with handy hints and tips for making the most of your Envelope Punch Board and my new Box Buster tool.

Back soon with another project; until then, happy stampin' (and box making!)


Stampin' Up! Supplies Used:

Table built using Product Table Builder by The Crafty Owl - Independent Stampin' Up! Demonstrator.


Hoppy Easter - Paper Craft Crew

by Joanne James4. March 2014 22:24

Good evening lovely readers! I have finished editing my next video tutorial but have bumped it to tomorrow so that I can fit in a quick card that I made for this week's Paper Craft Crew challenge. here is this week's sketch layout:

Here is the card I made using this layout:

I went with a 4" square card for a change and a Crumb Cake base, then took a strip of Whisper White that I lightly sponged in Soft Sky across the top with Wild Wasabi across the bottom, then stamped the bunny minus the sentiment in Chocolate Chip and coloured him with Crumb Cake ink and a blender pen, before adding a candy dot for his tail. I matted this section on a strip of Chocolate Chip and then added a fringe of Wild Wasabi to the front of the card to make it look like the bunny was hiding in the grass. The new fringe scissors are great for creating grass in an instant and add a lovely texture. I then finished by wrapping some Early Espresso baker's twine around my card and tying in a bow. I stamped the sentiment onto an oval of Crumb Cake cardstock and finished with two co-ordinating banners, stamped using the Banner Blast stamp set and punched out with the matching punch. Both of these items are available free with a spend of £45 or more during Sale-A-Bration - contact me or visit my online store if you would like to place a £45 order and receive these gifts for free.

I've had a busy day today so am off to bed for a well-earned rest; back tomorrow with the second in my 'Any Size' box tutorial series. Until then, happy stampin'!


Stampin' Up! Supplies Used:

Table built using Product Table Builder by The Crafty Owl - Independent Stampin' Up! Demonstrator.


Whole Latte Love

by Joanne James21. February 2014 22:37

One last quick post from me today - call it an early post for tomorrow! I saw the current sketch over at Retrosketches and was really keen to have a go as I managed to squeeze in a little extra crafting time this afternoon, so thought I would combine it with the challenge over at Addicted to CAS this week:

Now I don't have a current coffee stamp, but I do have a cute little stamp that was part of one of last year's Sale-A-Bration sets that I knew would fit the bill. Here is my card: 

I used coffee as the inspiration for my colour scheme too, with my base card of Early Espresso picked up in the co-ordinating baker's twine. I coloured my coffee cup in red to give a pop of colour and embossed my card base with the Decorative Dots Textured Impressions Embossing Folder to add texture and interest.

That's all from me; I'm off to catch up on a little late night TV. Back tomorrow with another project; until then, happy stampin'!


Stampin' Up! Supplies Used:

Table built using Product Table Builder by The Crafty Owl - Independent Stampin' Up! Demonstrator.


Sale-A-Bration You're Lovely Paper Piecing

by Joanne James19. February 2014 21:02

Good evening blog readers! My busy days continue as this week the James juniors are off school as it's half term. Today has been a day of piano and singing practice, book reading and review writing, nail painting and telling the time problems, with a little basketball and a couple of baskets of ironing thrown in! Crafting time is in short supply this week, so today I'm sharing with you a stepped up version of a card that we made in my Sale-A-Bration card class this month. This card was a CASE of this one by Mary Fish, although I tweaked a few things, primarily the colour scheme as I wanted to use the Pistachio Pudding DSP from the Sale-A-Bration set. Here is my card:

I stamped the image twice, once on Whisper White for the label, which I cut out using the Big Shot and Deco label Framelits and once on Summer Starfruit, which is the piece that I used to cut the flowers from. I paper-pieced all four of the flowers on this card and coloured the leaves and stems with a Pistachio Pudding marker, then finished with a few pearls. I think this would make quite a nice Easter card too, with an alternative sentiment.

Back tomorrow with another project; until then, happy stampin'!


Stampin' Up! Supplies Used:

Table built using Product Table Builder by The Crafty Owl - Independent Stampin' Up! Demonstrator.


Sale-A-Bration Scrap Book Page

by Joanne James18. February 2014 20:58

Good evening blog readers! Today I'm going to share a scrapbook page with you that I made at a recent team training event and designed by the lovely Bekka Prideaux. It features a number of the Sweet Sorbet paper designs and the Petal Parade stamp set - both items that can be yours free during Sale-A-Bration with an order of £45 or more - some new Spring-Summer items and a somewhat overlooked item in the annual catalogue (more on that in a moment). So here is my scrapbook layout:

I decided to use one of my summer holiday photos of Rebecca and Ben as the centrepiece; I have so many amazing photographs from our holiday that I have yet to do something with, so this seemed a good opportunity to start. They are participating in one of my favourite activities at a Disney theme park - no not a roller coaster, but the ritual eating of a Mickey ice-cream bar (I am rather partial to these!) - and the concentration on their faces is a concerted attempt to get them eaten before they melt in the extreme heat!

The bright colours and patterns in the papers make a great background for my photo. Did you spot the 'hidden treasure' from the annual catalogue? The photograph is mounted on to one of the Simply Fabulous Simply Sent cards, with another attached to the Scallop tag Topper Punch piece behind for hidden journaling. These cards are great for quick cards but can also be used for journaling or as a photo mount. Lastly, a fringe cut using the new fringe scissors adds texture and draws the eye in to the focal point.

Back tomorrow with another project; until then, happy stampin'!


Stampin' Up! Supplies Used:

Table built using Product Table Builder by The Crafty Owl - Independent Stampin' Up! Demonstrator.


Sale-A-Bration My Digital Studio Party Invitations

by Joanne James15. February 2014 21:50

I've had the busiest of days today, dominated by last minute preparations for the wedding fair I am exhibiting at tomorrow, so today I've just got time for a quick post to share with you something I made with another of the items you can receive free with a £45 spend during Sale-A-Bration.

There are two My Digital Studio digital ensembles available as part of this year's Sale-A-bration free gift offering - one of them is the 'Hooray for Parties' set, which includes some great designer templates for invitations, thank yous, treat holders and much more. Here's a party invitation I made with it using the basic layout:

This is a great package if you need to make lots of invitations or party bits and pieces and have limited time - you only need to design once, then can just print out as few or as many as you need. And it can be yours free with a spend of £45 or more during Sale-A-Bration before 31st March.

Another busy day ahead tomorrow; if you're local to me and a bride-to-be, do pop in to the Budget Bride Live Wedding Fair at Diana's in Wellingborough - I'll be there talking to brides about how they can make the wedding stationery of their dreams using Stampin' Up! products and I would love to see you too.

Back tomorrow with another project; until then, happy stampin'!


Stampin' Up! Supplies Used:

Table built using Product Table Builder by The Crafty Owl - Independent Stampin' Up! Demonstrator.


One Layer Happy Anniversary - Back on Black!

by Joanne James12. February 2014 09:56

So I didn't quite manage to squeeze in another 'make' for you yesterday, but I'm here bright and breezy (or should that be windswept, given the gales we've had here for the last day or so!) this morning with today's card. Given my recent dalliances with the colour black, I thought I would try something different using black cardstock and one of my most favourite stamps - yes, the Flowerfull Heart (still available to order until Friday if you'd like one - click on the link to my online shop below!) Here is my card:

Now, I know you might be thinking "Anniversary card - on black??!" but hear me out! I wanted to use this stamp again with some heat embossing; I toyed with gold (well, it worked pretty well on this card I think) but eventually decided to use Pool Party embossing powder. My colour combination was inspired by one of the DSP patterns in the Sweet Sorbet pack that is available as one of the free Sale-A-Bration gifts currently when you spend £45 or more - the little blue Pool Party flowers with black centres. I would not necessarily have thought about using these colours together had it not been for this paper. A simple sentiment from the 'Express Yourself' hostess set (such a versatile set of greetings in a very usable font, it can be yours when you host a Stampin' Up! party - contact me to book yours) finishes this simple card.

So what do you think - a colour combination that works or one to be avoided, especially on a romantic card? I'd love to know what you think. I'm also linking this card up with the 'One Layer Card - Anything Goes' challenge over at Less is More this week (currently the only card using black for it's 'white space' - should I be worried?!) and CAS(E) This Sketch as my card uses their sketch again:

Funny how you can use the same two starting points, yet end up with two cards that couldn't be more different. Back tomorrow with another project; until then, happy stampin'!


Stampin' Up! Supplies Used:

Table built using Stampin' Up! Product Table Builder from The Crafty Owl.


Mini Catalogue

BROWSE THE CATALOGUE

The mini catalogue is now live! Read and download your copy here.

Shop Online

Access my online shop 24 x 7, 365 days of the year:

Current March hostess code:

S9F2XJJW

Shop Online

Join My Team

It's always a great time to join Stampin’ Up! New team members can get £130 worth of products for only £99 + free business supplies + free shipping + all the fun being a part of Stampin’ Up! Stampin' Up! has something for everyone: join my growing team and benefit from my support to enjoy Stampin' Up! however you choose.

If you're interested, call me for a chat to understand how I can help you realise your goals. Alternatively, if you have already decided to sign up and you just can't wait, please click here for the link to the online form where you can sign up and order your starter kit right away! 

Latest Kit!

Stampin Cut and Emboss

The Rock Legend Kit has all you need to make 8 cards with coordinating envelopes. Along with the new Panda Friends Kit, both are available from January 4th for just £14 each - get yours here!

2023-24 Annual Catalogue

BROWSE THE CATALOGUE

Click on the catalogue for a full list of current SU! supplies - if you would like to order any of the items featured, please drop me a line at [email protected] or give me a call on 07773 421446 - I'd be happy to help.

New Online Exclusives

There will be new products available exclusively in the online store from 5 March - check them out here.

About Me

Hi I'm Joanne and live in Northampton and when I'm not looking after my husband and two beautiful children, am an avid crafter with a passion for all things Stampin' Up!

I must confess that I have never been a big rubber stamper - until I discovered Stampin' Up! that is. I love the fact that I can get such great results with co-ordinating stamps, inks, papers and punches - the possibilities are endless! Join me on my stamping journey as I share the things I love and be inspired to create amazing things yourself!

Follow Me

Monthly Newsletter

Box Builder

Click the button above to use Box Buster to create your custom box design using the Envelope Punch Board!

Kits Collection Now Available!

Stampin Cut and Emboss

The new Kits Collection from Stampin' Up! is now available!

Click here to see the current kits available and order yours online today.

I Design For


Stampin' Up Stuff

This is my personal blog and is not endorsed by Stampin’ Up! I hope you find it a plentiful source of ideas and personal inspiration but please don't copy my designs for contest submission or use for classes, publication or sale without express permission.