All About Autumn Horse Chestnut Leaves PP664

by Joanne James29. October 2023 08:00

Today it's Sunday and time for this week's new challenge over at The Paper Players! It's the turn of the fabulous Claire to host this week and since it's the fifth Sunday of the month she has a bonus tic-tac-toe board challenge for us to work with:


I went across the middle of the board with patterned paper/diecut/enamel dots and used the layout over at Sketch Saturday to showcase another of the beautiful autumn leaf papers in the All About Autumn paper pack - take a look:


Here's the low-down on today's card:

I cut a slanted banner of the design featuring autumnal horse chestnut leaves and added it to my Cajun Craze card base. I used a sentiment from the retired stamp set 'Lighthearted Leaves', an old favourite of mine, as it seemed to fit the theme of my card perfectly:

I added a couple of narrow strips of copper foil and a vellum leaf accent (cut using my retired Stitched Leaves Dies) for a little added texture and a trio of copper enamel dots to complete my card. 

All in all pretty simple, but a lovely celebration of autumn leaves - so I'm sharing with the ladies over at TGIF Challenges too.

Here is the visual summary of the key products used on today's project for you to pin for easy reference:


You can see all of my Product and 'How To' summaries on my 'How To - Tips and Techniques' Pinterest board in case you've missed any. 

Before you reach for your ink and papers, check out what our amazing team has created to inspire you this week:

Here's a quick recap of our challenge rules:
 
1.  Create a new paper project
2.  Upload your creation to your blog with a link back to us and provide a direct link to the post featuring your challenge submission.
3.  Please link your card to no more than four challenges, TOTAL.
4.  Have FUN!

Enjoy your day; I hope you all enjoyed the extra hour in bed - I will be using my extra time today to do some gardening! I'll be back tomorrow with another project. Until then, happy stampin'!


Stampin' Up! Supplies Used: 

Table built using Product Table Builder by The Crafty Owl - Independent Stampin' Up! Demonstrator.

Hey There Zoo Crew Clean and Simple PP649

by Joanne James16. July 2023 08:00

Today it's Sunday and time for this week's new challenge over at The Paper Players! It's the turn of the fabulous Anne Marie to host this week and she has a fun clean and simple challenge for us to work with:


I used the sketch over at Try Stamping on Tuesday and also played along with their optional twist of camping/campfire and got fussy cutting with my paper snips and some Zoo Crew Designer Series Paper to come up with today's fun clean and simple notecard - take a look:


Here's the low-down on today's card:

Today's card is all about the designer paper! I had lots of images fussy cut from the Zoo Crew designer paper so I chose this one of the lion, added some additional colour to him with my Stampin' Blends markers and adhered him and some trees that I also fussy cut from the paper to a stitched oval, to which I'd added some Starry Sky and Parakeet Party inks with some blending brushes to ground my campfire scene (I also added a flick of clear Wink of Stella to give my sky a starry night feel, although it is difficult to see this on the photo). I anchored my oval with a trio of strips featuring some of the black and white patterns from the Zoo Crew papers and stamped a vertical sentiment from the 'charming Sentiments' stamp set:

Whilst you might be forgiven at first glance for thinking I missed the point of Anne Marie's challenge this week, you will see my lion is busy roasting his pink marshmallows over his open campfire. yum - s'mores, anyone?! Fussy cutting the individual images is such a fun way to use designer paper! A little goes a long way and this kind of minimalist layout is perfect for clean and simple cards. I'm also linking today's card up over at CAS on Friday where designer paper is the theme of their current challenge too.

Here is the visual summary of the key products used on today's project for you to pin for easy reference:


You can see all of my Product and 'How To' summaries on my 'How To - Tips and Techniques' Pinterest board in case you've missed any. 

Before you reach for your ink and papers, check out what our amazing team has created to inspire you this week:

Here's a quick recap of our challenge rules:
 
1.  Create a new paper project
2.  Upload your creation to your blog with a link back to us and provide a direct link to the post featuring your challenge submission.
3.  Please link your card to no more than four challenges, TOTAL.
4.  Have FUN!

Enjoy your day; it's sun loungers rather than campfires for me, but I'm not complaining! I'll be back on Tuesday with another project. Until then, happy stampin'!


Stampin' Up! Supplies Used: 

Table built using Product Table Builder by The Crafty Owl - Independent Stampin' Up! Demonstrator.

Bright and Beautiful Starry Congratulations Card FF0136

by Joanne James9. June 2023 09:00

Today I have my card for the new challenge over at Festive Friday Card Making and Paper Crafting Challenge


The challenge that we are celebrating this week is 'International Fairy Day' which is on June 24th. Remember the fun thing is that at Festive Friday you do not need to actually celebrate the occasion; your goal is to simply use three or more items from the inspiration list on your project. This week I used pink, sparkle, vellum and stars and the current layout over at Sunday Stamps and this is what I came up with:


Here's the low-down on today's card:

No fairies or toadstools here today; instead a riot of colour for a starry congratulations card. I might be getting a little ahead of myself, but with both of the James Juniors and their friends taking major exams this year, I am hoping that lots of this kind of card will be in order, so I'm starting early! The Bright and Beautiful designer paper pack has some fabulous colours and patterns, but this all-over starry design screams celebration! I used a Bubble Bath pink card base and added mats in Basic White and Berry Burst, splitting my designer paper into three as per the sketch layout. I added a simple sentiment from the 'Charming Sentiments' stamp set in a Stylish Shapes stitched circle, and decorated this with punched stars, picking out the colours of the stars in the patterned paper. I also used some (retired) Fresh Freesia shimmer vellum for some added sparkle - hopefully you can see it on the close up below: 

I used a couple of retired star punches for my stars, but if you need a current equivalent, the Beautiful Balloons Dies have two star dies that are the same size and shape - I've included the link in the supplies list below.

The Bright and Beautiful Designer Series Paper is another of those that are available at 15% discount in this month's designer series paper sale - I would definitely recommend you stock up! 

Here is the visual summary of the key products used on today's project for you to pin for easy reference:


You can see all of my 'How To' summaries on my 'How To - Tips and Techniques' Pinterest board in case you've missed any. 

How does our board inspire you? I can’t wait to see what YOU create! For more inspiration, be sure to visit the rest of the Festive Friday Card Making and Paper Crafting Challenge Design team:


Enjoy your day and I'll be back tomorrow with another project. Until then, happy stampin'!


Stampin' Up! Supplies Used:

Table built using Product Table Builder by The Crafty Owl - Independent Stampin' Up! Demonstrator.

A Card Full Of Love FF123

by Joanne James25. November 2022 09:00

Today I have my card for the new challenge over at Festive Friday; I've also used the Try Stamping On Tuesday sketch for my layout and played tic-tac-toe colours over at Color My Heart Color Dare (first column plus Seabrook):


The challenge that we are celebrating this week is 'National Letter Writing Day' which is on December 7th. Remember the fun thing is that at Festive Friday you do not need to actually celebrate the occasion; your goal is to simply use three or more items from the inspiration list on your project. This week I used hello sentiment, envelope and embossing folder from the inspo list and in a change from this week's run of Christmas cards, this is what I came up with:


Here's the low-down on today's card:

Full of Love - The 'Full of Love' stamp set was the obvious choice for my card today, as it features not one but two envelopes! I used the one surrounded by flowers on the front of my card, tucking an embossed panel in behind (I used the retired Greenery embossing folder) and coloured it with my Stampin' Blends markers. I added my sentiment to a stitched circle, masking it so that the words stamped one above the other rather than side by side.  

It's In The Detail - In addition to the (retired) striped Poppy Parade ribbon and bow, I stamped the image again and fussy cut the envelope and added it with dimensionals for a little extra height and added a few small pearls to the centre of the pink flowers:


Finishing Touches - I used another stamp from this set to decorate both the inside of my card and the reverse of my own envelope - for the envelope I used the other flower-filled envelope image in the set:

This is such a pretty card and I can't wait to write it to someone. Are you a big letter writer?  I have always loved writing letters; as a young girl, I would write to one of my aunts who lived the other side of the country on an almost weekly basis and we continued this ritual until she became too ill with Parkinson's Disease in her old age to hold a pen, but we both loved sharing each other's news across the years and it definitely brought us closer together. Today's card is in memory of her but will definitely be sent to someone else to brighten up their mailbox. It's so easy in today's busy world to resort to a text or WhatsApp message, but there really is no substitute for some good old-fashioned letter writing. Why not pick up a pen and send someone a handwritten note today?

Here is the visual summary of the key products used on today's project for you to pin for easy reference:


You can see all of my 'How To' summaries on my 'How To - Tips and Techniques' Pinterest board in case you've missed any. 

How does our board inspire you? I can’t wait to see what YOU create! For more inspiration, be sure to visit the rest of the  Festive Friday Challenge Design team:

Ann Schach
Beth McCullough
Sharon Hashimoto Burkert
Melanie Hungerford
Helen Jennings
Melva Peters
Jaydee
Diane Evans
Joanne James

Enjoy your day and I'll be back tomorrow with another project. Until then, happy stampin'!


Stampin' Up! Supplies Used:

Table built using Product Table Builder by The Crafty Owl - Independent Stampin' Up! Demonstrator.

Mango Flowering Tulip Fields Thank You AYSI270

by Joanne James11. March 2022 13:00

Today I'm sharing my design team card for our new challenge over at As you See It where the I chose a theme of spring flowers for our challenge this week:


The Stampin' Up! catalogue is great for florals of all kinds and the current mini has a great selection of spring florals in particular. I was a little spoilt for choice! I decided to showcase some of the beautiful Flowering Fields designer series paper covered in bright tulips on my card today - take a look:


Here's the low-down on today's card:

Flowering Fields - The handpainted designs of the Flowering Tulips designer series paper are stunning! Beautifully coloured and sized perfectly for cardmaking. I chose one with a mango-orange colour scheme and used the sketch over at Atlantic Hearts Sketch Challenge for my layout, cutting the paper into three columns. The pattern carries across the panels and the layering adds visual interest to the design. 

Tulips And More - I also used the co-ordinating 'Flowering Tulips' bundle for the remaining details. I tweaked the sketch elements slightly, using the horizontal element to showcase one of the Tulips Dies and added the sentiment to the circle - it's a perfect fit:


A Final Touch - My final addition was some of the check ribbon, that I wrapped around my diecut and tied in a bow. I sometimes feel like I have lots of ribbon that I don't use and this design really lends itself to a bow I think. The colours compliment the busy paper pattern beautifully without overwhelming. 

So what do you think? When you think 'spring flowers', what is the floral set that you reach for? Do join us over in the AYSI gallery with your spring floral creations.

Here is the visual summary of the key products used on today's project for you to pin for easy reference:


You can see all of my 'How To' summaries on my 'How To - Tips and Techniques' Pinterest board in case you've missed any. 

Here's a summary of our challenge rules:

  • Create any card, scrapbooking page, 3D project or packaging project that fits the challenge.
  • Please include the challenge graphic and link back to the challenge in your blog post. Turn off word verification so we can leave you lots of lovely comments. Make sure you link the post not the whole blog to the Linky. Use #AYSIXXX when uploading to a public gallery.
  • If you’re unsure about ‘the rules’, check the details under the Challenge Guidelines tab on the As You See It Challenge homepage.
We look forward to seeing your creations in the AYSI gallery.

Enjoy your day and I'll be back tomorrow with another project. Until then, happy stampin'!


Stampin' Up! Supplies Used:

Table built using Product Table Builder by The Crafty Owl - Independent Stampin' Up! Demonstrator.

Nuts And Bolts Greetings Kind Human Card FMS524

by Joanne James28. February 2022 11:00

I had a productive card making session last week so I have an extra couple of cards to share today - this one uses Cecile's intriguing sketch over at Freshly Made Sketches:


This is a great layout that was perfect to highlight another of my favourite 'Nuts & Bolts' stamp set robots - take a look:


Here's the low-down on today's card:

I chose a bright Mango melody card base and stamped my robot on a (retired) diecut stitched square. I decided to have a go at some 'rusty' colouring with my Blends. This was so much fun and not as difficult to achieve as I thought it might be. You just start with orange and browns and blend them in to your greys. I also added another rusty robot to the inside of my card:


Cecile's sketch is at first glance fairly straight forward, with a focal point square and sentiment beneath it. The thing that most intrigued me about it were the arrow-like details at opposing top and bottom corners. I wanted something to highlight this detail and remembered I had some retired spanner embellishments in my stash; given the otherwise clean and simple nature of my card, I decided to use them as a fun addition:


I wonder if those spanners are slightly too small to accent my square panel - or maybe it's just that I don't usually use an embellishment in this way, but I kind of like it so I went with it!

Here is the visual summary of the key products used on today's project for you to pin for easy reference:


You can see all of my 'How To' summaries on my 'How To - Tips and Techniques' Pinterest board in case you've missed any. 

LAST CALL!! One last reminder that today is your last chance to snap up a Sale-A-Bration free product or take advantage of the current enhanced joining offer - head on over to the online store or get in touch if you'd like to take advantage!

Enjoy your day and I'll be back shortly with another project. Until then, happy stampin'!


Stampin' Up! Supplies Used:

Table built using Product Table Builder by The Crafty Owl - Independent Stampin' Up! Demonstrator.

Banner Year With Grateful Heart Thank You Card PP566

by Joanne James7. November 2021 08:00

Today it's Sunday and time for this week's new challenge over at The Paper Players! It's the turn of the fabulous Claire to host this week and she has a timely theme challenge for you to work with:
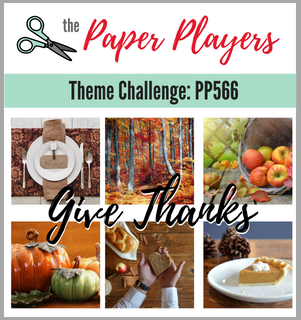
          

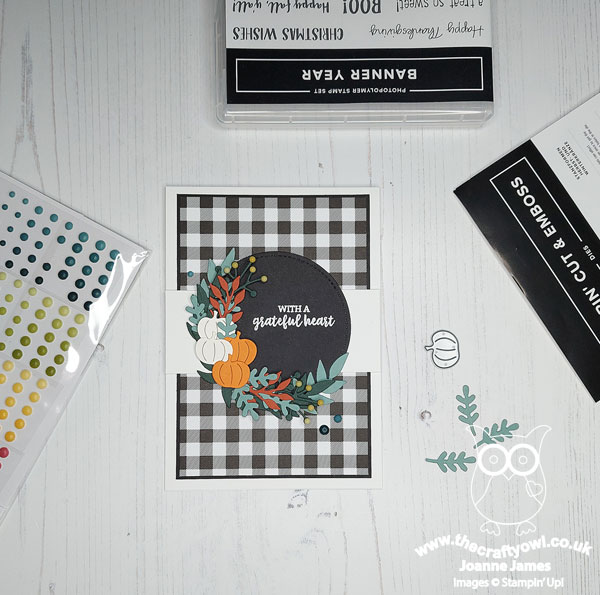
With Thanksgiving just around the corner, Claire's theme is a timely one although it's fair to say that there is plenty to be thankful for all year round so a card that gives thanks is always a useful one to have on hand. I couldn't resist another card with Jen M's layout over at Freshly Made Sketches this week (this layout is definitely a 'go to' for me!). No wreath this time though, instead totally inspired by the current challenge photo over at The Card Concept - take a look:
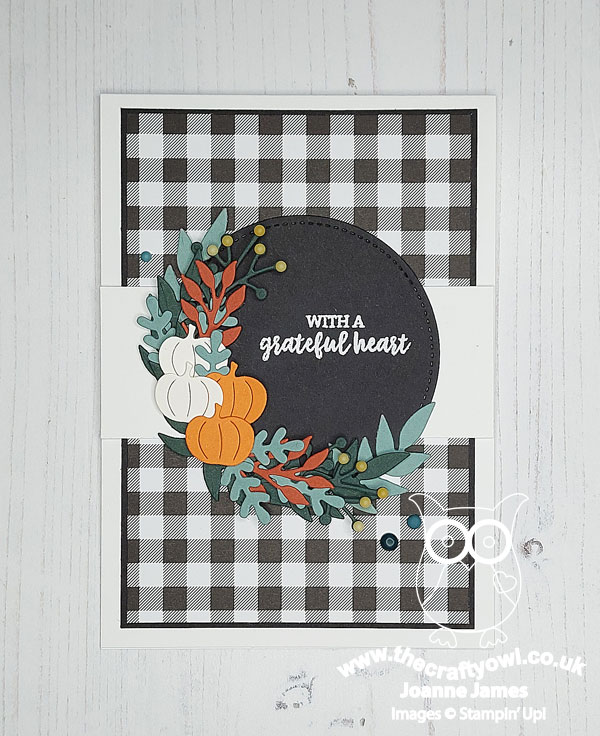
 

Here's the low-down on today's card:

I loved the colours and foliage and pumpkin elements in the Card Concept photo, along with the striking black and white tablescape, complete with gingham napkins and I incorporated all of these elements into my clean and layered card. I used black and white mats, layers and some gingham paper from the Pattern Paper hostess DSP pack, and layered a variety of foliage around one edge of a (retired) stitched circle onto which I heat-embossed my sentiment from the stamp set 'Banner Year'. I added some of the yellow decorative matt dots to my berry sprigs for a little extra dimension and detail which I really love:
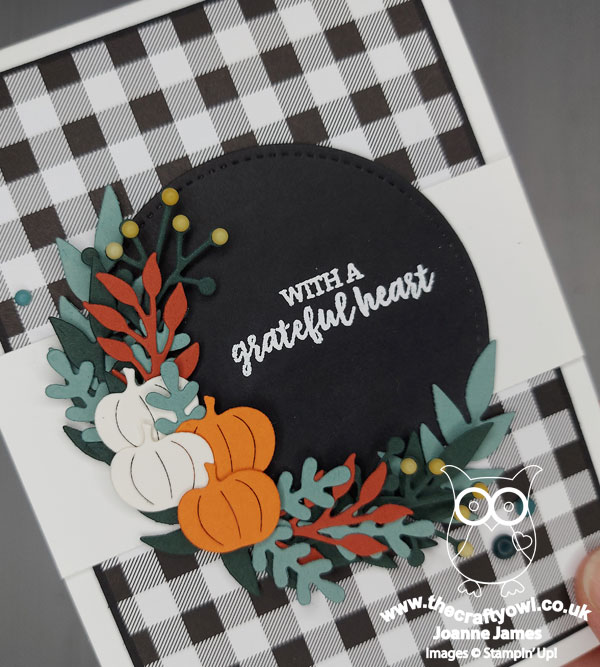
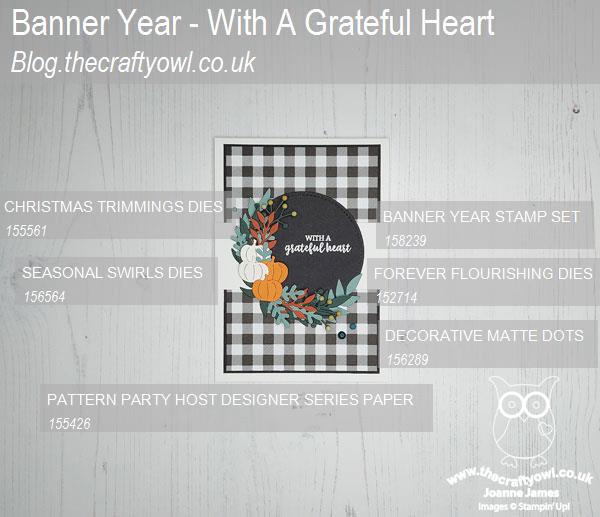
Another trio of Evening Evergreen decorative matt dots onto my base complete my card. My foliage elements were taken from various die sets - all listed in the supplies list below. This is one of those cards that turned out exactly as I intended, first time - and I love it! I often spend ages procrastinating whilst card making, so it feels like a bonus when ideas translate exactly how you envisaged, don't you think?

Here is the visual summary of the key products used on today's project for you to pin for easy reference:
 

You can see all of my Product and 'How To' summaries on my 'How To - Tips and Techniques' Pinterest board in case you've missed any. 

Before you reach for your ink and papers, check out what our amazing team has created to inspire you this week:

Here's a quick recap of our challenge rules:
 
1.  Create a new paper project
2.  Upload your creation to your blog with a link back to us and provide a direct link to the post featuring your challenge submission.
3.  Please link your card to no more than four challenges, TOTAL.
4.  Have FUN!

You can see all of my 'How To' summaries on my 'How To - Tips and Techniques' Pinterest board in case you've missed any. 

Enjoy your day; we had a busy day of sport yesterday so nothing special happening here today, but I'm not complaining. The next few weekends are super busy, so I'll take the calm before the storm! I'll be back tomorrow with another project. Until then, happy stampin'!
 

Stampin' Up! Supplies Used: 

Table built using Product Table Builder by The Crafty Owl - Independent Stampin' Up! Demonstrator.
 
Edit: This card was Jen T's choice for Princess of Clean for FMS510 - yay!
 

Counting Sheep Happy Birthday Card For Festive Friday

by Joanne James17. September 2021 09:00


Today will be a two-post day as I have some news: I am joining the Festive Friday Challenge team! This is a fortnightly challenge that is inspired by a particular day of the year that I have played along with on a number of occasions. The fun thing is that at Festive Friday you do not need to actually celebrate the occasion; your goal is to simply use three or more items from the inspiration list on your project.


The challenge that we are celebrating this week is 'Balloons Around The World Day' which is on 1st October. I often only use three or four elements when I play along, but when I saw this week's board I knew exactly what I wanted to create - and ended up using balloons, red, purple, clouds, sun, stripes, twine and paper-piecing!

This is the card I created:


Here's the low-down on today's card:

I grabbed my 'Counting Sheep' and co-ordinating Sheep Dies, both freebies with the current Sale-A-Bration promotion and created a little scene. I used a (retired) stitched square for my scene and layered this onto a striped banner and then a stitched rectangle, to tie in with the stitched detail on the sun. The one thing you may be asking yourself is 'where is the paper-piecing?' It's subtle, but I assure you it's there: I paper-pieced my sheep's wool with the Snowy White Velvet Sheets - it gives the sheep's coat a fun, almost fuzzy felt, feel and you can see it better on the close-up below:


How cute is that?! And all the better for being made with free products too! If you'd like to get your hands on this bundle, you still have a couple of weeks to place your order before the Sale-A-Bration promotion ends. Bear in mind that products are only available whilst stocks last and as we near the end of the promotion, there is a chance that popular items will sell out, so don't leave it too late!

Here is the visual summary of the key products used on today's project for you to pin for easy reference:


You can see all of my 'How To' summaries on my 'How To - Tips and Techniques' Pinterest board in case you've missed any. 

How does our board inspire you? I can’t wait to see what YOU create! For more inspiration, be sure to visit the rest of the  Festive Friday Challenge Design team:

Ann Schach
Beth McCullough
Sharon Hashimoto Burkert
Melanie Hungerford
Helen Jennings
Stephanie Lanzalotto
Melva Peters
Jaydee
Diane Evans
Joanne James

Enjoy your morning and I'll be back later with my project for the new challenge over at As You See It. Until then, happy stampin'!


Stampin' Up! Supplies Used:

Table built using Product Table Builder by The Crafty Owl - Independent Stampin' Up! Demonstrator.

Pansy Petals Birthday Card

by Joanne James15. May 2021 19:00

Today I've a quick post to share a card using Julee's current Mojo Monday sketch:


I couldn't resist another pansy card - take a look:


Here's the low-down on today's card:

My paper choices were not where I started out with today's card, but I ended up being drawn again to the bold designs in the Pansy Petals pack as they seemed to compliment my Calypso Coral/Pale Papaya pansy perfectly. My diecut pansy was the starting point for today's card - the layering and embossed detailing is so pretty, and some additional sponged colour to the edges of the petals and leaves makes them even more defined:


A sentiment from the Pansy Patch stamp set completes my card front.

Here is the visual summary of the key products used on today's project for you to pin for easy reference:


You can see all of my 'How To' summaries on my 'How To - Tips and Techniques' Pinterest board in case you've missed any. 

Enjoy your evening and I'll be back tomorrow with another project. Until then, happy stampin'!


Stampin' Up! Supplies Used:

Table built using Product Table Builder by The Crafty Owl - Independent Stampin' Up! Demonstrator.

Zany Zebras Circles Boy Birthday Card TTT112

by Joanne James6. May 2021 17:00

It's Thursday and time for a new challenge over at TicTacToe! It's the turn of Team X to host this week and the lovely Betty is our featured designer this week. This is the fun board that we are playing along with: 


I went down the third column with Heat Embossing/Diecuts/Circles and made another boy's birthday card with my now retired 'Zany Zebras' stamp set that I used on my Paper Players card earlier this week (if you missed it, you can see that card here) - take a look:


Here's the low-down on today's card:

I used a ton of retired product on my card today: Zany Zebras, Playing with Patterns paper, Stitched Shapes Dies, enamel stars and Large Dot embossing folder to name but a few, but I think they were totally fitting for the grid and they combine to make a fun birthday card for a boy. Check out the hat on my zebra with oversized tassle too:

I also added some words and another fun zebra to the inside of my card:


No visual summary of the key products used on today's project today or supplies list as so much came from the storecupboard!

A tictactoe board offers so many creative possibilities - how does this week's board inspire you? Why not have a go? We would love to see you in the gallery and who knows - you might be selected for Designer's Choice and be eligible to be a guest designer on a future challenge.

I'm also linking today's card up over at the Festive Friday Challenge where I chose red, blue and emboss as my 3 (I realise I also have stitching too with my circle!) and am making another entry over at SUO Challenges for their 'animals' theme.

Enjoy your evening; I'll be back tomorrow with another project. Until then, happy stampin'!

This card was a Festive Faves Winner for #FF0083

FF#001 Festive Friday Faves

Scrapbooking

Stampin' Up! has introduced a new range of 12x12" scrapbooking product and kit - the full range is now available to purchase online. To download a copy of the new digital Scrapbooking Catalogue click here.

Mini Catalogue

BROWSE THE CATALOGUE

'Tis The Season - the new Stampin' Up! Mini Catalogue is here! For more details and to download your copy click here

Shop Online

Access my online shop 24 x 7, 365 days of the year:

Current September hostess code:

JQEHTZGK

Shop Online

2024-25 Annual Catalogue

BROWSE THE CATALOGUE

Click on the image to download your copy of the 2024-25 annual catalogue. For a full list of current SU! supplies, go to my online store. If you would like any help or advice, please drop me a line at joanne@thecraftyowl.co.uk or give me a call on 07773 421446 - I'd be happy to help.

Join My Team

It's always a great time to join Stampin’ Up! New team members can get £130 worth of products for only £99 + free business supplies + free shipping + all the fun being a part of Stampin’ Up! Stampin' Up! has something for everyone: join my growing team and benefit from my support to enjoy Stampin' Up! however you choose.

If you're interested, call me for a chat to understand how I can help you realise your goals. Alternatively, if you have already decided to sign up and you just can't wait, please click here for the link to the online form where you can sign up and order your starter kit right away! 

Latest Kits!

Stampin Cut and Emboss

The Christmas Ornaments Kit and Card Keeper Kit are the latest kits that will be arriving in the online store later this month - get yours here!

New Online Exclusives

There are new products available exclusively in the online store from 3 July - check them out here.

About Me

Hi I'm Joanne and live in Northampton and when I'm not looking after my husband and two beautiful children, am an avid crafter with a passion for all things Stampin' Up!

I must confess that I have never been a big rubber stamper - until I discovered Stampin' Up! that is. I love the fact that I can get such great results with co-ordinating stamps, inks, papers and punches - the possibilities are endless! Join me on my stamping journey as I share the things I love and be inspired to create amazing things yourself!

Follow Me

Monthly Newsletter

Box Builder

Click the button above to use Box Buster to create your custom box design using the Envelope Punch Board!

Kits Collection Now Available!

Stampin Cut and Emboss

The new Kits Collection from Stampin' Up! is now available!

Click here to see the current kits available and order yours online today.

I Design For


Stampin' Up Stuff

This is my personal blog and is not endorsed by Stampin’ Up! I hope you find it a plentiful source of ideas and personal inspiration but please don't copy my designs for contest submission or use for classes, publication or sale without express permission.