Wedding Invites Made Easy - All It Takes Is A Little Planning!

by Joanne James19. May 2018 18:00


Good evening everyone! Well, today has been a special day here in the UK - we celebrated the royal wedding of HRH Prince Harry and Meghan Markle. Whilst I'm not a devoted Royal watcher, I do think the Monarchy has an important role to play and one thing's for sure: I love a wedding, royal or otherwise! I enjoyed watching the wedding from my office as I was crafting this morning and ooh'ed and ahh'ed at the flowers, the dresses and those adorable and so well-behaved bridesmaids and page boys. Such a glorious day for it too and the bride was truly stunning.

Since weddings are the order of the day, I thought it would make a great topic for today's blog post too so I'm sharing with you the invites I designed recently for a bride who was keen to create her own stationery for the big day.

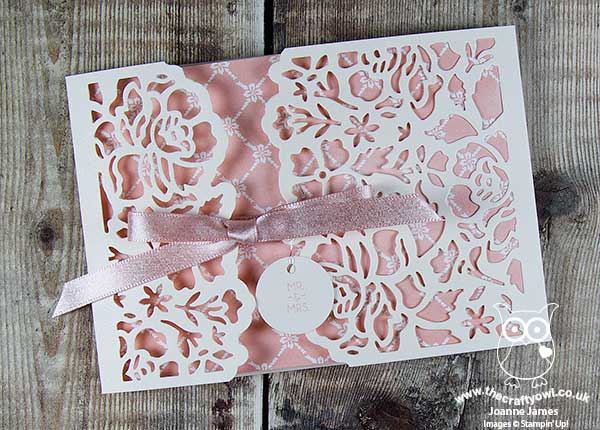
Making your own wedding stationery is a great way to create something individual and personal to you - take a look at the design we agreed upon:
 

The key things to remember when designing your own wedding stationery are as follows:

Make It Your Own - When you make your own wedding stationery, you are able to create something unique and personal to you in a way that off-the-shelf invitations will never be able to deliver. You can choose colours that co-ordinate with your scheme for the day and flowers or emblems that tie in with your chosen theme. For this wedding, the bride was keen to incorporate pale pink, but otherwise had no fixed views on design. This is one of the things I love about being a Stampin' Up! demonstrator - I love to design cards and projects, so working to a bride-to-be's brief is always an exciting prospect. It's great for the bride too - often they are keen to make their own stationery but have never done this (or sometimes any papercrafting) before, so they are keen to work with someone who can take their ideas and make them into a workable, reproductable, design. 

Keep It Simple - The key to good wedding stationery design is to keep it simple. Sometimes you may only have to make 20 invitations, but sometimes it is 120! For any kind of mass production, it's important to have a design that can be easily reproduced many times, each time as good as the last, so keeping it simple is key. For this invitation, we used the Detailed Floral Thinlits to create a gatefold-style card, with a Powder Pink Fresh Florals Designer Series Paper insert that was adhered on one side. When opened, the invitation wording was then on the inside.

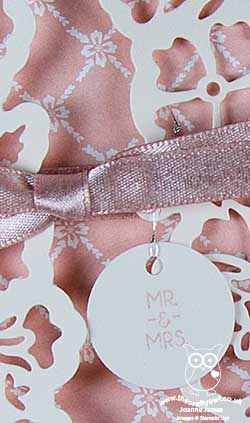
Finishing Touches - Whilst the design is simple and easy to reproduce, the finishing touches are all-important to add that of luxury: the outer gatefold was cut from Shimmery White cardstock, with the addition of Powder Pink Shimmer Ribbon to create the tied closure that co-ordinates with the DSP lining. We also added a small round punched tag, with the words 'Mr & Mrs' from the 'Beautiful Bouquet' set stamped on it in pink, using a length of silver thread.  

These invitations were really not too tricky at all to make, armed with the right tools and a few pairs of hands. The most important thing to consider when making your own wedding stationery is to plan ahead - don't underestimate the time it takes to mass produce invitations and other stationery items and be sure to allow enough time to actually put it all together. This is the perfect activity to involve friends and bridesmaids in - after all, many hands make light work!

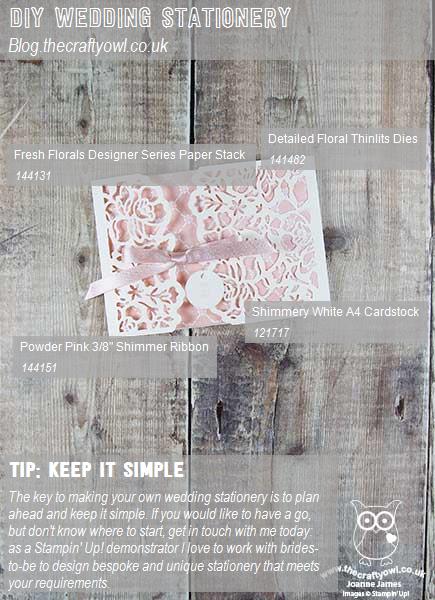
Here is the visual summary of the key products used on today's project for you to pin for easy reference:
 

You can see all of my 'How To' summaries on my 'How To - Tips and Techniques' Pinterest board in case you've missed any. 

If you are reading this and thinking you would like some help in designing your own wedding invitations, please don't hesitate to get in touch - I'd love to discuss your requirements and help you create the unique, bespoke stationery of your dreams.

Enjoy your day and I'll be back tomorrow with another project. Until then, happy stampin'!


Stampin' Up! Supplies Used:


Table built using Product Table Builder by The Crafty Owl - Independent Stampin' Up! Demonstrator.

So In Love Concertina Wedding Card

by Joanne James25. May 2017 06:00

Today I'm sharing a card from this month's technique class which featured the So In Love bundle and the beautiful Falling In Love designer series paper - take a look:


 Here's the low-down on today's card:

So Detailed Thinlits - The main feature on the front of these cards is the pair of diecut panels cut using the Big Shot and the largest of the So Detailed Dies. They really are so beautiful! I backed them with some of the Falling In Love designer series paper - these papers have some lovely subtle images, some of them photographic, that make a perfect background for these detailed diecuts. Unfortunately both of these items are now sold out here in the UK - I love this card though and just had to share it so hopefully for those of you who already have these items this will still serve as useful inspiration.

So In Love - I used the So In Love stamp set to stamp my greeting on my label wrap and to decorate the inside of my card. This card is larger than usual at 6" square and opens in a concertina style - this really shows the diecuts off to full advantage. 

A New Favourite - Yes, it's here again - I used the Pretty Label Punch for my sentiment panel on the front of my card, backed with a pinched circle - can you tell how much I LOVE this new punch?!

This card is subtle in colour, using only Very Vanilla and Sahara Sand - perfect for a wedding that doesn't have a strong colour scheme. It would work well and could be adapted as an invitation too, so lots of creative possibilities and it really is the Big Shot that does all the work on this one (a die brush is essential to poke all those little pieces out cleanly!)

Here is the visual summary of the key products used on today's project for you to pin for easy reference:


You can see all of my 'How To' summaries on my 'How To - Tips and Techniques' Pinterest board in case you've missed any. 

Enjoy your day and I'll be back tomorrow with another project. Until then, happy stampin'!


Stampin' Up! Supplies Used:

Table built using Product Table Builder by The Crafty Owl - Independent Stampin' Up! Demonstrator.

Congrats Expressions Not So Naturals Elements Wedding Card

by Joanne James22. June 2015 09:09

Good morning everyone - it's Monday! I am saying that with more optimism than I feel, but as usual there is lots to achieve this week so I'd best get on! Today I'm here with a card that I made for the challenge over at TGIF Challenge! this week, however firstly a big thank you to James Weber and the TGIF Team for choosing me as their TGIF Fave for my Build a Birthday card last week:

WINNER BUTTON!

If you missed it, you can see my winning card here. I am honoured to be a fave pick of this talented bunch of designers; I also got a shout out for my rule-breaking card for the TGIF Throwdown challenge; you can see my card here. There is still the rest of the month to enter this one, so watch this space for my bona fide entry which is still to come! Meanwhile onto today's card which is as mentioned for this week's TGIF Challenge where the theme is 'Togetherness', so weddings, anniversaries and the like; I also used this week's Colour Q colour palette and the sketch over at Pals Paper Arts as inspiration for my card:

      PPA256kwb

Without further ado, let me get to today's card:

I saw the Colour Q colours this week and thought they would work really well for a wedding or engagement card and I was particularly inspired by the inspiration photo of those patterned straws, which immediately took me to my gold Fancy Foil Designer Vellum. I used the new Whisper White Thick cardstock for my base (p. 149 of the catalogue with the speciality cardstocks in case you missed it) - did I tell you already how much I LOVE this cardstock? It makes such great card bases and is beautifully thick for one layer cards. I used a mat of Night of Navy and another of Blushing Bride, before adhering a layer of heart-embossed gold foil vellum over the top. This mutes the pink slightly and creates a real feeling of luxury, which I think is important for a wedding or celebratory card. I layered my banners, all punched with the new triple banner punch, again layering vellum over the navy ones, this time in gold stripes and leaving the bottoms visible for contrast. My cross panel is Night of Navy layered on a piece of Gold Foil Sheet, with two offset layered hearts - one gold foil, one Blushing Bride with one of the heart stamps from the 'Hello Life' set embossed in gold in the centre and some of the lovely new gold metallic thread wound in between. To finish, I added my sentiment which is the thing I probably love most on this card: it's one of the new Expressions Natural Elements wooden diecuts, which I decided to double heat-emboss in gold to tie in with the rest of my card. I love these in their natural wood finish, but they are fun to jazz up too!

This is one of those cards that I didn't have a clear idea about when I started work and it sort of evolved as I went along. I love it though - I just need someone to announce their engagement or get married so that I can send it now!

I hope you like today's card' I'll be back tomorrow with another project, so stay tuned. Until then, happy stampin'!


Stampin' Up! Supplies Used:

Table built using Product Table Builder by The Crafty Owl - Independent Stampin' Up! Demonstrator.

Tags: , , , , , , ,

Cards | Stamping | Weddings

Cheers To Love Wedding Card

by Joanne James4. May 2015 18:54

It's a Bank Holiday here in the UK today and whilst I made today's card this morning, I have spent a pleasant afternoon gardening so am late with my blog post today! I used this week's sketch over at Freshly Made Sketches for today's card and I am squeezing in just under the wire for a link-up (hopefully!) Here is the sketch:

I decided to use one of my retiring and not-yet-inked-up (shock, horror!) sets to make a wedding card today - here it is:


I went with a 'black and white and hint of pink' colour scheme today, using a base of Basic Black with mats in Pink Pirouette and Basic Black and a strip of 'Stacked With Love' DSP for my patterned edge. I made my card slightly narrower than usual to allow for the overhanging element and still fit into a standard envelope. I stamped the main stamp from the 'Cheers To Love' stamp set in Memento Black onto my right hand panel of Whisper White and then for my 'over the edge' element I chose a couple of stacked hearts, stamped with the 'Mr' and 'Mrs' stamps from the same set and punched with my Sweetheart punch. Lastly I added a tiny pink heart punched with my trusty Owl Builder Punch to the main sentiment and a few rhinestones to the hearts for a little sparkle.

I really love this set and it has everything you need to create beautifully co-ordinated wedding stationery, not just wedding cards. So it might be retiring, but for me it's a keeper (best make extra room on my shelf...)

I hope you like today's card; back tomorrow with another project. Until then, happy stampin'!


Stampin' Up! Supplies Used:

Table built using Product Table Builder by The Crafty Owl - Independent Stampin' Up! Demonstrator.


Tags: , , , , , , ,

Cards | Stamping | Weddings

Wedding Cake For Your Perfect Day

by Joanne James25. April 2015 20:41

I've had a week of haphazard blogging this week and not much time for making, but today I managed to get a couple of cards made so hopefully that will put me back on track. Today I'm sharing a card I made using this week's sketch over at Freshly Made Sketches, the first time I've managed to play along in a few weeks:


That long vertical panel offered so many possibilities - I decided it was time to use the wedding cake for the Your Perfect Day stamp set and more of the Something Borrowed DSP for a wedding card:

I went with a base of Blushing Bride, then matted my DSP on a piece of Sahara Sand cardstock, wrapped with some lace trim and Blushing Bride baker's twine. The wedding cake was stamped in Sahara Sand onto Whisper White and matted in the same way. I used a blender pen to add some Blushing Bride and Sahara Sand ink to the image and I split the sentiment into two parts so that it would sit more neatly on my panel. I thought my card still needed a little something, so I added a few tiny pearls - still clean, but just the right finishing touch.

That's all from me today; I'll be back tomorrow with this week's new challenge over at The Paper Players where Ann has a great sketch for us to work with. Until then, happy stampin'!


Stampin' Up! Supplies Used:

Table built using Product Table Builder by The Crafty Owl - Independent Stampin' Up! Demonstrator.


Tags: , , , , , ,

Cards | Stamping | Weddings

Flowerfull Heart Wedding Card

by Joanne James16. August 2014 21:54

I've spent a pleasant afternoon today with the ladies at my local hair and beauty salon celebrating their 3rd anniversary since opening (Pamper Me Hair & Beauty in Northampton - if you're local look them up, they're a lovely bunch). So another quick share today - I'm linking up with The Card Concept where the theme is to make a wedding card:

As much as I loved the photo inspiration for this challenge, I wanted to use Shimmery White and silver for my card - I had a clear idea in mind of what I wanted to create. Here's my card: 

This card uses some of my favourite 'vintage' stamps and tools of all time - Expressions Thinlits and that beautiful Flowerfull Heart stamp. The card is still my usual clean and layered style, but I do think the silver elements and the bow give a real 'classy and elegant' feel. This is one of those cards that looks so much better in real life - so very opulent, even with a relatively simple design.

That's all from me today - back tomorrow with my Design Team post this week for The Paper Players - and it's a fun one!

Until then, happy stampin'!

Stampin' Up! Supplies Used:

Table built using Product Table Builder by The Crafty Owl - Independent Stampin' Up! Demonstrator.


Make a Cake Quatrefancy Wedding Card

by Joanne James18. June 2014 08:45

Back so soon, I know - here is today's creative post! I'm sharing a card I made using the sketch over at Create with Connie and Mary this week:

I decided to use some of my retiring stamps and papers for my card and started out making a birthday card because the cake reminded me of Rebecca's birthday cake at the weekend, but by the time I had everything laid out on my desk I decided that the card would make a nicer wedding card. Here's my finished card:

I made a 5" square card and matted a piece of Quatrefancy paper onto Midnight Muse and a Pool Party base (I know technically the dots on the paper are Island Indigo, but since the dots are so small the whole thing still works, even though I've not followed the colours exactly for the rest of the card - what a rule-breaker am I??!) I then stamped a three tier cake with butterfly decoration from the 'Make a Cake' stamp set, stamping the base section twice, once in Midnight Muse for the stand and then again in Pool Party. I fussy cut the Pool Party cake out and used it to create the base layer for my cake. I used my oval framelits to cut out my framed oval and finished with a Mr & Mrs banner flag from the 'Banner Greetings' stamp set, a couple of double-stamped and punched butterflies to echo those on top of the cake and a strip of silver glimmer paper for just the right amount of sparkle.

I really like this finished card but despite where my mind started out it looks absolutely nothing like Rebecca's kitkat cake that I made for her birthday this past weekend:

If that's not death by chocolate, then I don't know what is - it did taste delicious though!

Back tomorrow with another project; until then, happy stampin'!


Stampin' Up! Supplies Used:

Table built using Product Table Builder by The Crafty Owl - Independent Stampin' Up! Demonstrator.


Mr & Mrs Wedding Card CCMC301

by Joanne James4. May 2014 20:57

I have a few wedding cards to make for a number of forthcoming nuptials and when I saw the sketch over at Create with Connie and Mary this week I knew it would be perfect for one of the cards I had in mind. Here is this week's sketch:

My wedding card needed to be Whisper White, Marina Mist and silver as I wanted it to reflect the wedding stationery which had been made by the mother of the bride a good friend and customer of mine. Here is my card:

It is very simple as I wanted my silver heat-embossed 'Mr & Mrs' to take centre stage and I layered my centre panel on dimensionals on a piece of brushed silver cardstock, both of which were cut out using the labels framelits. I turned the sketch around through 180 degrees, as I wanted my embellishment to be a silver glimmer butterfly and it looked better top right than bottom left and I used a piece of silver taffeta ribbon to create a band around my Marina Mist mat. Very simple but like the original wedding stationery, very elegant and with just a hint of sparkle.

If you'd like to see more great design inspiration for this sketch, check out what the CCMC design team have been up to - there are some great interpretations over there this week.

Back tomorrow with another card;; until then, happy stampin'!


Stampin' Up! Supplies Used:

Table built using Product Table Builder by The Crafty Owl - Independent Stampin' Up! Demonstrator.


Tags: , , , ,

Cards | Stamping | Weddings

Spiral Flower Bird Cage

by Joanne James16. February 2014 20:50

I've had a busy but productive day today exhibiting at the Budget Bride Live Wedding Fair at Diana's Health and Fitness Club in Wellingborough. Thank you to all of the lovely brides to be that came to say 'hello' to me in the Ruby lounge today - it was lovely to meet you all and I'm really looking forward to chatting with you again soon to begin the process of turning your stationery dreams into reality. Today I'm sharing one of the table decorations that I made for my exhibition display that received lots of positive feedback today - a birdcage decorated with flowers made with the new Spiral Flower Die:

I made these flowers in three co-ordinating colours of cardstock and finished the centre of each flower with a pearl, then added some satin stitched ribbon to finish. You could make something similar in any colour to tie in with your chosen wedding colour scheme - it would make a lovely table centre.

That's all from me today; I am crafting at a children's birthday party tomorrow so will share one of the projects we are doing with you in tomorrow's post.

Until then, happy stampin'!


Stampin' Up! Supplies Used:

Table built using Product Table Builder by The Crafty Owl - Independent Stampin' Up! Demonstrator.


DIY Wedding Stationery - It's Easier Than You Think!

by Joanne James12. January 2014 19:56

Good evening lovely blog readers - I hope you have all enjoyed a lovely weekend. Mine seems to have revolved around cooking for a change, with more time in the kitchen trying out new things. I blame Gordon Ramsey - I caught the last few episodes of his recent home cooking series on Channel 4 and just had to buy the accompanying book. The whole family pored over it yesterday morning and are now in a race to work our way through the delicious recipes within! Coupled with the fact that I seem to have passed my recent ailments to my daughter, such that she couldn't manage her swim squad training today as usual, it has felt like a less frantic weekend than is usually the case in the James household.

Anyway, today I thought I would share something different with you: wedding stationery. I recently wrote an article for the Winter Edition of a local wedding magazine called 'Local Wedding Connections' on just how easy it is to create the wedding stationery of your dreams, at a fraction of the cost of purchasing ready-made. You can read my article in full here, but I wanted to share more of the samples I created for this shoot in my post today. So here is the entire collection: 

Creating your own wedding stationery can be not only cost-effective, but also means you can produce something that is unique and personal to you. I created the above range using the 'Hearts-A-Flutter' stamp set and matching framelits - here are some additional images that show some of the close-up design detail:

Wedding favour 'crackers' made using the Envelope Punch Board:

A dinner menu for the Reception dinner, where you can see the subtle layering of the design:

A place card, to denote the bride's place setting:

The inside of one of the 'Save The Date' cards:

You can go to my own website, www.thecraftyowl.co.uk for more information on the services I provide. As customers of mine that have made their own stationery will attest, if you choose a simple yet elegant design it is easier to produce large volumes of perfectly co-ordinating stationery than you might think. Best of all, Stampin' Up!'s extensive range of co-ordinating inks, papers, ribbons, embellishments and cardstock, alongside an extensive range of stamp designs, mean that pretty much anything is possible. That said, if making your own wedding stationery really isn't for you, I also offer a bespoke 'make to order' service - just contact me to discuss your requirements.

Christmas time is popular for engagements and many people will be making wedding plans at this time of year, so if you know someone who fits the bill do share my details with them - I can make a huge chunk of their wedding preparations easier! In addition, point them in the direction of the Local Wedding Connections website at www.localweddingconnections.co.uk; it contains lots of useful information, supplier details and general useful bits and pieces for anyone in the market for a wedding.

Back tomorrow with another project; until then, happy stampin'!


Stampin' Up! Supplies Used:

Table built using Stampin' Up! Product Table Builder from The Crafty Owl.


Tags: , , , , , , , ,

Cards | Stamping | Weddings

New Online Exclusives

There are new products available exclusively in the online store from 5 November - check them out here.

Latest Kits!

Stampin Cut and Emboss

The Perpetual Beauty Calendar Kit and Cherry Blossoms Treat Boxes Kit are the latest kits in the online store - get yours here!

Shop Online

Access my online shop 24 x 7, 365 days of the year:

Current December hostess code:

9NKXDTTR

Shop Online

Mini Catalogue

BROWSE THE CATALOGUE

'Tis The Season - the new Stampin' Up! Mini Catalogue is here! For more details and to download your copy click here

Scrapbooking

Stampin' Up! has introduced a new range of 12x12" scrapbooking product and kit - the full range is now available to purchase online. To download a copy of the new digital Scrapbooking Catalogue click here.

2024-25 Annual Catalogue

BROWSE THE CATALOGUE

Click on the image to download your copy of the 2024-25 annual catalogue. For a full list of current SU! supplies, go to my online store. If you would like any help or advice, please drop me a line at joanne@thecraftyowl.co.uk or give me a call on 07773 421446 - I'd be happy to help.

Join My Team

It's always a great time to join Stampin’ Up! New team members can get £130 worth of products for only £99 + free business supplies + free shipping + all the fun being a part of Stampin’ Up! Stampin' Up! has something for everyone: join my growing team and benefit from my support to enjoy Stampin' Up! however you choose.

If you're interested, call me for a chat to understand how I can help you realise your goals. Alternatively, if you have already decided to sign up and you just can't wait, please click here for the link to the online form where you can sign up and order your starter kit right away! 

About Me

Hi I'm Joanne and live in Northampton and when I'm not looking after my husband and two beautiful children, am an avid crafter with a passion for all things Stampin' Up!

I must confess that I have never been a big rubber stamper - until I discovered Stampin' Up! that is. I love the fact that I can get such great results with co-ordinating stamps, inks, papers and punches - the possibilities are endless! Join me on my stamping journey as I share the things I love and be inspired to create amazing things yourself!

Follow Me

Monthly Newsletter

Box Builder

Click the button above to use Box Buster to create your custom box design using the Envelope Punch Board!

Kits Collection Now Available!

Stampin Cut and Emboss

The new Kits Collection from Stampin' Up! is now available!

Click here to see the current kits available and order yours online today.

I Design For


Stampin' Up Stuff

This is my personal blog and is not endorsed by Stampin’ Up! I hope you find it a plentiful source of ideas and personal inspiration but please don't copy my designs for contest submission or use for classes, publication or sale without express permission.

DSP Special Release

Check out 3 popular designer series paper designs in fresh new colourways! Available exclusively in the online store from 3 December - check them out here

Last Chance Products

Last Chance Products will now be updated every other month - check them out here.