Paper Aeroplanes - You've Got Mail

by Joanne James1. August 2016 08:00

Happy Monday everyone! Week 2 of the long school summer holiday! I managed to get some quality craft time over the weekend, so have a few things to share with you this week. The first is a card for this week's CASology challenge:

This week's cue card is 'journey'. I've been having fun playing along with this challenge when I can as it's a great opportunity both to hone my CAS card style and have fun, as there are often numerous ways the cue card can be interpreted. The design team are also awesome with amazing cards each week - you should definitely check them out! So with 'journey' it didn't take me long to get to thinking about transport, but I still managed to make a slightly quirky interpretation; take a look:


Here's the low-down on today's card:

Is it a star? No it's a plane! - I decided to go with a simple notecard and paper aeroplane for my card today. It reminded me of my schooldays, when I spent far too much time sending notes across the classroom to my class mates via this mode of transport. But I digress! My paper aeroplane today comes from the 'Shooting star' stamp set and is easily cut out with the co-ordinating Sliding Star Framelit Dies. I added a dotted trail using a retired stamp from the 'Cool Kid' set, but you could just as easily hand draw this in with your Basic Black Stampin' Write marker.

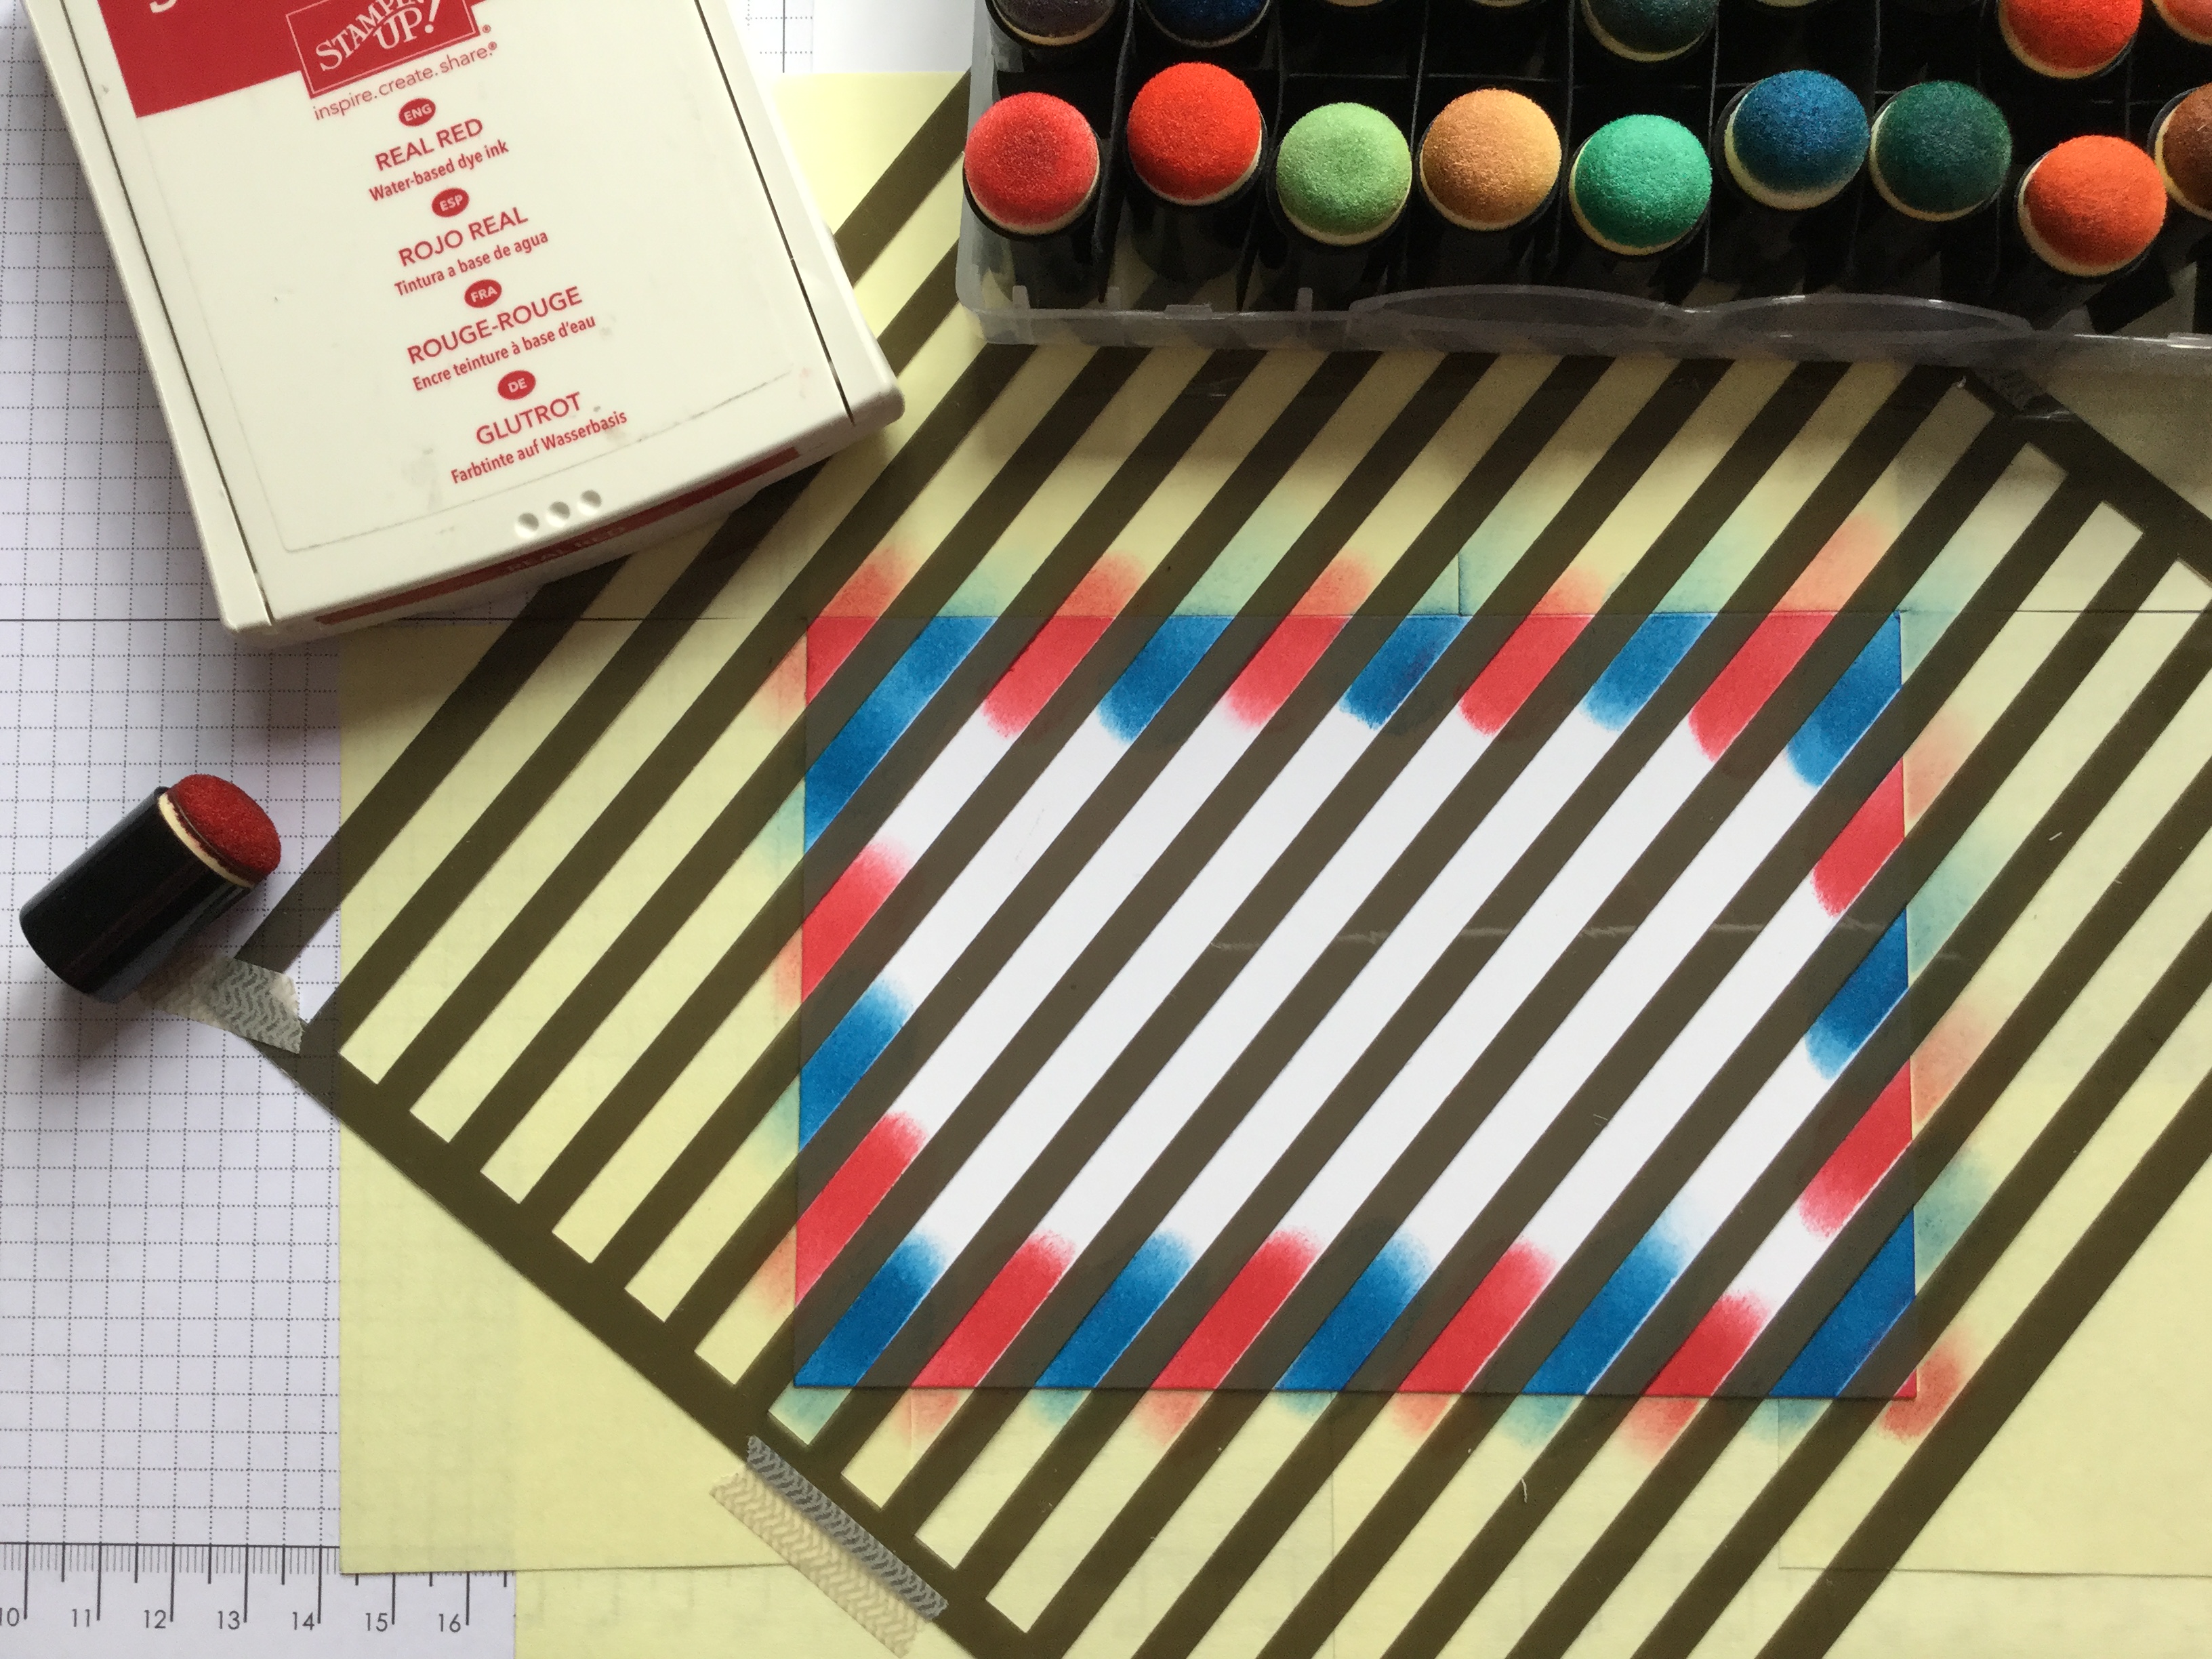
Airmail Border - I decided that I would use an airmail-type border around the edge of my notecard base to tie in with the postal theme, but on hunting for a suitable stamp that would give me the alternating red, white and blue stripes I was looking for and failing to come up with anything suitable, I decided instead to use my retired striped stencil and sponge in the alternating colours to create my border. It worked a treat! Here's a picture showing you how I did it:


Just A Note - Despite the simplicity of my notecard, I managed to use three stamp sets! My third set is 'Picture Perfect' and this is where I found my simple sentiment to finish my card. I stamped it in Pacific Point and finished with a Real Red enamel shape heart to complete my visual triangle.

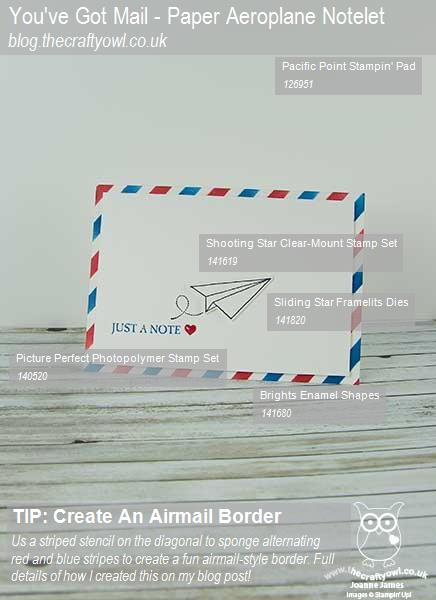
Here is the visual summary of the key products used on today's project for you to pin for easy reference:


You can see all of my 'How To' summaries on my 'How To - Tips and Techniques' Pinterest board in case you've missed any. 

A fun notecard that would be useful for any little notes that you want to send. I might actually use this card to send a note to one of my blog friends who lives across the pond - it seems a fitting card for that kind of journey!

That's all from me today; I have a child-free day today as I am attending a business function; the James Juniors are looking forward to spending the day with Granny and Ollie dog, as he is on vacation with her whist my brother-in-law and his family are holidaying abroad. I'll be back tomorrow with another project and news of the new Thoughtful Branches set that will be available to order; until then, happy stampin'!


Stampin' Up! Supplies Used:

Table built using Product Table Builder by The Crafty Owl - Independent Stampin' Up! Demonstrator.

Teenager Cards Made Easy with My Digital Studio

by Joanne James3. March 2015 15:00

Today I have something a little different for you! The current challenge over at SUO Challenges is 'Cards For Teens', sometimes a tricky group to create for. Most of the children's cards I create are for the under-10s so I wouldn't consider my self experienced in this field at all although having purchased an e-cutter recently and looking through My Digital Studio for inspiration, I discovered a stamp that is perfect for a birthday card for male teens that ultimately led me to make a few cards. Here's the first one:


Using Pacific Point as my base colour, I used the 'Extreme Skateboard' stamp image and converted it to a cut file which I then cut out of Basic Black cardstock using my e-cutter. Before adhering to my cardbase, I added some spatter and stripes in Memento Black ink and Encore Silver Metallic to create a grungy background. I also added a retired 'Awesome' stamp from the 'Cool Kid' set to this card.

For my second card, I used the negative space of the skateboarder to create a black card with a graduated rainbow sponged skateboarder behind and added some letters cut with my Little Letters thinlits to spell 'Cool' - something all teens think applies to them I think:

Finally, I used the cut skateboarder and adhered him to a sponged rainbow starburst background - I also stamped some black stars on top of this to add to the effect:

I love all of these cards, bit I think the bottom one is my favourite. It has an almost psychodelic feel. This is one of the projects that I submitted for the Convention Design Challenge in Brussels last November, although haven't shared until now. I gave the first card to my skateboard-mad 13 year old neighbour for his birthday and he pronounced it 'sick' - as I looked puzzled and slightly disappointed, he rushed to explain this was a good thing - apparently in teen-speak this is high praise! Clearly, what do I know!!!

If you struggle with teenage cards too, do check out the DT samples and the SUO gallery, where there's lots of teen inspiration.

Back tomorrow with a new set of Wednesday Weekly Deals and another project. Until then, happy stampin!


Stampin' Up! Supplies Used:

Table built using Product Table Builder by The Crafty Owl - Independent Stampin' Up! Demonstrator.


Awesome Boy's Card!

by Joanne James21. February 2014 21:01

So here is my second card of the day, just in time for this week's challenge over at Less is More where the theme this week is 'masculine cards'. I decided to use the 'Cool Kid' stamp set for my card; when I saw this stamp set I just had to have it - my children always get so excited if they have been chosen as the class 'cool kid' for the day at school. So here is my card:

I chose to use the Brights colour combination of Real Red, Tempting Turquoise and Tangerine Tango for my card - all colours my son would love! - and having stamped the dog in orange, I coloured in his scarf and boots with my Stampin' Write markers. I used the blue to outline both my circle and sentiment panel, then picked up the orange with a thin strip cut from a piece of cardstock embossed with the new Arrows Textured Impressions Embossing Folder. I inked up the sentiment using my markers too, so that I could have multi-coloured lettering - I love the effect that this give on this card.

I used this week's sketch over at Create with Connie and Mary for my layout.

Back soon with another card; until then, happy stampin'!


Stampin' Up! Supplies Used:

Table built using Product Table Builder by The Crafty Owl - Independent Stampin' Up! Demonstrator.


Tags: , , , , , , , ,

Cards | Stamping

Video Tutorial: Treat Pouches using the Scalloped Tag Topper Punch

by Joanne James3. February 2014 21:18

This week is a busy week for me, with a couple of classes and lots more going on. I held my first class of the week today and we had a lot of fun making cards using all of the items that can be yours free with a £45 spend during Sale-A-Bration. I'll share some of these cards with you later in the week (I don't want to spoil things for those ladies that haven't made them yet!) but today I wanted to share a short video tutorial for the first of the projects I've made using the Scalloped Tag Topper Punch. The Scalloped Tag Topper Punch is new in the Spring-Summer seasonal catalogue and, along with its neighbour the Angled Tag Topper Punch, can be used to make easy gift tags and bookmarks in one simple step, as the top is shaped and the hole punched for you in one easy movement. It is an incredibly versatile punch and can be used to create lots more besides.

I have filmed a series of tutorials that show the versatility of these punches and the first of these shows you how to make a basic treat holder. Here are some of the ones I created:

These were for my children as an after-school treat (they always complain I never greet them with sweets at the school gate, so this made a nice change!) and then I also created this more grown-up version:

I think these would make such lovely wedding favours and are so easy to make you could easily put together large quantities with minimal effort. I was inspired by these treat holders made by Mary Fish and adapted mine to suit the chocolate supplies on hand! Also, I have included both metric and imperial measurements in my tutorial, so you can create this treat holder with ease, whichever method you prefer.

So here's the first in my series of Scalloped Tag Topper Punch video tutorials - enjoy!

I hope you found my video useful; if you would like to purchase any of the items featured, please click on the links below and hop on over to my online store or give me a call if you're local to me and would like to save on postage costs. Back soon with news of some product shares that I've put together for those of you who have now had time to browse the new Spring-Summer catalogue and would like a little bit of everything! Until then, happy stampin'!


Stampin' Up! Supplies Used:

Table built using Stampin' Up! Product Table Builder from The Crafty Owl.


Mini Catalogue

BROWSE THE CATALOGUE

The mini catalogue is now live! Read and download your copy here.

Shop Online

Access my online shop 24 x 7, 365 days of the year:

Current March hostess code:

S9F2XJJW

Shop Online

Join My Team

It's always a great time to join Stampin’ Up! New team members can get £130 worth of products for only £99 + free business supplies + free shipping + all the fun being a part of Stampin’ Up! Stampin' Up! has something for everyone: join my growing team and benefit from my support to enjoy Stampin' Up! however you choose.

If you're interested, call me for a chat to understand how I can help you realise your goals. Alternatively, if you have already decided to sign up and you just can't wait, please click here for the link to the online form where you can sign up and order your starter kit right away! 

Latest Kit!

Stampin Cut and Emboss

The Rock Legend Kit has all you need to make 8 cards with coordinating envelopes. Along with the new Panda Friends Kit, both are available from January 4th for just £14 each - get yours here!

2023-24 Annual Catalogue

BROWSE THE CATALOGUE

Click on the catalogue for a full list of current SU! supplies - if you would like to order any of the items featured, please drop me a line at [email protected] or give me a call on 07773 421446 - I'd be happy to help.

New Online Exclusives

There will be new products available exclusively in the online store from 5 March - check them out here.

About Me

Hi I'm Joanne and live in Northampton and when I'm not looking after my husband and two beautiful children, am an avid crafter with a passion for all things Stampin' Up!

I must confess that I have never been a big rubber stamper - until I discovered Stampin' Up! that is. I love the fact that I can get such great results with co-ordinating stamps, inks, papers and punches - the possibilities are endless! Join me on my stamping journey as I share the things I love and be inspired to create amazing things yourself!

Follow Me

Monthly Newsletter

Box Builder

Click the button above to use Box Buster to create your custom box design using the Envelope Punch Board!

Kits Collection Now Available!

Stampin Cut and Emboss

The new Kits Collection from Stampin' Up! is now available!

Click here to see the current kits available and order yours online today.

I Design For


Stampin' Up Stuff

This is my personal blog and is not endorsed by Stampin’ Up! I hope you find it a plentiful source of ideas and personal inspiration but please don't copy my designs for contest submission or use for classes, publication or sale without express permission.