It's Here - Time to Sale-A-Brate!

by Joanne James28. January 2014 11:50

Yes it's arrived - Sale-A-Bration, the best time of the Stampin' Up! year begins today!

Sale--Bration runs from today, 28th January until 31 March 2014 and there is so much to celebrate - you can read all about it by clicking on the brochure in the side bar of my blog, but the key things to know are:

FREE GIFTS: For every £45 you spend during Sale-A-Bration, you get a free exclusive Sale-A-Bration gift - and there are 13 to choose from!

MORE FREE GIFTS: Get £25 more to spend on any Stampin' Up! products with a qualifying party*

EVEN MORE FREE GIFTS: If you decide to join Stampin' Up! during Sale-A-Bration, you can choose £150 worth of products for only £99 (instead of the usual £130). All this in addition to a 20% discount on future product purchases, the ability to order new items in advance of everyone else, along with the wider benefits that joining a company such as Stampin' Up! has to offer. Also, if you join my growing team of Stampin' Up! demonstrators, you will receive additional benefits, including a FREE copy of my Product Table Builder software to help you make the most of your online sales opportunities - this is an exclusive benefit to those who sign up to be a part of my team (worth £35). My team is a mix of those who are hobby demonstrators and those who use Stampin' Up! as a business to earn them additional income and are a great bunch - everyone is welcome and I would love you to join us.

The best way to see these products is to attend my February classes, which will feature Sale-A-Bration products, or give me a call on 07773 421446 and arrange to host your very own Stampin' Up! party. To whet your appetite, I made a short video showcasing lots of the Sale-A-Bration products - they look even better close up than in the brochure, so why not click on the link below and take a look:


I hope that got you all excited - don't forget, please get in touch via [email protected] or call me on 07773 421446 if you would like to get your hands on some yourself or click on the links below to hop on over to my online shop! 

Today also sees the launch of the Spring-Summer catalogue, featuring some lovely new products - please check out today's other post for more information on my favourite things!

Lots going on today so back soon with more creative delights; until then, happy stampin'!


Stampin' Up! Sale-A-Bration Products available free with a £45 spend:

Table built using Stampin' Up! Product Table Builder from The Crafty Owl.


*An extra £25 of hostess credits will be earned for all qualifying party sales of £250 or more.


Gift Bow Bigz Die Stampin' Up! 2013 European Convention Commercial Video Entry

by Joanne James11. December 2013 20:39

Evening all! I've been busy in the kitchen today icing biscuits that I baked yesterday in readiness for end-of term teacher gifts later in the week. More to do tomorrow and I will endeavour to share some pictures later in the week, but for today something fun! A little while ago I entered a competition to create a video advertising a Stampin' Up! event or product. The winners were announced at this year's European Convention and whilst I didn't win, today I thought I would share with you my entry as it features - yes, you've guessed it - the Stampin' Up! Gift Bow Bigz Die!

This really is a great product, as there is so much you can do with it, including, but in no way exclusively, make the most beautiful bows. In addition, as with all Stampin' Up! dies, it will cut cut not only cardstock, but other materials too: cork, coaster board, fabric, felt and lots more. The inspiration for my video came from Bryony the elf, who features in one of my favourite Christmas movies, 'Arthur Christmas'. She is an ace gift wrapper whose catchphrase is "there's always time for a bow!". Here she is doing her thing:


And here I am, doing mine:


Did you spot the 'make' that I haven't shared with you separately? It really is so easy to use the Gift Bow Bigz Die to make so many different projects. I still have more I would like to share with you; I just need more hours in my day to make them all!

I hope you enjoyed today's fun video - back next time with more creative inspiration. Until then, happy stampin'!


Stampin' Up! Supplies Used:

Table built using Stampin' Up! Product Table Builder from The Crafty Owl.


Tags: , , , , ,

3D Projects | Promotions | Video Tutorials

Gift Bow Bigz Die Christmas Pudding Ornament and Video Tutorial

by Joanne James9. December 2013 21:00

So today is the start of the last week of school for the James' juniors, so there are lots of daily activities with Christmas in mind. I've just returned from watching my youngest in his Christmas school production, having given a stellar performance as the 'Bethlehem Census Man' (imagine town crier!) and delivered his one line with true dramatic style: "Hear ye, hear ye - census in Bethlehem! Your country needs you !" There's nothing like a Christmas production to make you feel like the festive season is upon us.

And so to today's creation with the Gift Bow Bigz Die: hot on the heels of yesterday's gift bow angel, a Christmas pudding tree ornament! Now, for my non-UK readers, you may not know that Christmas or plum puddings are a peculiarly British fayre, traditionally eaten after Christmas lunch on Christmas Day. They are eaten with either white sauce or brandy butter and are something of an acquired taste, or so my American friends told me after I sent them one for Christmas one year! So without further ado, here's a picture of the finished pudding: 

I made a few of these a while ago (tomorrow's post will explain all!) and I think they make another cute ornament for Christmas time. You could just follow the instructions to make a plain sphere out of patterned paper, but I decided mine needed dressing up, hence the Christmas pudding. I made a video showing you how easy they are to create using the Gift Bow Bigz Die from Stampin' Up!; the video also shares a handy technique for colouring your glimmer paper to match your product - did you know you can colour Stampin' Up!'s Glimmer Paper using your Stampin' Write markers? If not, watch the video to find out how:


I hope you like today's project - back tomorrow with something a little different, but still bow-related!

Until then, happy stampin'!


Stampin' Up! Supplies Used:

Table built using Stampin' Up! Product Table Builder from The Crafty Owl.


Gift Bow Bigz Die Angel Christmas Tree Ornament and Video Tutorial

by Joanne James8. December 2013 16:00

Another weekend of James family busy, busy. Yesterday: hairdressers, mad science parties and swimming gala on top of the usual homework and household chores. Today: swimming lessons, family lunch and decorating the house ready for Christmas. Finally I'm able to share today's post with a cute project: this adorable angel Christmas tree ornament made using the Stampin' Up! Gift Bow Bigz Die:

I've seen a few different examples of these angels on the internet; the first one I saw was on Tanya Bell's blog here which also included a great tip for getting even eyes. I'm not sure where the original idea came from, but as they are all a little different I thought I would share with you my version; I've been making lots of these to decorate the house this year and love that I can use my Gift Bow Die for so many more things than making bows. I made a video tutorial for you to show how I put these together; here it is:


The supplies and equipment you need to make an angel are listed below and the key measurements for the cardstock to make the main part which is the angel dress body are:

2 pieces cardstock: 10.5cm x 5cm

1 piece cardstock: 1.5cm x 8cm

These card sizes enable you to get three angels out of one sheet of A4 cardstock. Come back tomorrow for another project using the Gift Bow Bigz Die; until then, happy stampin'!


Stampin' Up! Supplies Used:

Table built using Stampin' Up! Product Table Builder from The Crafty Owl.


Festive Flurry 3D Snowflake Bottle Tag and Video Tutorial

by Joanne James26. November 2013 13:20

Well, I'm back from Stampin' Up! 2013 European Convention and what can I say - my team and I had a blast! We came home exhausted, but having had the best time swapping, learning, meeting old friends, making new ones, 'sneak peeking' at some fabulous new products. Normal blogging is now resumed and I have lots of lovely things to show you, starting with the general swap that one of my downlines, Barbara, and I made for everyone we met at convention. It was something of a 'case' on the tag that features in this year's autumn-winter seasonal catalogue, but with a few changes to make it our own. Here is a picture of one of our finished swaps:

We also made some in a Pool Party/Island Indigo/Embossed Silver colourway - I will have to edit this post to include a photograph of one of these as I can't find one at the moment (might have to retake!) The snowflakes in the Festive Flurry set are great for making ornaments or 3-D tags or box-toppers with and you can layer just three snowflakes or all four to get a really large one. I shot a short video tutorial to show you how to put these layered snowflakes together to create this added dimension; grab your glue gun and click on the link below if you would like to see how to achieve it yourself - the video also shows the snowflake in the alternative colourway:

 I hope you find the video useful and have fun creating your own snowflakes in lots of different colour combinations. Just before I leave you the supplies list for this project, I thought you might like to see a fun Convention picture of me with 2 of my downline team members - I'm the one in the middle with the stripey hat:

If you would like to join us for some fun - and chocolate! - at next year's European Convention in Brussels next October, get in touch for more information about the benefits of joining my team.

Back tomorrow with more swaps and gifts made for friends; until then, happy stampin'!


Stampin' Up! Supplies Used:


Envelope Card using the Envelope Punch Board and 'How to' Video Tutorial

by Joanne James19. November 2013 20:29

Evening blog readers! I had to do some Christmas shopping today, but managed to squeeze in a quick hour of crafting - still so much to do before I'm ready for my very first Stampin' Up! European Convention in Manchester in 2 days time! I'm very excited (can you tell?!) and am looking forward to spending some quality crafting and partying time with Barbara and Samantha, the two of my team that are accompanying me.

More news of that later in the week, but today I have another video tutorial of you to show you how to make a very simple envelope card using your Envelope Punch Board:

I made a whole bunch of these as thank you cards to pop in with my most recent batch of customer orders; lots of my customers have already bought envelope punch boards, so I'm keen to show them lots of simple and straightforward ways that they can use it for things as well as straightforward envelopes.

Here's a picture of the cards I made, both open and closed:

And here's the link to my YouTube channel to watch the video tutorial if you would like to make your own:


I used Sycamore Street designer series paper for my cards, which is a retired paper but one that is still available currently on the clearance rack for only £3.59 - pop over to my online store by clicking on the image below if you would like to snap some up at this bargain price before its all gone!

Back tomorrow with another project; until then, happy stampin'!


Stampin' Up! Supplies Used:


Easiest Ever Crackers with the Stampin' Up! Envelope Punch Board - Video Tutorial

by Joanne James16. November 2013 21:42

Yay - it's the weekend! I've been busy doing homework and more convention swaps today, along with other lovely items for my convention friends, all of which I will share with you another time ... because today I'm going to show you the easiest ever way to make Christmas Crackers using the new Stampin' Up! Envelope Punch Board! Not just pictures, but a video too. The new envelope punch board from Stampin' Up! has been hugely popular as lots of my customers will testify and it really is a versatile piece of kit. As I mentioned in a previous post, the board can be used not only to make envelopes, but also boxes in a variety of shapes and sizes and other 3D items such as crackers.

As we are fast approaching the start of the festive season, what better than to make some lovely Christmas crackers to decorate your Christmas tree, as table favours for the festive table or even to house a couple of chocolates as a little gift for someone special? Here are the ones I make in my video, along with a picture of some other ones that I've made:
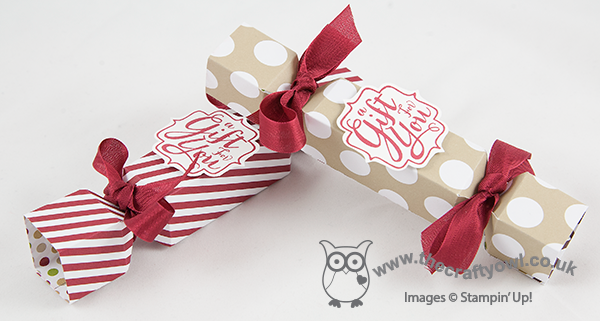
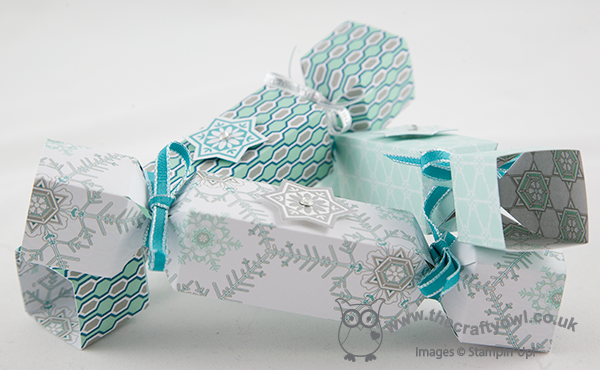
I've seen lots of videos and tutorials on how to make them in a variety of sizes and styles, but if you want to make lots I think by far the easiest way is to use the current Designer Series Paper Stacks in the seasonal catalogue as your starting point: each sheet measures 4.5"x6.5" so it makes the score measurements really easy: 1", 2", 3" and 4" on the short side, and 1", 1.5", 2", 4.5", 5" and 5"5 on the long side. Simply score, punch stick and done - you can make a cracker in just a couple of minutes. Add a minute or two more to add some decoration and you could be mass producing these in no time. If you don't use the paper stacks, any designer paper cut to the basic measurement will do; I would avoid using solid colour standard cardstock as this is much thicker and whilst your envelope punch board will punch through a double thickness of cardstock, it is quite hard work and you risk damaging your punch and board as it isn't really designed with this in mind.

In my video, I also show a boxed set of crackers that I made using the Winter Frost Designer Series Paper Stack - here is the photo again:
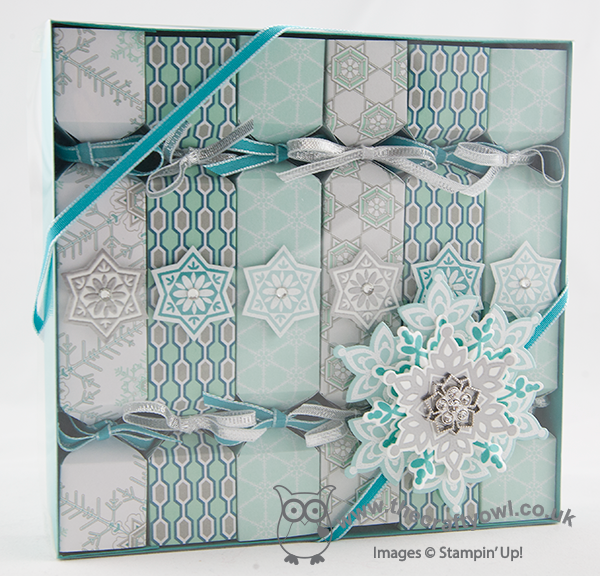
This box set would make a lovely gift for someone - if you would like to make a box for your crackers, the dimensions you will need are as follows:

Box Base: Sheet of cardstock (I used Bermuda Bay) 8 1/4" x 8 1/2". Score at 1 1/8" and 7 1/8" across the short side, then rotate through 90 degrees and score at 1 1/8" and 7 3/8" on the long side.

Box lid: Acetate window sheet size 8 1/4" x 8 1/2". Create a shim for your score board using an offcut of window sheet, then with your shim in place, score the lid to the same dimensions as the base above (1 1/8" and 7 1/8" across the short side, 1 1/8" and 7 3/8" on the long side). This will ensure your box lid fits snugly.

I then decorated my box with some embossed die cut snowflakes using the Festive Flurry Stamp Set and Framelits, Bermuda Bay ribbon and a Frosted Finishes embellishment.

So without further ado, grab your paper stack and watch my video tutorial and start making your Christmas crackers today!


Stampin' Up Supplies Used:


Merry Mini Card and Custom Envelope using the NEW Envelope Punch Board

by Joanne James4. November 2013 21:26

Today's post features one of the cards that I'm making in my classes this week: it's a 3" x 4" notelet card, with co-ordinating DSP bespoke envelope made with the new Envelope Punch Board. This really is a great piece of kit and can be used for so much besides envelopes, but before we get ahead of ourselves I thought I would shoot a short video to show you just how easy it is to make a simple envelope to fit a card that isn't a 'standard' size.

So here is the card I made:

The card itself is very simple, with some festive washi tape and a small punched square, that has been embossed with the Stylish stripes TIEF and had a little Christmas tree punched out using one of the Merry Minis punch trio. Then a tiny button and twine bow to finish and a simple sentiment and done. The great thing is that with the new envelope punch board a co-ordinating envelope really can be created in minutes - just watch the video below to see how easy it is:


Isn't that great? The ladies at my class today couldn't believe just how easy it was to create a perfect envelope. It was a good job this was our last card of the class, otherwise I think they would have spent the whole afternoon making envelopes and not cards! The envelope board can be used for so much more though; watch out for more videos showing you how to get the most out of this great new tool.

I'm also linking today's card up with the colour challenge over at Create with Connie and Mary, where this week's challenge is to make a card using my featured colours: 

If you would like to be inspired, pop over to their blog and see how other designers have used this colour combination in a variety of different ways. Back tomorrow with another project; until then, happy stampin'!


Stampin' Up! Supplies Used:


Mosaic Bauble Thinlit Card and Punch Tip Video

by Joanne James26. October 2013 22:16

We have had a lovely day today; we've stayed indoors out of the howling winds and had some family over for Sunday lunch. It's been lovely to spend time with my brother- and sister-in-law, nephew and niece, as we don't do it nearly often enough with the busy lives we all lead.

As promised, I have another Thinlit card for you today, this time with a Mosaic Madness bauble design - take a look:

I created a simple 'layered' bauble using a circle punch and the mosaic punch, then layering by raising the outer circle on dimensionals and creating a ribbon hanger. Here's a close-up of my bauble:

For a greeting on this card, I used a pair of sentiments from the 'Petite Pairs' stamp set, stamping one half on a layered label on the front of the card and the other half on the reverse of the flipped circle:

Lastly, are you wondering what punches I used for my raised sentiment label on the front of my card? Here's a closer look:

No, it's not a new label punch or two, I actually used my Mosaic Punch to create them! I'm all for making your tools work harder for you and this punch is great for creating labels as well as straight forward mosaic shapes. I shot a short video to show you how to make these labels; I actually made it a while ago, but didn't make a card to go with it, so haven't shared it until now. This also explains why the stamped pieces I used in the video are not the actual ones you see on today's card. If you're feeling confused, just watch the video - it will all make sense! Here's the link:

Just to recap on the measurements in the video: I recommend the narrow label is a maximum of 1.5cm in width, and the wider label 3.0cm in width. Either label can be of any length. I hope you found the video tutorial useful.

Lastly, don't forget, you have only until 11pm tomorrow night to order any of the 25 stamp sets that are 25% off - for details on the stamps on offer, click here.

Back tomorrow with another project; until then, happy stampin'!


Stampin' Up! Supplies Used:

The Big Shot Magnetic Platform is Now Available to Order!

by Joanne James13. September 2013 20:30

No post yesterday, but two today to make up for it! Here's the first one. Great news - the Big Shot Magnetic Platform is back and now available to order again!

This is one of the 'unsung heroes' of this year's annual catalogue, although clearly I am not the only one to think so - some 13 weeks worth of stock sold out in about 3 weeks! I'm happy to report that supplies have now been restored, so if you've been eagerly awaiting yours, now's the time to order!

The magnetic platform makes light work of cutting cardstock with framelits; no longer do you need to rely on post-it notes and hope that they hold everything in place. If you would like to see the magnetic platform in action, here's a great video from Stampin' Up that shows you how it works:

If you would like to order a magnetic platform, either contact me or pop over to my online store now to purchase.

Back shortly with another post; until then, happy stampin'!

Tags: , , , , , ,

Catalogues | Shop Online | Video Tutorials

Mini Catalogue

BROWSE THE CATALOGUE

The mini catalogue is now live! Read and download your copy here.

Shop Online

Access my online shop 24 x 7, 365 days of the year:

Current April hostess code:

VDKNV7BH

Shop Online

Join My Team

It's always a great time to join Stampin’ Up! New team members can get £130 worth of products for only £99 + free business supplies + free shipping + all the fun being a part of Stampin’ Up! Stampin' Up! has something for everyone: join my growing team and benefit from my support to enjoy Stampin' Up! however you choose.

If you're interested, call me for a chat to understand how I can help you realise your goals. Alternatively, if you have already decided to sign up and you just can't wait, please click here for the link to the online form where you can sign up and order your starter kit right away! 

Latest Kit!

Stampin Cut and Emboss

The Rock Legend Kit has all you need to make 8 cards with coordinating envelopes. Along with the new Panda Friends Kit, both are available from January 4th for just £14 each - get yours here!

2023-24 Annual Catalogue

BROWSE THE CATALOGUE

Click on the catalogue for a full list of current SU! supplies - if you would like to order any of the items featured, please drop me a line at [email protected] or give me a call on 07773 421446 - I'd be happy to help.

New Online Exclusives

There are new products available exclusively in the online store from 5 March - check them out here.

About Me

Hi I'm Joanne and live in Northampton and when I'm not looking after my husband and two beautiful children, am an avid crafter with a passion for all things Stampin' Up!

I must confess that I have never been a big rubber stamper - until I discovered Stampin' Up! that is. I love the fact that I can get such great results with co-ordinating stamps, inks, papers and punches - the possibilities are endless! Join me on my stamping journey as I share the things I love and be inspired to create amazing things yourself!

Follow Me

Monthly Newsletter

Box Builder

Click the button above to use Box Buster to create your custom box design using the Envelope Punch Board!

Kits Collection Now Available!

Stampin Cut and Emboss

The new Kits Collection from Stampin' Up! is now available!

Click here to see the current kits available and order yours online today.

I Design For


Stampin' Up Stuff

This is my personal blog and is not endorsed by Stampin’ Up! I hope you find it a plentiful source of ideas and personal inspiration but please don't copy my designs for contest submission or use for classes, publication or sale without express permission.