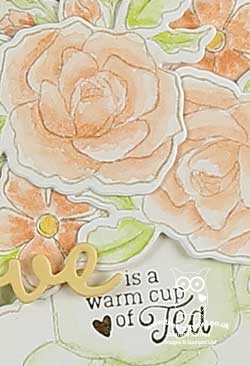
Tea Together Mother's Day Card for PP426

by Joanne James27. January 2019 09:00

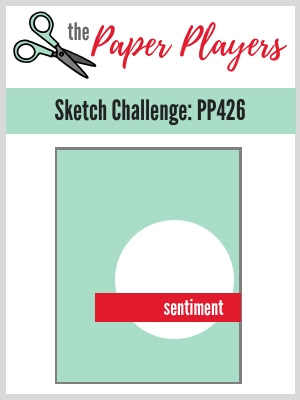
Today it's Sunday and time for this week's new challenge over at The Paper Players! It's the turn of the talented Jaydee to host this week and she has my favourite, a sketch challenge, for you to work with:
       

Today's card is something of a departure from my usual 'clean' style and is choc-full of detail, so I hope you like it! I've gone pastel with this week's Global Design Project colours and whilst not for Valentine's my card is definitely all about love so is perfect for the Stamp Ink Paper challenge too - take a look:
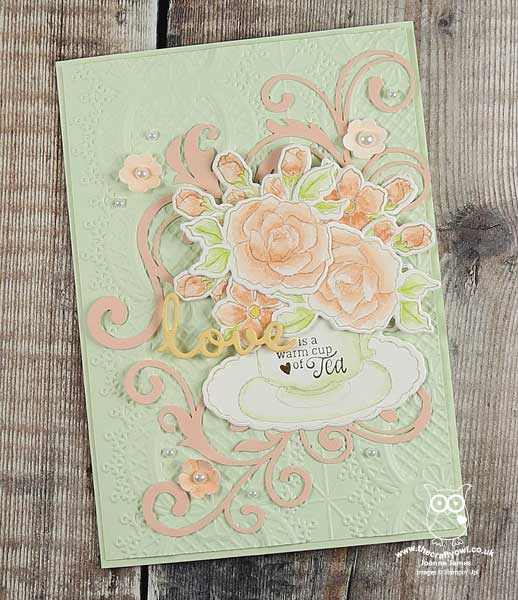
 

Here's the low-down on today's card:

Time For Tea - The moment I laid eyes on the 'Tea Together' stamp set in the Spring-Summer catalogue, I knew it would have to find it's way into my shopping basket: as a self-confessed 'teapot' who often drinks between 6 and 8 cups of tea a day, it was bound to appeal, but the clincher was that it was paired with some wonderful Mother's Day sentiments too and the only person I know who drinks more tea each day than me is my Mum, so it seemed a perfect choice. Add to this the fact that the co-ordinating Tea Together Framelits Dies that cut out each of the elements, including the flowers, are available free during Sale-A-Bration with a £90 purchase and that was it - decision made! I decided to continue with my watercolouring phase and for today's teacup and flowers, as it suited the subtle, pastel colours and coloured, cut and layered until I was happy with the result.

Flourishes and Lace - I added additional detail to my background with a combination of an embossed panel - check out that fabulous lace effect detail - and some Petal Pink flourishes, carefully snipped from the new Beautifully Detailed Laser-Cut Paper, which is helpfully already coloured Petal Pink on one side (and white on the other side). Along with a few punched flowers and pearls, I'm really going for the vintage look and feel today. 

A Mother's Love - I've been liberal with my interpretation of Jaydee's sketch, but you can still see the basic circular shape represented by my tea cup full of flowers and my horizontal overlaid sentiment, accentuated by stamping only part of the sentiment on the teacup and substituting the masked word 'love' with a stacked diecut, courtesy of the Well Written Framelits. Whilst I would definitely agree with the sentiment on the front of this card, the sentiment from the 'Tea Together' set really is one of the most wonderful we have had in a stamp set for a long time:
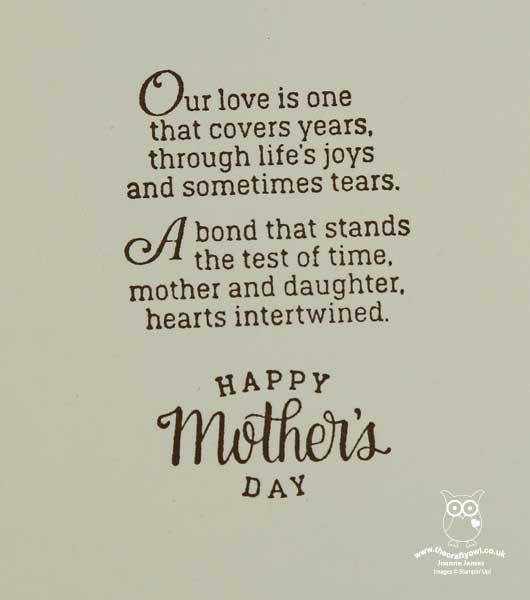
 

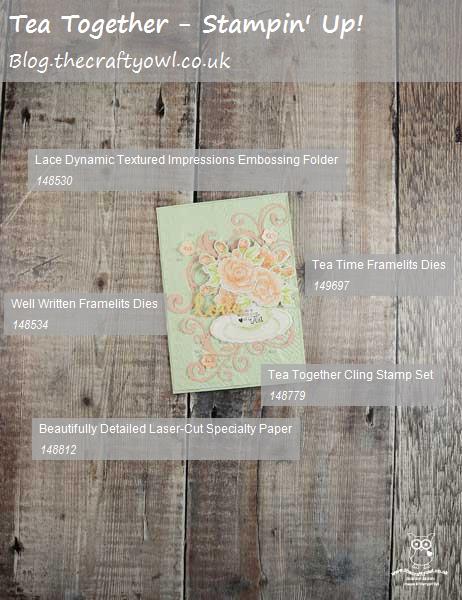
The perfect finishing touch for my Mother's Day card. Here is the visual summary of the key products used on today's project for you to pin for easy reference:
 

You can see all of my Product and 'How To' summaries on my 'How To - Tips and Techniques' Pinterest board in case you've missed any. 

Before you reach for your ink and papers, check out what our amazing team has created to inspire you this week:

Here's a quick recap of our challenge rules:
 
1.  Create a new paper project
2.  Upload your creation to your blog with a link back to us and provide a direct link to the post featuring your challenge submission.
3.  Please link your card to no more than four challenges, TOTAL.
4.  Have FUN!

You can see all of my 'How To' summaries on my 'How To - Tips and Techniques' Pinterest board in case you've missed any. 

Enjoy your day; we are finishing up on our homework today along with the dreaded tax returns (each year I tell myself I will make time to process them well in advance of the deadline, yet it never happens!) Hopefully I will finish in time to sneak into my craft room for a quick make or two. Either way, I'll be back tomorrow with another project. Until then, happy stampin'!


Stampin' Up! Supplies Used: 

Table built using Product Table Builder by The Crafty Owl - Independent Stampin' Up! Demonstrator.

Fairies and Cherries For The Paper Players PP406

by Joanne James19. August 2018 09:00

Another week of school summer vacation in the James household this week! Today it's Sunday and time for this week's new challenge over at The Paper Players. It's the first challenge for our returning Paper Players designer, the lovely Anne-Marie Hile, this week so be sure to pop by her blog with a friendly 'hello'. It's the turn of the super-talented Sandy to host this week and she has a clean and simple challenge for us to work with:


Remember in addition to the theme of "fruits and vegetables", this week is a Clean-and-Simple (CAS) challenge!  What do we mean by CAS?

  • Minimal layers and embellishments
  • Plenty of open space, aka "white" space
  • Simple and uncluttered

Having trawled through my collection of current stamps, it turns out I have very few with fruit (or veg!) for that matter, so a little creative stamping was called for. I actually found some fruit 'hidden' in the Fairy Celebration stamp set - take a look:


Here's the low-down on today's card:

This little fairy happens to be hanging from a cherry tree, so a little watercolouring using my new watercolour pencils and an aquapainter (I am so happy that we have more of these now, the new colours in the second pack available exclusively this month extend the variety of colours and allow much greater flexibility - don't leave it too late to get yours!) was all I needed to create a focal point for my card. I added some clear Wink of Stella to the fairy wings and some fine tip glue to the cherries to give them a glossy finish - both of which are difficult to see from the photos, but add subtle detail in real life.

I decided to use the sketch over at CAS(E) This Sketch this week for my layout, and used a couple of pieces cut with my Stitched Labels Framelits then trimmed to add interest behind my main image. I have seen these Stitched Labels Framelits used on some fabulous cards elsewhere on the internet and hold my Paper Player team mate LeAnne responsible for me 'needing' to add them to my own collection (check out her blog for some great examples of how to use them!) so thought I would try something a little different with them. The two blocks of colour mirror the colouring on my cherries and leaves and add detail, without encroaching too much into my white space and maintaining my overall clean and simple feel.

And that's all there is to it: clean and simple - done!

Here is the visual summary of the key products used on today's project for you to pin for easy reference:


You can see all of my Product and 'How To' summaries on my 'How To - Tips and Techniques' Pinterest board in case you've missed any. 

Before you reach for your ink and papers, check out what our amazing team has created to inspire you this week:

Here's a quick recap of our challenge rules:
 
1.  Create a new paper project
2.  Upload your creation to your blog with a link back to us and provide a direct link to the post featuring your challenge submission.
3.  Please link your card to no more than four challenges, TOTAL.
4.  Have FUN!

You can see all of my 'How To' summaries on my 'How To - Tips and Techniques' Pinterest board in case you've missed any. 

Enjoy your day and I'll be back tomorrow with another project: a Christmas card featuring some sneak peeks of some great new products from the forthcoming seasonal catalogue. Do come back then, you won't want to miss it. Until then, happy stampin'!


Stampin' Up! Supplies Used: 

Table built using Product Table Builder by The Crafty Owl - Independent Stampin' Up! Demonstrator.

Springtime Hello Friend

by Joanne James7. June 2014 20:55

Today I'm sharing the original card I designed for this week's challenge over at The Card Concept, which I also adapted for my Springtime Hello card class this week. Here is this week's challenge colour palette:

This card is quite different to my previous entry (you can see that card here); much more 'Classy and Elegant' this time around I think - here's my card:

I used Daffodil Delight for my card base and layered up from there. I dry embossed a piece of Basic Black cardstock with the Honeycomb embossing folder, then layered my main stamped panel onto this. I repeat-stamped the daisy stamp from the 'Springtime Hello' onto a piece of Watercolour Wonder DSP so that the panel would have a lovely washed background, and also stamped the text stamp from the retired 'French Foliage' set in Smoky Slate behind this, having stamped off twice first to give a very faint image. You could substitute this stamp with one from the 'Background Borders' set, which is currently reduced and still available on the retired list. I then stamped the bee and using my aquapainter, I washed white kraft ink over the bee's wings and the daisy flower petals to give a subtle hint of natural colour, whilst allowing the yellow of the DSP to show through. I finished with a piece of Basic Black 3/4" Chevron ribbon and heat embossed my sentiment fro the Six Sided Sampler set in black embossing powder onto a punched hexagon and popped it onto a dimensional.

I hope you like today's card; back tomorrow with another project. Until then, happy stampin'!


Stampin' Up! Supplies Used:

Table built using Product Table Builder by The Crafty Owl - Independent Stampin' Up! Demonstrator.


Watercolour Springtime Hello

by Joanne James2. June 2014 22:28

Good evening! A really quick post from me today, as I've been out and about all day today: my regular monthly card class with a super bunch of ladies, piano lessons after school and some admin this evening and now I'm ready for my bed! I just wanted to quickly share one of the cards we made in our class today, featuring the Springtime Hello stamp set:

We watercoloured a background using our aquapainters and blended Soft Sky, Pool Party and Pear Pizzazz inks, then overstamped this with one of the flowers in the set and added Melon Mambo and more Pear Pizzazz to the stamped image. We also added the 'Hello' sentiment from the 'A Dozen Thoughts' stamp set. This panel was then mounted onto two mats of co-ordinating cardstock and adhered to a Naturals Ivory card base. The card was then finished with a knot-tied piece of Pool party seam binding ribbon.

A simple card with a lovely pop of colour with the pink flower.

Right my bed is calling, but I will be back tomorrow with another project; until then, happy stampin'!


Stampin' Up! Supplies Used:

Table built using Product Table Builder by The Crafty Owl - Independent Stampin' Up! Demonstrator.


Tags: , , , , , , ,

Cards | Classes | Stamping

Video Tutorial: Make Any Size Envelope Using Your Envelope Punch Board and Envelope Expert from The Crafty Owl

by Joanne James28. April 2014 21:16

Good evening blog readers! Today I'm just in time with a card for this week's Colour Q challenge - here is the colour palette:

Last week I was chosen as one of the ColourQ Courtiers - you can see my winning card here. I saw this week's colour palette and photo inspiration and decided to make a card using a technique that I'm teaching in my card classes this week - painting on a white watercoloured background within a heat-embossed outline (not sure if there's a more succinct title for this technique, but that's how you do it!). Here is my card:

I went for a simple and bright layered background of Daffodil Delight on a Pear Pizzazz base, as I wanted the detail on my tag to take centre stage. I stamped my flower image in white kraft ink onto a piece of Crumb Cake cut with the Scallop Tag Topper Punch, then heat embossed with white embossing powder. Then, using my aquapainter, I painted the whole of the image white using the white craft ink, then when dry used my aquapainter again to over-paint with Daffodil Delight and Elegant Eggplant on the flowers, and Pear Pizzazz for the stems. I backed this tag with a second one cut out of Elegant Eggplant for another splash of colour and finished with a double ribbon bow topper and stamped a simple birthday sentiment.

The stamp that I used on my tag is from the 'Happy Watercolour' set and does require quite a long tag to fit it onto, which doesn't lend itself to a standard A6 card size. So I made a bespoke card, 200mm x 105mm, for which I then needed a bespoke envelope. And so to the exciting news that I hinted at the end of yesterday's post - I have another cool tool for you!

Following on from the huge success of Box Buster from The Crafty Owl, which enables you to make any size box using your Envelope Punch Board, I had so many requests for a similar tool to create an envelope of any size, I thought I had better get on with it - and Envelope Expert from The Crafty owl is the result! In truth I don't make that many unusually sized cards, and therefore envelopes, I didn't appreciate there was such a need to go beyond the 66 standard envelope sizes that come with the board - but having 'busted' boxes, Envelope Expert was pretty straightforward. So for everyone who asked, here it is! you can find this free to use tool at www.thecraftyowl.co.uk/envelopeexpert or simply go to www.thecraftyowl.co.uk and on the menu choose 'Tools' and 'Envelope Expert'. To see Envelope Expert in action, why not watch the short video below:


Now you can make any size card and matching envelope you like, just as easily as you can make an any size box - can you tell how much I love my Envelope Punch Board?!

Back tomorrow with another card; until then, happy stampin' - and envelope-making :-)


Stampin' Up! Supplies Used:

Table built using Product Table Builder by The Crafty Owl - Independent Stampin' Up! Demonstrator.


Yellow Happy Watercolour Poppy

by Joanne James13. April 2014 22:33

Today I'm sharing a card I made using the poppy in the Happy Watercolour set. I used the sketch over at Freshly Made Sketches for my simple layout and was inspired by the colours over at Create with Connie and Mary this week:

I decided to go with quite a simple design - here's my card:

I used a Daffodil Delight card base and stamped my poppy stem only in Versamark and stamped it onto my base card and heat embossed in gold, then did the same again with the flowerhead on a separate piece of cardstock, coloured it with Daffodil Delight and my aquapainter and cut it out, then popped it onto my card on a dimensional. I know poppies are traditionally red, but they come in all kinds of different colours, including yellow - which also give the card a bright feel.

Here's a close up of the flowerhead:

For my horizontal cross-section panel beneath the poppy, I used a piece of Watercolour Wonder DSP that features all of the challenge colours above. This is the only place where the green and orange features on my card, yet the colour works really well in breaking up what would otherwise be a rather monochromatic card. I added a few gold sequins to finish, and done.

If you'd like more ideas on how to use these colours, check out the design team inspiration - lots of great work on show, as always.

I'm off to take my juniors tenpin bowling with some friends today and then go and purchase some paint tester pots for Ben's bedroom redecoration - I love the Easter holidays!

Back tomorrow with another project; until then, happy stampin'!


Stampin' Up! Supplies Used:

Table built using Product Table Builder by The Crafty Owl - Independent Stampin' Up! Demonstrator.


Happy Mother's Day FMS#125

by Joanne James2. March 2014 23:23

Today it's the first Monday of the month, which means one thing - card class! I'm looking forward to a fun afternoon with the ladies in the first of my classes this week, but before I go I have the first of today's blog posts for you - my card for this week's challenge over at Freshly Made Sketches. This week Narelle has designed the following sketch layout:

Since Mothering Sunday falls at the end of March here in the UK (earlier than my readers from across the pond) I decided it's time to start card making with Mothers in mind, so here's what I did with today's sketch:

Using watercolour paper, I heat embossed my Happy Mother's Day sentiment in white and then using my Aquapainter and some Crisp Cantaloupe ink, I created a watercolour background. When the paper was dry, I stamped the hearts from the same set in Strawberry Slush ink over the top, stamping off some of them to create a variation in colour intensity. I stuck with the circle shape to highlight 'You're 1 in a Million' and also heat embossed this in white directly onto Strawberry Slush cardstock matted onto Crisp Cantaloupe, to echo the matting on the main section of my card. It almost looks like a badge doesn't it?

Back later with a very exciting video tutorial for you - how to make a box of any size using your envelope punch board - you're not going to want to miss it!

Until then, happy stampin'!


Stampin' Up! Supplies Used:

Table built using Product Table Builder by The Crafty Owl - Independent Stampin' Up! Demonstrator.


Tags: , , , , , , , , ,

Cards | Stamping

Mini Catalogue

BROWSE THE CATALOGUE

The mini catalogue is now live! Read and download your copy here.

Shop Online

Access my online shop 24 x 7, 365 days of the year:

Current March hostess code:

S9F2XJJW

Shop Online

Join My Team

It's always a great time to join Stampin’ Up! New team members can get £130 worth of products for only £99 + free business supplies + free shipping + all the fun being a part of Stampin’ Up! Stampin' Up! has something for everyone: join my growing team and benefit from my support to enjoy Stampin' Up! however you choose.

If you're interested, call me for a chat to understand how I can help you realise your goals. Alternatively, if you have already decided to sign up and you just can't wait, please click here for the link to the online form where you can sign up and order your starter kit right away! 

Latest Kit!

Stampin Cut and Emboss

The Rock Legend Kit has all you need to make 8 cards with coordinating envelopes. Along with the new Panda Friends Kit, both are available from January 4th for just £14 each - get yours here!

2023-24 Annual Catalogue

BROWSE THE CATALOGUE

Click on the catalogue for a full list of current SU! supplies - if you would like to order any of the items featured, please drop me a line at [email protected] or give me a call on 07773 421446 - I'd be happy to help.

New Online Exclusives

There will be new products available exclusively in the online store from 5 March - check them out here.

About Me

Hi I'm Joanne and live in Northampton and when I'm not looking after my husband and two beautiful children, am an avid crafter with a passion for all things Stampin' Up!

I must confess that I have never been a big rubber stamper - until I discovered Stampin' Up! that is. I love the fact that I can get such great results with co-ordinating stamps, inks, papers and punches - the possibilities are endless! Join me on my stamping journey as I share the things I love and be inspired to create amazing things yourself!

Follow Me

Monthly Newsletter

Box Builder

Click the button above to use Box Buster to create your custom box design using the Envelope Punch Board!

Kits Collection Now Available!

Stampin Cut and Emboss

The new Kits Collection from Stampin' Up! is now available!

Click here to see the current kits available and order yours online today.

I Design For


Stampin' Up Stuff

This is my personal blog and is not endorsed by Stampin’ Up! I hope you find it a plentiful source of ideas and personal inspiration but please don't copy my designs for contest submission or use for classes, publication or sale without express permission.