Friendly Wishes Onstage Swap Cards

by Joanne James27. April 2016 19:00

Mid-week already! I spent a pleasant morning at my Coffee and Card Session at Bell's in Kingsthorpe, Northampton making birthday cards and the afternoon at my desk. Today I'm sharing the card that was my swap at the Stampin' Up! UK Onstage Local event that I attended with some of my team the weekend before last. The event itself was a blast! I thought it was about time I shared some photos with you, so here goes!

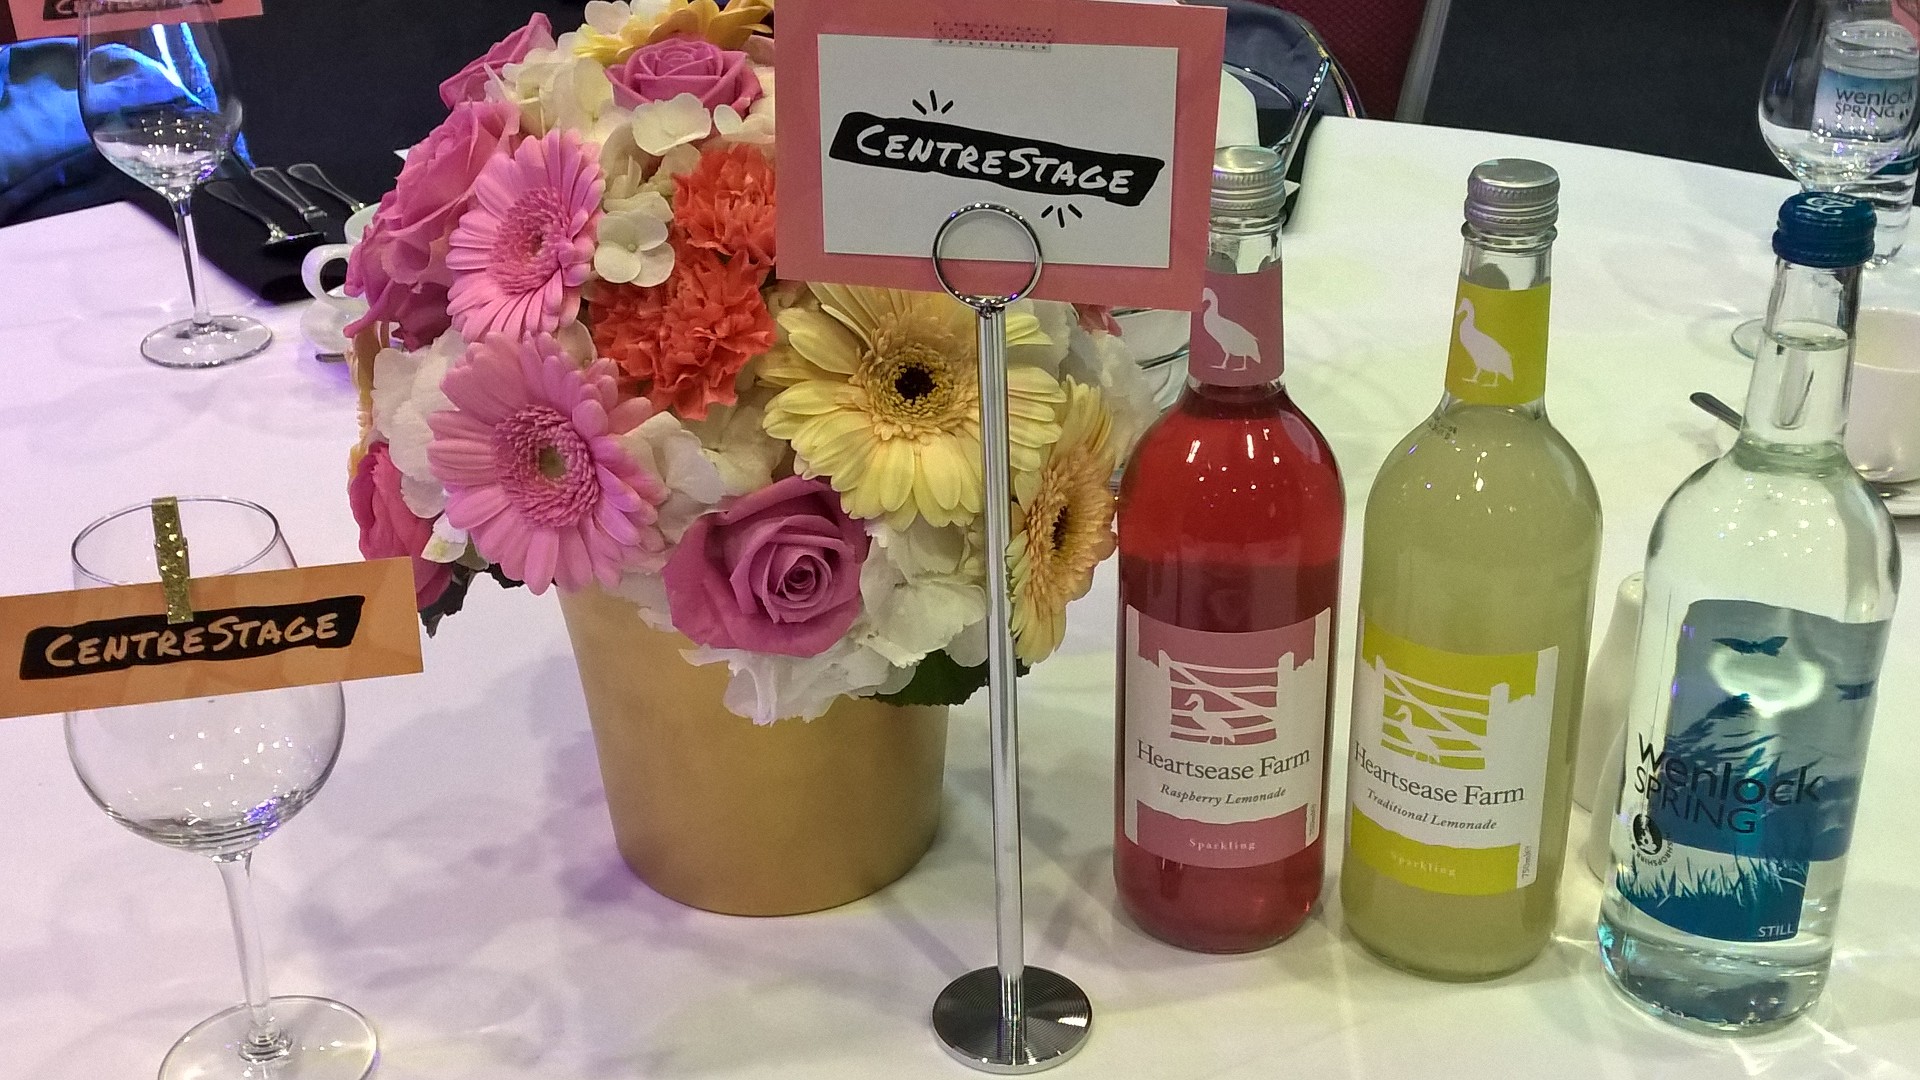
I was treated to a wonderful Centre Stage reception the evening before the main event with other Stampin' Up! leaders - here's a picture of the beautiful table settings:


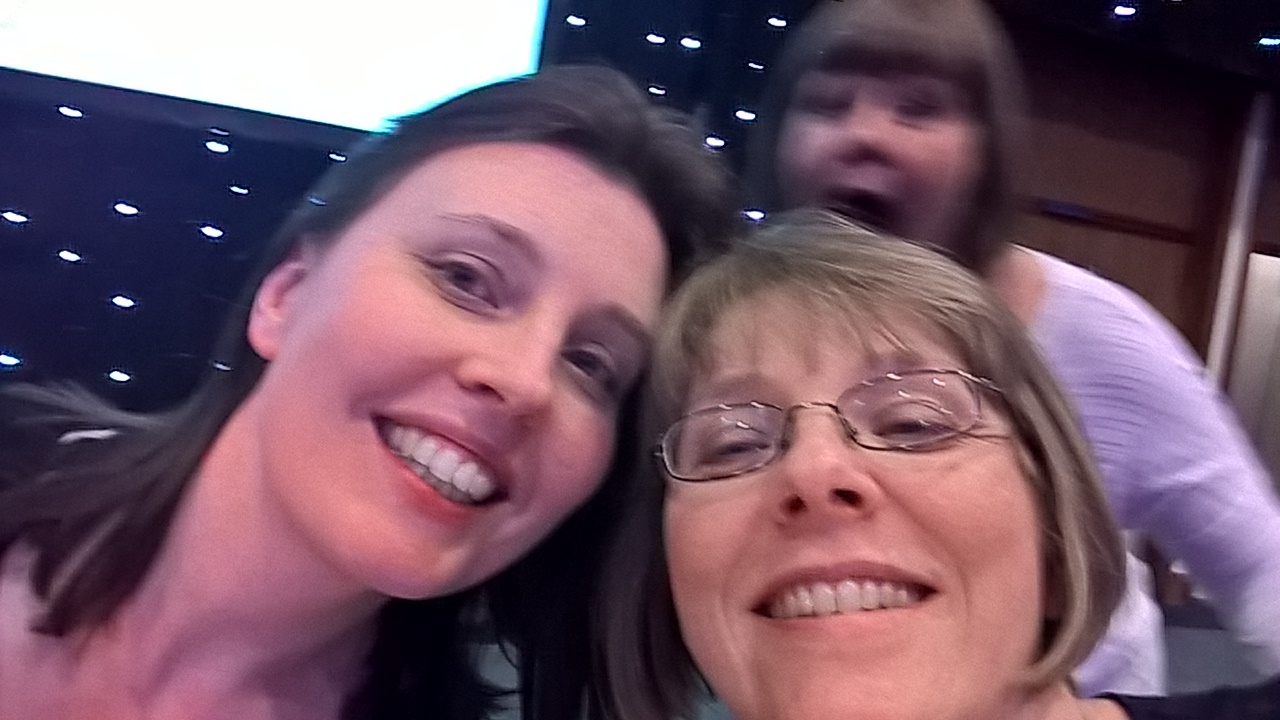
I managed a quick selfie with my good friend Louise Sims, only to be right royally photo-bombed by the equally charming if mischievous Natalie O'Shea:


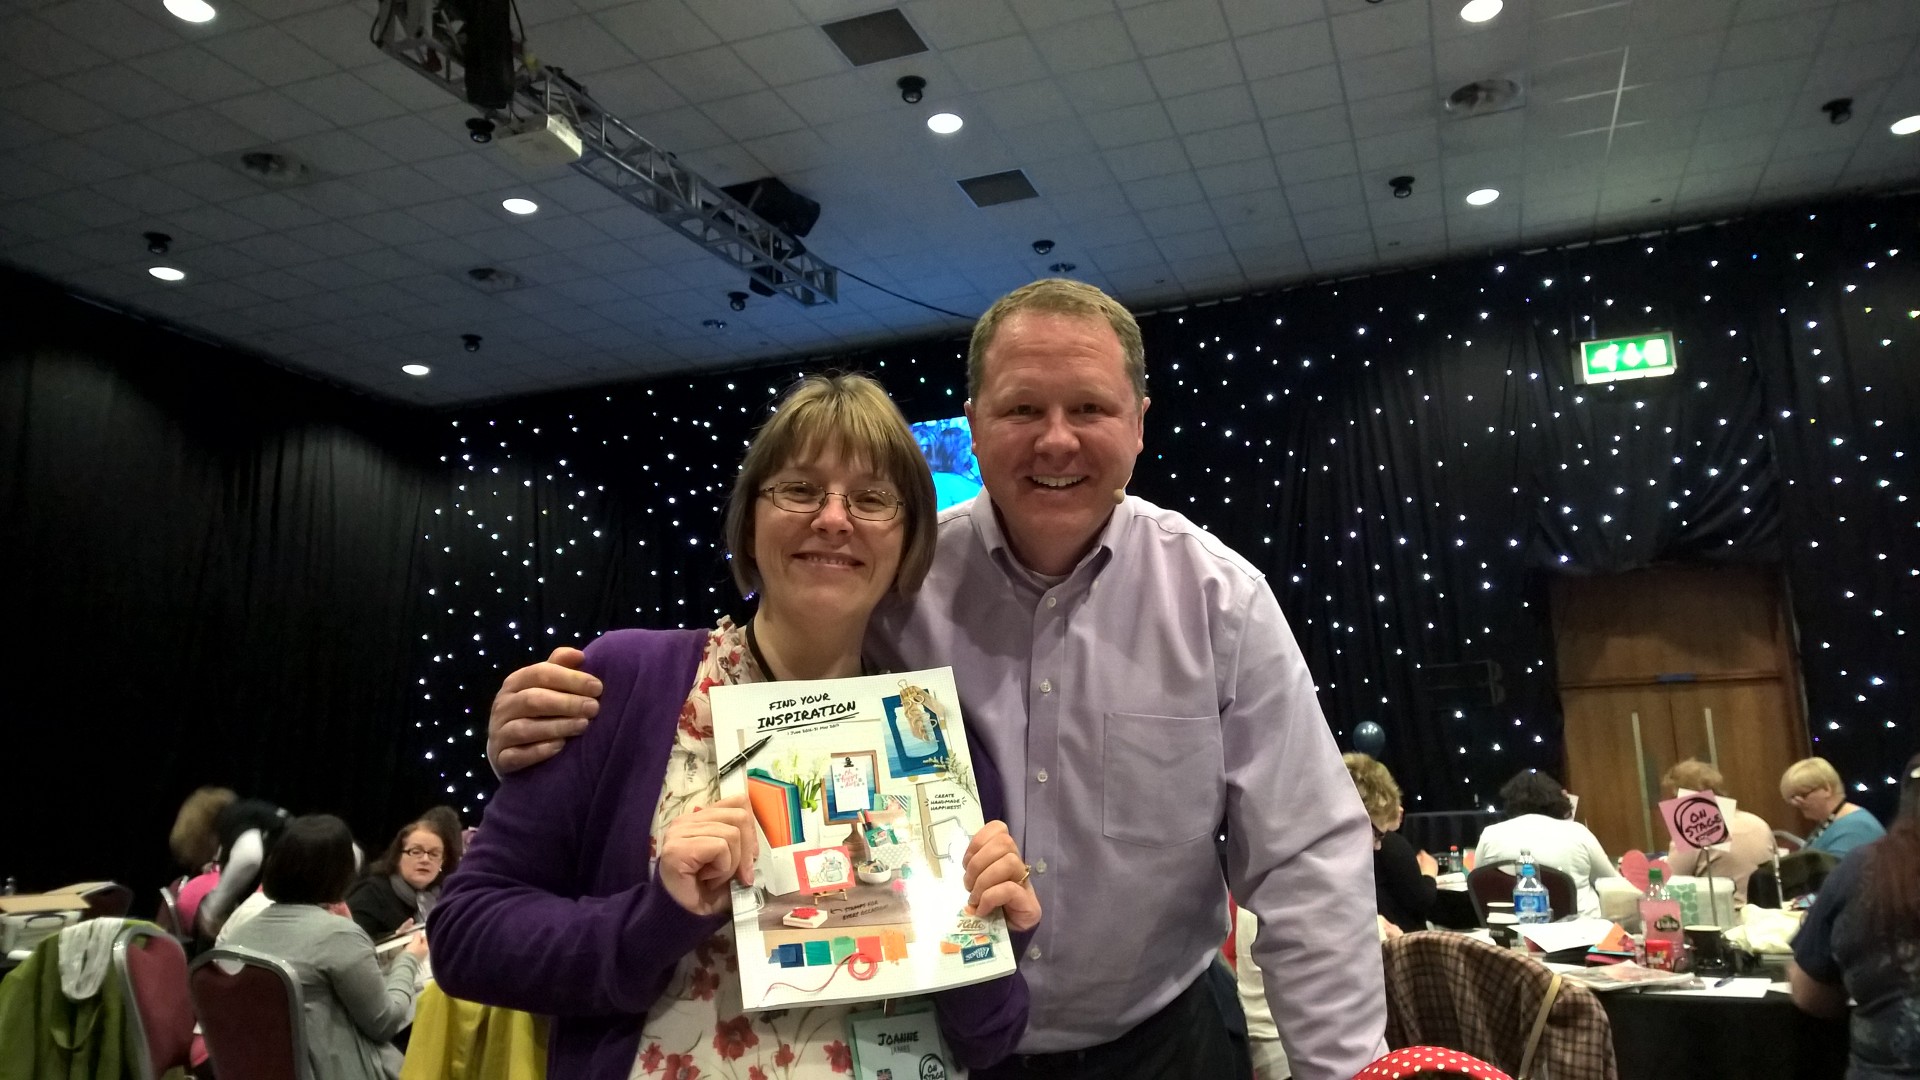
We got our hands on the new catalogue - here's me with mine courtesy of the lovely Dave Baugh, Stampin' Up!'s Vice President of Global Operations who came all the way from Utah to join us for the event:


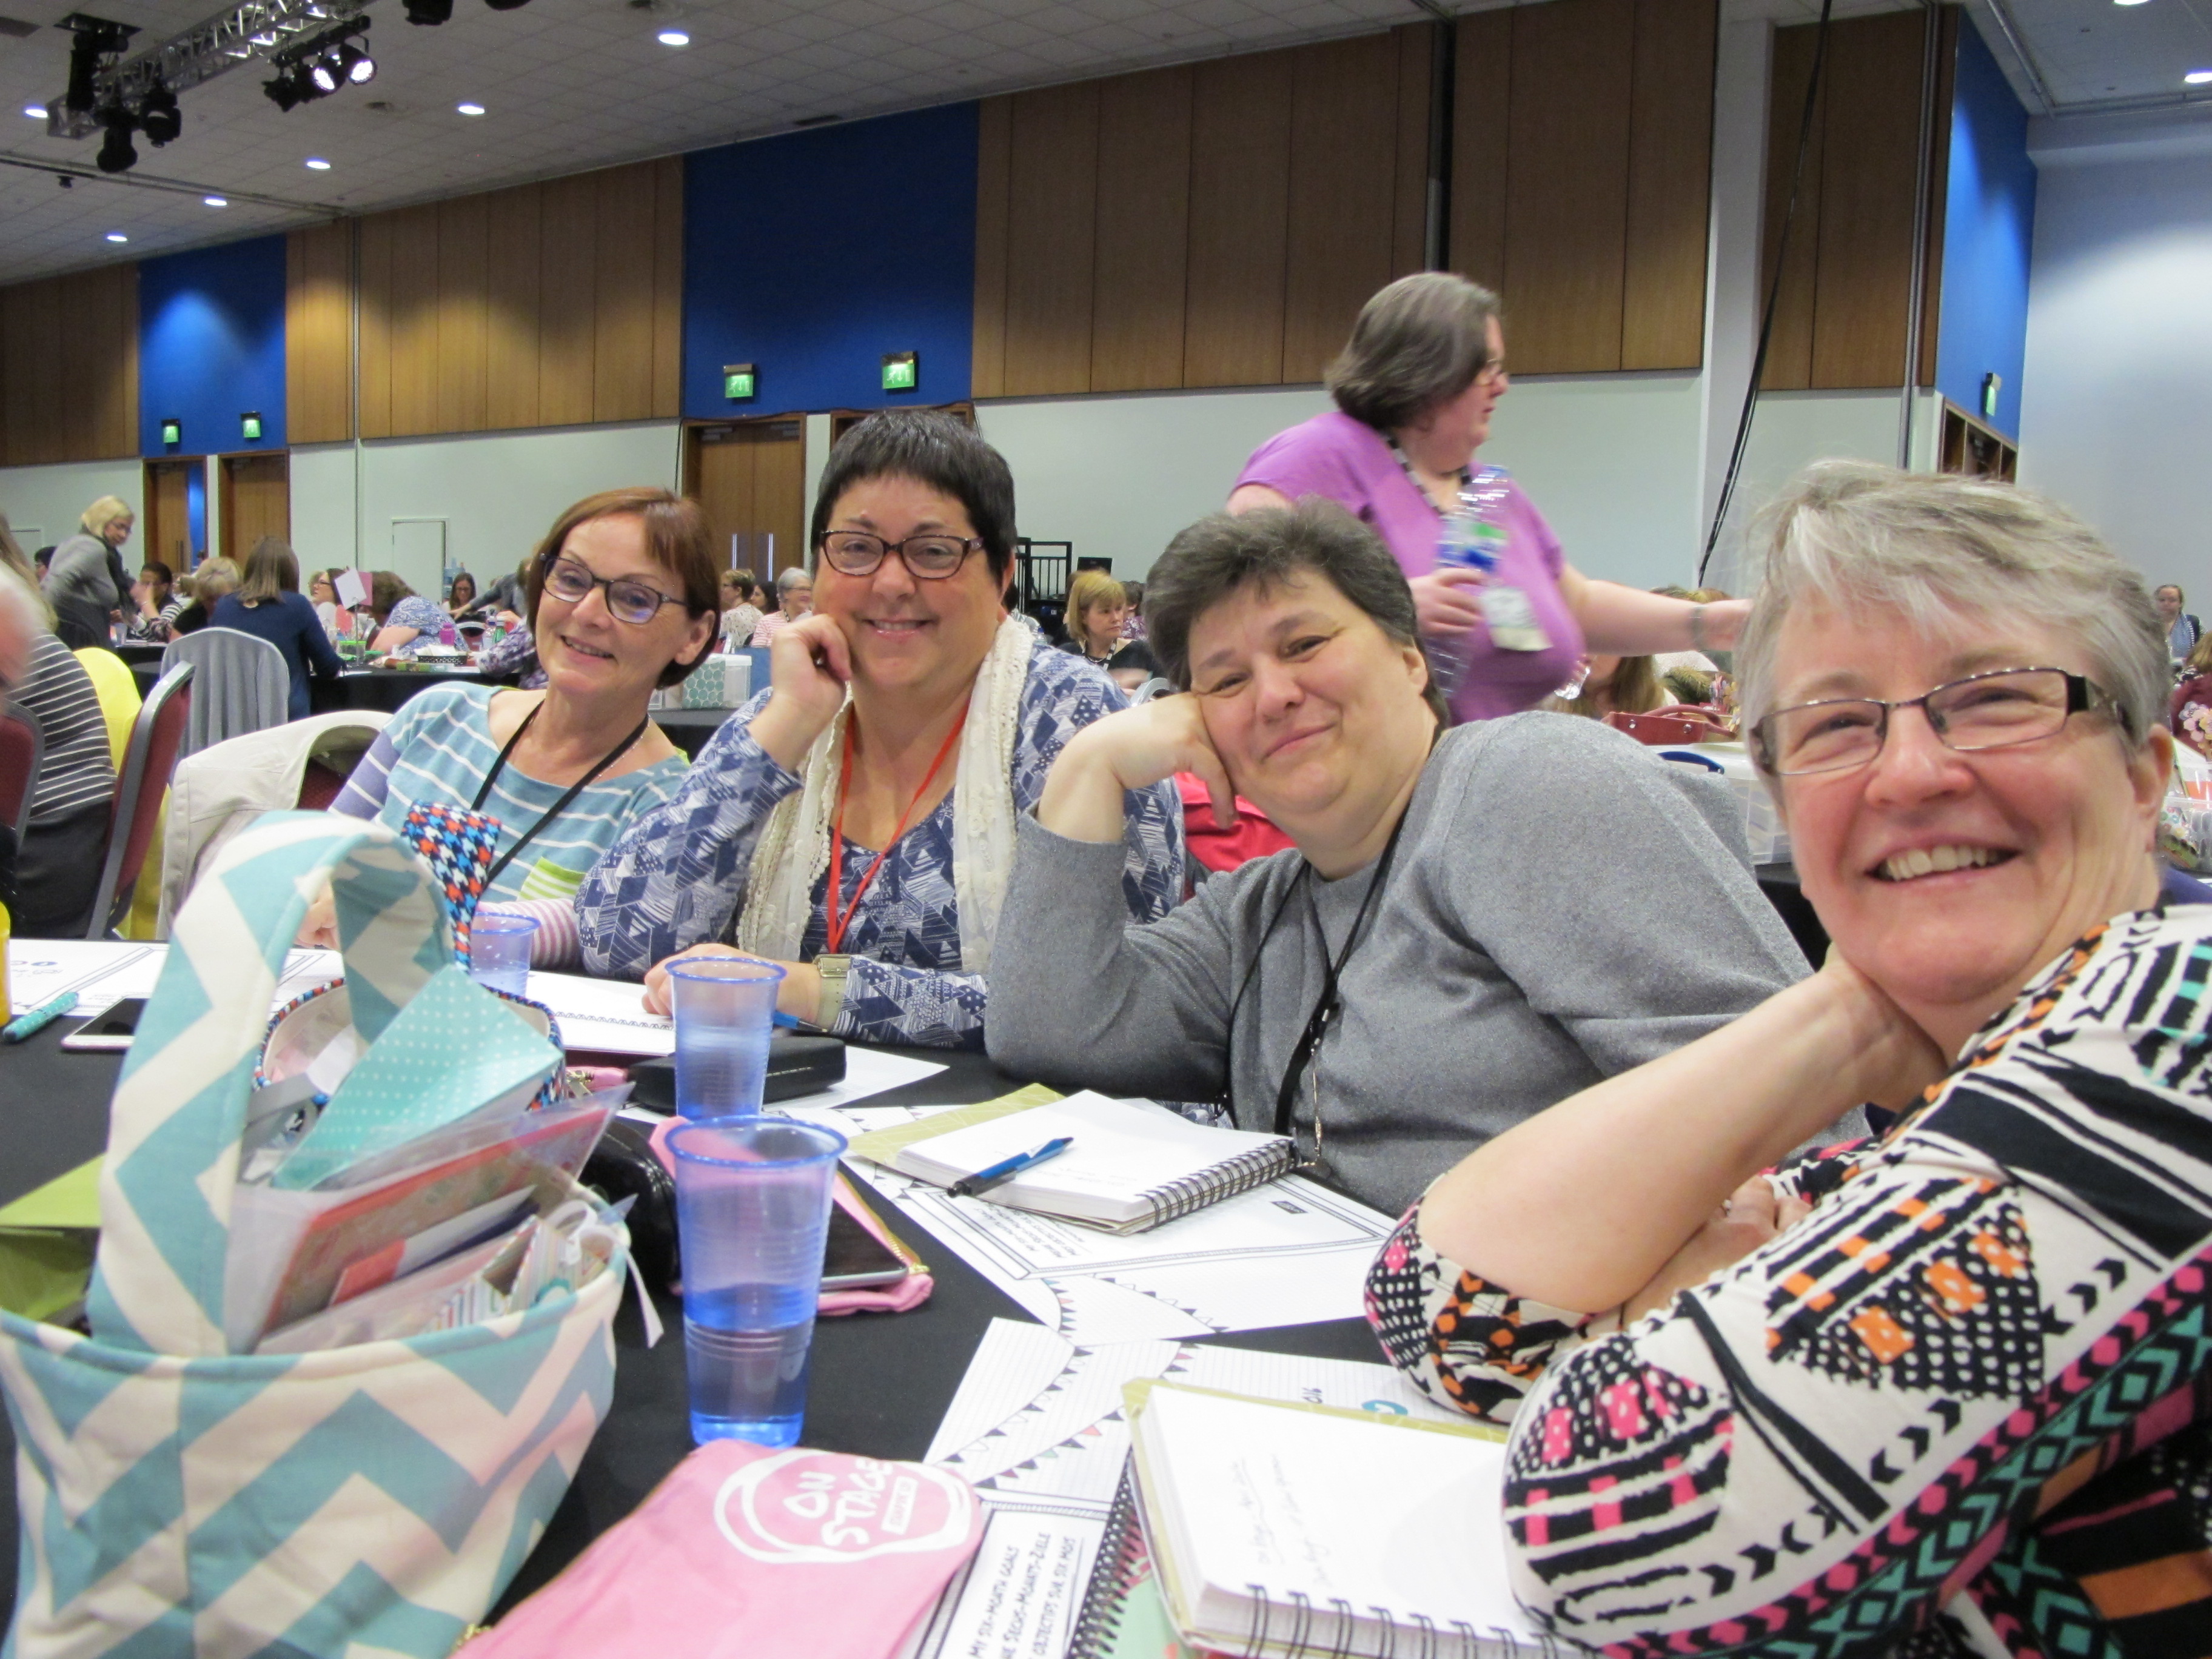
It really is a good one! Here's also a photo of some of my team enjoying the day of presentations and new product reveals:


I could share a ton of new product 'spoilers' too, but with more than a month to go still until the new catalogue is officially released, I think I'll save those for nearer the time!

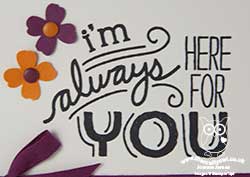
Anyway, onto today's creative make - my swap for this event, using some retiring accessories but featuring the 'Friendly Wishes' stamp set that I'm pleased to say will be carrying over to the new catalogue: 

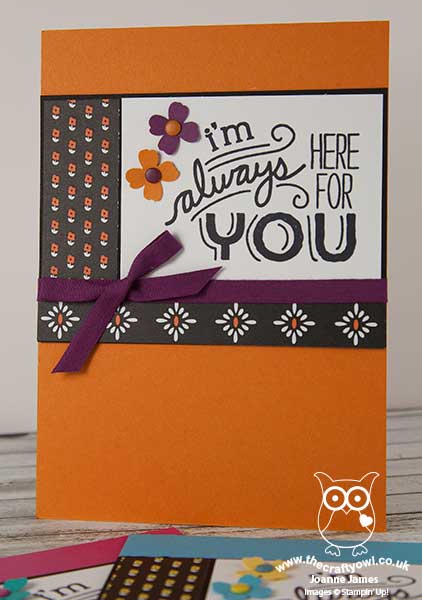
I made these in a range of colourways - the one I've featured here is in Pumpkin Pie and Rich Razzleberry - read on for the low-down on this card:

Brights - I love the Brights colour collection and as I wanted my swap to be bright and colourful this family was the natural choice. I actually chose my colour combinations based on ... the candy dots I had most of in my part-used packets! I use lots of these, but find myself using some colours way more than others. I used a card base of Pumpkin Pie, then used accents in this colour and the contrasting Rich Razzleberry to highlight my black and white stamping, including a cotton seam binding ribbon bow.

Black and White Everyday Chic - I stamped my sentiment from the 'Friendly Wishes' stamp set in Archival Black on Whisper White cardstock, to give a clean, crisp design that was easy to replicate - an important consideration when you are mass-producing a design. To compliment this, I used two different patterns of the black and white Everyday Chic Designer Series Paper to border my focal sentiment, elements of which I highlighted with my Stampin' Write marker. This is a great way to add interest and makes this designer series paper very versatile.

Itty Bitty Flowers - My final embellishment was a pair of Itty Bitty Accents Punch Pack punched flowers, each finished with a contrasting candy dot. I can't quite believe that this punch pack is retiring - I've used all three of these little punches on many, many projects but I think it's this itty bitty flower I will miss the most.

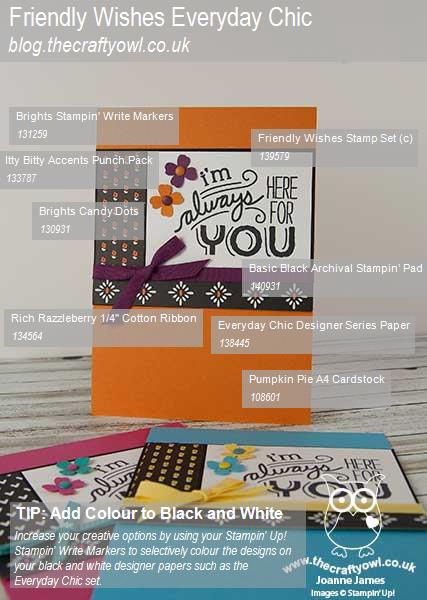
Here is the visual summary of the key products used on today's project for you to pin for easy reference:


You can see all of my 'How To' summaries on my 'How To - Tips and Techniques' Pinterest board in case you've missed any. 

I had some lovely swaps in return which the ladies in my classes have 'ooh'd and ahh'd' over this week. I'll be back tomorrow with my card for this week's new challenge over at Create With Connie and Mary; until then, happy stampin'!


Stampin' Up! Supplies Used: 

Table built using Product Table Builder by The Crafty Owl - Independent Stampin' Up! Demonstrator.

2015 Stampin' Up! Catalogue Sneak Peak - Endless Birthday Wishes

by Joanne James16. May 2015 18:00

Today I've been at a Stampin' Up! UK regional training event in Telford. These events are both exhilarating and exhausting at the same time! It's a great opportunity to get together with team members, other SU! demos and the Stampin' Up! UK and European Home Office teams, to see lots of new and exciting product and swap work with others as a means of creative inspiration. I love creating swaps for this type of event although they can be time-consuming and always seem to create something rather too elaborate for mass production, hence no post yesterday and a late one today. I made a card for this week's challenges over at The Paper Craft Crew and Colour Me! and then based my swap on this as it features a stamp that is new to us here in the UK so is an annual catalogue 'sneak peek', although if you are a USA reader this set will be familiar to you as it has been available as a photopolymer set for some time: Endless Birthday Wishes.


So here is my original challenge card:  

I stamped the sprinkles stamp on my base of Melon Mambo and used the challenge colours to create my own custom happy birthday DSP which I used for the right hand panel - thank heavens for photopolymer stamps, they made lining up a doddle! I then stamped the cake in Memento Black on Whisper White and coloured with my retired Blendabilities, before mounting on a starburst cut with the retiring Starburst framelits - still available and a bargain at only £11.48 for the set! I added a few sequins for sparkle and to tie in my gold button, and then added a strip with a few DSP banners and the second part of my sentiment (the stamp has these words side by side, so I stamped it in two separate goes, so that the words sat on top of each other and fitted my banner better). 

I liked this card so much I created a (only slightly!) simpler version as my swap for the Stampin' Up! regional event. Here it is in the same colours:

The background and DSP panel was the same, however to save on colouring I stamped the cake in a single colour and mounted on a combination of a 2" circle, 2 3/8" scallped circle and 2 1/2" circle instead and I left off the button and twine. I also created it in three other colour combinations, but totally forgot to take photos of the whole pile when finished! I do however have this 'work in progress' shot of the chaos on my office desk last week:

Well, organised chaos! Here are the other colour combinations: Tangerine Tango and Tempting Turquoise (top left), Calypso Coral and Bermuda Bay (bottom left) and Wisteria Wonder and Elegant Eggplant (bottom right).

Thanks to everyone who swapped with me - I have some lovely samples that I'm looking forward to sharing with my customers. Also, before I go here's another quick photo of some of my downline and team members who I was lucky enough to spend the day with:

Even the camera-shy Samantha doesn't look to cross to have been snapped in this one :-) Love you ladies!

I'm looking forward to sharing lots more of the new and fun things that we got to see and create with at our training in the coming weeks; only a couple more weeks until the new 2015 Stampin' Up! annual catalogue launches!

Back tomorrow with another project; until then, happy stampin'!


Stampin' Up! Supplies Used (challenge card):

Table built using Product Table Builder by The Crafty Owl - Independent Stampin' Up! Demonstrator.


Stampin' Up! Supplies Used (swap card):

Table built using Product Table Builder by The Crafty Owl - Independent Stampin' Up! Demonstrator.


Look Up To Father Acrylic Block Technique

by Joanne James12. April 2014 20:45

I've had a lovely day today finishing off my swaps in readiness for our quarterly team training tomorrow. Our swaps always have a theme and this quarter it's 'technique'; I've based my swaps on a card I made for the challenge over at Seize The Sketch this week, which has this great layout:

Here is my card - can you tell what technique I'm showcasing?

I know Father's Day is still a few months away, but I love the sentiment on this stamp and have been keen to use it for the first time. I decided that I would showcase the 'acrylic block & markers' technique on my card: this is where you colour an acrylic block with markers (I used a variety of greens and browns) and then spritz with water (I add a few drops of alcohol to mine so that it dries quicker) then stamp the block onto the paper.

I thought this technique would make a lovely background to the tree stamp and would add a little more interest than just colouring the image with markers directly. Here's a close-up of the stamped background:

Whilst all of my swap cards look the same, each has a slightly different central panel as each time you stamp using a block it comes out differently, making them all unique.

Sticking with the wood theme, I added a panel of Chocolate Chip embossed with the Woodgrain Textured Impressions Embossing Folder and stamped the layer of Crumb Cake beneath this with the Hardwood background stamp. To finish, I added a couple of chevrons as an accent - wooden of course, coloured with my Chocolate Chip Stampin' Write marker pen:


I also incorporated some Old Olive into the mat layers just to give the card a lift and so that it wouldn't appear too 'brown'.

I'm quite pleased with the overall end result - let's hope my team like their swaps tomorrow too!

Back tomorrow with another card; until then, happy stampin'!


Stampin' Up! Supplies Used:

Table built using Product Table Builder by The Crafty Owl - Independent Stampin' Up! Demonstrator.


Sale-A-Bration Sneak Peeks: Team Swap

by Joanne James19. January 2014 21:09

Once a quarter, my wider upline team get together for a team training day. We craft, we share business tips and ideas and we catch up with friends. It's a fun day devoted to our Stampin' Up! businesses and one of the many benefits of being a part of a wider Stampin' Up! team. One of the important parts of these events is the process of 'swapping'. Everyone prepares a card, scrapbook or 3D sample using current products in line with a chosen theme. Today our theme was the forthcoming Sale-A-Bration campaign; as promised, today I'm sharing the swap I prepared:

This card uses three of the products that you can earn free with a £45 purchase: The Petal Parade stamp set, the Decorative Dots Textured Impressions Embossing Folder, and one of the Sweet Sorbet Designer Series paper designs. I used a 1 1/4" circle punch and my circle framelits to cut out the flowers and mounted them on dimensionals for extra interest.

If you would like to make this card, you have only nine more days to go until Sale-A-Bration is live and these products will be available online or through the Sale-A-Bration mini catalogue - not much longer to wait now! I am already taking party bookings for the Sale-A-Bration period; if you would like to host a party during Sale-A-Bration, then contact me to book a slot. Sale-A-Bration is a great time to join Stampin' Up! too; if you would like to know more about the benefits of becoming a Stampin' Up! demonstrator, then check out the link on the right hand side of my blog page or get in touch for an informal chat; I would be happy to share with you the benefits that being a demonstrator can offer.

Back tomorrow with another project; until then, happy stampin'!


Stampin' Up! Supplies Used:

Table built using Stampin' Up! Product Table Builder from The Crafty Owl.


My Digital Studio Keyrings and Downloads

by Joanne James3. December 2013 12:30

Today I have a quick post with the last of my Convention-related makes to share with you. One of the things we have to do for Convention is make a bag tag featuring our names. Why? Well, we are each given a Convention rucksack full of goodies and everything we will need to get us through the event. The rucksacks are great, but there's only one problem - they're all the same! So it's really important that we have a name tag that enables us to identify our bags, and each other, in the crowd. I made bag tags for each of the team members travelling with me that featured our team logo - The Crafty Owl:

Cute, eh?! I made these by printing onto shrink plastic at 250% of finished size, then cut out the shapes, punched a hole for the keyring and shrunk them in the oven. I was so pleased with the result, I made a few more for some of my good friends and members of my wider Stampin' Up! team, this time using My Digital Studio (my logo was created using alternative software when UK demos didn't have access to MDS). I used the butterfly stamp that comes as part of the Creative Elements stamp set, and coloured the sections individually using the brush tool, using various shades of greens and turquoise - here are a couple of them:

What do you think? These bag tags are really eye-catching and certainly helped my team stand out from the crowd - my friends loved theirs too, especially Michelle whose team is a called the Butterfly Belles - how appropriate! I just thought I would share to show how versatile MDS can be - it's not just for cards!

The MDS shop links are included below if you don't already have it; Creative Elements is part of the standard software version so there is no product link for this, however as today is Digital Downloads Weekly Release Day I've also included the links to all of this week's new MDS downloads - some lovely festive sets here.

Right, off to attend my son's Christingle service at school; I'm hoping for a nice photo or two for my December photo journal (another MDS project that I'll be sharing with you another day!) Back tomorrow with another project - I'm thinking we might need to get back to Christmas, it is the 3rd December after all! Until then, happy stampin'!


Stampin' Up! Supplies Used:

Table built using Stampin' Up! Product Table Builder from The Crafty Owl.


Fabulous Friend Boxed Keyring and Pen

by Joanne James27. November 2013 21:02

Today I'm sharing a gift I made for some of my most supportive stamping friends who I met up with at Convention. One of the great things about being a Stampin' Up! demonstrator is the friendships you make along the way - I have friends that I would never have met if it wasn't for Stampin' Up! and they are some of the most supportive when it comes to sharing successes, failures and ideas. Here is one of the gifts I made:

I found these cute little keyring notebooks in a local stationery store and customised them with stamps, punches and ribbon. I added a keyring Sharpie pen to each one, then made a little box with my Envelope Punch Board and closed with a co-ordinating belly band.

These are perfect for keeping in your handbag to always ensure you have a pen and paper to hand for quick notes.

Back tomorrow with another project. until then, happy stampin'!


Stampin' Up! Supplies Used:


Festive Flurry 3D Snowflake Bottle Tag and Video Tutorial

by Joanne James26. November 2013 13:20

Well, I'm back from Stampin' Up! 2013 European Convention and what can I say - my team and I had a blast! We came home exhausted, but having had the best time swapping, learning, meeting old friends, making new ones, 'sneak peeking' at some fabulous new products. Normal blogging is now resumed and I have lots of lovely things to show you, starting with the general swap that one of my downlines, Barbara, and I made for everyone we met at convention. It was something of a 'case' on the tag that features in this year's autumn-winter seasonal catalogue, but with a few changes to make it our own. Here is a picture of one of our finished swaps:

We also made some in a Pool Party/Island Indigo/Embossed Silver colourway - I will have to edit this post to include a photograph of one of these as I can't find one at the moment (might have to retake!) The snowflakes in the Festive Flurry set are great for making ornaments or 3-D tags or box-toppers with and you can layer just three snowflakes or all four to get a really large one. I shot a short video tutorial to show you how to put these layered snowflakes together to create this added dimension; grab your glue gun and click on the link below if you would like to see how to achieve it yourself - the video also shows the snowflake in the alternative colourway:

 I hope you find the video useful and have fun creating your own snowflakes in lots of different colour combinations. Just before I leave you the supplies list for this project, I thought you might like to see a fun Convention picture of me with 2 of my downline team members - I'm the one in the middle with the stripey hat:

If you would like to join us for some fun - and chocolate! - at next year's European Convention in Brussels next October, get in touch for more information about the benefits of joining my team.

Back tomorrow with more swaps and gifts made for friends; until then, happy stampin'!


Stampin' Up! Supplies Used:


Postage Due Telford Swap

by Joanne James27. August 2013 19:30

A quick post from me today. Here is the last of my favourite Telford swaps to share: this one was by Maria (you can see her blog here):

I like it because it used a number of products and sets I don't have and showcases some beautiful clear embossing. I love the overall finished effect of this card and the unusual colour combination too.

Back tomorrow with another of my cards; until then, happy stampin'!


Stampin' Up Supplies:

Stamps: Postage Due

Cardstock: Primrose Petals, Pool Party, Whisper White, Early Expresso

Ink/Stampin' Write Markers: Primrose Petals, Pool Party, Versamark

Tools: Big Shot, Delicate Design Textured Impressions Embossing Folder, Argyle Textured Impressions Embossing Folder, Floral Fusion Sizzlit

Finishing Touches: Clear Embossing Powder, Early Expresso Stitched Grosgrain Ribbon, Basics Rhinestones


Tags: , , , ,

Cards | Stamping | Swaps

Summer Silhouettes Telford Swap

by Joanne James26. August 2013 22:24

Today I have another of the swaps I received at our training event in Telford a little while ago to share with you. This card was made by Jenny Moors and we laughed as we swapped as I had used the same stamp set but taken a completely different creative approach (you can see my Telford swap card here). Here is Jenny's card:

I love the bright colours of this card and there is tons of detail here, right down to the paper pierced edge. It's also a great example of a very well made slider card - here's the inside of the card extended so that you can see what I mean:

If you would like to re-create this card, Jenny has provided a step-by-step tutorial on her blog here. Back with the last of my favourite three swaps I received at Telford next time; until then, happy stampin'!


Stampin' Up Supplies:

Stamps: Summer Silhouettes, Petite Pairs

Cardstock: Tangerine Tango, Rich Razzleberry, Whisper White

Ink/Stampin' Write Markers: Tangerine Tango, Rich Razzleberry, Wild Wasabi

Tools: Paper Piercing Essentials Pack

Finishing Touches: Whisper White Stitched Grosgrain Ribbon, Basics Rhinestones

Tags: , , , , ,

Cards | Stamping | Swaps

Mosaic In-Colour Card Swaps

by Joanne James15. July 2013 21:52

Today I'm sharing my team training swaps that I promised you on Saturday, but after a fun day at training yesterday was too tired to post. I completed one basic design, featuring the Mosaic Madness stamp set, but in five different colourways, each showcasing one of the new in colours. So here is the first one, with the base colour of Strawberry Slush:

The feature colours on this card are Crisp Cantaloupe and Coastal Cabana. Here is the second card, with a Crisp Cantaloupe base and feature colours of Coastal Cabana and Pistachio Pudding:

Here is the third card, with a Baked Brown Sugar base and feature colours of Crisp Cantaloupe and Bermuda Bay:

Here is the fourth card, with a Coastal Cabana base and feature colours of Calypso Coral and Smoky Slate:

Here is the fifth and last card, with a Pistachio Pudding base and feature colours of Strawberry Slush and Smoky Slate:

The design is intentionally simple - it needs to be when there are so many to make! I liked taking the opportunity to play around with new colour combinations and also I like the stamping of the same colour ink on cardstock that I used for the main card; this isn't something I do much of, usually but I like the effect and think I'll be doing it more often. So which colour combination is your favourite? Do you have a new 'number one' in-colour? Leave me a comment below or on my Facebook page - I'd love to know what you think. It's still neck-and-neck Strawberry Slush and Coastal Cabana for me; too close to call!

Back tomorrow with another card; until then, happy stampin'!

Stampin' Up Supplies:

Stamps: Mosaic Madness, Happy Day

Cardstock: 2013-15 In Colours

Ink/Stampin' Write Markers: As detailed above

Tools: Mosaic Punch, Itty Bitty Punch

Finishing Touches: Basics Rhinestones


Tags: , , , , , , , ,

Cards | Stamping | Swaps

Mini Catalogue

BROWSE THE CATALOGUE

The mini catalogue is now live! Read and download your copy here.

Shop Online

Access my online shop 24 x 7, 365 days of the year:

Current March hostess code:

S9F2XJJW

Shop Online

Join My Team

It's always a great time to join Stampin’ Up! New team members can get £130 worth of products for only £99 + free business supplies + free shipping + all the fun being a part of Stampin’ Up! Stampin' Up! has something for everyone: join my growing team and benefit from my support to enjoy Stampin' Up! however you choose.

If you're interested, call me for a chat to understand how I can help you realise your goals. Alternatively, if you have already decided to sign up and you just can't wait, please click here for the link to the online form where you can sign up and order your starter kit right away! 

Latest Kit!

Stampin Cut and Emboss

The Rock Legend Kit has all you need to make 8 cards with coordinating envelopes. Along with the new Panda Friends Kit, both are available from January 4th for just £14 each - get yours here!

2023-24 Annual Catalogue

BROWSE THE CATALOGUE

Click on the catalogue for a full list of current SU! supplies - if you would like to order any of the items featured, please drop me a line at [email protected] or give me a call on 07773 421446 - I'd be happy to help.

New Online Exclusives

There will be new products available exclusively in the online store from 5 March - check them out here.

About Me

Hi I'm Joanne and live in Northampton and when I'm not looking after my husband and two beautiful children, am an avid crafter with a passion for all things Stampin' Up!

I must confess that I have never been a big rubber stamper - until I discovered Stampin' Up! that is. I love the fact that I can get such great results with co-ordinating stamps, inks, papers and punches - the possibilities are endless! Join me on my stamping journey as I share the things I love and be inspired to create amazing things yourself!

Follow Me

Monthly Newsletter

Box Builder

Click the button above to use Box Buster to create your custom box design using the Envelope Punch Board!

Kits Collection Now Available!

Stampin Cut and Emboss

The new Kits Collection from Stampin' Up! is now available!

Click here to see the current kits available and order yours online today.

I Design For


Stampin' Up Stuff

This is my personal blog and is not endorsed by Stampin’ Up! I hope you find it a plentiful source of ideas and personal inspiration but please don't copy my designs for contest submission or use for classes, publication or sale without express permission.