Country Lane Thank You Card and Chocolate Slider Gift Packaging

by Joanne James3. September 2018 09:00


Today I'm sharing a card and co-ordinating chocolate slider gift package that I actually made for last week's challenge over at Just Add Ink  but didn't get to photograph in time to play along;luckily for me, it is perfect for this week's Just Add Ink challenge too - if you take a look at the challenge badges, you will see what I mean: 


I absolutely loved the JAI colour palette last week and I couldn't resist breaking out some of my new products to create a card and matching gift packaging - luckily there's plenty of texture in there too! Firstly, here's the card I created:


Here's the low-down on today's projects:

Country Home - From the Country Lane Suite in the new Autumn-Winter catalogue, the Country Home stamp set is all about country living, with some great thanks sentiments and it's perfect for colouring too. I used my Blends to add colour to my Fall florals and fussy cut them out ready to layer onto my card. I also stamped a border using the tiled stamp in the set for some 'faux texture' with some Bermuda Bay tone-on-tone stamping, tucked under my sentiment.

Tin Tile Metallics - The background panel of my card is a piece of silver foil cardstock that has been embossed with the new Tin Tile Dynamic Textured Impressions Embossing Folder and given a slightly aged/distressed look by sponging with some Soft Suede ink. I just love the embossed pattern of this folder; it's so pretty. I know I'm going to use it lots!

Thankful For ... Chocolate - I loved my card so much, I thought I would create a matching slider gift package using exactly the same layout and design to make a slider wrap for one of my favourite bars of chocolate, ready to gift to someone; it's always nice to be able to share a sweet treat, especially when beautifully packaged I think - I love going to the trouble to make something quite ordinary appear to be rather special: 


These wraps are very straightforward - and when you pull the ribbon bow and tag, the chocolate bar slides outwards:


Finally, here's a shot of both items together:


Here is the visual summary of the key products used on today's project for you to pin for easy reference:


You can see all of my 'How To' summaries on my 'How To - Tips and Techniques' Pinterest board in case you've missed any. 

I think this set will be heading for my local postmaster as a thank you for his help with my Autumn-Winter catalogue mailings this week (yes, if you're one of my customers the catalogues are in the post!) He is used to me appearing with bags full of catalogues to be mailed at this time of year and we have a great system going now, which makes the process efficient and keeps ongoing queues to a minimum! I like to give him a bar of chocolate as a thank you for his help and to keep him sweet :-) On the subject of Autumn-Winter catalogues: if you don't have a demonstrator and would like me to add you to my list, then do get in touch and I can pop one in the post to you too. The electronic version of the catalogue will be available here online tomorrow when it launches.

Enjoy your day and I'll be back tomorrow with another project. Until then, happy stampin'!


Stampin' Up! Supplies Used:

Table built using Product Table Builder by The Crafty Owl - Independent Stampin' Up! Demonstrator.

Half Full For The Paper Players PP403

by Joanne James29. July 2018 09:00

Another busy week in the James household with little time for crafting - too busy having holiday fun with the Juniors and putting everything back into my fabulous new kitchen which is pretty much finished at last! I Today it's Sunday and time for this week's new challenge over at The Paper Players - yay! It's the turn of my awesome friend Claire to host this week and she has my favourite, a sketch challenge, for you to work with:
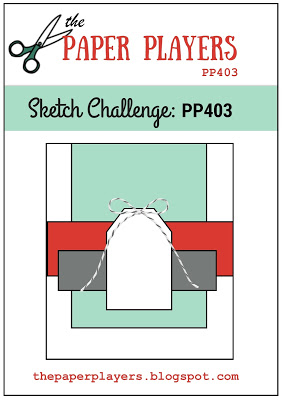
    

A card with a tag - I haven't made one of those in a while! I decided that the sketch layers lent themselves to a card using the Half Full stamp set which I haven't yet used for a non-Christmas card, along with a little DSP too - take a look:
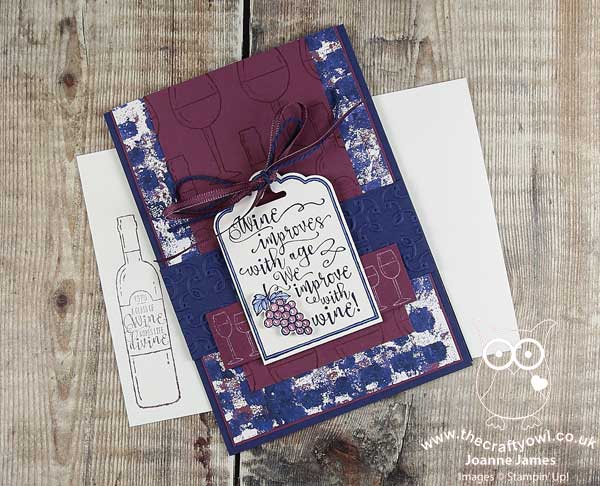
 

Here's the low-down on today's card:

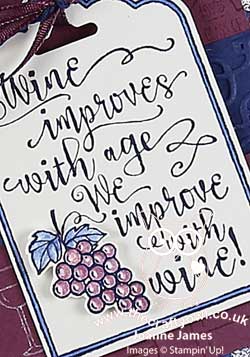
Half Full And An Old Faithful - My starting point for today's card was the tag and I decided to use the ready-to-stamp one that comes with the half Full stamp set. This makes the tag element really easy to create, with the sentiment, decoration and border all laid out. Not only that, it perfectly co-ordinates with one of my most-used punches, the fabulous Scalloped Tag Topper Punch, which makes tag creation a breeze. I fussy-cut the bunch of grapes for extra interest and also used the single glass and bottle stamps to create a tone-on-tone background panel and to decorate the inside of my card and the envelope, whilst I stamped the row of glasses in white kraft ink to create a contrasting border too. I am quite partial to a glass of red (or white!) so this set is perfect for cards for my wine-loving friends and also to quickly dress-up a bottle to say thank you to a party hostess, for example.

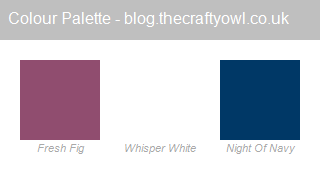
Tranquil Textures Colour Combo - I often use colour combinations straight from Stampin' Up!'s designer series papers as the basis for my cards and today as I looked for something with a non-descript pattern that would compliment my various stamped layers and tag I decided upon this Night of Navy, Whisper White and Fresh Fig combination from the Tranquil Textures pack. Here is the colour combo for you to save should you wish to use it as inspiration for your future projects too:
Whilst this pack is designed to co-ordinate with the Tranquil Textures Suite, which has an under-the-sea theme, I wasn't constrained by this. The pack has lots of interesting textured designs that can be used in many other ways too. This is my 'twist' for the challenge over at Just Add Ink this week, although it is a little more tenuous than some of those that the JAI design team have come up with - check them out to see which items they have used in a different way on their projects. Don't forget these papers are available for just 3 more days as part of the current 'buy 3, get 1 free' DSP offer that is running this month; if you missed the details, you can read all about it here.

A Trellis Textured Border - The final element to my card was some actual texture, courtesy of the Garden Trellis Textured Impressions Embossing Folder on the navy border panel. It creates just enough interest to differentiate and separate the layers, without detracting from the stamped images.

Here is the visual summary of the key products used on today's project for you to pin for easy reference:
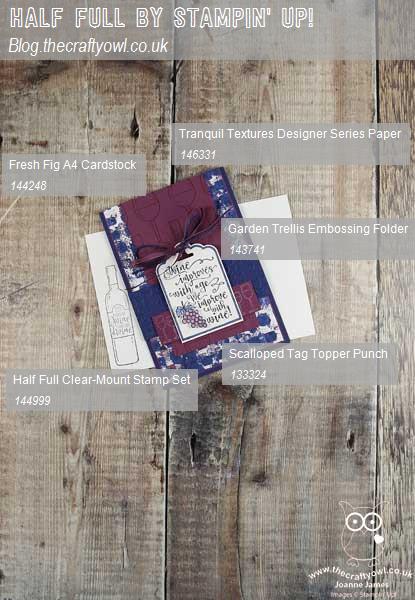
 

You can see all of my Product and 'How To' summaries on my 'How To - Tips and Techniques' Pinterest board in case you've missed any. 

Before you reach for your ink and papers, check out what our amazing team has created to inspire you this week:

Here's a quick recap of our challenge rules:
 
1.  Create a new paper project
2.  Upload your creation to your blog with a link back to us and provide a direct link to the post featuring your challenge submission.
3.  Please link your card to no more than four challenges, TOTAL.
4.  Have FUN!

You can see all of my 'How To' summaries on my 'How To - Tips and Techniques' Pinterest board in case you've missed any. 

Enjoy your day; I will be spending mine in London at the Vitality Hockey Women's World Cup with the rest of the James family, as we have tickets to watch the India v USA and England v Ireland matches that are taking place this afternoon. I'm hoping we will escape the thunderstorms and it will stay dry for us and the players, although I'm sure they will appreciate the slightly cooler temps that we have been having this week.

I'll be back tomorrow with another project. Until then, happy stampin'!


Stampin' Up! Supplies Used: 

Table built using Product Table Builder by The Crafty Owl - Independent Stampin' Up! Demonstrator.

Pick Your Potion Halloween Card and Test Tube Treat Duo PP366

by Joanne James15. October 2017 09:00

It's Sunday and time for this week's new challenge over at The Paper Players! It's the turn of the queen of diecuts, the talented Laurie, to host this week and she has a timely clean and simple challenge for us to work with:

    Square Sketch PCC Challenge 263   

I haven't bought any new Halloween sets this year or any of the Spooky Night Designer Series Paper, so I had to get creative with existing (and a few retired) supplies coupled with a few stamps from some multi-occasion sets. I used the sketch over at Paper Craft Crew and the colours at Stamp Ink Paper and managed to create not one but two spooky Halloween-themed projects for you. The first one is my card - take a look:


Here's the low-down on today's card:

Festive Phrases - I focused both of my projects today around the 'pick your potion' stamp in the Festive Phrases stamp set. I actually bought this set for the elf (who can resist him?!) however the other three stamps in this set will also get plenty of use for other festive occasions. It's difficult to se on my card, but having stamped the cauldron in black, I heat embossed it with clear embossing powder for a lovely added shine.

Add Colour - I used a couple of alcohol-based markers - one of my Pumpkin Pie Blendabilities and a! lime green Sharpie - to add colour to my project: I coloured the white dots green on my retired Halloween paper border, I coloured in the dots on the cauldron and then my favourite part on this card - I coloured a few White Perfect Accents with each colour and added them around my cauldron to look like potion bubbles. I love the shine that they have! I also stamped my sentiment again onto a piece of Lemon-Lime Twist cardstock and cut it with my banner punch add another pop of colour and finally a couple of diecut bats using the retired Halloween Scenes framelits for just the right amount of spooky!

Pick Your Potion - I decided that this card needed an accompanying treat that would fit with the 'pick your potion' theme, so whipped up a little test tube holder using a piece of cardstock and my Scalloped Tag Topper Punch to hold a pair of test tubes (love these!), one filled with a green potion and the other with an orange one. The Scalloped Tag Topper Punch was the perfect width and all I needed to do was punch a couple of 3/4" circle holes into the folded-over piece to slot my colourful potions into - here's my treat holder and card together:


I just love this pair of cute projects and they really didn't take long at all to put together; I'm definitely going to make a whole bunch of these in different colours ready for trick-or-treat time!

Here is the visual summary of the key products used on today's project for you to pin for easy reference:


You can see all of my Product and 'How To' summaries on my 'How To - Tips and Techniques' Pinterest board in case you've missed any. 

Before you reach for your ink and papers, check out what our amazing team has created to inspire you this week:

The Paper Players Design Team
 
 
Here's a quick recap of our challenge rules:
 
1.  Create a new paper project
2.  Upload your creation to your blog with a link back to us and provide a direct link to the post featuring your challenge submission.
3.  Please link your card to no more than four challenges, TOTAL.
4.  Have FUN!  

I look forward to seeing your clean and simple creations in the gallery this week. Enjoy the rest of your weekend as it will be over all too quickly; we have been having unseasonably warm weather here in the UK these last couple of days - a good ten degrees warmer than usual. I'm sure it won't last so since we have a reasonably sport-free day, I'm hoping to get out and spend some time in the garden before the autumn chill returns. I'll be back tomorrow with another project; until then, happy stampin'!


Stampin' Up! Supplies Used: 

Table built using Product Table Builder by The Crafty Owl - Independent Stampin' Up! Demonstrator.

New Wednesday Weekly Deals Are Here!

by Joanne James12. August 2015 09:00

It's Wednesday and you know what that means: a new collection of Wednesday Weekly Deals! The same as last week there are more offers than usual, with increased reductions of up to 30% on Weekly Deals this month, although there are specific allocated quantities at the increased offer price; once they're gone, the price will revert to RRP, so don't delay in ordering if there is something on your wish list. Each week items are proving very popular and some are sold out within a couple of days of the offers being published. As always, a new collection of deals will be announced next Wednesday.

If you want to take advantage of any of the deals on offer, you can support my business by placing your order online by clicking here or using the link to my store on the right hand side of my blog page where it says 'Shop Online' or with me in person. Don't forget to add the new Hostess Code for August SCFAMEG2 if your order is under £150 and be sure to make sure that you don't check the 'no contact' box if you'd like to be kept updated with the progress of you order and receive a little thank you in the post from me. 

Here's a summary of this week's one-week only Wednesday deals - click on each item to go to the online store to purchase:

Table built using Product Table Builder by The Crafty Owl - Independent Stampin' Up! Demonstrator.

More great deals this week - the in-colour blossom accents and epoxy stickers are great deals for cute embellishments but my favourite weekly deal this week has to be the Scalloped Tag Topper Punch - this is my 'go to' tag punch and is perfect to get a headstart on Christmas gift tags, so at the reduced price of £15.75 it's one to snap up this week! 

That's all from me; back later with today's creative post. Until then, happy shopping!

Easter Egg Hunt Basket with the Berry Basket Bigz Die

by Joanne James5. April 2015 10:00

It's Sunday - my favourite day of the blogging week! It's time for a new challenge over at The Paper Players and this week the lovely Jaydee has a fun theme for us:

Use any die cut on your project - boy did I deliberate over this! I use die cuts all the time and my Big Shot is my crafting best friend, but what to share? I made several cards, all trying to showcase different aspects of dies and diecuts, but none of them were working for me; I think I was trying too hard! After much deliberating I decided to share a 3D project instead and since it's Easter Sunday today what better than an Easter basket made with the Berry Basket Bigz Die, along with some cute little tags all ready for today's Easter egg hunt:

The basket itself is really easy to make using the die: I made mine out of So Saffron cardstock with a Pink Pirouette trim and handle, and having stamped some eggs on the basket using my Subtles Stampin' Write markers, I finished my completed basket with a couple of pink bows punched from the Bow Builder punch and a stamped tag tied on with some Marina Mist chevron ribbon. I then used my Big Shot, Handpicked framelit dies and my Alphabet rotary stamp to make a whole bunch of tags ready to place around the garden for our Easter egg hunt today - here are just a selection:

I made them out of coaster board, so that they would be extra-strong and added coloured punched out arrows to some of them to add to the fun.

There are some great projects from the Design Team this week - do pop by their blogs and take a look:

The Paper Players Design Team
 
Here's a quick recap of our challenge rules:
 
1.  Create a new paper project
2.  Upload your creation to your blog with a link back to us and provide a direct link to the post featuring your challenge submission.
3.  Please link your card to no more than three challenges, TOTAL.
4.  Have FUN! 

I hope you like today's project - there are so many different dies to choose from, I can't wait to see what you come up with for your cards and projects in our gallery this week. I'm off to play Easter bunny and follow the James juniors around the garden collecting eggs, then attempt to persuade them to not eat them all before lunch! Back tomorrow with another project; until then, happy stampin'!


Stampin' Up! Supplies Used:

Table built using Product Table Builder by The Crafty Owl - Independent Stampin' Up! Demonstrator.


Gift Packaging Made Easy with the Gift Box Punch Board and Banner Framelits

by Joanne James27. December 2014 16:40

Merry Christmas to you all, my lovely blog readers! After a welcome few days break hosting Christmas for my family, today I'm back to the blog! I have a couple of pre-Christmas makes to share still; do you ever find yourself so busy crafting in the run up to the big day that you spend more time 'in the moment' rather than recording it and sharing? Well, this year that was definitely me! Today I am being treated to a day of rest - my seven year old has declared that he is doing the cooking today, from his new boy's cookbook (doing well so far - fresh fruit and pancakes for breakfast, followed by shepherd's pie for lunch) - so whilst he prepares a feast of chicken dippers for tea, I thought I would take the opportunity to get back into my blog. 

Today's share is some lovely gift packaging made with the Gift Box Punch Board, Envelope Punch Board and the Big Shot and Banner Framelits. I decorated some gifts using boxes made with the gorgeous Under the Tree speciality DSP and the Gift Box Punch board and some easy die cut tags to co-ordinate:


If your gift fits the standard boxes that the Gift Box Punch Board makes, it is a quick and easy 'no glue' packaging solution. With some ribbon and a fancy tag they really look the part:


I also made some bottle tags using the Banner framelits and a circle punch, again decorating with some simple wreaths cut with the Wonderful Wreath framelits - here's a close up:


As my regular readers will know, I am a big fan of the Envelope Punch Board and it is still my tool of choice for creating custom boxes - this is so easy to do with my BoxBuster tool - it enables you to create the perfect box size first time with no paper wastage. Here's one I made for my niece's Christmas gift that is the perfect case in point, this time finished with a tag made with the tree punch to co-ordinate with the Under The Tree paper:


If you are a fan of creating easy, attractive gift packaging, you will be pleased to know that the Gift Box Punch Board is carrying over and will still be available when the current Autumn-Winter seasonal catalogue ends. The Envelope Punch Board is always available as a standard annual catalogue item - phew, I don't know what I'd do if this tool was ever discontinued!

Back tomorrow with another of my pre-Christmas makes and a special announcement, so check back then for more crafting lovliness!

Until then, happy stampin'!


Stampin' Up! Supplies Used:

Table built using Product Table Builder by The Crafty Owl - Independent Stampin' Up! Demonstrator.


Halloween Treats - Good To the Very Last Bite!

by Joanne James31. October 2014 16:00

I'm off to a Halloween party today with friends and I wanted to do a quick post to share with you some of the treats I made to take for the children. I found these cute mini pumpkins for the girls and slightly more scary eyeballs for the boys, and just tied them in some cellophane with the White and Tangerine Tango Two-tone Trim and added some cute tags:

I also found these cute chocolate Halloween figures that I dressed up with some covers made using the Scalloped Tag Topper Punch with a large oval punched out of the front section, and decorated with some colourful tags - I stamped the Halloween image from the 'Merry Everything' stamp set twice, once on Tangerine Tango then again on some scraps of retired Lucky Limeade cardstock and cut out the Dracula on the green cardstock and paper-pieced them together.

How cute are these? I'm entering these into this week's challenge over at Colour Q, as they were inspired by this week's colour scheme and challenge badge (I substituted Rich Razzleberry as my purple, since I didn't have and Concorde Grape):

Happy Halloween everyone! Back tomorrow with another project; until then, happy stampin'!


Stampin' Up! Supplies Used:

Table built using Product Table Builder by The Crafty Owl - Independent Stampin' Up! Demonstrator.


Holiday Home Happy Haunting Halloween Card

by Joanne James9. September 2014 12:00

Today my blog posts are a little like buses: nothing for ages then three come at once! Well, maybe not for ages, but this post was actually yesterday's scheduled post (apologies to those of you who were waiting for a post only to find it never arrived!) but it didn't publish as there were some server problems at my blog hosting site. All sorted today though, so here is Tuesday's post - soon to be followed by the Wednesday Weekly Deals and Wednesday's actual creative post - this week's Colour Me..! card!

Today I'm sharing another Halloween card, featuring lots of goodies from the current seasonal catalogue. I'm also using this week's colour palette over at CAS Colours and Sketches:

I haven't played along with these ladies for a little while and this week's colours were just perfect for my spooky Halloween card:

I used a Blackberry Bliss base for my card, to which I adhered a piece of Tangelo Twist, partially overlaid with a section of Basic Black cardstock, which I punched down one side with the Confetti Stars punch to allow the orange to peek through and then alongside this I stamped a house from the 'Holiday Home' photopolymer stamp set in Whisper White Kraft ink. I used the co-ordinating framelit to cut out the same shaped house out of a Lost Lagoon tag, made using the Scalloped Tag Topper Punch, and after decorating, adhered this to my card using dimensionals so that the house could be seen on the layer beneath. I punched a small moon using my 3/4" circle punch and decorated this and my tag with the bat and lamp images from the Holiday Home set. I also stamped a ghost from the same set onto Whisper White, fussy cut him and adhered him so that it looks as if he is floating out of the window of my haunted house.

The Holiday Home set is one of my favourites in the seasonal catalogue - it is so versatile, with options from new home to Christmas, Halloween and tons in between and it comes with lots of little stamps to enable you to make your cards unique, along with matching framelits to make for easiest ever cutting out. What's more, if you buy the bundle you save 15% so all in all lots of great reasons to put this in your Top 5! To finish, I added my sentiment from the 'Ghoulish Greetings' stamp set - perfect for my spooky house - and a piece of Tangelo Twist satin ribbon to my tag.

A fun Halloween-inspired card for this time of year; I think I might use mine as an RSVP to an invitation I received to a Halloween party this year. I often have fun with my kiddies at home at this time of year, but must confess to being quite excited at the prospect of a family Halloween party, with obligatory fancy dress (pictures to follow nearer the time!!)

That's all from me today; back tomorrow with this week's Wednesday Weekly Deals and my Design team card for Colour Me...! Until then, happy stampin'!


Stampin' Up! Supplies Used:

Table built using Product Table Builder by The Crafty Owl - Independent Stampin' Up! Demonstrator.


Million & One Thanks Teacher Card and Gift Box

by Joanne James18. July 2014 15:53

Apologies for my blog absence yesterday - I spent most of the day icing biscuits for teacher thank you gifts as today is the last day of the academic year for my James Juniors. I promise my self I'll start earlier every year, but what always seems to happen is I squeeze in a few more commissions and then also a few extra names get surrepticiously added to the list of thank yous by the children which means even more baking and icing!

I've shared my teachers gifts on my blog previously - you can check them out here if you would like to be reminded - so today I thought I would share a matching card and gift box commission that I made for someone else to give to their teacher. So here is my card:

For my card I used the retired Gingham Garden DSP (this was requested - lucky I still have a pack!) however most of the other product is current and you could easily create this set in an alternative paper without the teacher tag as a thank you gift for someone special. The star of the show is definitely the 'Million and One' sentiment stamp - perfect to show your appreciation of someone special.

Here is the matching gift box - I love these kraft boxes, they are so useful and very sturdy, and at £2.75 for 4 represent great value. I'm doubly pleased that the Extra-Large Gift Boxes have returned and made it into the annual catalogue as a stock item - these are great for larger gifts. 

Right, I've a few more jobs to do before I go and pack a picnic - we're off to see an outdoor theatre production of Peter Pan and The Lost Boys this evening. I've seen this theatre company perform the Railway Children previously, so I'm expecting great things - I'll report back tomorrow! Until then, happy stampin'!

Stampin' Up! Supplies Used:

Table built using Product Table Builder by The Crafty Owl - Independent Stampin' Up! Demonstrator.


Scalloped Tag Dinoraur Bookmark Cards and Goodie Gear Simply Created Treat Bags

by Joanne James12. July 2014 22:43

Well what a day! The highlight has definitely been Ben's birthday party with his class mates at Bugtopia, an insect and reptile centre near here. He had the most amazing time, holding everything from stick insects and tarantulas to chameleons and crickets! I will share some photos with you when I've had a chance to download them from my camera, but for today thought I would share the cards I made for Ben's two fellow 'birthday boys' with whom he shares his special day and some of the sweet treats that made it into the party bags. So first up, one of Ben's frineds is currently dinosaur mad, so I made a card using the new retired 'Dinoraur' stamp set (with a soon to be 7 year old son, I couldn't possibly part with my set, retired or otherwise!). I decided to create a fun card with a removable dinosaur bookmark made with the Scalloped tag Topper punch. Here is the card with the bookmark in its little pocket:

And here is the bookmark when removed, showing Triceratops on the bottom too:

This card was such fun to make and perfect for a would-be palaeontologist. I have a bonus share for you today too: given the theme of our party, I used the Goodie Gear Simply Created Treat Kit for some suitably themed sweet treats - take a look:

I bought a box of jelly frogs and tied them into the kit bags, decorated the labels and made a little stamped frog button (this is also from the retired 'Spring Sampler' stamp set). I thought I would share these with you as these bag kits are currently available on the Clearance Rack for just £1.79, and the Pumpkin Pie versions too - bargain or what?! Go and snap up a few to add a little 'wow' factor to your party treats! We also gave each child their very own butterfly garden to enable them to hatch their own caterpillar eggs into Painted Lady butterflies - a perfect project for the forthcoming long school summer holidays!

I'll be back tomorrow nice and early with my Paper Players post for the week; until then, happy stampin'!

Stampin' Up! Supplies Used:

Table built using Product Table Builder by The Crafty Owl - Independent Stampin' Up! Demonstrator.


Mini Catalogue

BROWSE THE CATALOGUE

The mini catalogue is now live! Read and download your copy here.

Shop Online

Access my online shop 24 x 7, 365 days of the year:

Current March hostess code:

S9F2XJJW

Shop Online

Join My Team

It's always a great time to join Stampin’ Up! New team members can get £130 worth of products for only £99 + free business supplies + free shipping + all the fun being a part of Stampin’ Up! Stampin' Up! has something for everyone: join my growing team and benefit from my support to enjoy Stampin' Up! however you choose.

If you're interested, call me for a chat to understand how I can help you realise your goals. Alternatively, if you have already decided to sign up and you just can't wait, please click here for the link to the online form where you can sign up and order your starter kit right away! 

Latest Kit!

Stampin Cut and Emboss

The Rock Legend Kit has all you need to make 8 cards with coordinating envelopes. Along with the new Panda Friends Kit, both are available from January 4th for just £14 each - get yours here!

2023-24 Annual Catalogue

BROWSE THE CATALOGUE

Click on the catalogue for a full list of current SU! supplies - if you would like to order any of the items featured, please drop me a line at [email protected] or give me a call on 07773 421446 - I'd be happy to help.

New Online Exclusives

There will be new products available exclusively in the online store from 5 March - check them out here.

About Me

Hi I'm Joanne and live in Northampton and when I'm not looking after my husband and two beautiful children, am an avid crafter with a passion for all things Stampin' Up!

I must confess that I have never been a big rubber stamper - until I discovered Stampin' Up! that is. I love the fact that I can get such great results with co-ordinating stamps, inks, papers and punches - the possibilities are endless! Join me on my stamping journey as I share the things I love and be inspired to create amazing things yourself!

Follow Me

Monthly Newsletter

Box Builder

Click the button above to use Box Buster to create your custom box design using the Envelope Punch Board!

Kits Collection Now Available!

Stampin Cut and Emboss

The new Kits Collection from Stampin' Up! is now available!

Click here to see the current kits available and order yours online today.

I Design For


Stampin' Up Stuff

This is my personal blog and is not endorsed by Stampin’ Up! I hope you find it a plentiful source of ideas and personal inspiration but please don't copy my designs for contest submission or use for classes, publication or sale without express permission.