A Winter Wonder Joy Christmas Card

by Joanne James9. September 2017 16:30

Yay, it's the weekend! I've had a busy week and didn't manage to squeeze in yesterday's blog post following my open house event to celebrate the launch of the new Autumn-Winter catalogue - a big thank you to all the lovely ladies who attended - so I'm back today with the Christmas card I promised for this week's challenge over at Merry Monday - I need to get cracking on building my festive stash:

I had a marathon session this week creating cards using the new snowflake embossing folder and knew that this would be perfect for the challenge - take a look:


Here's the low-down on today's card:

Year Of Cheer - My card was inspired by the wonderful display of projects on page 36 of the seasonal catalogue featuring the Year Of Cheer Suite - the combination of whites and metallics and intricate foiled papers are perfect for seasonal wintry projects. I particularly love the papers in this suite - the foil patterns are gorgeous and work for lots of occasions, not just Christmas, The snowflake foiled pattern was just the right base for my wintry Christmas card.

A Winter Wonder - I'm generally not big into embossing folders, but there are a few in my collection that are absolute keepers and at this time of year are much loved and used. Two of my long-time favourites are the Woodland TIEF and my all-time favourite Softly Falling however I am pleased to report that the Winter Wonder Textured Impressions Embossing Folder will be completing my trio of festive favourites. This huge single snowflake measures 4" square and makes a real statement on a Christmas card, for sure.

JOY - The 'Cheers to the Year' stamp set that is part of the Year Of Cheer Suite includes the word 'Joy' - although as I don't have this stamp set I substituted with a little more retro rubber today and used a very similar stamp from last year's retired 'Holly Jolly Greetings' stamp set, heat embossed in silver on my folded banner. 

Here is the visual summary of the key products used on today's project for you to pin for easy reference:


You can see all of my 'How To' summaries on my 'How To - Tips and Techniques' Pinterest board in case you've missed any. 

I'll be back tomorrow with another project for this week's new challenge over at The Paper Players. Until then, happy stampin'!


Stampin' Up! Supplies Used:

Table built using Product Table Builder by The Crafty Owl - Independent Stampin' Up! Demonstrator.

Cookie Cutter Christmas Santa

by Joanne James6. October 2016 08:05

Today it's time for a new challenge over at Create With Connie and Mary and this week we have a sketch for you:


I decided to use this sketch for one of the cards that I made in my Christmas Stamp-A-Stack class earlier this week - take a look:


Here's the low-down on today's card:

Something Old - I decided to feature a die cut 'merry' sentiment using my Christmas Greetings Thinlits and finish with some stamped words from the co-ordinating 'Holly Jolly Greetings' set. Last season I used these thinlits more times than I can count and in all the excitement of the Autumn-Winter catalogue I forgot that they had moved into the annual catalogue until I was browsing its Christmas section. For me they are a keeper and it felt like renewing acquaintance with an old friend to get them out and use them on my card today.

Something New - I paired my sentiment with a fun Santa from the Cookie Cutter Christmas set, punched out with the Cookie Cutter Builder Punch and some of the new Candy Cane Lane DSP; I recommend you stock up on this during the current 'buy 3, get 1 free' offer on Designer Series Paper this month - I know I will be! My cute Father Christmas was coloured in with my Stampin' Write markers for a bold finish, with a  liberal dose of clear Wink of Stella to accent his fur trim. 

A Perennial Favourite - Last but not least, I embossed my top Whisper White layer in my favourite embossing folder of all time: the Softly Falling Textured Impressions Embossing Folder. I'm not big into dry embossing, however I would make an exception for Softly Falling any day of the week, I just love the texture and interest that this falling snow gives a card. 

Here is the visual summary of the key products used on today's project for you to pin for easy reference:


You can see all of my 'How To' summaries on my 'How To - Tips and Techniques' Pinterest board in case you've missed any. 

Do visit the other Design Team members to see what they did with this week's sketch; there's lots of inspiration over on their blogs too!

Enjoy your day and I'll be back tomorrow with another project; until then, happy stampin'!


Stampin' Up! Supplies Used:

Table built using Product Table Builder by The Crafty Owl - Independent Stampin' Up! Demonstrator.

Smooshing Into 2016 With A New Technique

by Joanne James1. January 2016 09:00

A new card for a new year! I know I shared a new year card with you yesterday - well, I have another one for you today! As a rule I only send one happy new year card each year, to my mother-in-law for hosting our family New Year's gathering, however when I saw that the theme this week over at Global Design Project was CASE The Designer and set eyes on Bibi Cameron's gorgeous card, inspiration most definitely struck. Here is her original card:

Isn't it lovely? I was really attracted to the background and decided to have a go at another technique that my good friend Kim Fee over at Simply Fairies affectionately calls the 'smooshing technique' as the basis for my card. So here is my card:


You might wonder why I struggled with this background - looks simple enough, right? Well, having thrown away many a piece of ruined cardstock I would have to disagree - there is clearly an art to getting it right! The lovely Kim recently made a short video after much pleading by myself and other smoosh-challenged friends; you can watch it here and I seriously recommend you do if you want to try this technique as it contains some great hints and tips. 

I used extra-thick Whisper White cardstock for my base, then created my inked layer on a piece of shimmery white cardstock using Pacific Point, Island Indigo and Night of Navy inks. The cardstock gives the card a wonderful all over shimmer in real life. I then used the stars stamp from Holly Jolly Greetings (a carryover set, yay!) stamped in Versamark and heat embossed in gold for added interest, then used some gold glimmer numbers, diecut using the new Large Numbers Framelits Dies (love these!). My Hello is from the 'Crazy About You' stamp set, which I popped up on dimensionals and finished with a trio of gold metallics sequins.

I really love the randomness of this background, which is quite different from my usual style, even though the card still feels true to me. So thanks Bibi and Kim for the inspiration for today's card. I hope it inspires you too to create something a little different this week - the new year is full of new creative possibilities and I am so looking forward to sharing them with you!

Happy New Year wishes to you all, my customers, blog and social media followers and friends and the ladies over at SUO Challenges where I'm linking up my second New Year card. I'll be back tomorrow with another project; until then, happy stampin'!


Stampin' Up! Supplies Used:

Available January 5th:

140622 Large Numbers Framelits Dies

Table built using Product Table Builder by The Crafty Owl - Independent Stampin' Up! Demonstrator.


Pink Perfect Pines Silhouette Card

by Joanne James29. November 2015 10:00

It's Sunday and time for a new challenge over at The Paper Players! This week it is the turn of the talented Sandy to host and she has a tic tac toe board to get our creative juices flowing this week:


There were so many ways I could have gone with Sandy's board this week - the creative possibilities are endless! - but in the end I decided to go with the far-right column: white, embossing and punch or die cut. I used this week's colours over at Colour Me and the Friday Mashup sketch for today's card:


I used a base of Melon Mambo for my card then on a piece of Whisper White I stamped the silhouette from the 'To You and Yours' stamp set in Memento Black then sponged in my sky using each of the Colour Me challenge colours and masking off a small moon with a small circle of post-it note. I also added a few tiny white stars using my chalk pen. I then took a piece of Basic Black cardstock and diecut the tree using the medium-sized Perfect Pines framelit, wrapping some silver thread around the base of the card and securing behind. The top layer is a piece of Shimmery White cardstock - you can't really see the sparkle of this card in the photo, which is a shame as it's lovely! I embossed this piece with the Softly Falling embossing folder to add texture then used the largest Christmas tree framelit to cut an aperture in my card to frame the tree in the black layer. Finally I added my sentiment; I added the silver glimmer 'peace' from the Christmas Greetings thinlits (I trimmed down the ends) and heat embossed the 'on earth' in silver onto the black layer. 

I've been wanting to use this silhouette stamp for ages and I like the idea of framing it with the diecut. Quite unconventional for a Christmas card, but I just love the colours of the pretty sunset too. 

Before you reach for your ink and papers, check out what our amazing team has created to inspire you this week:

The Paper Players Design Team
Anne Marie Hile - on leave
 
 
Here's a quick recap of our challenge rules:
 
1.  Create a new paper project
2.  Upload your creation to your blog with a link back to us and provide a direct link to the post featuring your challenge submission.
3.  Please link your card to no more than three challenges, TOTAL.
4.  Have FUN! 


I look forward to seeing how many tic tac toe combinations you can come up with this week. I'm off for a morning of basketball and then a quiet day for the James juniors, given that Rebecca has an awful cold and needs some R&R to prepare for the busy month ahead in the run up to Christmas. I'm hoping to work on a few projects and get a few jobs done - wish me luck!

Back tomorrow with another project; until then, happy stampin'!


Stampin' Up! Supplies Used:

Table built using Product Table Builder by The Crafty Owl - Independent Stampin' Up! Demonstrator.


Snow Friends Jolly Snowman Christmas Card

by Joanne James26. November 2015 08:05

Today it's time for a new challenge over at Create With Connie and Mary and this week we have a great sketch for you:


I had lots of ideas about ways to use this sketch; I eventually settled on this fun card featuring a snowman with a difference:


Instead of stamping a snowman on my card, I decided to create a graphic snowman using my Big Shot and the Snow Friends framelits. I used a card base of extra-thick white cardstock and tucked a strip of red striped Holidays Fancy Foil Vellum don the left hand side. I then added a panel of Soft Sky, onto which I stamped the snowflakes from the Wonderland stamp set in Versamark and heat embossed them in white, before cutting out the snowman shape and scarf and hat, which adhered across the negative space for dimension. I then stamped part of the sentiment from Holly Jolly Greetings directly onto the cardbase in Pacific Point, adding a red glimmer 'jolly' cut from the co-ordinating Christmas Greetings Framelits dies to finish. I also used black glimmer paper for the snowman's hat - both add great sparkle to this card. To finish, I added a few pearls coloured with a red Sharpie as the holly berries for the leaves on the hat.

I love the subtle textures and layering on this card - and it's fun to look at framelits and dies to see how else they can be used beyond the straightforward cutting out of shapes.

Do visit the other Design Team members to see how they interpreted this week's sketch; there's lots of inspiration over on their blogs too!

Enjoy your day and I'll be back tomorrow with another project; until then, happy stampin'!


Stampin' Up! Supplies Used:

  • Snow Friends Framelits Dies
  • Holly Jolly Greetings Clear-Mount Bundle
  • Wonderland Wood-Mount Stamp Set
  • Embossing Buddy
  • Versamark Pad
  • Heat Tool (Uk)
  • White Stampin' Emboss Powder
  • Big Shot
  • Whisper White A4 Thick Cardstock
  • Holidays Fancy Foil Designer Vellum
  • Soft Sky A4 Cardstock
  • Pacific Point Classic Stampin' Pad
  • Pacific Point A4 Cardstock
  • Cucumber Crush A4 Cardstock
  • Pearl Basic Jewels
  • Red Glimmer Paper
  • Black Glimmer Paper


Holly Jolly Christmas Greetings Christmas Cards - Two Ways

by Joanne James31. October 2015 22:29

A late post from me today - too much trick-or-treat fun earlier on this evening! Anyway without further ado, today I made a couple of cards using the sketch from Mojo Monday this week, the second of which is also for this week's challenge over at Merry Monday:


Both my cards feature papers from the Season of Cheer designer series paper, along with the Christmas Greetings Thinlits with the Holly Jolly Greetings stamp set - one of the great bundle offers in the current seasonal catalogue. Here's the first card I made in traditional festive colours with the holly paper:

I went with a simple base layer of Real Red, then for the panel layered the holly paper with some Mossy Meadow and added a banner of red glimmer paper before adding my layered circles featuring my sentiment, a combination of stamped elements from the 'Holly Jolly Greetings' stamp set and a glimmer die cut using the Christmas Greetings Thinlits. I really liked this card, so decided to make a second one with a slightly different sentiment combination from the same sets, this time featuring the Christmas lights paper from the same DSP pack and a slightly less traditional colour scheme. Here it is:

I just love the glimmer paper on both of these cards; I'm not a fan of loose glitter, but glimmer paper is the best! So which one do you prefer - traditional or contemporary colour scheme? They are both great, although I think I'm veering towards the holly - I'm a sucker for red and green at Christmas time! I'd love to hear your thoughts - do leave me a comment below.

Back tomorrow with this week's new challenge over at The Paper Players; until then, happy stampin'!


Stampin' Up! Supplies Used:

Table built using Product Table Builder by The Crafty Owl - Independent Stampin' Up! Demonstrator.


Vintage Leaves Holly Christmas Card

by Joanne James18. October 2015 10:00

It's Sunday and time for a new challenge over at The Paper Players! This week it is the turn of the multi-talented Nance, who not only produces fabulous cards but also designs all our challenge badges and does so much to keep our challenge blog running smoothly - thank you Nance! This week we have a clean and simple challenge for you:


I considered going with something autumnal for my card today, but in truth I've had this idea for a card in my head for a while and decided that since it fits today's brief it was about time I got it down on paper - and it's a Christmas card! Take a look:

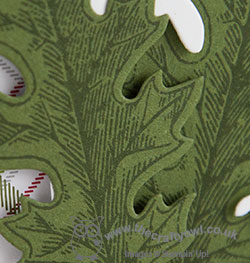
I've been using my Vintage Leaves set a lot this week and I'm not sure whether it is meant to be or not, but the large spiky leaf definitely reminds me of holly, so I decided to use it on a Christmas card. I used Mossy Meadow for my card base and adhered a strip of the gingham patterned paper from the Merry Moments DSP stack down the left hand side. My raised panel is extra thick Whisper White cardstock, out of which I cut the spiky leaf shape using the co-ordinating Leaflets Framelits Dies - another one of the great 15% off bundles when you purchase both items together from the current catalogue - and stamped the leaf in Mossy Meadow directly onto the Mossy Meadow panel below, so that it could be seen through the aperture. I then stamped another leaf on a separate piece of Mossy Meadow and cut this out with the same framelit too, positioning it at an angle over the first one and overhanging the edge of the white panel. My 'Joy' sentiment is from the Holly Jolly Greetings set and stamped in Real Red. To finish, I added a trio of Cherry Cobbler Home For Christmas enamel dots for my berries - I love these, they add the perfect finishing touch to my card. So what do you think - do these leaves work as holly? Either way, I am pleased with the finished result.

Before you reach for your ink and papers, check out what our amazing team has created to inspire you this week:

The Paper Players Design Team
Anne Marie Hile - on leave
 
 
Here's a quick recap of our challenge rules:
 
1.  Create a new paper project
2.  Upload your creation to your blog with a link back to us and provide a direct link to the post featuring your challenge submission.
3.  Please link your card to no more than three challenges, TOTAL.
4.  Have FUN! 
 

I look forward to seeing your CAS creations this week.

I'm having a change of sport today as Rebecca is playing in her first club hockey tournament of the season, so I'm off to cheer her team on and then we'll be home for a late lunch. Fortunately for us this weekend marks the start of our school half-term holiday, so we have a lovely two week break from our routine of homework and early mornings to look forward to, which is especially welcome given how cold and dark it has been this week  - far from jumping out of bed in the morning I am more inclined to snuggle under the duvet and hibernate! Enjoy your Sunday however you are choosing to spend it.

I'll be back tomorrow with another project; until then, happy stampin'!


Stampin' Up! Supplies Used:

Table built using Product Table Builder by The Crafty Owl - Independent Stampin' Up! Demonstrator.


Home For Christmas Jolly Reindeer Card

by Joanne James28. September 2015 22:14

Happy Monday everyone! Today I have another of the cards that I designed for my recent Christmas stamp-a-stack featuring an adorable reindeer from the Home For Christmas designer paper. This clean and layered card is just perfect for the challenge over at The Card Concept this week, which is to feature a forest friend on your card:

Isn't that inspiration photo just the cutest? Here's the reindeer forest friend that features on my card:

I used a Soft Suede base and a couple of patterned pieces of Home for Christmas DSP, then punched a 2" circle of Very Vanilla and adhered my fussy cut reindeer on the top. I stamped the 'Have a' and 'Christmas' parts of my sentiment from the Holly Jolly Greetings set in Memento Black onto Very Vanilla, then cut a 'jolly' out of red glimmer paper using my Big Shot and Christmas Greetings Thinlits Dies and adhered all of my sentiments with dimensionals for a little extra height. I just love the Home For Christmas Designer Series Paper - the retro designs are fantastic and the reindeers and santas are all decorated differently and in slightly different poses that are great for fussy cutting, although I'm not sure my ladies agreed after cutting out six of these little fellas!

That's all from me today; back tomorrow with another project. Until then, happy stampin'!


Stampin' Up! Supplies Used:

Table built using Product Table Builder by The Crafty Owl - Independent Stampin' Up! Demonstrator.


Merry Christmas Ornament Card

by Joanne James26. September 2015 22:33

A quick - and late! - post from me today, but since I didn't post yesterday I thought I'd better squeeze one in today! I was fundraising at a MacMillan Coffee morning yesterday and have been busy with the usual flurry of household chores, homework and swimming clubs that generally occupy a Saturday in the James household today. The lovely ladies over at Less Is More have a challenge for 'something shiny' this week and I have the perfect CAS creation to fit - here's my card:

I used a simple base of Real Red and a mat of Whisper White, onto which I stamped 'have a' and 'Christmas' in red around a gold foil 'Merry' diecut, formed using my Christmas Greetings thinlits (I am so in love with these!) I cut an ornament shape out of gold foil using my Delicate Ornament Thinlits Dies and my Big Shot and backed this with a 1 3/4" circle of red glimmer paper (well what is shine without a little sparkle too?!), added a gold cord trim bow and adhered the ornament slightly off the edge of the card to look as if it was hanging from the 'y' of 'merry'. 

I designed this card as one of the makes for my all day Christmas stamp-a-stack this week and the ladies present loved it, although having to remove the tiny pieces from the ornament was proving tedious by the time they had made six of them! I'm also using the ornament dies in my October technique class in a couple of weeks time and can't wait - combined with the Embellished Ornaments stamp set (another 15% off bundle when you buy the two together!) they really are very versatile.

Back tomorrow with my card for this week's new challenge over at The Paper Players; come back then, you won't want to miss it!

Until then, happy stampin'!


Stampin' Up! Supplies Used:

Table built using Product Table Builder by The Crafty Owl - Independent Stampin' Up! Demonstrator.


Festival Of Trees in Green and Gold Christmas Card

by Joanne James11. September 2015 20:51

Yay it's Friday! This has been a busy week, but a good one nonetheless. Today I'm sharing a card that I made earlier this week for this week's Less Is More challenge but am only just getting the opportunity to share - how does that happen?! Anyway, the LIM girls have a challenge this week to use the colours green and gold on your card (with lots of white space!) and I just couldn't resist. Here's my card:

I decided to use Cucumber Crush as my green as I think it has a real vibrancy with the gold and white for a Christmas card. I heat embossed the pattern on my tree using the Festival of Trees stamp set in gold and combined this with a piece of Cherry on Top check DSP, my sentiment which is a combination of a gold foil 'merry' cut using the new Christmas Greetings thinlits and the stamped 'Christmas' from the Holly Jolly Greetings on a white banner. I added a couple of loops of gold corded trim and a sprinkle of gold star sequins - on offer on weekly deals this week and so easy to adhere with my new fine tip glue pen! - and that's my card done. 

A super modern CAS Christmas card that would be easy to mass-produce and in tradition colours. Maybe this will make the 'shortlist for mass production' pile this holiday season!

That's all from me today; my week has worn me out! Back tomorrow with another project. Until then, happy stampin'!


Stampin' Up! Supplies Used:

Table built using Product Table Builder by The Crafty Owl - Independent Stampin' Up! Demonstrator.


Mini Catalogue

BROWSE THE CATALOGUE

The mini catalogue is now live! Read and download your copy here.

Shop Online

Access my online shop 24 x 7, 365 days of the year:

Current March hostess code:

S9F2XJJW

Shop Online

Join My Team

It's always a great time to join Stampin’ Up! New team members can get £130 worth of products for only £99 + free business supplies + free shipping + all the fun being a part of Stampin’ Up! Stampin' Up! has something for everyone: join my growing team and benefit from my support to enjoy Stampin' Up! however you choose.

If you're interested, call me for a chat to understand how I can help you realise your goals. Alternatively, if you have already decided to sign up and you just can't wait, please click here for the link to the online form where you can sign up and order your starter kit right away! 

Latest Kit!

Stampin Cut and Emboss

The Rock Legend Kit has all you need to make 8 cards with coordinating envelopes. Along with the new Panda Friends Kit, both are available from January 4th for just £14 each - get yours here!

2023-24 Annual Catalogue

BROWSE THE CATALOGUE

Click on the catalogue for a full list of current SU! supplies - if you would like to order any of the items featured, please drop me a line at [email protected] or give me a call on 07773 421446 - I'd be happy to help.

New Online Exclusives

There will be new products available exclusively in the online store from 5 March - check them out here.

About Me

Hi I'm Joanne and live in Northampton and when I'm not looking after my husband and two beautiful children, am an avid crafter with a passion for all things Stampin' Up!

I must confess that I have never been a big rubber stamper - until I discovered Stampin' Up! that is. I love the fact that I can get such great results with co-ordinating stamps, inks, papers and punches - the possibilities are endless! Join me on my stamping journey as I share the things I love and be inspired to create amazing things yourself!

Follow Me

Monthly Newsletter

Box Builder

Click the button above to use Box Buster to create your custom box design using the Envelope Punch Board!

Kits Collection Now Available!

Stampin Cut and Emboss

The new Kits Collection from Stampin' Up! is now available!

Click here to see the current kits available and order yours online today.

I Design For


Stampin' Up Stuff

This is my personal blog and is not endorsed by Stampin’ Up! I hope you find it a plentiful source of ideas and personal inspiration but please don't copy my designs for contest submission or use for classes, publication or sale without express permission.