The Big Fifty Birthday Card PP557

by Joanne James5. September 2021 08:00

Today it's Sunday and time for this week's new challenge over at The Paper Players! It's the turn of the fabulous LeAnne to host this week and she has a fun theme challenge for you to work with:


LeAnne's theme was a timely one for me this week since my 'better half' celebrates a milestone birthday early next month so this gave me the perfect opportunity to make his birthday card. I thought the colours over at Just Add Ink were perfect for a fresh, masculine card and I absolutely love Kim's sketch over at Freshly Made Sketches so I used this for my layout (albeit I created my card in a landscape orientation in order to fit all the words in! So first up - take a look at my card:


Whilst browsing the internet for birthday inspiration, I saw a pin badge that had the above phrase on it and I thought it would be perfect for a milestone birthday card and I know Jason will appreciate this kind of sideways humour. I stamped the phrase in Night of Navy using my retired 'Sophisticated Serif' stamp set with the 'F' highlighted in Coastal Cabana, which I carried through to my '50', diecut using my retired Large Number Framelits, and used for contrast on my background panels in some retired Brights DSP in a masculine argyle pattern.

Kim's sketch also features a vertical sentiment banner, which was the perfect place to add a happy birthday greeting (stamped using my retired 'Milestone Moments' stamp set) which I heat-embossed in silver on vellum so that it wouldn't obscure the message on my central panel. This was also the perfect place to add an embellishment of a trio of retired co-ordinating ribbons tied with silver twine:


My card is otherwise very clean and uncluttered, but I figured it might be a masculine card but a milestone birthday needs a little pizzazz, right?!

Before you reach for your ink and papers, check out what our amazing team has created to inspire you this week:

Here's a quick recap of our challenge rules:
 
1.  Create a new paper project
2.  Upload your creation to your blog with a link back to us and provide a direct link to the post featuring your challenge submission.
3.  Please link your card to no more than four challenges, TOTAL.
4.  Have FUN!

You can see all of my 'How To' summaries on my 'How To - Tips and Techniques' Pinterest board in case you've missed any. 

Enjoy your day; the forecast here is for a warmer day so we are hoping for one last BBQ before the James Juniors return to school and the summer well and truly leaves us for good. I'll be back tomorrow with another project. Until then, happy stampin'!


Stampin' Up! Supplies Used:

This card uses mostly retired products apart from the current colours so there is no supplies list today.

Perennial Petals In Bloom Birthday Card PP545

by Joanne James13. June 2021 08:00

Today it's Sunday and time for this week's new challenge over at The Paper Players! It's the turn of the fabulous Claire to host this week and she has a colour challenge for us to work with:


I am a big lover of 'Brights' so Claire's colour choices this week were right up my street! I decided to pair them with this week's TGIF Challenges sketch to create a (slightly larger) birthday card for someone rather special who will be sweet sixteen this week - take a look:


Here's the low-down on today's card:

I decided to get another use out of my Perennial Petals Dies before they retire at the end of the month and used them to cut a large layered flower and leaf stem to flank a Bermuda Bay label cut with the Tasteful Labels Dies that is the basis for my sparkly diecut 16 numbers (retired Large Numbers Framelits - still so, so useful!). I overlaid my three elements with a heat-embossed sentiment from the 'In Bloom' stamp set that I cut in half horizontally, adding the upper portion to the outside and the lower portion to the inside of my card:

I love the TGIF sketch this week; I did take a more liberal interpretation on this one, although I think you can clearly see how it influenced the layout of my card this week. I'd like to give a shout out to the TGIF team who selected this card as their winner for Bree Renwick's Stampin' Blends challenge a couple of week's ago - thanks ladies!


This card is for the oldest of the James Juniors who turns 16 on Tuesday - where did that time go?! I'm safe to blog today as she doesn't read my blog, but I won't be sharing it to my social media channels until the big day; she has been helping me get to grips with Instagram and so checks that feed every day, so no spoiling the surprise!!

Here is the visual summary of the key products used on today's project for you to pin for easy reference:


You can see all of my Product and 'How To' summaries on my 'How To - Tips and Techniques' Pinterest board in case you've missed any. 

Before you reach for your ink and papers, check out what our amazing team has created to inspire you this week:

Here's a quick recap of our challenge rules:
 
1.  Create a new paper project
2.  Upload your creation to your blog with a link back to us and provide a direct link to the post featuring your challenge submission.
3.  Please link your card to no more than four challenges, TOTAL.
4.  Have FUN!

You can see all of my 'How To' summaries on my 'How To - Tips and Techniques' Pinterest board in case you've missed any. 

Enjoy your day; we spent the day at hockey and cricket respectively yesterday, so are looking forward to a day at home today, catching up on garden jobs and enjoying more of this glorious weather we are having before it breaks later this week. I'll be back tomorrow with another project. Until then, happy stampin'!


Stampin' Up! Supplies Used:

Table built using Product Table Builder by The Crafty Owl - Independent Stampin' Up! Demonstrator.

Hand Delivered Eclipse Birthday Wishes For A Discerning Teenager

by Joanne James22. May 2018 07:30

Today I'm sharing a card for the current challenge over at Just Add Ink where they are asking us to embrace the eclipse technique. I also used the sketch over at Fusion for my layout and it is perfect for the numbers and letters challenge over at Stamps Ink Paper too:


Firstly, a shout out to the lovely team over at Just Add Ink for choosing this card as the winner for challenge 407 - what an honour and I'm thrilled you liked my delicately different take on the Love What You Do stamp set. I was unable to play along with last week's colour challenge, but was keen to have another go at the eclipse technique this week with a birthday card for a discerning teenager - take a look:


Here's the low-down on today's card:

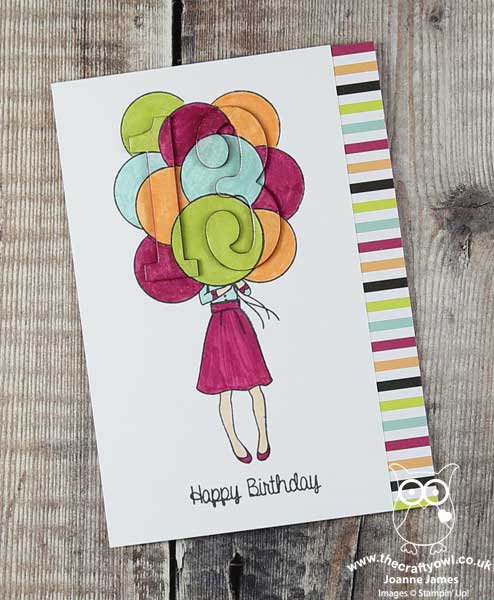
A Sneak Peak At Hand Delivered - I decided to give you a 'sneak peak' of a new stamp set today that is actually one of the exclusive hostess sets from the new Stampin' Up! annual catalogue. A fun set that has a selection of items being carried by a young lady, everything from balloons to cakes to message boards, with a variety of different skirt designs and sentiments that offer a ton of creative combinations for lots of different occasions. Best of all, it's photopolymer too, so aligning the pieces is super easy - bonus!

I think this will be one of my favourite hostess sets in the catalogue - I have so many cards in the pipeline for this one, you are definitely going to want to host a party so that you can get your hands on it too. It's worth pointing out I did make a slight modification to my stamped image on this card, in that in order to fully accommodate my numbers within the bouquet of balloons, I added a couple of extra balloons to left and right - this really wasn't tricky though, I simply masked the original image and then stamped again slightly offset on each side (the uppermost green and orange balloons on my card).  

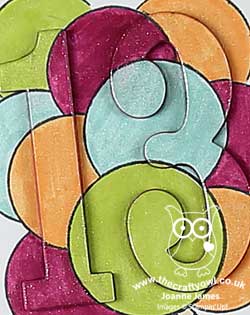
Last Chance For Large Numbers - The eclipse technique is where a word or some element of design is 'hidden' within the broader design and built up in layers so that it stands out in relief and is therefore visible as part of the overall card. I made an eclipse card previously using my Large Letters Framelits - you can see that card here - so today decided to go with the Large Numbers Framelits as I needed a card for a friend of my daughter who becomes a teenager this week. Such a milestone birthday is worthy of a number, so I decided to 'hide' mine in the collection of balloons being carried to the birthday girl, stepped up on three layers of Berry Burst cardstock.

Oh how I will miss these numbers! I can't quite believe they are retiring and they will most definitely be a 'keeper' in my collection. Incredibly, they are still available but be warned - you only have until the end of the month to add them to your crafting arsenal if you would like them; one things for sure, they are a purchase you won't regret and will get loads of use from them. 

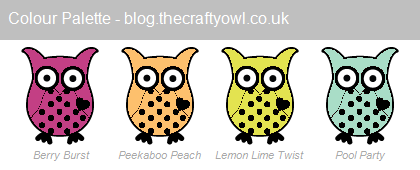
Picture Perfect Palette - I used the colours in the Picture Perfect DSP stack that featured in my vertical border as the palette for my card and simply coloured my image with my Stampin' Write Markers, adding a liberal dose of clear Wink of Stella to my balloons. Here is the colour swatch if you would like to save it for your future project inspiration:


Lastly, I finished the inside of my card with this sentiment from the Cake Soiree stamp set:


So what do you think? I'd love to hear your thoughts by leaving a comment below. Also, be sure to check out the Just Add Ink designers and gallery for lots more inspiration with the eclipse technique.

Here is the visual summary of the key products used on today's project for you to pin for easy reference:


You can see all of my 'How To' summaries on my 'How To - Tips and Techniques' Pinterest board in case you've missed any. 

Enjoy your day and I'll be back tomorrow with another project. Until then, happy stampin'!


Stampin' Up! Supplies Used:

Table built using Product Table Builder by The Crafty Owl - Independent Stampin' Up! Demonstrator.

Happy New Year 2018 Celebrate You Shaker Card #GDP119

by Joanne James2. January 2018 21:00

Hello lovely readers - and a happy new year to you all! Today I'm sharing a card that I made for some friends with whom welcomed in the new year - I was still enjoying the 'morning after the night before' yesterday so from a blog perspective today heralds the beginning of the end of my festive blog break! I'm also linking up with a couple of challenges - the current challenge over at Global Design Project where the theme is all about celebrating at home and the lovely ladies over at As You See It who are all about the sparkle for their first challenge of the year:


My card was inspired by my 2017 new year card, minus the owl of course (you can see that card in a previous post here) and has a little 'something old ... and lots new' about it - take a look:


Here's the low-down on today's card:

A Window Into 2018 - I used my much-loved Large Numbers Framelits to create fun shaker-card windows in the front of my card. This is so easy to do; you just need to remember to keep the middle of the 0 and 8 to complete the negative image. If you place the numbers that you've cut out over the window sheet without sticking them down, they will allow you to position the negative pieces in just the right position when you remove the numbers again. 

All That Glitters - My decision to create a shaker card was largely because I was looking for an opportunity to use these amazing gold glitter flakes from the new Spring-Summer catalogue that launches tomorrow. Check out the close-up below - aren't they gorgeous? So sparkly! 

Celebrate ... Amazing You - The main front panel of my card features a stamp from a new Sale-A-Bration set, Amazing You (stamped in Versamark and heat embossed in gold and silver) and the word 'celebrate' cut from silver glimmer paper using another of this year's Sale-A-Bration free items - a set of thinlits dies called 'Celebrate You' that co-ordinate with the stamp set and are available free with a £90 purchase. More news on Sale-A-Bration tomorrow, but I hope these sneak-peeks have got you all excited about the fabulous things that are to come!

Here is the visual summary of the key products used on today's project for you to pin for easy reference:


You can see all of my 'How To' summaries on my 'How To - Tips and Techniques' Pinterest board in case you've missed any. 

I'll be back tomorrow with all of the news and information on the 2018 Sale-A-Bration promotion and the launch of the new Spring-Summer seasonal catalogue. Until then, happy stampin'!


Stampin' Up! Supplies Used:

Table built using Product Table Builder by The Crafty Owl - Independent Stampin' Up! Demonstrator.

Large Letters and Numbers Brother Football Birthday Card #GDP103

by Joanne James7. September 2017 20:30

Good evening lovely readers! I was tempted to share a Christmas card today but as it's my birthday I thought a birthday card was in order. Not one to me though - instead one that I made for Ben from Rebecca for his birthday recently - another masculine card to fit with the theme over at the Global Design Project this week which also happens to use this week's Color Throwdown colour palette too:


I decided to make another slightly larger card than usual as I wanted to be able to personalise it - take a look:


Here's the lowdown on today's card:

Recipe For Success - Every time I make a card with someone in particular in mind, I try to choose something personal or meaningful to that individual; after all, that has to be the biggest benefit of crafting your own. That is no more so than when it's a card for your nearest and dearest, and Rebecca was clear this card needed some key things: the number 10, the word 'brother', some form of birthday greeting and both a football and the colour red - the colour of Ben's beloved Manchester United football team. Armed with such clear requirements, it made the job of designing this card super easy.

Numbers and Letters - I used both my large letters and numbers today. My letters were stamped using 'Letters For You' again like yesterday's card and cut out with the Large Letters Framelits. I used my numbers to create a tone-on-tone repeating background pattern of the number 10; a good way to include it without having it front and centre. I also used the banner die from the Large Numbers Framelits for my happy birthday banner.

Retro Rubber - I substituted the 'O' in 'BROTHER' with a football, courtesy of a little 'retro rubber' from the long-retired stamp set, 'Great Sport'. I'm so glad I held on to this set - I have used the football and basketball in this set sooo many times!! A true blast from the past - so one for a link up with SUO Challenges too this week as this is their theme, how appropriate!

Here is the visual summary of the key products used on today's project for you to pin for easy reference:


You can see all of my 'How To' summaries on my 'How To - Tips and Techniques' Pinterest board in case you've missed any. 

What kinds of stamps have you held on to and would never part with? Do leave me a comment below - Id love to know!

I hope you enjoyed today's post; I'll be back tomorrow with another project - definitely for Christmas and with a little more retro rubber thrown in! Until then, happy stampin'!


Stampin' Up! Supplies Used:

Table built using Product Table Builder by The Crafty Owl - Independent Stampin' Up! Demonstrator.

It's A 2017 Celebration With The Crafty Owl

by Joanne James1. January 2017 07:00

Well hello! Have you missed me? I hope you've all enjoyed a wonderful Christmas and best wishes for a very happy new year! I had a very busy Christmas season and had to take an extended blogging break; sometimes some things just have to give and for me my blog was one of them this past few weeks. Anyway, now I'm back and here with a card to welcome in the new year. I'm also entering a couple of challenges: the Paper Craft Crew are looking for a black-tie gala inspired card and the peeps over at CAS-ual Fridays are working with the theme of 'Celebrations':

Join me for a Black Tie Gala event with the Paper Craft Crew and play along with Challenge 224. #pcc2016 #themechallenge #blacktie www.papercraftcrew.com   

I decided that today the owl should return in more ways than one - take a look at my card to see what I mean:


Here's the low-down on today's card:

A Dapper Owl - The star of today's card is the super-sparkly, rather dapper Fred Astaire-esque owl that is tripping the light fantastic as he welcomes in the new year! The Owl Builder Punch was one of my first Stampin' Up! purchases and I love how versatile it is. I used the owl punch to make the very first new year card that I blogged way back in 2013 when I first began blogging (you can see that card here) so it seemed fitting that I should use an altogether more elegant owl to kick start 2017. This card also heralds the start of a new weekly feature of mine: each week I will be creating a card that features a different owl or character made with the Owl Builder Punch. This is a fun way to demonstrate the versatility of this popular Stampin' Up! punch, so be sure to tune in each week for your owl inspiration. Today's owl sports a gold glimmer waistcoat and a top hat and bow tie courtesy of the Snow Friends Framelits. The walking cane is a simple strip of glimmer paper and a circle punched with the owl builder punch. Along with my Large Number Framelit numbers, today's owl is seriously sparkly!

It's A Celebration - My starry background is courtesy of the fireworks in the 'It's a Celebration' stamp set in the current seasonal catalogue; I stamped them in Versamark and heat embossed in silver and gold for a dramatic background reminiscent of the night sky.

Yes, Let's Celebrate 2017! - I finished my card with a sentiment from the 'Confetti Celebration' stamp set - ot just for birthdays, this set works for lots of other kinds of celebration too.

Here is the visual summary of the key products used on today's project for you to pin for easy reference:


You can see all of my Product and 'How To' summaries on my 'How To - Tips and Techniques' Pinterest board in case you've missed any. 

That's all from me; I'm off to spend the day with the extended James family to welcome in the new year. Back tomorrow with another project; until then, happy stampin'!


Stampin' Up! Supplies Used: 

Table built using Product Table Builder by The Crafty Owl - Independent Stampin' Up! Demonstrator.

Smooshing Into 2016 With A New Technique

by Joanne James1. January 2016 09:00

A new card for a new year! I know I shared a new year card with you yesterday - well, I have another one for you today! As a rule I only send one happy new year card each year, to my mother-in-law for hosting our family New Year's gathering, however when I saw that the theme this week over at Global Design Project was CASE The Designer and set eyes on Bibi Cameron's gorgeous card, inspiration most definitely struck. Here is her original card:

Isn't it lovely? I was really attracted to the background and decided to have a go at another technique that my good friend Kim Fee over at Simply Fairies affectionately calls the 'smooshing technique' as the basis for my card. So here is my card:


You might wonder why I struggled with this background - looks simple enough, right? Well, having thrown away many a piece of ruined cardstock I would have to disagree - there is clearly an art to getting it right! The lovely Kim recently made a short video after much pleading by myself and other smoosh-challenged friends; you can watch it here and I seriously recommend you do if you want to try this technique as it contains some great hints and tips. 

I used extra-thick Whisper White cardstock for my base, then created my inked layer on a piece of shimmery white cardstock using Pacific Point, Island Indigo and Night of Navy inks. The cardstock gives the card a wonderful all over shimmer in real life. I then used the stars stamp from Holly Jolly Greetings (a carryover set, yay!) stamped in Versamark and heat embossed in gold for added interest, then used some gold glimmer numbers, diecut using the new Large Numbers Framelits Dies (love these!). My Hello is from the 'Crazy About You' stamp set, which I popped up on dimensionals and finished with a trio of gold metallics sequins.

I really love the randomness of this background, which is quite different from my usual style, even though the card still feels true to me. So thanks Bibi and Kim for the inspiration for today's card. I hope it inspires you too to create something a little different this week - the new year is full of new creative possibilities and I am so looking forward to sharing them with you!

Happy New Year wishes to you all, my customers, blog and social media followers and friends and the ladies over at SUO Challenges where I'm linking up my second New Year card. I'll be back tomorrow with another project; until then, happy stampin'!


Stampin' Up! Supplies Used:

Available January 5th:

140622 Large Numbers Framelits Dies

Table built using Product Table Builder by The Crafty Owl - Independent Stampin' Up! Demonstrator.


Mini Catalogue

BROWSE THE CATALOGUE

The mini catalogue is now live! Read and download your copy here.

Shop Online

Access my online shop 24 x 7, 365 days of the year:

Current April hostess code:

VDKNV7BH

Shop Online

Join My Team

It's always a great time to join Stampin’ Up! New team members can get £130 worth of products for only £99 + free business supplies + free shipping + all the fun being a part of Stampin’ Up! Stampin' Up! has something for everyone: join my growing team and benefit from my support to enjoy Stampin' Up! however you choose.

If you're interested, call me for a chat to understand how I can help you realise your goals. Alternatively, if you have already decided to sign up and you just can't wait, please click here for the link to the online form where you can sign up and order your starter kit right away! 

Latest Kit!

Stampin Cut and Emboss

The Rock Legend Kit has all you need to make 8 cards with coordinating envelopes. Along with the new Panda Friends Kit, both are available from January 4th for just £14 each - get yours here!

2023-24 Annual Catalogue

BROWSE THE CATALOGUE

Click on the catalogue for a full list of current SU! supplies - if you would like to order any of the items featured, please drop me a line at [email protected] or give me a call on 07773 421446 - I'd be happy to help.

New Online Exclusives

There are new products available exclusively in the online store from 5 March - check them out here.

About Me

Hi I'm Joanne and live in Northampton and when I'm not looking after my husband and two beautiful children, am an avid crafter with a passion for all things Stampin' Up!

I must confess that I have never been a big rubber stamper - until I discovered Stampin' Up! that is. I love the fact that I can get such great results with co-ordinating stamps, inks, papers and punches - the possibilities are endless! Join me on my stamping journey as I share the things I love and be inspired to create amazing things yourself!

Follow Me

Monthly Newsletter

Box Builder

Click the button above to use Box Buster to create your custom box design using the Envelope Punch Board!

Kits Collection Now Available!

Stampin Cut and Emboss

The new Kits Collection from Stampin' Up! is now available!

Click here to see the current kits available and order yours online today.

I Design For


Stampin' Up Stuff

This is my personal blog and is not endorsed by Stampin’ Up! I hope you find it a plentiful source of ideas and personal inspiration but please don't copy my designs for contest submission or use for classes, publication or sale without express permission.