by Joanne James27. October 2021 20:04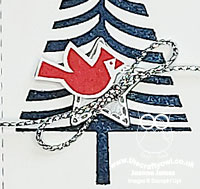
Today I have a really quick post to share a card that I made for this week's Inspired By challenge:

They had another two great inspiration photos this week; I decided to use the winter inspiration photo and the sketch (in landscape) and was drawn to both the colours and one of the styles of Christmas trees it featured - it's very similar to one in the retired set 'Festival of Trees' - take a look at my card and you'll see which one I mean:
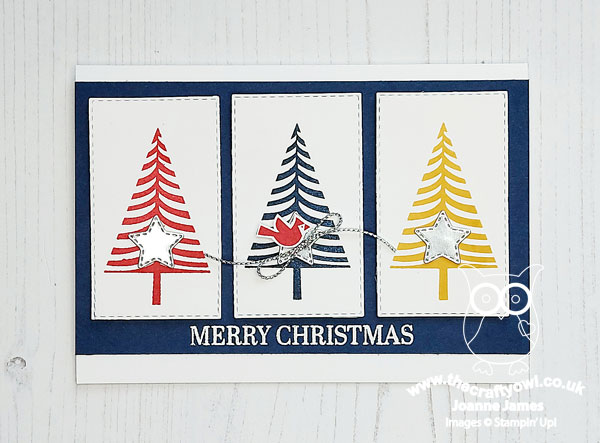
I stamped the tree in Real Red, Night of Navy and Bumblebee on a trio of white stitched rectangles, I added a silver foil stitched star to each one, cut using one of the Give It A Whirl dies and added a red cardinal from the same stamp set and a silver twine bow to the centre one:

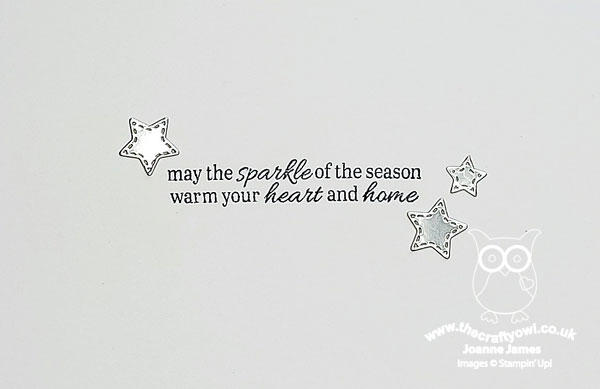
A heat-embossed sentiment and a few extra stars to pretty up the inside completes my card:
No supplies list today - I hope you enjoyed this mix of old and new! I do love an unconventionally-coloured Christmas card and these modern trees are a timeless class for sure so it felt good to give them some love too.
Enjoy your evening and I'll be back tomorrow with another project. Until then, happy stampin'!
by Joanne James11. September 2015 20:51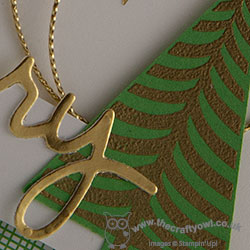
Yay it's Friday! This has been a busy week, but a good one nonetheless. Today I'm sharing a card that I made earlier this week for this week's Less Is More challenge but am only just getting the opportunity to share - how does that happen?! Anyway, the LIM girls have a challenge this week to use the colours green and gold on your card (with lots of white space!) and I just couldn't resist. Here's my card:

I decided to use Cucumber Crush as my green as I think it has a real vibrancy with the gold and white for a Christmas card. I heat embossed the pattern on my tree using the Festival of Trees stamp set in gold and combined this with a piece of Cherry on Top check DSP, my sentiment which is a combination of a gold foil 'merry' cut using the new Christmas Greetings thinlits and the stamped 'Christmas' from the Holly Jolly Greetings on a white banner. I added a couple of loops of gold corded trim and a sprinkle of gold star sequins - on offer on weekly deals this week and so easy to adhere with my new fine tip glue pen! - and that's my card done.
A super modern CAS Christmas card that would be easy to mass-produce and in tradition colours. Maybe this will make the 'shortlist for mass production' pile this holiday season!
That's all from me today; my week has worn me out! Back tomorrow with another project. Until then, happy stampin'!
Stampin' Up! Supplies Used:
by Joanne James6. December 2014 14:01A quick card from me today for this week's challenge over at Merry Monday, where Deanne would like us to use a bird on our card:

I am sharing a card I made at one of my first Christmas card classes, which featured the lovely Partridge & Pears stamp. Here is my card:
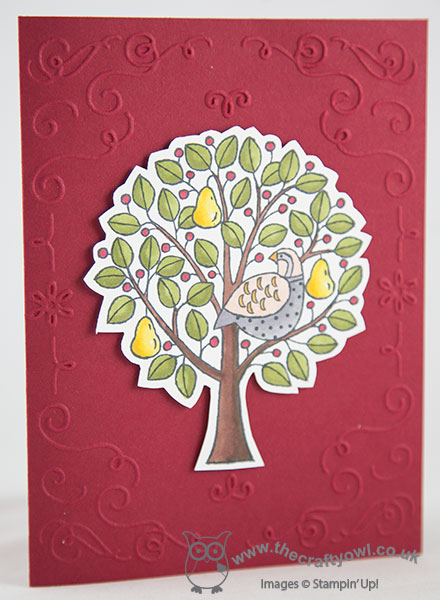
This is one of the simpler cards that we made and I left it sentiment-free on the front, as I didn't want to interfere with the embossing folder detail. The main tree image was stamped in Memento Black ink and coloured with a selection of Stampin' Up! Blendabilities and then fussy cut and popped up on dimensionals so that it would really stand out. I love this image for a traditional Christmas card and whilst I don't use embossing folders as much as the other products in my craft room, I love the effect of this frame around the focal image.
That's all from me today - I'm off to my first Christmas party of the season this evening. Back tomorrow with my very last Design Team post for The Paper Players. My 6 month tenure has finally come to an end and whilst I will be sad to leave that amazing team, you will not want to miss tomorrow's post as we have some very special projects lined up for you! Until then, happy stampin'!
Stampin' Up! Supplies Used:
by Joanne James3. December 2014 07:00 
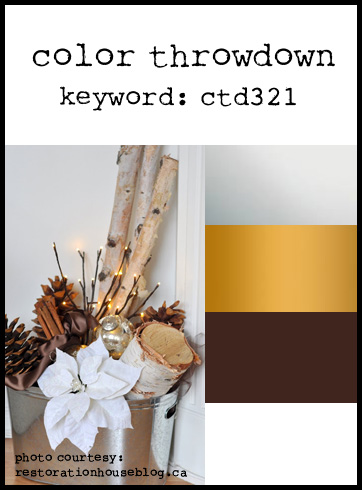
Welcome to my first creative post of the day! Following my selection as Featured Stamper for this card using the above challenge colours over at Color Throwdown a couple of weeks ago, the lovely ladies over there have invited me to be a guest designer for this week's challenge - yay! As if that wasn't enough, just look at the lovely colours and inspiration photo we had to work with:
I had to go with something Christmassy and I found the mix of textures in the inspiration photo provided me with the starting point for my card. So this is what I came up with:
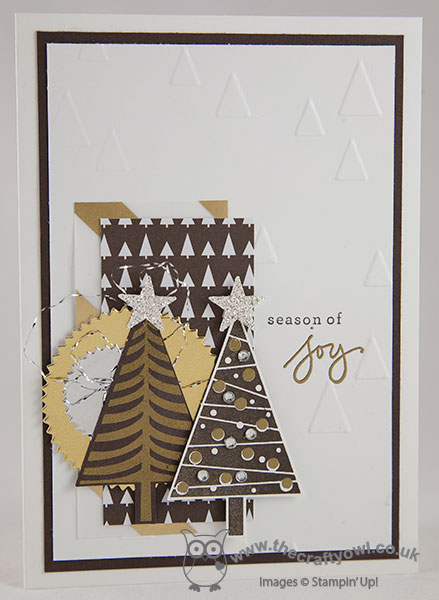
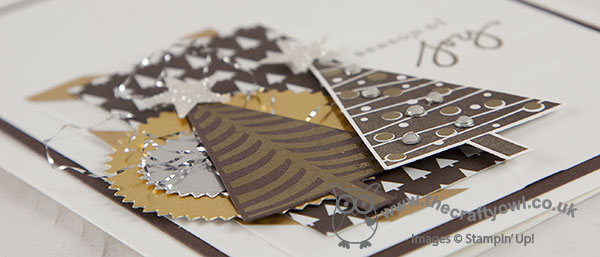
I used Whisper White for my base and layered this with a mat of Early Espresso, then another piece of Whisper White, having first embossed this piece with my On Point embossing folder. I then created a little 'corner collage', comprising some gold striped vellum, a piece of tree-patterned DSP from the 'Trim The Tree' stack, a gold and snaller silver foil starburst circle, and then two Christmas trees - one stamped in Versamark and heat embossed in gold on Early Espresso cardstock and the other stamped in Early Espresso on Whisper White, with the baubles heat embossed in gold and a few silver rhinestones added for extra sparkle. A couple of silver glimmer paper stars top the trees and I looped some silver thread removed from some silver baker's twine behind them. To finish, I stamped my sentiment in between the embossed area in Early Espresso and Versamark heat embossed in gold. Collage-style cards are not my usual thing, but I must confess I enjoyed getting slightly carried away with this card and am really pleased with the result.
Do pop over to the Color Throwdown blog to see what the other designers have created using this colour palette; these ladies do a great job each week and would I'm sure appreciate your visit. I for one will be stalking the gallery with interest!
Back shortly with today's third post! Until the, happy stampin'!
Stampin' Up! Supplies Used:
df70faee-acae-439b-bd50-2ff22182b1d7|0|.0|96d5b379-7e1d-4dac-a6ba-1e50db561b04
Tags: Christmas, Festival of Trees, Endless Wishes, On Point TIEF, Trim The Tree, Embossing, Shop online, Stampin' Up Supplies, Stampin' Up Card ideas, Stampin' Up Card, Stampin' Up, Starburst Framelits, Big Shot
Cards | Stamping
by Joanne James13. November 2014 20:10Today I'm sharing my card for this week's challenge over at Less is More, where the focus for this week's one layer challenge is a 'starry, starry night'. I was aiming for an early LIM entry this week and this post was originally scheduled for Tuesday, but best laid plans and all that .... So two days later, here it is:
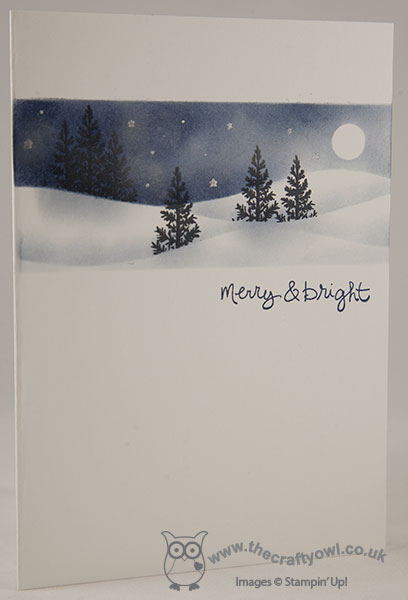
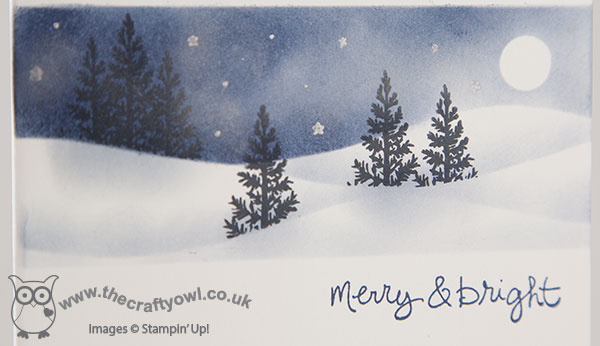
So how did I create today's card? Well, I've been wanting to create a sponged snowy scene for a while, so this card was the perfect opportunity. I masked off a horizontal panel, added a masked circle for my moon and then created a 'hill' mask to create my landscape itself. I sponged in my sky using Night of Navy ink and used the same colour to highlight the edges of the snow dunes and some subtle tree shadows (I did this bit after I stamped in the trees). Once I'd created my snowscape, I used the tip of the pine tree from the Festival of Tree stamp set to add in my trees. I stamped them in Memento Black ink, being careful to keep my mask in place each time so that the trees were behind the surface of the snow. To finish, I used some Encore silver ink to sponge in some tiny stars using a stencil I created with my Confetti Stars punch, along with a few dots added with my Silver marker. I also lightly sponged some Encore Silver onto some areas of the sky to add a subtle sheen. To finish, I stamped my sentiment from the 'Good Greetings' stamp set beneath my scene. Here's a closeup of the scene itself so that you can see it in more detail:
For such a 'blue' card, this really is very pretty and for a one layer card has so much going on. I think I might have to make a few more like this!
Back tomorrow with another card; until then, happy stampin'!
Stampin' Up! Supplies Used:
998fba23-8838-4f0a-a0f9-7baa554c0316|0|.0|96d5b379-7e1d-4dac-a6ba-1e50db561b04
Tags: Christmas, circle punch, Confetti Stars Punch, one layer cards, Festival of Trees, Good Greetings, Shop online, Sponging, Stampin' Up, Stampin' Up Card, Stampin' Up Card ideas, Stampin' Up Supplies
Cards | Stamping
by Joanne James19. September 2014 18:54Yay - it's Friday! I've had a productive craft day today, even if no housework managed to get done (ah well, there's always tomorrow for that!) and am finally finding time to write today's blog post. I used this week's sketch over at Retrosketches to make today's Christmas card and broke out my Festival of Trees stamp set for the first time. Here's the sketch I based my card on:
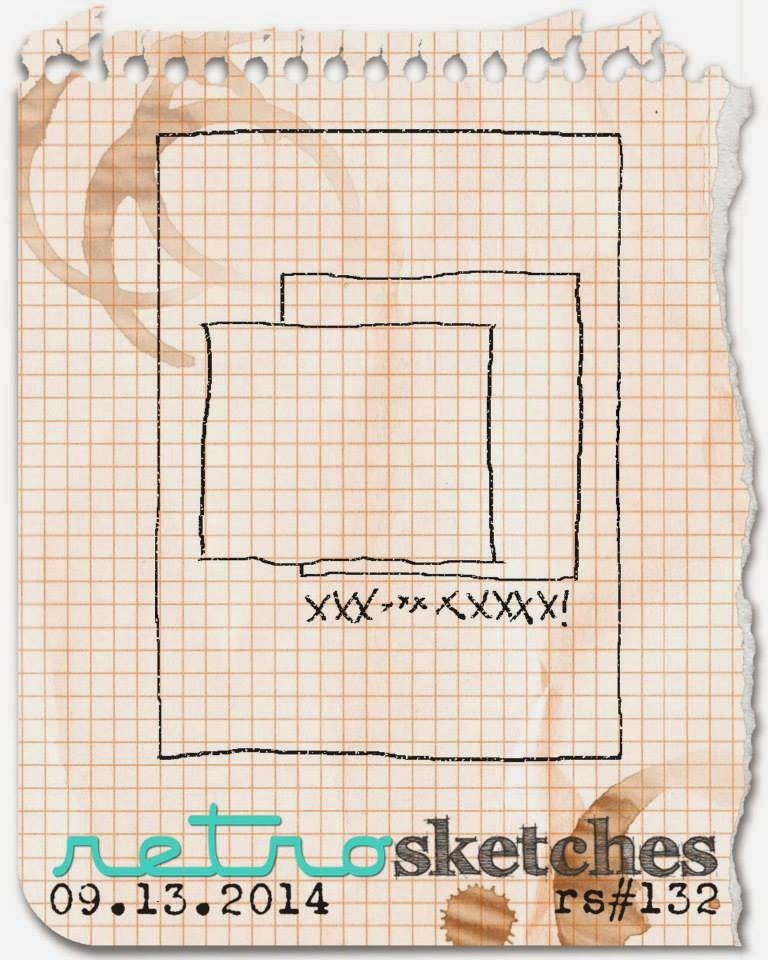
A great layered layout - and here's what I did with it:
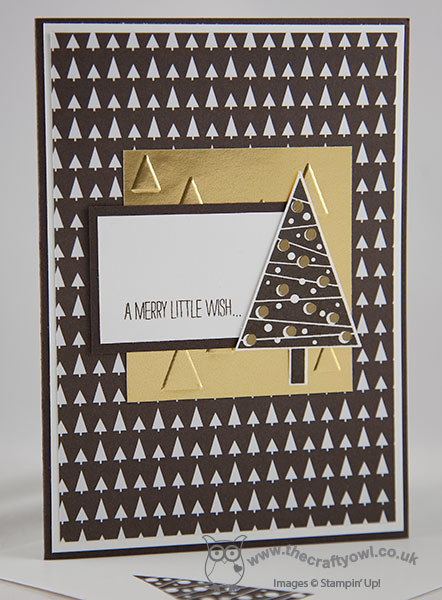
I based my card around the graphic Christmas tree design paper from the Trim The Tree DSP stack - these are so great for making cards! - and having layered this piece onto my Early Espresso card base and a mat of Whisper White, I embossed a piece of gold foil with the On Point embossing folder, which looks like little Christmas tree shapes, then followed this with a smaller piece of Whisper White mounted on Early Espresso and stamped with the first part of the sentiment that comes with the Festival of Trees stamp set. I then added my Christmas tree, which I stamped in Early Espresso on Whisper White, then stamped the baubles in Versamark and heat embossed them in gold - in real life they are really shiny and contrast beautiful with the dark brown of the tree. Oh and did I mention how easy it was to punch out with my co-ordinating tree punch? No? Well, it's a doddle!
An unconventional colour scheme for a Christmas card maybe, but I like it! Before I forget - I'm also joining up with the lovely Darnell's NBUS challenge - pretty much everything other than ink and solid colour cardstock that I used today was officially 'Never Before Used Stuff!'

Right - I'm off to catch up on some of the jobs that I should have been doing at home today. Back tomorrow with another Christmas card in an altogether more conventional colour scheme -until then, happy stampin'!
Stampin' Up! Supplies Used: