by Joanne James30. January 2020 12:30 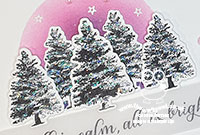
The week is running away with me again - I can't believe it's Thursday already and I'm finally managing a blog post! Today I'm sharing a card that I made for a few challenges in an attempt to keep my 2020 Christmas cardmaking on track:

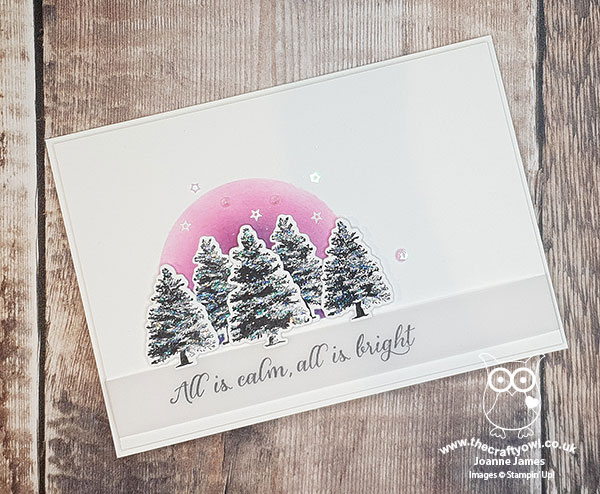
Armed with the codeword of 'Frosty' from the current challenge over at Addicted to CAS, along with the snowflakes, trees and pink sky in the inspiration photo at Hand Stamped Sentiments, I set to work and this is what I came up with:
Here's the low-down on today's card:
This was another relatively quick and easy card to make: I used a 2 1/4" circle punch to make a mask and then sponged a combination of Melon Mambo and Blueberry Bushel inks on a Whisper White base to create my sky. I stamped a collection of trees from Rooted in Nature in Memento Black onto Whisper White and cut them out with my co-ordinating Nature's Roots Dies and popped them up on dimensionals in front of the sky. I added snow to the branches of my trees with a chalk marker then added a liberal application of glitter to the snowy branches and a few sequins to complete my frosty look:
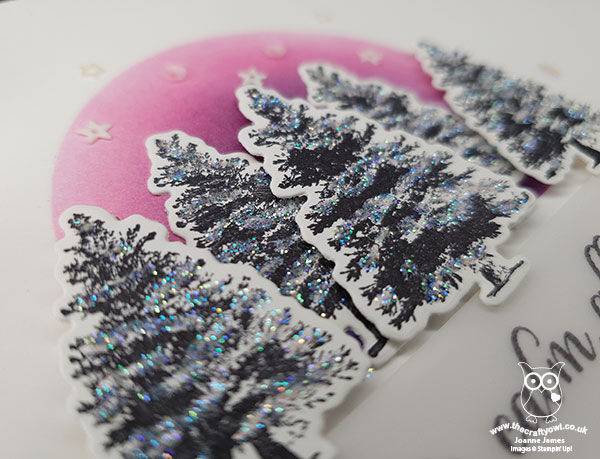
How pretty is this? Given the crystalline appearance of all that glittery and frosty snow, I am also linking up with CASology for my take on the word 'Crystal'. I then stamped my sentiment (from the retired SU! stamp set 'Wonderland') in black onto vellum and wrapped this around the front of my card to finish. I do find it difficult to think about Christmas amongst all of the hearts and flowers that are prevalent at this time of year, so was grateful to the above challenges for some festive inspiration!
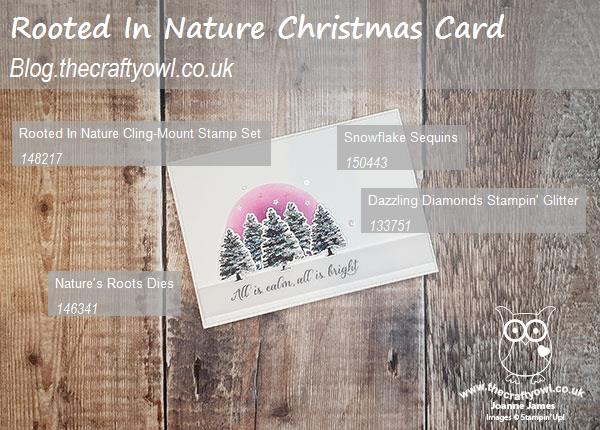
Here is the visual summary of the key products used on today's project for you to pin for easy reference:
You can see all of my 'How To' summaries on my 'How To - Tips and Techniques' Pinterest board in case you've missed any.
Enjoy your day; I am without electricity today, which since it was planned is no bad thing; I've enough laptop battery to write this post and access to a wifi hotspot, and no means to do any washing, ironing, cooking or vacuuming - an afternoon of crafting it is then!! I'll be back tomorrow with another project. Until then, happy stampin'!
Stampin' Up! Supplies Used:
by Joanne James17. December 2015 08:05
I've had a few blog-free days this week - so much going on with the end of the school term and Christmas preparations, blogging has had to take a bit of a back seat - however today it's time for a new challenge over at Create With Connie and Mary so I'm back with it and this week we have a great colour combination for you:
My card this week is all about the reindeer - take a look:
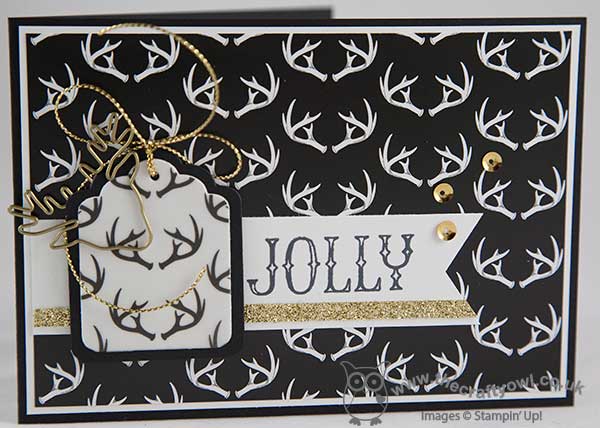
I decided to make a feature of the reindeer antler paper and vellum from the Winter Wonderland designer series paper, with a little gold glimmer paper, a few gold sequins, corded trim and one of my favourite reindeer paper clips to finish off my little layered tag. A little bit of layering but still easy enough to make for those last minute Christmas cards and a great way to use up that rather tricky heavily patterned paper.
Do visit the other Design Team members to see what they did with this week's colours; there's lots of inspiration over on their blogs too! Due to the Christmas festivities, this challenge will run for two weeks instead of one, so lots of time for to squeeze in an entry!
Enjoy your day and I'll be back tomorrow with another project; until then, happy stampin'!
Stampin' Up! Supplies Used:
- Winter Wonderland Specialty Designer Series Paper
- Winter Wonderland Designer Vellum Stack
- Gold Cording Trim
- Reindeer Paper Clips Embellishments
- Tags & Labels Framelits Dies
- Gold Glimmer Paper
- Metallics Sequin Assortment
- Basic Black A4 Cardstock
- Whisper White A4 Cardstock
- Big Shot
- Fine-Tip Glue Pen

f7cc3feb-9faf-428c-b747-9f9fdec49648|0|.0|96d5b379-7e1d-4dac-a6ba-1e50db561b04
Tags: Create With Connie And Mary, Stampin' Up, Stampin' Up Card, Stampin' Up Card ideas, Stampin' Up Supplies, Wonderland, Winter Wonderland, Tags and Labels Framelits, Reindeer paper clip, Christmas, Oh What Fun
Cards | Shop Online | Stamping
by Joanne James26. November 2015 08:05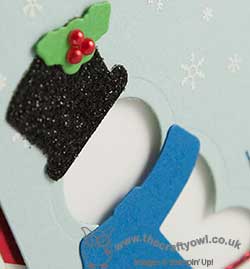
Today it's time for a new challenge over at Create With Connie and Mary and this week we have a great sketch for you:
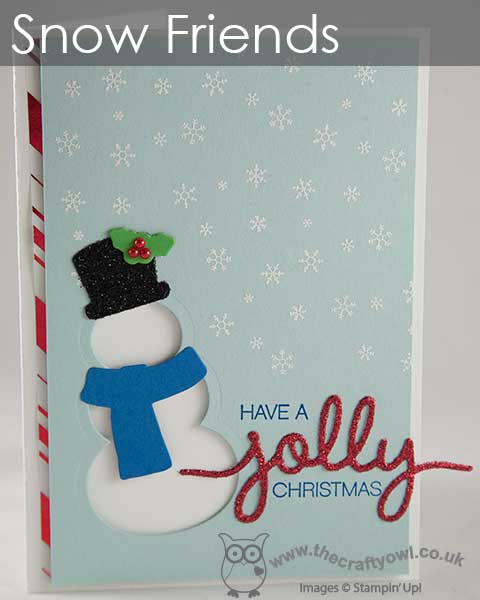
I had lots of ideas about ways to use this sketch; I eventually settled on this fun card featuring a snowman with a difference:
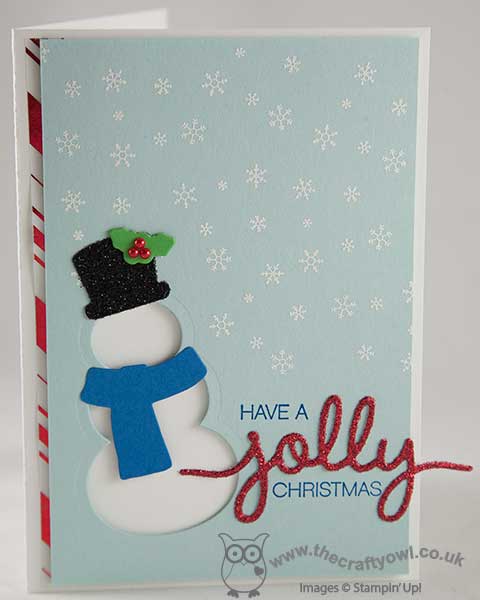
Instead of stamping a snowman on my card, I decided to create a graphic snowman using my Big Shot and the Snow Friends framelits. I used a card base of extra-thick white cardstock and tucked a strip of red striped Holidays Fancy Foil Vellum don the left hand side. I then added a panel of Soft Sky, onto which I stamped the snowflakes from the Wonderland stamp set in Versamark and heat embossed them in white, before cutting out the snowman shape and scarf and hat, which adhered across the negative space for dimension. I then stamped part of the sentiment from Holly Jolly Greetings directly onto the cardbase in Pacific Point, adding a red glimmer 'jolly' cut from the co-ordinating Christmas Greetings Framelits dies to finish. I also used black glimmer paper for the snowman's hat - both add great sparkle to this card. To finish, I added a few pearls coloured with a red Sharpie as the holly berries for the leaves on the hat.
I love the subtle textures and layering on this card - and it's fun to look at framelits and dies to see how else they can be used beyond the straightforward cutting out of shapes.
Do visit the other Design Team members to see how they interpreted this week's sketch; there's lots of inspiration over on their blogs too!
Enjoy your day and I'll be back tomorrow with another project; until then, happy stampin'!
Stampin' Up! Supplies Used:
- Snow Friends Framelits Dies
- Holly Jolly Greetings Clear-Mount Bundle
- Wonderland Wood-Mount Stamp Set
- Embossing Buddy
- Versamark Pad
- Heat Tool (Uk)
- White Stampin' Emboss Powder
- Big Shot
- Whisper White A4 Thick Cardstock
- Holidays Fancy Foil Designer Vellum
- Soft Sky A4 Cardstock
- Pacific Point Classic Stampin' Pad
- Pacific Point A4 Cardstock
- Cucumber Crush A4 Cardstock
- Pearl Basic Jewels
- Red Glimmer Paper
- Black Glimmer Paper
f1729a10-d793-4de2-b586-a56e2bfae032|1|5.0|96d5b379-7e1d-4dac-a6ba-1e50db561b04
Tags: Create With Connie And Mary, Stampin' Up, Stampin' Up Card, Stampin' Up Card ideas, Stampin' Up Supplies, Big Shot, Snow Friends Framelits, Wonderland, Holly Jolly Greetings, Christmas, Christmas Greetings thinlits
Cards | Shop Online | Stamping
by Joanne James23. November 2015 08:00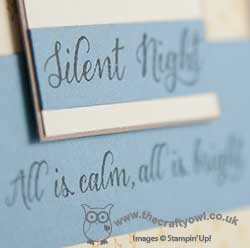
Happy Monday everyone - a new week begins! Today I'm sharing a card using this week's sketch over at Freshly Made Sketches:
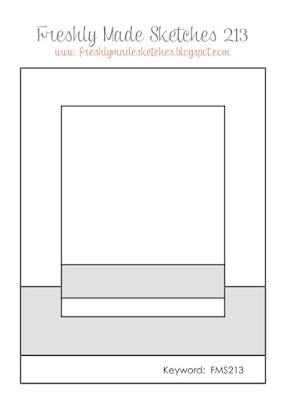
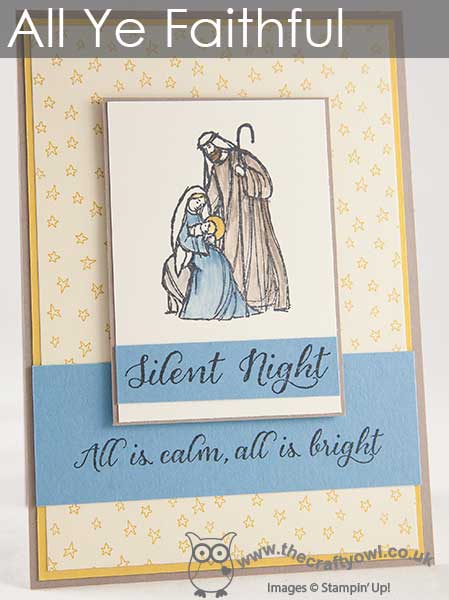
I decided the horizontal panels would work for a two-piece sentiment, so I chose to pair the Wonderland sentiments with the holy family image from 'All Ye Faithful' and some not so Christmassy designer series paper - take a look:
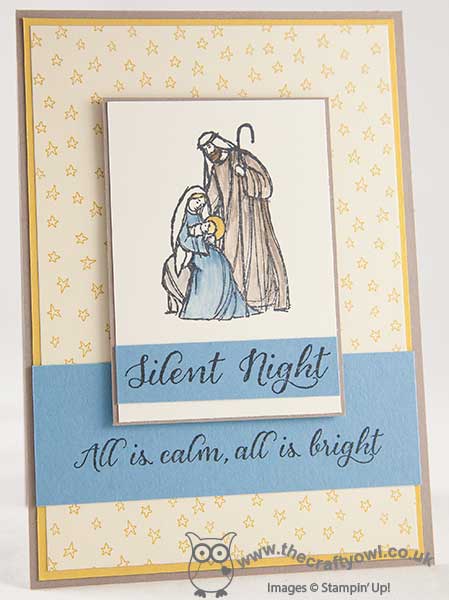
I used Tip Top Taupe for my card base, with a mat of Hello Honey and a piece of the Sweet Li'l Things starry paper for the background panels. I stamped my holy family in Memento Black and coloured it using my inks and blender pen, stamping my sentiment in black on two panels of Marina Mist. Not altogether tricky and I must say I love the pop of blue from the Marina Mist sentiment panels. Great to be able to use this paper in a non-baby way too. I've already had another idea for this sketch which, all being well, I will make up and share later in the week.
That's all from me today; a piano lesson, business meeting then hopefully some time at my desk crafting this afternoon. Enjoy your Monday - I'll be back tomorrow with another project; until then, happy stampin!
Stampin' Up! Supplies Used:
by Joanne James21. November 2015 22:57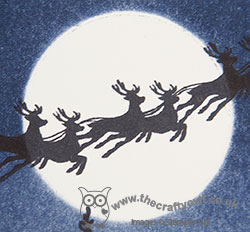
I've had a busy day working with Ben on his school project today but just have time to squeeze in a quick blog post with a card for this week's challenge over at Merry Monday:
I actually cased my own card for this one; this card here is one of my most pinned cards on Pinterest and I thought that my Wonderland stamp and the lovely sleigh and reindeer from Cozy Christmas would make for a great updated version so here it is:
On a base of Night of Navy and a matt of brushed silver, I masked a panel and moon on a piece of Whisper White using post-it notes then sponged in a sky in Night of Navy, with the trees from the 'Wonderland' stamp set stamped in Archival Black across the bottom. I then stamped my sleigh and reindeer silhouette in front of the moon and stamped my sentiment in Versamark and heat embossed it in silver across the bottom. Clean, simple and without fuss - very me! - and not one but eight reindeer, skimming the tree tops.
That's all from me; back tomorrow with a new challenge over at The Paper Players. until then, happy stampin'!
Stampin' Up! Supplies Used:

by Joanne James15. November 2015 09:00
It's Sunday and time for a new challenge over at The Paper Players! This week it is the turn of the lovely Jaydee to host and she has a clean and simple challenge to get our creative juices flowing this week:
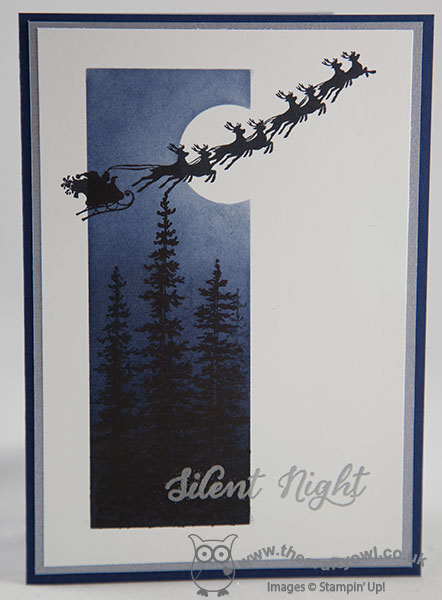
I decided to get to work with my brayer and create a starry night sky over a forest created with my Wonderland stamp set for my card today:
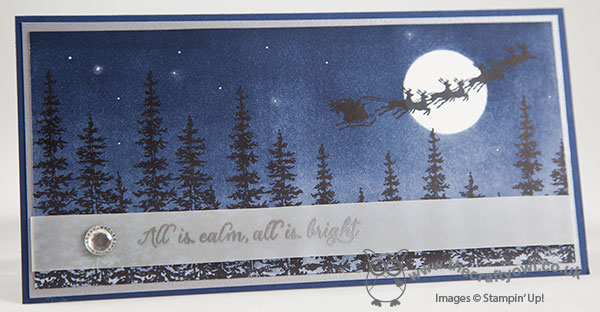
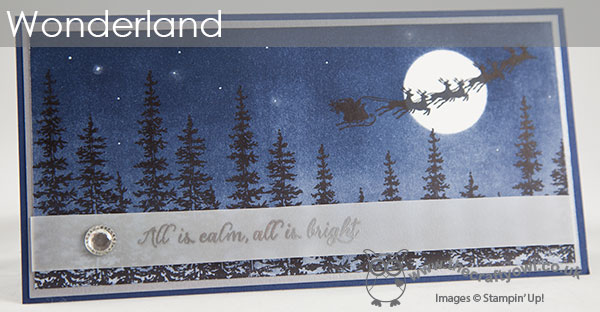
I went for a long, thin card and brayered my background in Night of Navy, masking the moon with a circle of post-it note, then stamped the trees from 'Wonderland' and the santa and reindeer from 'Cozy Christmas'. I added a few stars with my white signo gel pen and a little white kraft ink. I stamped the sentiment in Versamark and heat embossed this in silver on vellum, wrapping it around my card front and finishing with an iced rhinestone embellishment.
So I have something of a confession! I saw the brief for our challenge today and the word 'Wonderland' and immediately reached for my stamp set of the same name to create my card. As I sat back to admire my handywork, I realised that a true 'Winter Wonderland' would surely have snow on the ground and mine didn't have a single flake in sight - oops! With Onstage Live and a trip to Brussels around the corner and
Before you reach for your ink and papers, check out what our amazing team has created to inspire you this week:
The Paper Players Design Team
Here's a quick recap of our challenge rules:
1. Create a new paper project
2. Upload your creation to your blog with a link back to us and provide a direct link to the post featuring your challenge submission.
3. Please link your card to no more than three challenges, TOTAL.
4. Have FUN!
I look forward to seeing your CAS creations this week. I'm travelling home from Onstage Live today having had an amazing time with some of my team in Brussels. I've written this post in advance, so I'm sure I'll have lots more to report this coming week.
Back tomorrow with another project; until then, happy stampin'!
Stampin' Up! Supplies Used: