by Joanne James6. October 2016 08:05
Today it's time for a new challenge over at Create With Connie and Mary and this week we have a sketch for you:

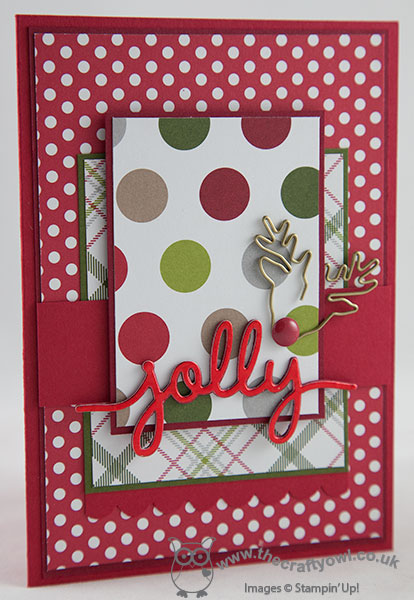
I decided to use this sketch for one of the cards that I made in my Christmas Stamp-A-Stack class earlier this week - take a look:

Here's the low-down on today's card:
Something Old - I decided to feature a die cut 'merry' sentiment using my Christmas Greetings Thinlits and finish with some stamped words from the co-ordinating 'Holly Jolly Greetings' set. Last season I used these thinlits more times than I can count and in all the excitement of the Autumn-Winter catalogue I forgot that they had moved into the annual catalogue until I was browsing its Christmas section. For me they are a keeper and it felt like renewing acquaintance with an old friend to get them out and use them on my card today.
Something New - I paired my sentiment with a fun Santa from the Cookie Cutter Christmas set, punched out with the Cookie Cutter Builder Punch and some of the new Candy Cane Lane DSP; I recommend you stock up on this during the current 'buy 3, get 1 free' offer on Designer Series Paper this month - I know I will be! My cute Father Christmas was coloured in with my Stampin' Write markers for a bold finish, with a liberal dose of clear Wink of Stella to accent his fur trim.
A Perennial Favourite - Last but not least, I embossed my top Whisper White layer in my favourite embossing folder of all time: the Softly Falling Textured Impressions Embossing Folder. I'm not big into dry embossing, however I would make an exception for Softly Falling any day of the week, I just love the texture and interest that this falling snow gives a card.
Here is the visual summary of the key products used on today's project for you to pin for easy reference:

You can see all of my 'How To' summaries on my 'How To - Tips and Techniques' Pinterest board in case you've missed any.
Do visit the other Design Team members to see what they did with this week's sketch; there's lots of inspiration over on their blogs too!
Enjoy your day and I'll be back tomorrow with another project; until then, happy stampin'!
Stampin' Up! Supplies Used:
8a0248bb-86c6-459b-ab82-fe172147949d|0|.0|96d5b379-7e1d-4dac-a6ba-1e50db561b04
Tags: Create With Connie And Mary, Shop online, Shop Stampin' Up online, Stampin' Up, Stampin' Up Card, Stampin' Up Card ideas, Stampin' Up Supplies, Christmas, Christmas Greetings thinlits, Cookie Cutter Builder Punch, Cookie Cutter Christmas, Candy Cane Lane, Softly Falling TIEF, Holly Jolly Greetings
Cards | Shop Online | Stamping
by Joanne James6. April 2016 08:00 
It's Wednesday and time for this week's new collection of Wednesday Weekly Deals! There are changes afoot as far as Weekly Deals are concerned - due to improvements in stock control, this week and next are the last weeks that they will be offered. They will however be replaced with less frequent but better 'Specials' promotions on an adhoc basis - please make sure you're checking my blog regularly for details. So for the final two weeks, there really are some great deals - as always, these offers are valid for one week only.
If you want to take advantage of any of the deals on offer, you can support my business by placing your order online by clicking here or using the link to my store on the right hand side of my blog page where it says 'Shop Online' or with me in person. Don't forget to add the new Hostess Code for April UD3KDWM4 if your order is under £150 and be sure to make sure that you don't check the 'no contact' box if you'd like to be kept updated with the progress of you order and receive a little thank you in the post from me. If you are local, then give me a call to place your order if you'd like to save on P&P.
Here's a summary of this week's one-week only Wednesday deals - click on each item to go to the online store to purchase:
If you're tempted to place an order, do check out the clearance rack online too - additional items have been added this week and there are some good bargains to be had!
It just so happens that I've used two of the products on this week's deals on my card today - check it out here!
That's all from me; back tomorrow with another project; until then, happy shopping!
239be490-532b-49c9-9415-37ca7160d1f7|0|.0|96d5b379-7e1d-4dac-a6ba-1e50db561b04
Tags: Promotions, Shop Stampin' Up online, Shop online, Stampin' Up, Stampin' Up Card ideas, Stampin' Up Supplies, Wednesday Weekly Deals, Endless Thanks, Confetti Hearts Border Punch, Flurry of Wishes, Christmas Greetings thinlits, Leaflets Framelits, Greatest Greetings, Sunburst Sayings, Wild About Flowers
Promotions | Shop Online | Stamping
by Joanne James3. December 2015 08:05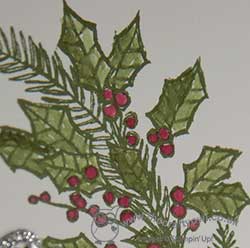
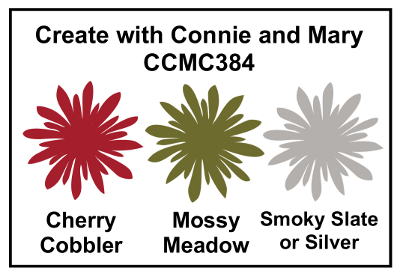
Today it's time for a new challenge over at Create With Connie and Mary and this week we have a great colour combination for you:
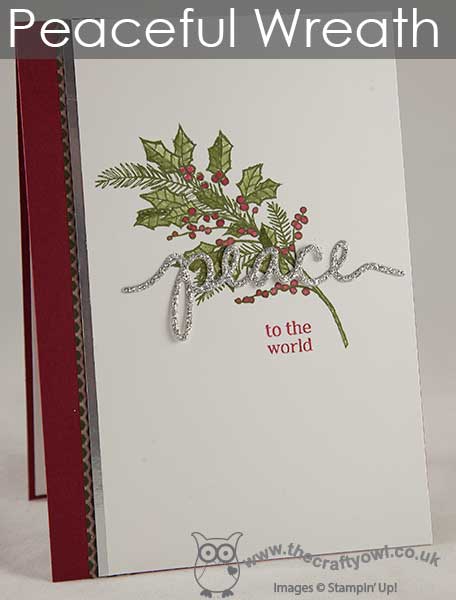
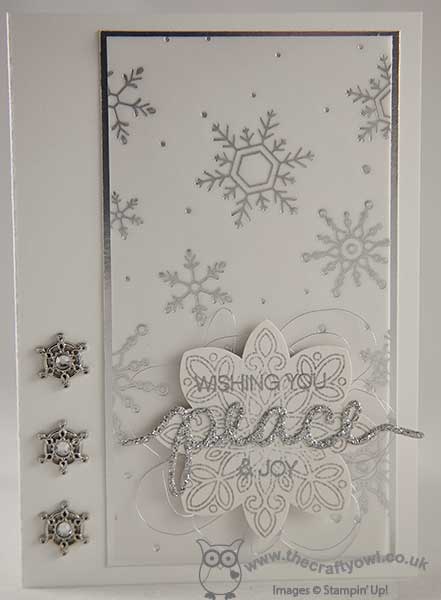
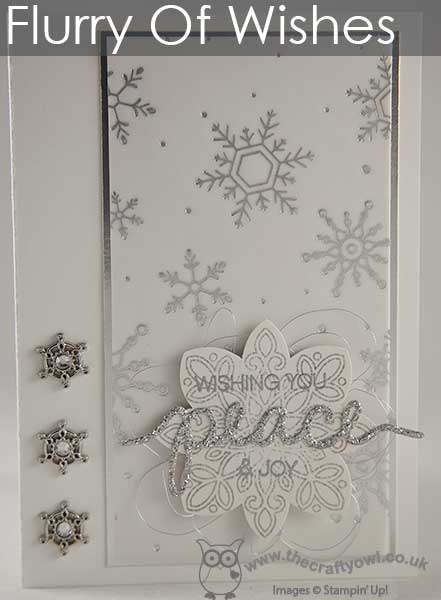
I have another CAS card for you today - I'm still making lots of cards to send out so unfussy and quick to mass-produce is something of the order of the day. For this card I decided to go with the holly sprig from the Peaceful Wreath set:
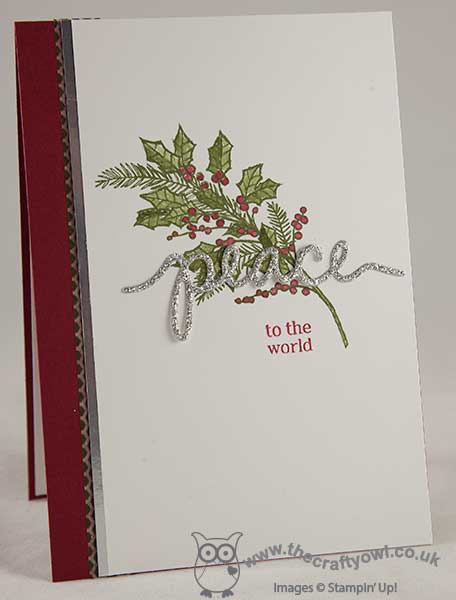
I used a base of Cherry Cobbler and added a strip of In-Colour Mossy Meadow washi tape and a sliver of silver foil cardstock along the edge of my offset Whisper White top layer for a little extra interest. On my front panel I stamped the holly sprig in Mossy Meadow and then used my aquapainter to roughly watercolour the leaves in the same colour and then added some Cherry Cobbler for my berries. I stamped the second part of my sentiment from the same set in Cherry Cobbler and decided to add a Christmas Greetings diecut silver glimmer 'peace' for a quick touch of festive sparkle to really draw the eye and ground my design. The washi tape I used is included in this week's Wednesday Deals, so now would be a good time to snap some up for the bargain price of £5.44!
Do visit the other Design Team members to see what they did with this week's colours; there's lots of inspiration over on their blogs too! I'm also linking up today's card with the lovely ladies over at Less Is More as I haven't played there for a few weeks and this week's theme is 'fruit' - and fortunately for me this includes holly berries and mistletoe too!
Enjoy your day and I'll be back tomorrow with another project; until then, happy stampin'!
Stampin' Up! Supplies Used:
- 2014-2016 In Color Designer Washi Tape
- Peaceful Wreath Photopolymer Stamp Set
- Cherry Cobbler Classic Stampin' Pad
- Cherry Cobbler A4 Cardstock
- Mossy Meadow Classic Stampin' Pad
- Whisper White A4 Cardstock
- Aqua Painters
- Christmas Greetings Thinlits Dies
- Silver Glimmer Paper
- Silver Foil Sheets
by Joanne James29. November 2015 10:00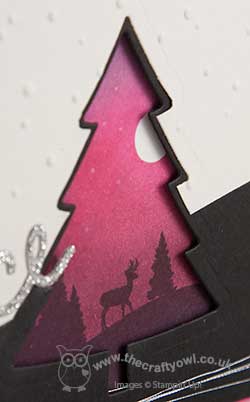
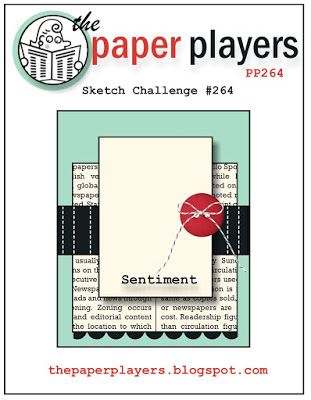
It's Sunday and time for a new challenge over at The Paper Players! This week it is the turn of the talented Sandy to host and she has a tic tac toe board to get our creative juices flowing this week:
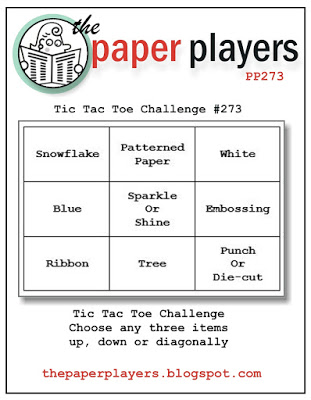


There were so many ways I could have gone with Sandy's board this week - the creative possibilities are endless! - but in the end I decided to go with the far-right column: white, embossing and punch or die cut. I used this week's colours over at Colour Me and the Friday Mashup sketch for today's card:
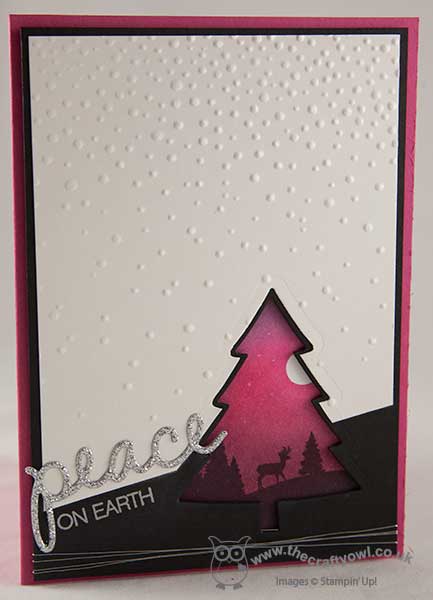
I used a base of Melon Mambo for my card then on a piece of Whisper White I stamped the silhouette from the 'To You and Yours' stamp set in Memento Black then sponged in my sky using each of the Colour Me challenge colours and masking off a small moon with a small circle of post-it note. I also added a few tiny white stars using my chalk pen. I then took a piece of Basic Black cardstock and diecut the tree using the medium-sized Perfect Pines framelit, wrapping some silver thread around the base of the card and securing behind. The top layer is a piece of Shimmery White cardstock - you can't really see the sparkle of this card in the photo, which is a shame as it's lovely! I embossed this piece with the Softly Falling embossing folder to add texture then used the largest Christmas tree framelit to cut an aperture in my card to frame the tree in the black layer. Finally I added my sentiment; I added the silver glimmer 'peace' from the Christmas Greetings thinlits (I trimmed down the ends) and heat embossed the 'on earth' in silver onto the black layer.
I've been wanting to use this silhouette stamp for ages and I like the idea of framing it with the diecut. Quite unconventional for a Christmas card, but I just love the colours of the pretty sunset too.
Before you reach for your ink and papers, check out what our amazing team has created to inspire you this week:
The Paper Players Design Team
Here's a quick recap of our challenge rules:
1. Create a new paper project
2. Upload your creation to your blog with a link back to us and provide a direct link to the post featuring your challenge submission.
3. Please link your card to no more than three challenges, TOTAL.
4. Have FUN!
I look forward to seeing how many tic tac toe combinations you can come up with this week. I'm off for a morning of basketball and then a quiet day for the James juniors, given that Rebecca has an awful cold and needs some R&R to prepare for the busy month ahead in the run up to Christmas. I'm hoping to work on a few projects and get a few jobs done - wish me luck!
Back tomorrow with another project; until then, happy stampin'!
Stampin' Up! Supplies Used:
d917e05b-ba85-44f4-8783-f31ef11d1308|0|.0|96d5b379-7e1d-4dac-a6ba-1e50db561b04
Tags: Stampin' Up, Stampin' Up Card, Stampin' Up Card ideas, Stampin' Up Supplies, The Paper Players, Shop online, Shop Stampin' Up online, To You And Yours Shaker Cards Project Kit, Perfect Pines, Holly Jolly Greetings, Christmas Greetings thinlits, Christmas
Cards | Shop Online | Stamping
by Joanne James26. November 2015 08:05
Today it's time for a new challenge over at Create With Connie and Mary and this week we have a great sketch for you:
I had lots of ideas about ways to use this sketch; I eventually settled on this fun card featuring a snowman with a difference:
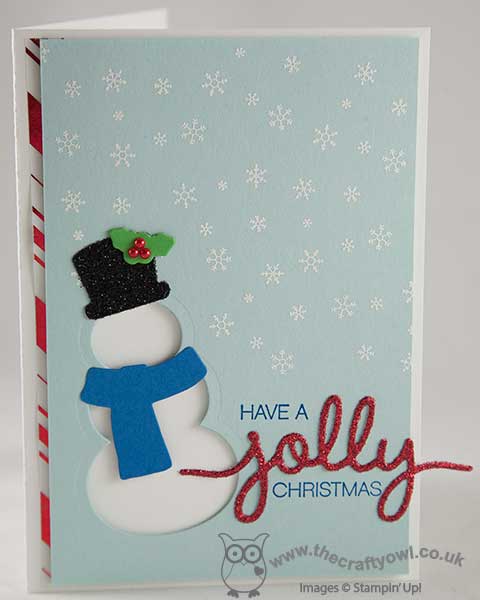
Instead of stamping a snowman on my card, I decided to create a graphic snowman using my Big Shot and the Snow Friends framelits. I used a card base of extra-thick white cardstock and tucked a strip of red striped Holidays Fancy Foil Vellum don the left hand side. I then added a panel of Soft Sky, onto which I stamped the snowflakes from the Wonderland stamp set in Versamark and heat embossed them in white, before cutting out the snowman shape and scarf and hat, which adhered across the negative space for dimension. I then stamped part of the sentiment from Holly Jolly Greetings directly onto the cardbase in Pacific Point, adding a red glimmer 'jolly' cut from the co-ordinating Christmas Greetings Framelits dies to finish. I also used black glimmer paper for the snowman's hat - both add great sparkle to this card. To finish, I added a few pearls coloured with a red Sharpie as the holly berries for the leaves on the hat.
I love the subtle textures and layering on this card - and it's fun to look at framelits and dies to see how else they can be used beyond the straightforward cutting out of shapes.
Do visit the other Design Team members to see how they interpreted this week's sketch; there's lots of inspiration over on their blogs too!
Enjoy your day and I'll be back tomorrow with another project; until then, happy stampin'!
Stampin' Up! Supplies Used:
- Snow Friends Framelits Dies
- Holly Jolly Greetings Clear-Mount Bundle
- Wonderland Wood-Mount Stamp Set
- Embossing Buddy
- Versamark Pad
- Heat Tool (Uk)
- White Stampin' Emboss Powder
- Big Shot
- Whisper White A4 Thick Cardstock
- Holidays Fancy Foil Designer Vellum
- Soft Sky A4 Cardstock
- Pacific Point Classic Stampin' Pad
- Pacific Point A4 Cardstock
- Cucumber Crush A4 Cardstock
- Pearl Basic Jewels
- Red Glimmer Paper
- Black Glimmer Paper
f1729a10-d793-4de2-b586-a56e2bfae032|1|5.0|96d5b379-7e1d-4dac-a6ba-1e50db561b04
Tags: Create With Connie And Mary, Stampin' Up, Stampin' Up Card, Stampin' Up Card ideas, Stampin' Up Supplies, Big Shot, Snow Friends Framelits, Wonderland, Holly Jolly Greetings, Christmas, Christmas Greetings thinlits
Cards | Shop Online | Stamping
by Joanne James24. November 2015 08:00
Today I'm sharing a card that I made for a couple of challenges this week, initially inspired by the intriguing sketch over at Pals Paper Arts but also with the theme over at TGIF Challenges in mind:


I'm also linking up with the talented team over at The Challenge - my card is definitely more contemporary than traditional, but it has snowflakes as per the inspiration photo; I might have to do another one for this challenge too with a little more red and green! Anyway - my card today is another of those so-difficult-to-photograph-yet-so-beautiful white and silver Christmas cards that I'm so fond of! here it is:
I used a base of extra-thick Whisper White and decided that the three circles in the sketch should be represented by a trio of Winter Wonderland Embellishments and the rest of my design came from there. I created a layered panel of silver foil, Whisper White and then the lovely snowflake patterned Holiday Fancy Foil Vellum. I stamped the medium sized Flurry of Wishes Snowflake in Smoky Slate onto Shimmery White cardstock, then stamped two of the three elements of my sentiment in Versamark and heat embossed in silver, then punched out the shape with my Flower Medallion punch. I added a silver glimmer die cut 'peace' and adhered the whole piece to my card using dimensionals, having added some thin silver metallic thread behind.
This is one of those cards that is so very pretty in real life - it has so much shimmer and sparkle, it's gorgeous! You can see the detail of the snowflake better in this close-up shot:
So many pretty snowflake elements too - embellishments, vellum and stamps!
That's all from me today; I'm looking forward to spending the day having some quality crafting time and a good catch up with a couple of friends.
Back tomorrow with another project; until then, happy stampin'!
Stampin' Up! Supplies Used:
by Joanne James28. September 2015 22:14
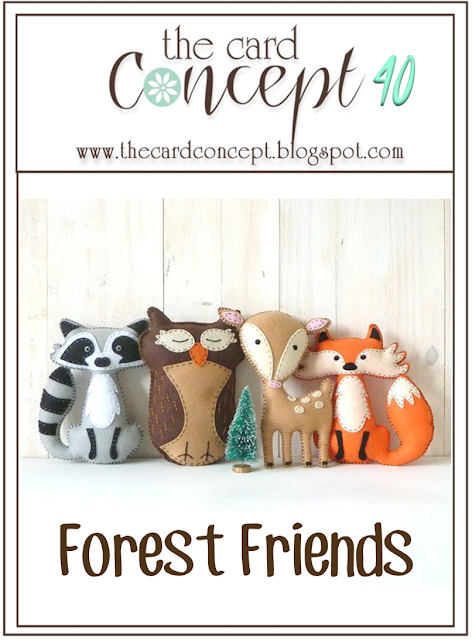
Happy Monday everyone! Today I have another of the cards that I designed for my recent Christmas stamp-a-stack featuring an adorable reindeer from the Home For Christmas designer paper. This clean and layered card is just perfect for the challenge over at The Card Concept this week, which is to feature a forest friend on your card:
Isn't that inspiration photo just the cutest? Here's the reindeer forest friend that features on my card:

I used a Soft Suede base and a couple of patterned pieces of Home for Christmas DSP, then punched a 2" circle of Very Vanilla and adhered my fussy cut reindeer on the top. I stamped the 'Have a' and 'Christmas' parts of my sentiment from the Holly Jolly Greetings set in Memento Black onto Very Vanilla, then cut a 'jolly' out of red glimmer paper using my Big Shot and Christmas Greetings Thinlits Dies and adhered all of my sentiments with dimensionals for a little extra height. I just love the Home For Christmas Designer Series Paper - the retro designs are fantastic and the reindeers and santas are all decorated differently and in slightly different poses that are great for fussy cutting, although I'm not sure my ladies agreed after cutting out six of these little fellas!
That's all from me today; back tomorrow with another project. Until then, happy stampin'!
Stampin' Up! Supplies Used:
7d13f4cb-0caf-49da-9fdc-04962fe7f8a3|0|.0|96d5b379-7e1d-4dac-a6ba-1e50db561b04
Tags: Big Shot, Christmas, Holly Jolly Greetings, Home For Christmas, Christmas Greetings thinlits, circle punch, Shop online, Shop Stampin' Up online, Stamp-A-Stack, Stampin' Up, Stampin' Up Card, Stampin' Up Card ideas, Stampin' Up Supplies, Classes
Cards | Shop Online | Stamping
by Joanne James27. September 2015 10:00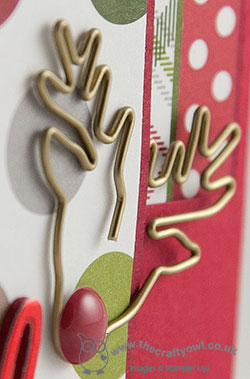
It's Sunday and you know what that means: time for a new challenge over at The Paper Players! This week it's the turn of my talented friend the lovely Claire to host and she has a great sketch challenge for you:
Claire loves layers and this sketch certainly has lots! I decided to go with a showcase of Merry Moments Christmas DSP on mine, although that wasn't where I started out with this card - I saw that button and just knew it was the perfect opportunity to showcase one of my reindeer paper clips! Take a look:
I used two of the Merry Moments DSP patterns along with a Real Red spotted paper (this one is retired but very similar to the pattern in the Brights DSP stack), matted on either Chrry Cobbler or Mossy Meadow. I added a band and scalloped edge in Real Red, but the stars of today's card are most definitely that 'jolly' sentiment cut from red foil (I built this up on 3 layers of cardstock to give added depth) and that oh-so-cute reindeer clip, complete with Cherry Cobbler enamel dot - well, what's a Rudolf without a red nose?!
A no-stamp card that uses layers and embellishment for pattern and interest - perfect for the festive season. As for the reindeer paper clip - how cute!
Before you reach for your ink and papers, check out what our amazing team has created to inspire you this week:
The Paper Players Design Team
Here's a quick recap of our challenge rules:
1. Create a new paper project
2. Upload your creation to your blog with a link back to us and provide a direct link to the post featuring your challenge submission.
3. Please link your card to no more than three challenges, TOTAL.
4. Have FUN!
I look forward to seeing how you interpret our sketch in your card designs. I'm off for a morning of basketball and hoping to spend a little time tidying up in the garden this afternoon, along with some baking to make use of some of our home grown raspberries - yum!
Back tomorrow with another project; until then, happy stampin'!
Stampin' Up! Supplies Used:
7a97245b-1617-4c5d-b970-be1aaeff1c70|0|.0|96d5b379-7e1d-4dac-a6ba-1e50db561b04
Tags: Shop online, Shop Stampin' Up online, Stampin' Up, Stampin' Up Card, Stampin' Up Card ideas, Stampin' Up Supplies, The Paper Players, Christmas, Merry Moments, Reindeer paper clip, Christmas Greetings thinlits, Big Shot
Cards | Shop Online | Stamping
by Joanne James26. September 2015 22:33
A quick - and late! - post from me today, but since I didn't post yesterday I thought I'd better squeeze one in today! I was fundraising at a MacMillan Coffee morning yesterday and have been busy with the usual flurry of household chores, homework and swimming clubs that generally occupy a Saturday in the James household today. The lovely ladies over at Less Is More have a challenge for 'something shiny' this week and I have the perfect CAS creation to fit - here's my card:
I used a simple base of Real Red and a mat of Whisper White, onto which I stamped 'have a' and 'Christmas' in red around a gold foil 'Merry' diecut, formed using my Christmas Greetings thinlits (I am so in love with these!) I cut an ornament shape out of gold foil using my Delicate Ornament Thinlits Dies and my Big Shot and backed this with a 1 3/4" circle of red glimmer paper (well what is shine without a little sparkle too?!), added a gold cord trim bow and adhered the ornament slightly off the edge of the card to look as if it was hanging from the 'y' of 'merry'.
I designed this card as one of the makes for my all day Christmas stamp-a-stack this week and the ladies present loved it, although having to remove the tiny pieces from the ornament was proving tedious by the time they had made six of them! I'm also using the ornament dies in my October technique class in a couple of weeks time and can't wait - combined with the Embellished Ornaments stamp set (another 15% off bundle when you buy the two together!) they really are very versatile.
Back tomorrow with my card for this week's new challenge over at The Paper Players; come back then, you won't want to miss it!
Until then, happy stampin'!
Stampin' Up! Supplies Used:
82497245-186e-47fd-82cd-738eb8c2f5f7|0|.0|96d5b379-7e1d-4dac-a6ba-1e50db561b04
Tags: Big Shot, Christmas, Christmas Greetings thinlits, Delicate Ornament thinlits, Holly Jolly Greetings, Shop online, Shop Stampin' Up online, Stampin' Up Supplies, Stampin' Up Card ideas, Stampin' Up Card, Stampin' Up
Cards | Classes | Shop Online | Stamping
by Joanne James11. September 2015 20:51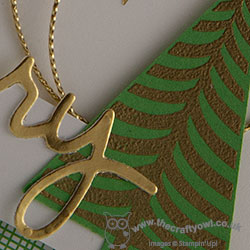
Yay it's Friday! This has been a busy week, but a good one nonetheless. Today I'm sharing a card that I made earlier this week for this week's Less Is More challenge but am only just getting the opportunity to share - how does that happen?! Anyway, the LIM girls have a challenge this week to use the colours green and gold on your card (with lots of white space!) and I just couldn't resist. Here's my card:

I decided to use Cucumber Crush as my green as I think it has a real vibrancy with the gold and white for a Christmas card. I heat embossed the pattern on my tree using the Festival of Trees stamp set in gold and combined this with a piece of Cherry on Top check DSP, my sentiment which is a combination of a gold foil 'merry' cut using the new Christmas Greetings thinlits and the stamped 'Christmas' from the Holly Jolly Greetings on a white banner. I added a couple of loops of gold corded trim and a sprinkle of gold star sequins - on offer on weekly deals this week and so easy to adhere with my new fine tip glue pen! - and that's my card done.
A super modern CAS Christmas card that would be easy to mass-produce and in tradition colours. Maybe this will make the 'shortlist for mass production' pile this holiday season!
That's all from me today; my week has worn me out! Back tomorrow with another project. Until then, happy stampin'!
Stampin' Up! Supplies Used: