Circle Punch Snowman for CASology 380 Guest Designer

by Joanne James15. December 2020 14:00

Today I'm sharing a card for the new challenge over at CASology where I have been invited by the lovely Melissa to be the guest designer, following my 'stag' card being chosen as a winner for challenge 378 - if you missed it, you can see that card here

Today's cue card is a festive one and perfect for some last-minute card making for the Christmas season:


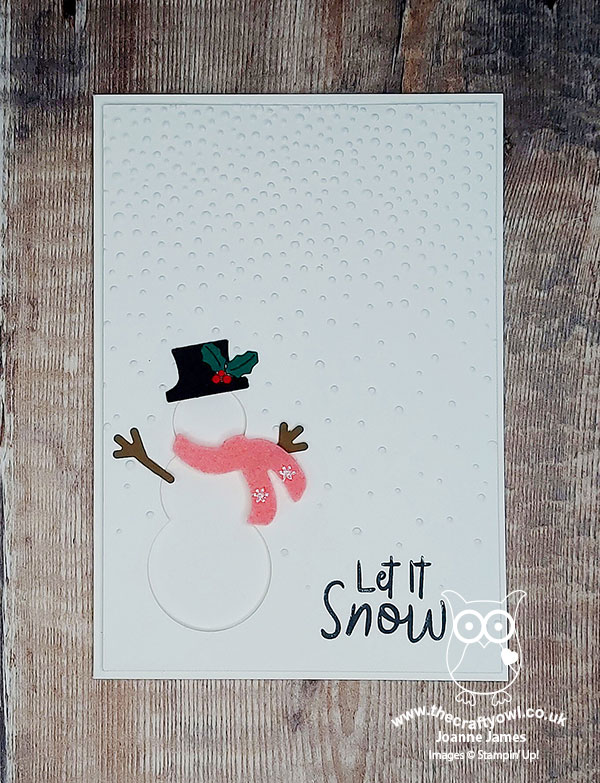
 I decided to create a cute snowman using negative space for my card today - take a look:


 Here's the low-down on today's card:

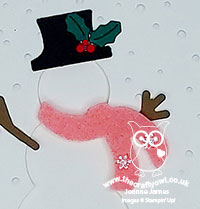
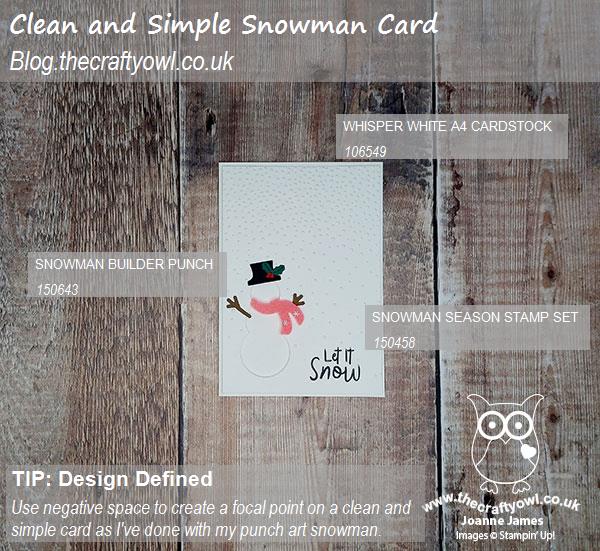
Do You Wanna Build A Snowman - Apologies if you now have THAT song stuck in your head, but that was exactly what I decided to do today, on my card at least! Whilst I used my Snowman Builder Punch for the hat and arms, it wouldn't work for the body but this was easily remedied by using some (retired) circle punches (3/4", 1" and 1 1/4"). I added a felt scarf left over from one of last year's accessory kits for a little added texture, a simple sentiment from the 'Snowman Season' stamp set and my falling snow was courtesy of my much-loved retired Softly Falling embossing folder - it's still a favourite of mine:


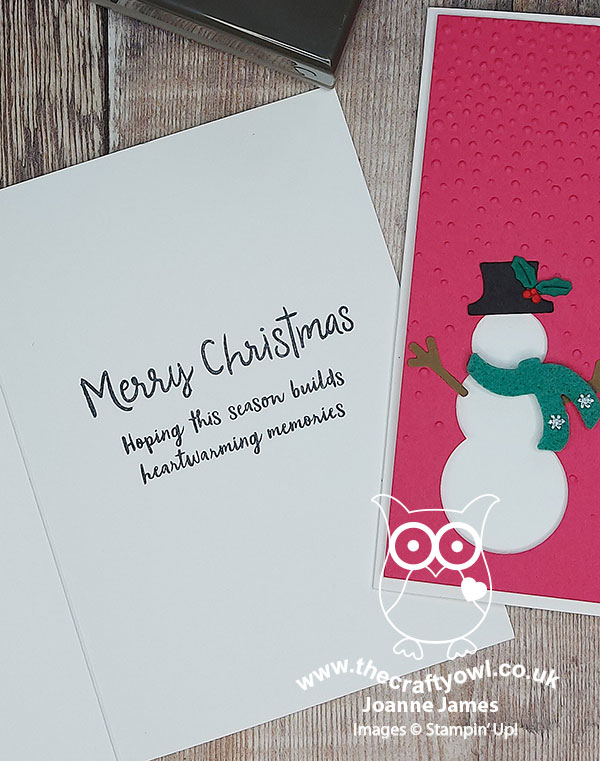
This was the stamping on the inside of my card:


Design Defined - One of the things I love about the CASology challenge is that they encourage us to consider what makes our card 'clean and simple'. In addition to the basic guidelines, the design team offer some great tips in terms of their cards. Often when I play along I do the same, and if you check out my previous CASology-related blog posts, you will see lots of similar tips in relation to the cards that I created. For today's card, I defined my card design as 'Use negative space to create a focal point' which is a great way to add interest to a CAS design. 

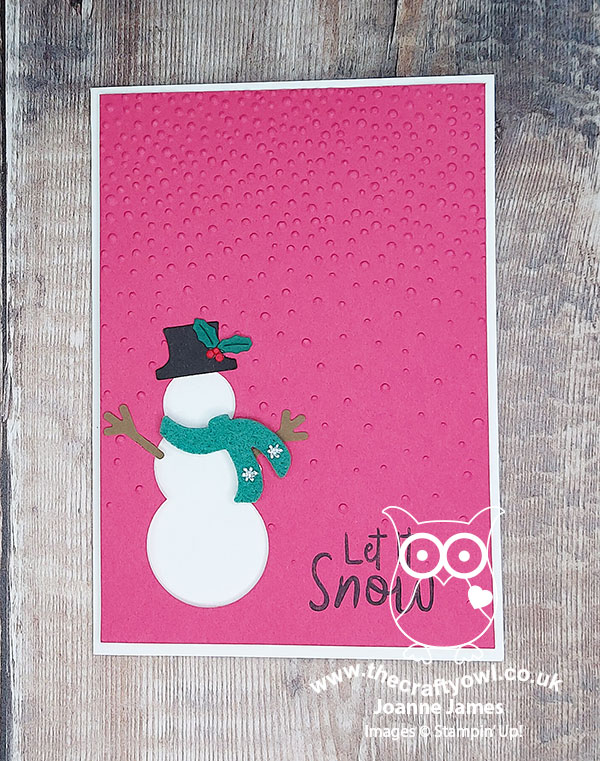
An Unconventional Take - I actually made a second card using the same design, that was as a result of seeing this week's Inspired By inspiration photo:

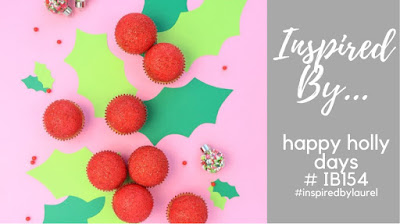
I loved the holly against the bright pink for an unconventional take on Christmas colour, so decided I would use this idea to create a second version of the above card. My holly is small and I swapped out my scarf colour for more green, but this card is very much about the pink:


So what do you think? I actually still prefer the original one myself, however it was fun to change out the colour for an alternative effect. Here are both cards together for comparison:


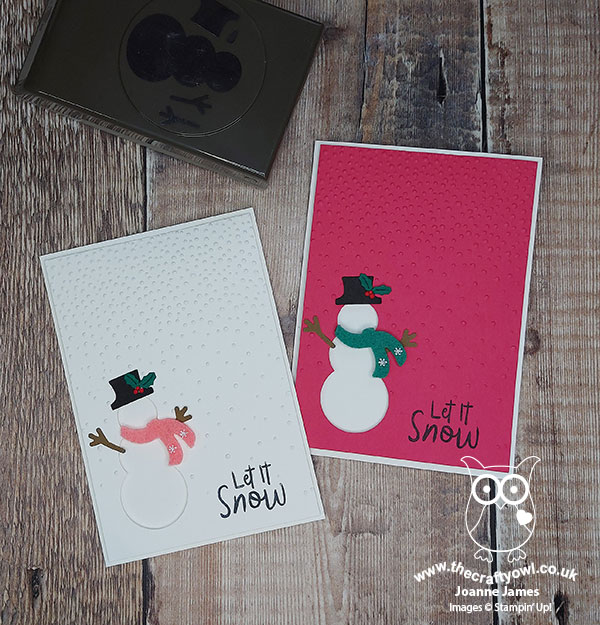
Which one do you prefer? Do leave me a comment below - I would love to hear your thoughts.

Here is the visual summary of the key products used on today's project for you to pin for easy reference:


You can see all of my 'How To' summaries on my 'How To - Tips and Techniques' Pinterest board in case you've missed any. Thank you to the team at CASology for having me as their Guest Designer this week - do check out the team designs and I'm sure they would love you to play along with this challenge too.

Enjoy your day and I'll be back tomorrow with another project. Until then, happy stampin'!


Stampin' Up! Supplies Used:

Table built using Product Table Builder by The Crafty Owl - Independent Stampin' Up! Demonstrator.

Aqua Snow is Glistening Christmas Tree Card

by Joanne James5. November 2018 10:00

Today I'm sharing a card for the current challenge over at Freshly Made Sketches where they have the following sketch to work with:


This layout was perfect for me to make another snowflake card using the exclusive limited offer Snowflake Showcase products that I shared with you last week - take a look:


Here's the low-down on today's card:

Softly Falling - I reached for my perennial favourite embossing folder, Softly Falling, for the perfect snowy backdrop  for my Snowflake Christmas tree. The texture adds just enough interest and detail without detracting from my snowflakes and trees and ties in with my wintry theme beautifully. 

Snow is Glistening - I decided to feature the snowflake Christmas tree on my card today. This is such a versatile stamp - with the aid of the Stamparatus or a Stampamajig, the image can be stamped in a row to create a border too as well as this fabulous snowy tree. I heat embossed my sentiment in white onto a strip of Bermuda Bay for an extra pop of colour against my pastel card. I also used another of the border stamps in the set for some falling snow on the inside too:

Snowflake Swirls - I couldn't resist using the snowflake swirls die cut from the Snowfall Thinlits set for the horizontal element on today's card (I had to trim the end slightly to fit), although it seemed a shame to hide it behind the portrait upright panel - I had to cut this into the tree shape to show off as much of the swirl as possible. I just love it!

Here is the visual summary of the key products used on today's project for you to pin for easy reference:


You can see all of my 'How To' summaries on my 'How To - Tips and Techniques' Pinterest board in case you've missed any. 

Enjoy your day and I'll be back tomorrow with another project. Until then, happy stampin'!


Stampin' Up! Supplies Used:

Table built using Product Table Builder by The Crafty Owl - Independent Stampin' Up! Demonstrator.

A Country Lane Inspired Thank You For Tic Tac Toe PP412

by Joanne James30. September 2018 09:00

Today it's Sunday and time for this week's new challenge over at The Paper Players - yay! It's the turn of my sweet friend, the lovely LeAnne, to host this week and since it is the fifth week of the month she has a tic-tac-toe challenge for you to work with:


The fun thing about tic-tac-toe are the many creative possibilities the board offers and as you will see from the design team cards this week, there is a wealth of inspiration to choose from. 

I decided that I would go down the centre for my card this week - patterned paper, pumpkin, orange/rust (although by coincidence my card fulfils one of the diagonals of diecut, pumpkin, green too) for my card this week - take a look:


Here's the low-down on today's card:

Inspired By Country Lane - My card today was inspired by the bold repeating pattern on my sheet of Country Home Designer Series Paper. I used the Mint Macaron green to frame my card and colour my milk churn, and paired it with a small panel of Whisper White that has been embossed with the Softly Falling Textured Impressions Embossing Folder too; it's a little difficult to see in the photo but I wanted to keep the balance of colour light and the panel not too busy.

Blended Country Home - I stamped and partially diecut my filled milk churn using my Stitched Shapes circle thinlit, courtesy of the country Home stamp set, then coloured it with similar shades to the milk churns on the DSP using my Stampin' Blends. I'm really pleased that the seasonal catalogue includes additional shades of these marker pens; they give such a smooth finish. I added a small bow of braided linen trim to finish.

Pick A Pair of Pumpkins - To complete the picture, I added a pair of pumpkins from the retired 'Pick A Pumpkin' stamp set. I heat embossed them both in white onto Basic Grey cardstock, and coloured one of them with my Cajun Craze Blends markers - along with the berries in my milk churn and the thankful sentiment, these are my rust/orange contributions to the tic-tac-toe board.

Here is the visual summary of the key products used on today's project for you to pin for easy reference:


You can see all of my Product and 'How To' summaries on my 'How To - Tips and Techniques' Pinterest board in case you've missed any. I hope you like my Fall themed card today; I'm also linking up with the team over at SUO Challenges where the current theme is Nature/Fall. 

Before you reach for your ink and papers, check out what our amazing team has created to inspire you this week:

Here's a quick recap of our challenge rules:
 
1.  Create a new paper project
2.  Upload your creation to your blog with a link back to us and provide a direct link to the post featuring your challenge submission.
3.  Please link your card to no more than four challenges, TOTAL.
4.  Have FUN!

You can see all of my 'How To' summaries on my 'How To - Tips and Techniques' Pinterest board in case you've missed any. 

Enjoy your day; having spent yesterday dividing my time between hockey, a swimming gala and a fairly hefty jam making session (raspberry jam and chilli jam, in case you're wondering!) to use up the last of my own garden harvest, I'm hoping today will be slightly less hectic! I'll be back tomorrow with another project. Until then, happy stampin'!


Stampin' Up! Supplies Used: 

Table built using Product Table Builder by The Crafty Owl - Independent Stampin' Up! Demonstrator.

Card Front Builder Christmas Shaker Card PP361

by Joanne James10. September 2017 09:00

It's Sunday and time for this week's new challenge over at The Paper Players! It's the turn of my fellow Brit turned Yankee teamie, the lovely Jaydee, to host this week and she has a fun colour challenge for us to work with:


Before I get into my post today, you will notice that our esteemed team leader, the fabulous Nance Leedy, is off this week; she is currently battling with the effects of Hurricane Irma; we love you Nance and our thoughts and prayers are with you that you and your family are safe! The same goes for anyone else reading this who is impacted either directly or indirectly by the devastating effects of the hurricanes moving through the Caribbean and USA currently.

Back to my card. Whilst these colours made me think 'floral', I struggled to incorporate the silver into my floral design so decided instead to create an unconventionally-coloured Christmas card with my Card Front Builder Thinlits Dies - take a look:


Here's the low-down on today's card:

Card Front Builder Dies - With the exception of a one-word stamped sentiment, today's card focuses on the Card Front Thinlit Builder Dies. I used a trio of trees to edge my shaker window and the teeny tiny deer to create a simple wintry scene.

Softly Falling Snow - Today I've used another embossing folder - my all-time favourite, the Softly Falling Textured Impressions Embossing folder. It provides great texture for my top card layer and my winter scene.

Shake, Shake, Shake - I continued my softly falling snow by creating a shaker card window as a focal point for my winter scene and filled it with white mica flakes. These were in last year's seasonal catalogue however you can currently snap them up on the clearance rack; they make a great alternative to sequins for a softer look and feel.

Here is the visual summary of the key products used on today's project for you to pin for easy reference:


You can see all of my Product and 'How To' summaries on my 'How To - Tips and Techniques' Pinterest board in case you've missed any. 

These may be unusual colours for a Christmas card, but I think they work. What do you think? Are there any unusual colour combinations you like to try on your Christmas cards? Do leave me a comment below - I'd love to hear your thoughts. 

Before you reach for your ink and papers, check out what our amazing team has created to inspire you this week:

The Paper Players Design Team
 
 
Here's a quick recap of our challenge rules:
 
1.  Create a new paper project
2.  Upload your creation to your blog with a link back to us and provide a direct link to the post featuring your challenge submission.
3.  Please link your card to no more than four challenges, TOTAL.
4.  Have FUN! 


I look forward to seeing what you create with this week's colour palette. Enjoy the rest of your weekend as it will be over all too quickly; I'll be back tomorrow with another project; until then, happy stampin'!


Stampin' Up! Supplies Used: 

Table built using Product Table Builder by The Crafty Owl - Independent Stampin' Up! Demonstrator.

Softly Falling And Hang Your Stocking - A Perfect Pair

by Joanne James11. December 2016 09:00

It's Sunday and time for a new challenge over at The Paper Players! Before I get into my post, I must just give a shout out to the lovely Linda, Hannelie and Colleen who have been the most awesome guest designers with us for the last six months; these ladies have done a fabulous job and I will miss your contributions and do hope you continue to play along with us from time to time. Thank you for sharing your designs and creativity with us! Whilst we are sad to see these ladies leave, it also means we will have some new guest designers joining us too; watch out for more news on this with my mid-week reminder post on Wednesday to see who will be joining us to kick off 2017!

Meanwhile, it's the turn of the lovely Jaydee to host this week and she has a glamorous colour challenge for us to work with:


All the sparkle of silver and gold, paired with brilliant white! I decided that a glamorous stocking was going to be my focal point today and I also used Amy's sketch over at Freshly Made Sketches for my layout - here's my card:


My card today is another one with lots of layers and a variety of foil and glimmer paper to add lots of sparkle: my diecut stocking is gold foil layered with gold glimmer and a white glimmer top with embossed holly decoration, I layered a silver foil doily behind and added a piece of silver foil acetate between my white cardbase and mat, which I embossed with my favourite embossing folder of all time, Softly Falling, for added detail. I used my Stitched Shape Framelits for my sentiment square (you will be pleased to know theses will be available to order again early January in time for Sale-A-Bration - yay!) and chose a sentiment from the Christmas Pines stamp set to complete my card as this seemed the most appropriate, which I also heat embossed in gold.

This is the kind of stocking I imagine someone like Joan Collins to own (or maybe Donald Trump, since he seems to be a fan of all things glitzy and gold!) - either way, definitely all about the luxury! I'm more of a traditional red and white girl myself :-)

Here is the visual summary of the key products used on today's project for you to pin for easy reference:


You can see all of my Product and 'How To' summaries on my 'How To - Tips and Techniques' Pinterest board in case you've missed any. 

Before you reach for your ink and papers, check out what our amazing team has created to inspire you this week:

The Paper Players Design Team
 
 
Here's a quick recap of our challenge rules:
 
1.  Create a new paper project
2.  Upload your creation to your blog with a link back to us and provide a direct link to the post featuring your challenge submission.
3.  Please link your card to no more than four challenges, TOTAL.
4.  Have FUN! 


I look forward to seeing what you create with this colour palette this week. This morning I will be recovering from a Christmas night out yesterday and this afternoon we are officially decorating the James household for Christmas. My wreath is made and hanging proudly on my front door already, so with the tree up and the rest of the decorations in place, I'm sure it will start to feel like Christmas is well and truly on its way!

Enjoy the rest of your weekend as it will be over all too quickly; I'll be back tomorrow with another project; until then, happy stampin'!


Stampin' Up! Supplies Used:

Table built using Product Table Builder by The Crafty Owl - Independent Stampin' Up! Demonstrator.

Cookie Cutter Christmas Santa

by Joanne James6. October 2016 08:05

Today it's time for a new challenge over at Create With Connie and Mary and this week we have a sketch for you:


I decided to use this sketch for one of the cards that I made in my Christmas Stamp-A-Stack class earlier this week - take a look:


Here's the low-down on today's card:

Something Old - I decided to feature a die cut 'merry' sentiment using my Christmas Greetings Thinlits and finish with some stamped words from the co-ordinating 'Holly Jolly Greetings' set. Last season I used these thinlits more times than I can count and in all the excitement of the Autumn-Winter catalogue I forgot that they had moved into the annual catalogue until I was browsing its Christmas section. For me they are a keeper and it felt like renewing acquaintance with an old friend to get them out and use them on my card today.

Something New - I paired my sentiment with a fun Santa from the Cookie Cutter Christmas set, punched out with the Cookie Cutter Builder Punch and some of the new Candy Cane Lane DSP; I recommend you stock up on this during the current 'buy 3, get 1 free' offer on Designer Series Paper this month - I know I will be! My cute Father Christmas was coloured in with my Stampin' Write markers for a bold finish, with a  liberal dose of clear Wink of Stella to accent his fur trim. 

A Perennial Favourite - Last but not least, I embossed my top Whisper White layer in my favourite embossing folder of all time: the Softly Falling Textured Impressions Embossing Folder. I'm not big into dry embossing, however I would make an exception for Softly Falling any day of the week, I just love the texture and interest that this falling snow gives a card. 

Here is the visual summary of the key products used on today's project for you to pin for easy reference:


You can see all of my 'How To' summaries on my 'How To - Tips and Techniques' Pinterest board in case you've missed any. 

Do visit the other Design Team members to see what they did with this week's sketch; there's lots of inspiration over on their blogs too!

Enjoy your day and I'll be back tomorrow with another project; until then, happy stampin'!


Stampin' Up! Supplies Used:

Table built using Product Table Builder by The Crafty Owl - Independent Stampin' Up! Demonstrator.

Christmas Cutie Elf in The Snow

by Joanne James12. October 2015 09:00

As promised on Sunday, here's the other card I made using this week's colour combination over at The Paper Players:

It's another card using the Christmas Cuties stamp set, featuring the happy little elf:

I used extra thick Whisper White for my card base, with a mat of Real Red and another piece of Whisper White embossed with the Softly Falling Embossing Folder. I added a couple of circles in Real Red and Cucumber Crush, then added a large Whisper White circle stamped with the elf image in Archival Black and then coloured in using my aqua painter and Real Red and Cucumber Crush inks, with a little Crushed Curry for his hair and jingle bells and a touch of Pink Pirouette for his face and hands. To finish I added a trio of white sequins from the Metallics Sequin Assortment to the circle.

The new extra thick Whisper White is just lovely and a joy to watercolour on - especially if you use the Archival Black ink for your stamped outline; this prevents bleeding or running of ink as you paint. 

I've had a busy day today with the second of this month's technique classes. We created some fabulous cards using the Embellished Ornaments set and Delicate Ornaments Thinlits Dies which I will share with you in due course. If you like these colours, be sure to link up your creations with us over at The Paper Players - we would love to see them!

Back tomorrow with another project; until then, happy stampin'!


Stampin' Up! Supplies Used:

Table built using Product Table Builder by The Crafty Owl - Independent Stampin' Up! Demonstrator.


Home For Christmas Edgelits Christmas Card

by Joanne James19. August 2015 09:05

As promised, today I have another sneak-peek Christmas card for you using another of the Sleigh Ride Edgelits, using this week's CAS(E) This Sketch layout for inspiration:

As soon as I saw this sketch, I knew it would work perfectly with the new Sleigh Ride Edgelits. Here's my interpretation with today's card:

I went again with my favourite festive colour combination of navy, whisper white and silver and this time used the negative cut of the edgelit to look like a snowy sky, again embossed with the Softly Falling Textured Impressions Embossing Folder, having first stamped my sentiment in Night of Navy along from the houses. These edgelits offer so many different ways to use them to achieve different looks, depending on whether you use the positive or negative cut out - I just love them! A loop of silver corded trim completes my card.

Clean and simple, yet rather effective. This card came together quickly and would look great in a wide range of colour combinations.

Back tomorrow with another card for this week's new challenge over at Create With Connie and Mary. Until then, happy stampin'!


Stampin' Up! Supplies Used:

* Sleigh Ride Edgelits - available September 1st


* Softly Falling TIEF - available September 1st

Table built using Product Table Builder by The Crafty Owl - Independent Stampin' Up! Demonstrator.


Making Spirits Bright Sleigh Ride Edgelits Christmas Card

by Joanne James18. August 2015 08:00

Today I'm sharing the second card I made this week using the sketch over at Mojo Monday. You can see the other card here and as I mentioned in my original blog post, I didn't enter this one which was the first one I created as when I went to upload and perused the gallery there was another card that was very similar - you can see the card in question, designed by Lisa Pretto, here. That hasn't happened to me before when entering a challenge, but what can I say other than great creative minds think alike! Here is my card using probably my most favourite product from the new seasonal catalogue, the Sleigh Ride Edgelits:

Oh there is so much I love about this card! It uses probably my favourite festive colour combo - navy, white and silver - but check out the fab new products that are coming your way on September 1st:

The Sleigh Ride Edgelits - these come as a set of three, featuring a sleigh, houses and trees, and co-ordinate with a stamp stamp called 'Jingle all the Way'. These can be used in so many ways to create beautiful cards; in fact I have another card for you tomorrow using one of the other Edgelits in the set and the co-ordinating stamp set, so stay tuned!

Making Spirits Bright - this is from a versatile set called 'Among The Branches'. I used the spooky Halloween stamp from this set on my LIM card last week (see it here) and it also includes an Autumn set, along with lots of fun embellishments that co-ordinate with the new Woodland TIEF. I love a set that transcends the seasons and this is definitely that kind of set.

Softly Falling Textured Impressions Embossing Folder - there are some great new embossing folders in the new seasonal catalogue, but I think the Softly Falling TIEF will be my favourite; proper falling snow adding a delightful delicate texture to cards.

Winter Wonderland Embellishments - Did you spot the cute little snowflake embellishment? Big enough to add some sparkle (sometimes foil and glimmer paper is just not enough!) yet small enough to not add too much bulk, these adorable little embellishments come in a pot of 20 - plenty for all your festive card making, but wouldn't look out of place on something less festive either.

I hope you like today's card; quite different to my earlier interpretation of this sketch and very 'me'. Which one do you prefer? Do let me know in the comments section below - I love hearing what you think!

Right, I'm back to squeeze in some more work before the James Juniors return exhilerated from this morning's basketball camp exertions. Back tomorrow with another festive sneak-peek and news of this week's Wednesday Deals - don't miss it! Until then, happy stampin'!


Stampin' Up! Supplies Used:

* Sleigh Ride Edgelits - available September 1st

* Among The Branches - available September 1st

* Softly Falling TIEF - available September 1st

* Winter Wonderland Snowflake Embellishments -  available September 1st

Table built using Product Table Builder by The Crafty Owl - Independent Stampin' Up! Demonstrator.


Mini Catalogue

BROWSE THE CATALOGUE

The mini catalogue is now live! Read and download your copy here.

Shop Online

Access my online shop 24 x 7, 365 days of the year:

Current April hostess code:

VDKNV7BH

Shop Online

Join My Team

It's always a great time to join Stampin’ Up! New team members can get £130 worth of products for only £99 + free business supplies + free shipping + all the fun being a part of Stampin’ Up! Stampin' Up! has something for everyone: join my growing team and benefit from my support to enjoy Stampin' Up! however you choose.

If you're interested, call me for a chat to understand how I can help you realise your goals. Alternatively, if you have already decided to sign up and you just can't wait, please click here for the link to the online form where you can sign up and order your starter kit right away! 

Latest Kit!

Stampin Cut and Emboss

The Rock Legend Kit has all you need to make 8 cards with coordinating envelopes. Along with the new Panda Friends Kit, both are available from January 4th for just £14 each - get yours here!

2023-24 Annual Catalogue

BROWSE THE CATALOGUE

Click on the catalogue for a full list of current SU! supplies - if you would like to order any of the items featured, please drop me a line at [email protected] or give me a call on 07773 421446 - I'd be happy to help.

New Online Exclusives

There are new products available exclusively in the online store from 5 March - check them out here.

About Me

Hi I'm Joanne and live in Northampton and when I'm not looking after my husband and two beautiful children, am an avid crafter with a passion for all things Stampin' Up!

I must confess that I have never been a big rubber stamper - until I discovered Stampin' Up! that is. I love the fact that I can get such great results with co-ordinating stamps, inks, papers and punches - the possibilities are endless! Join me on my stamping journey as I share the things I love and be inspired to create amazing things yourself!

Follow Me

Monthly Newsletter

Box Builder

Click the button above to use Box Buster to create your custom box design using the Envelope Punch Board!

Kits Collection Now Available!

Stampin Cut and Emboss

The new Kits Collection from Stampin' Up! is now available!

Click here to see the current kits available and order yours online today.

I Design For


Stampin' Up Stuff

This is my personal blog and is not endorsed by Stampin’ Up! I hope you find it a plentiful source of ideas and personal inspiration but please don't copy my designs for contest submission or use for classes, publication or sale without express permission.