by Joanne James14. August 2020 12:00 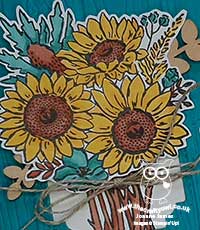
Today I'm sharing my design team card for our new challenge over at As you See It where it's time for a colour challenge:
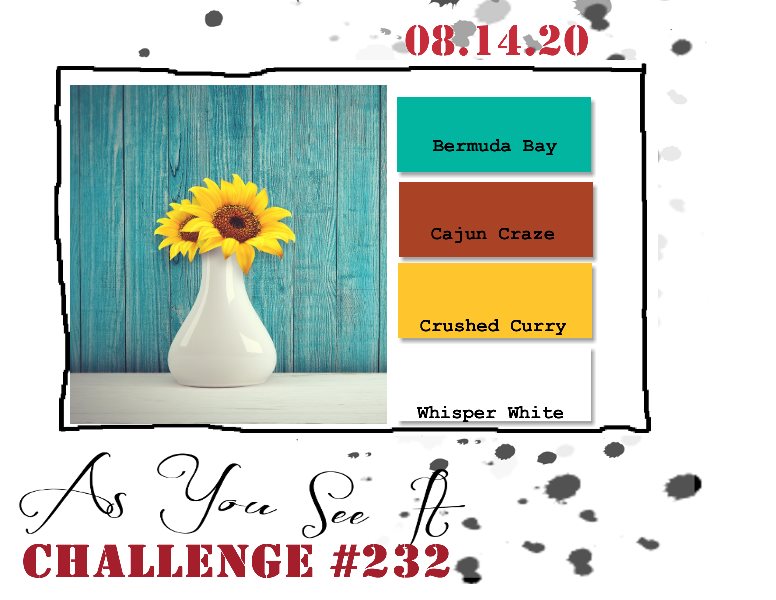
Whilst sunflowers are by no means mandatory for this week's colour challenge, my card today was totally inspired by this week's challenge badge - take a look:
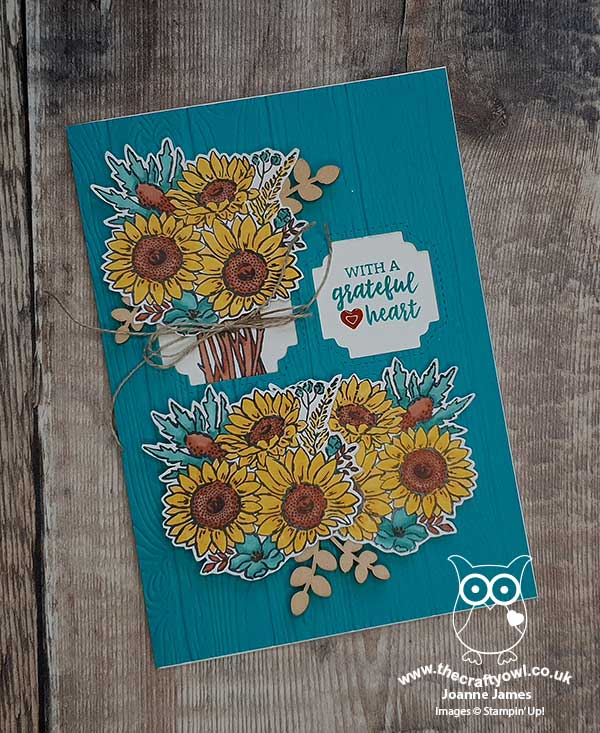
Here's the low-down on today's card:
Not A Jar of Sunflowers - I used one one of the flower toppers featuring sunflowers from the Jar of Flowers set to create both a stemmed bunch and a layered group on today's card. For the layered bunch in the bottom window, I used my Stamparatus to stamp a mirror image, so that it would create a uniform display. I coloured them with my Blends (I used a combination of Dark Mango Melody and Dark Daffodil Delight to achieve a colour close to Crushed Curry) and fussy cut them, before popping them up on dimensionals. I tucked in some wooden stems and added a double-linen bow to my tied bunch for added decoration.
Peek A Boo Florals - My florals and sentiment are nestled in the apertures cut using one of the new Peek A Boo dies; co-ordinating with the fabulous 'Have A Hoot' stamp set, I decided to use this window die piece to create a focal point for my florals and sentiment instead of owls today. I also embossed this panel with the Pinewood Planks 3D embossing folder for added texture, again inspired by our challenge photo.
Banner Year Greeting - Finally the greeting on my card comes from the new 'Banner Year' stamp set. This will be a super useful set with lots of teeny tiny images and sentiments for this time of year. Again, this set is designed to co-ordinate with the new Banners Pick A Punch punch, but I decided to mask it to enable me to stamp the words one under each other to fit my square. A Cajun Craze enamel heart from my stash finished my card.
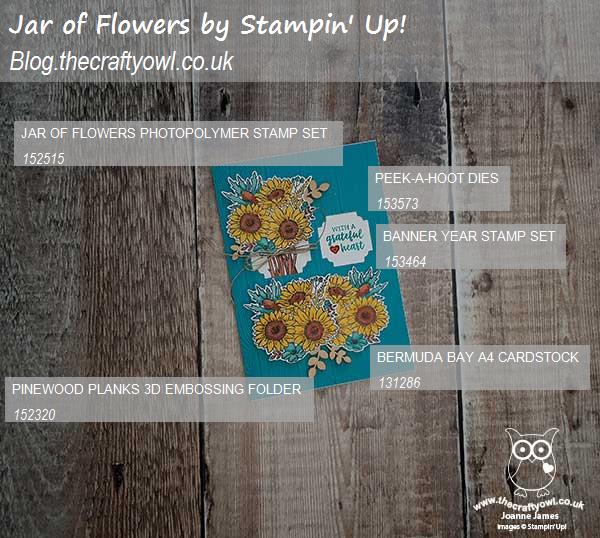
Here is the visual summary of the key products used on today's project for you to pin for easy reference:
You can see all of my 'How To' summaries on my 'How To - Tips and Techniques' Pinterest board in case you've missed any.

Here's a summary of our challenge rules:
- Create any card, scrapbooking page, 3D project or packaging project that fits the challenge.
- Please include the challenge graphic and link back to the challenge in your blog post. Turn off word verification so we can leave you lots of lovely comments. Make sure you link the post not the whole blog to the Linky. Use #AYSIXXX when uploading to a public gallery.
- If you’re unsure about ‘the rules’, check the details under the Challenge Guidelines tab on the As You See It Challenge homepage.
- In a colour challenge, black or other neutral can be used in outlines and sentiments but no other colours should be included. Stampin’ Up colours are used for reference but colours that are a close match are welcome.
We look forward to seeing your creations in the AYSI gallery.
Enjoy your day. The temperatures are blissfully cooler in the UK today and this can only mean one thing - no excuse now to not do the cleaning! I'll be back tomorrow with another project. Until then, happy stampin'!
Stampin' Up! Supplies Used:
3a2c7cce-75dc-4f00-9708-8ad7073d2ce2|0|.0|96d5b379-7e1d-4dac-a6ba-1e50db561b04
Tags: Stampin' Up, Stampin' Up Card, Stampin' Up Card ideas, Stampin' Up Supplies, Shop online, Shop Stampin' Up online, Shop Stampin' Up! Online, As You See It Challenge, Hardwood, Jar of Flowers, Peek A Hoot Dies, Banner Year
Cards | Shop Online | Shop Stampin' Up! Online | Stamping
by Joanne James21. September 2017 18:59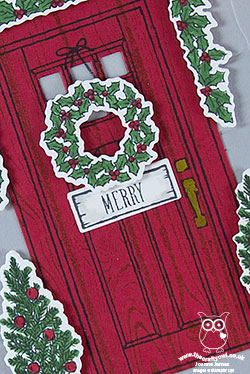
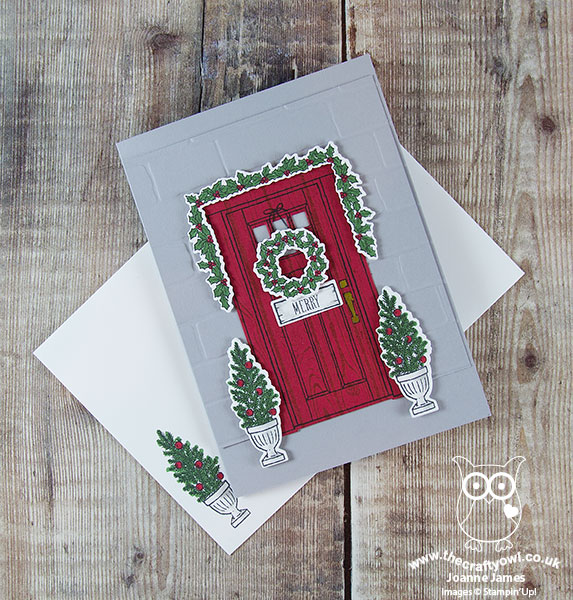
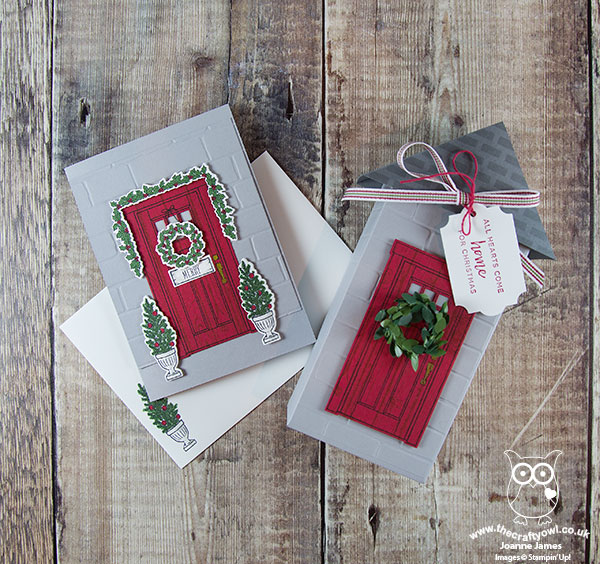
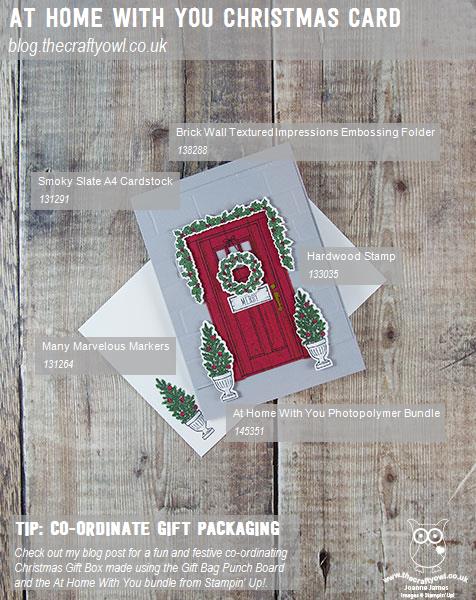
Happy Friday everyone! I'm not sure where the time goes - I can't believe it's the end of the working week already - well, for some anyway! Today I'm sharing a another card along with a matching gift box from one of last month's monthly technique classes using the At Home With You bundle - take a look:
Here's the low-down on today's card:
At Home With You At Christmas - The At Home With You bundle is so versatile and works for lots of different seasons. Today's card features the gorgeous holly bough around the door, along with the holly wreath and the ornamental trees either side of the front door. I coloured them with my Stampin' Write markers and they were easily cut out with the framelits. I even decorated the inside and envelope for complete co-ordination.
More Ways To Add Texture - As with the last card I shared featuring this set (you can see that card here if you missed it), today's card has another three ways in which you can incorporate texture into your projects:
Adding Texture 1: Stamping To add to the Christmas feel, I wanted a red front door; by stamping my Real Red cardstock with the Hardwood stamp in Real Red, before stamping with the door outline in black, to add some tone-on-tone interest and texture for added kerb appeal.
Adding Texture 2: Dry Embossing On both my card and box I embossed the Smoky Slate base cardstock with my Brick Wall textured embossing folder to create some textured walls as a backdrop for my festive entrance.
Adding Texture 3: Embellish Sometimes on a card it helps to minimise bulk especially if you need it to be post-friendly, however this is rarely the case with packaging and the addition of bulky embellishments is less of an issue. On my gift box, in addition to a tag and ribbon, I added a boxwood wreath to my front door - I love the extra texture this adds.
A Matching Gift Box - It's always nice to be able to create fancy packaging for gifts and no more so than at this time of year. I made my simple gift box using the Gift Bag Punch Board (I just didn't score the side indents to make the bag shape) and created a little triangle roof for a lid (it's a simple hinged closure that is held in place with washi tape) that I stencilled some tile on using some Basic Grey ink and my brick pattern Patterned Party Decorative Mask and added a tag punched with the super-useful Everyday Label Punch:
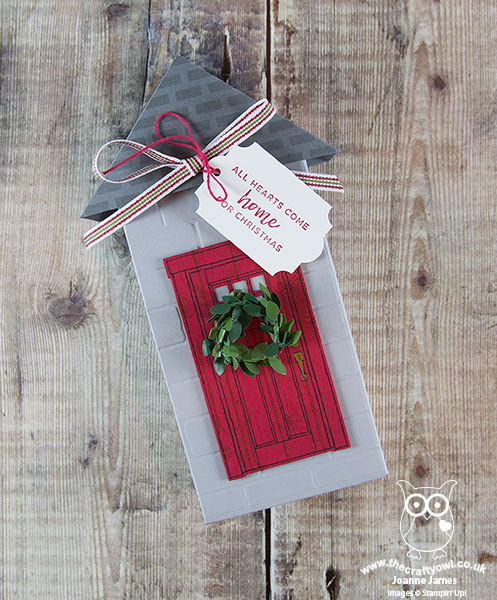
This box measures approx. and is a reasonable size, big enough to accommodate most small gifts. Here's a picture of both items together:
Here is the visual summary of the key products used on today's project for you to pin for easy reference:
You can see all of my 'How To' summaries on my 'How To - Tips and Techniques' Pinterest board in case you've missed any.
Enjoy the rest of your day and I'll be back tomorrow with another project. Until then, happy stampin'!
Stampin' Up! Supplies Used:
dc036cae-2d05-42e4-ba02-978d3d69806c|0|.0|96d5b379-7e1d-4dac-a6ba-1e50db561b04
Tags: Shop Stampin' Up! Online, Stamping Shop Stampin' Up online, Shop online, Stampin' Up, Stampin' Up Card ideas, Stampin' Up Supplies, Stampin' Up Card, At Home With You, At home Framelits, Brick Wall TIEF, Hardwood, Pattern Party Decorative Masks, Gift Packaging, Gift Bag Punch Board, Christmas, Everyday Label Punch, Hearts Come Home
3D Projects | Boxes | Cards | Classes | Gifts | Shop Online | Shop Stampin' Up! Online | Stamping
by Joanne James20. July 2016 07:00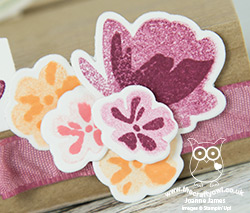
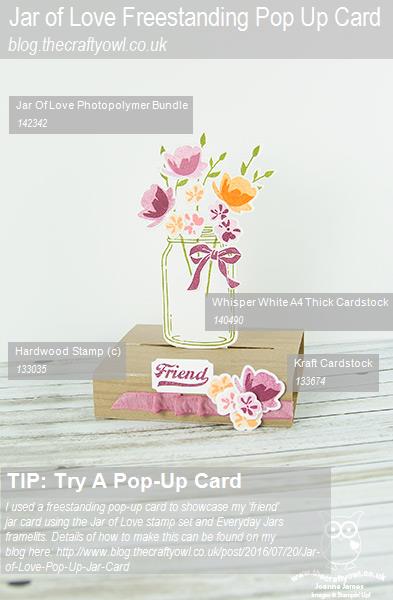
Today I'm sharing the third and final card from my second of this month's technique class featuring the very on-trend Jar of Love stamp set and co-ordinating Everyday Jars Framelits Dies. Each of the ladies received the bundle and as always I was on a mission to use as wide a variety as possible of the stamps in this set to showcase its versatility.
This card is a lovely freestanding pop-up card that was inspired by this card created by Lou Kitzelman. I loved it so much I had to have a go at making my own so here's my version:
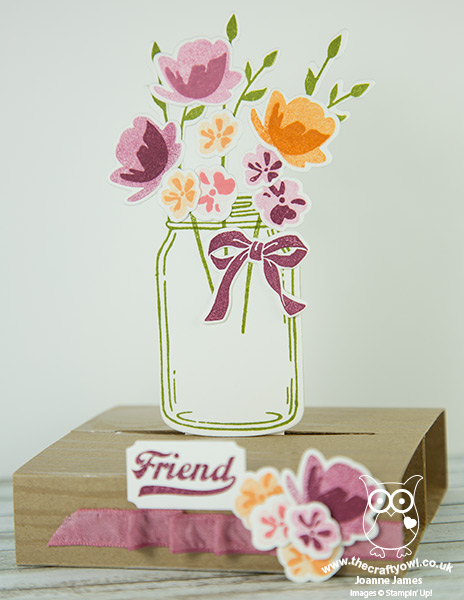
Here's the low-down on today's card:
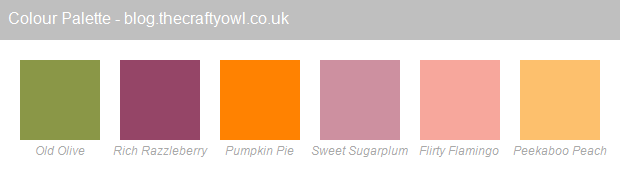
Jar of Flowers - Here I've used the Jar of Love set to create a jam jar full of pretty flowers. I love the little flowers in this set and the co-ordinating Everyday Jar Framelits make light work of cutting them out. Each flower is done in a single colour, with the base flower stamped off once to give the contrast with the smaller piece. I chose a mix of purples, pink and orange for my little posy - feel free to hover and pin this colour combination if it's one that appeals to you too:
Kraft Hardwood Table - I used some retired pre-embossed kraft cardstock in my class, however by stamping the Hardwood stamp in Versamark and clear embossing on plain kraft cardstock you can achieve a similar woodgrained effect for your 'table' base.
Another Fun Fold - This freestanding pop-up card is easier to re-create than it looks. It is a great statement card that also folds completely flat for postage which is always a bonus.
Here's a quick step-by-step tutorial should you wish to have a go:
Freestanding Pop-Up Jar of Love card - Metric Version
Using the diagram below as your guide:
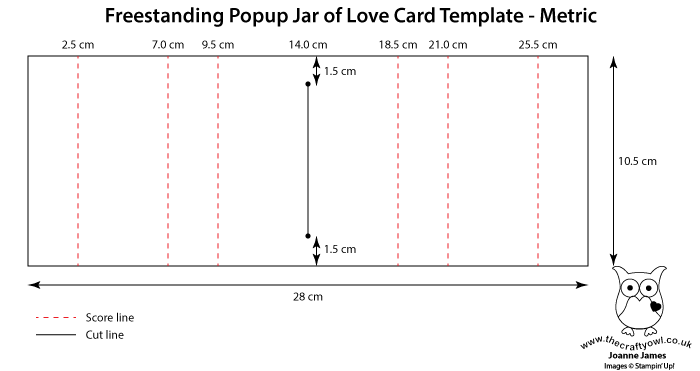
- Cut a piece of kraft cardstock to 10.5cm wide x 28cm long
- Stamp the cardstock in Versamark with the Hardwood stamp and heat emboss with clear embossing powder for a woodgrain effect.
- LANDSCAPE score as per dotted lines:
- 2.5cm, 7cm, 9.5cm, 18.5cm, 21cm and 25.5cm
- At 14cm, punch a small hole using a 1/8" punch or crop-a-dile 1.5cm in from both ends and cut a narrow channel approx. 2mm wide between them (i.e. 1.5-9cm)
- Fold each of the score lines with mountain folds
- Cut a small strip of Whisper White measuring 3cm x 8cm and attach this using fast fuse in the centre of the end panel on the front (right side)
- Turn the base over, and folding the end section in a mountain fold from the front back on itself, feed this white piece through the slit from the back of the card to the front.
- Folding the base in on itself to form a figure 8 shape, adhere both of the front ends together, making sure the white card is through the slit as this is what your jar will be stuck to. As you pull this piece upwards, your freestanding table mechanism forms.
- This completes your base - you then need to adhere your jars and flowers to the front of the white piece of card, and add a plain jar to the back when complete to neaten things up and give you space to write your sentiment.
Isn't this such a fun way to create a pop-up? I'm sure there are lots of other ways that this design could be used too.
Here is the visual summary of the key products used on today's project for you to pin for easy reference:
You can see all of my 'How To' summaries on my 'How To - Tips and Techniques' Pinterest board in case you've missed any.

The Jar of Love and Everyday Jars Framelits bundle is another of those that has just has so many creative possibilities! If you haven't bought yours yet, this month would be the perfect time to do so; if you purchase the bundle at £48.50 you will earn yourself a £4.50 money-off coupon any purchases next month too - bargain! Just click on the links below to hop on over to my online store to order yours today - and don't forget to add this month's hostess code 63RNATE3 to get a little thank you in the post from me too.
I'll be back tomorrow with the second of the cards from my Jar of Love class; come back then, you won't want to miss it! Until then, happy stampin'!
Stampin' Up! Supplies Used:
231b968a-d8f7-45c5-b4ed-fa460b0dc7ba|0|.0|96d5b379-7e1d-4dac-a6ba-1e50db561b04
Tags: Everyday Jars Framelits, Jar of Love, Shop online, Shop Stampin' Up online, Promotions, Stampin' Up, Stampin' Up Card, Stampin' Up Card ideas, Stampin' Up Supplies, Fancy Fold, Hardwood, pop up cards
Cards | Shop Online | Stamping
by Joanne James10. November 2015 07:00
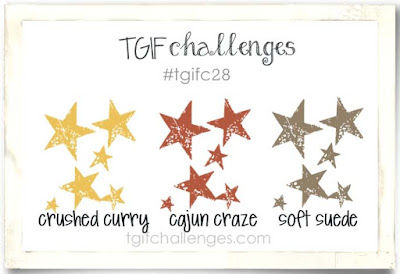
Today I have a card for this week's colour challenge over at TGIF Challenge - here is their colour palette this week:
Before I get to my card though, I would like to give the team over there a big shout out to say thank you for choosing my card as the winner of last week's remix challenge - you can see that card here if you missed it - I love designing for and participating in challenges and it's always nice to be recognised, so thank you!
I used this week's colours to create one of the shaker cards that I will be making in my November technique class, so for any of the ladies booked to attend, today you are getting a sneak peek! Here is my card:
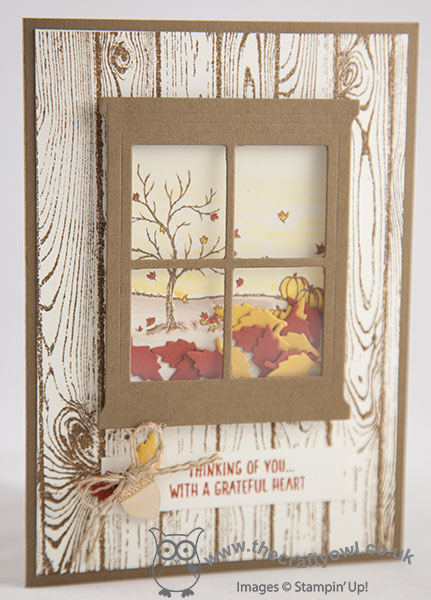
I used Soft Suede for my card base and the window frame that I cut with my Hearth and Home framelits. I stamped my Hardwood and the little autumn scene and sentiment banner from the 'Happy Scenes' stamp set in Soft Suede on Very Vanilla and coloured in the leaves and pumpkins with Cajun Craze and Crushed Curry, given the sky a wash with my aquapainter and a little Crushed Curry ink and some Crumb Cake for the ground (as a permissible neutral). For my shaker element I cut some leaves in the challenge colours using the little die in the Square Pillow Box Framelits set - what a useful little item! I used a couple of these leaves with one of the acorn Wooden Elements and some shredded burlap for an added embellishment to ground my sentiment banner too.
A pretty autumn scene perfectly suited to this week's colours. If you live in or around Northampton and would like to make this and the other shaker cards that I'll be featuring in my November Technique Classes on 16th and 17th November, then do get in touch; I still have a couple of places left if you would like to join us.
That's all from me today; back tomorrow with another project. Until then, happy stampin'!
Stampin' Up! Supplies Used:
5ac121e2-bc6e-449a-931d-2c5a7ecef8b9|0|.0|96d5b379-7e1d-4dac-a6ba-1e50db561b04
Tags: Big Shot, Hearth and Home, Happy Scenes, Hardwood, Shaker cards, Shop online, Shop Stampin' Up online, Stampin' Up, Stampin' Up Card, Stampin' Up Card ideas, Stampin' Up Supplies, Square Pillow Box Thinlits Dies
Cards | Shop Online | Stamping
by Joanne James26. March 2015 08:05Today we have a new challenge over at Create With Connie and Mary and this week we are working with the following colour combination:
I decided these colours were perfect for another entry into this week's challenge over at The Card Concept, this time using the current CAS(E) This Sketch for my layout:
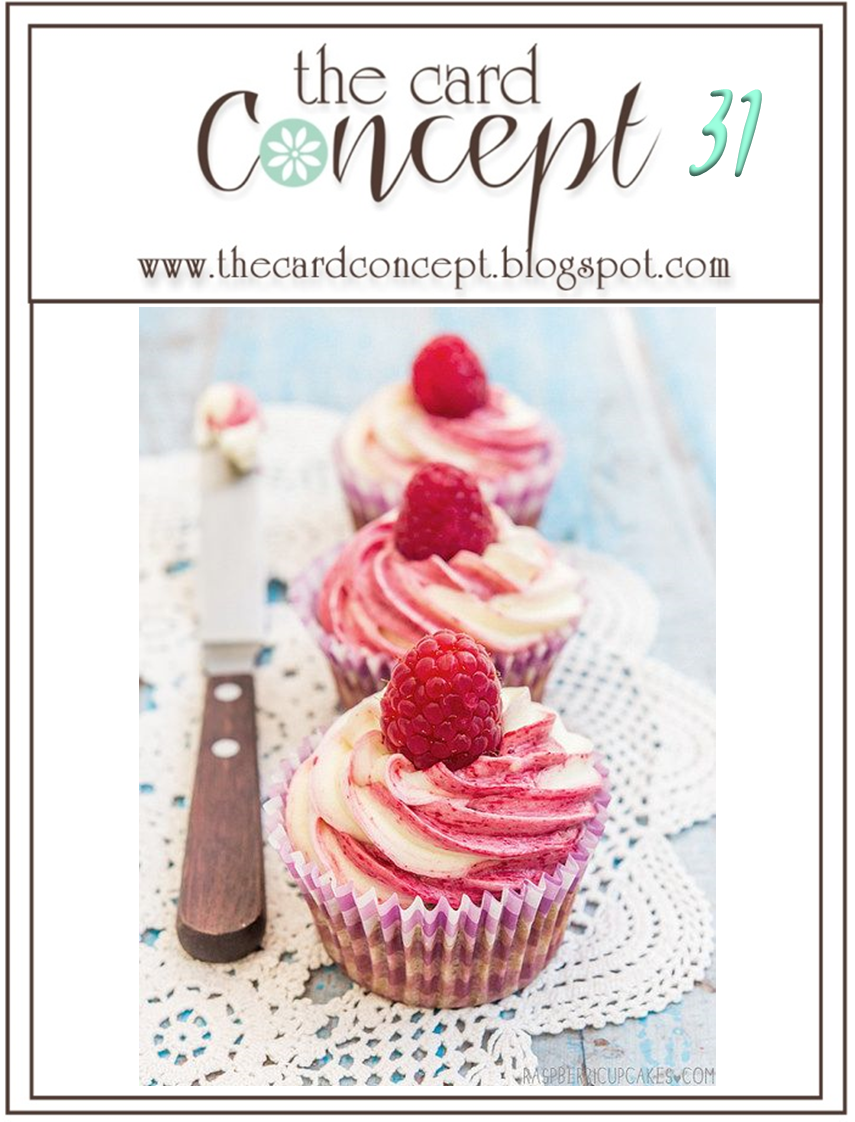
This week's colours all feature in the inspiration photo above, and I wanted to create a card with some whitewashed painted wood like the table in the photo - this is what I came up with:
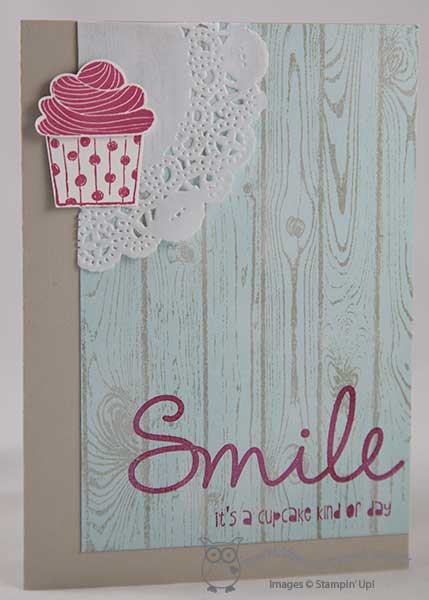
I stamped the Hardwood stamp in Sahara Sand onto a piece of Soft Sky, then 'aged' it by sponging over some Whisper White kraft ink and I really like the look. The combination of sentiments really work for me here too; this is the first time I've used the 'smile' from the 'So You' stamp set and I love it, especially paired with the cupcake one. I have something of a love-hate relationship with doilies (my regular followers will know I don't use them often and even then I'm not sure about them!) but here I felt one would be the perfect background for my cupcake, again, echoing the lace doily in the inspiration photo.
I hope you like today's card and that it inspires you to create something with this colour palette. Do check out the other Design Team member cards - we look forward to seeing you in the Create With Connie and Mary gallery this week.
Back tomorrow with another project; until then, happy stampin'!
Stampin' Up! Supplies Used:
- Hardwood Wood-Mount Stamp Set
- Cupcake Party Clear-Mount Stamp Set
- Cupcake Punch
- So You Photopolymer Stamp Set
- Whisper White Craft Stampin' Pad
- Tea Lace Paper Doilies
- Card Stock A4 Soft Sky
- Sahara Sand Classic Stampin' Pad
- Sahara Sand A4 Card Stock
- Rose Red Classic Stampin' Pad
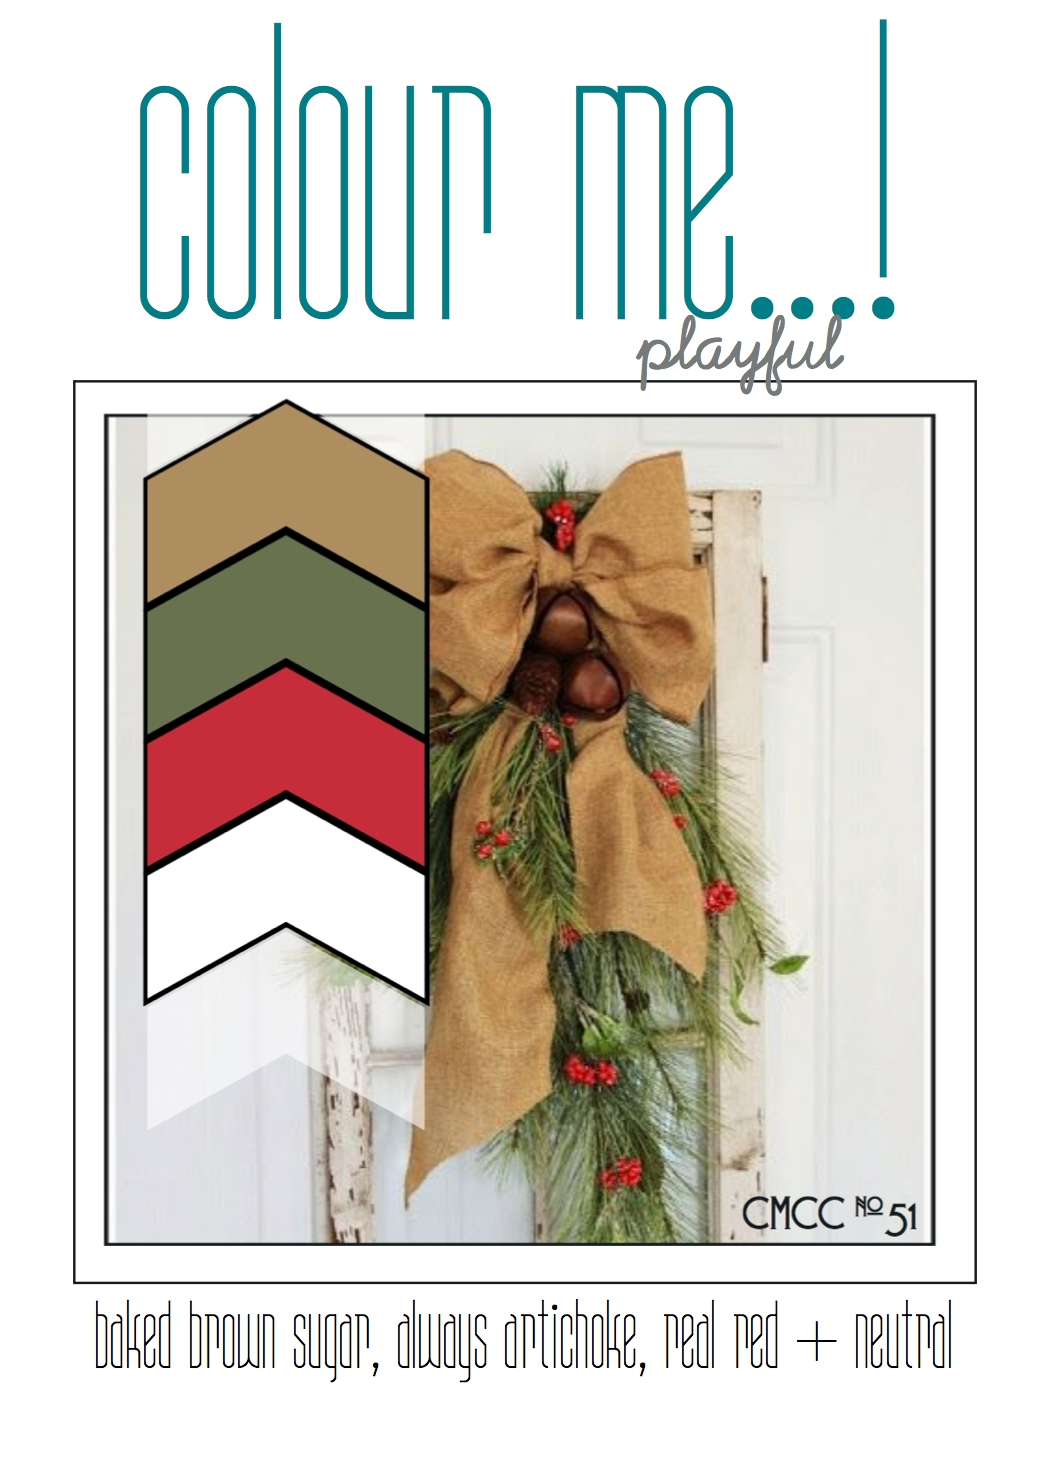
by Joanne James17. December 2014 09:30It's Wednesday and time for my last challenge as a designer over at Colour Me...! It has been a great 6 months working with these lovely ladies and the various colour palettes week on week and I would like to say a big 'thank you' to Tara and Hayley for the opportunity and to my fellow designers, Claire Broadwater, Julia Altermann and Sherrie Mannion and the various monthly guest designers for their collective inspiration. So we are ending the year with a playful colour palette with a distinctive festive feel:
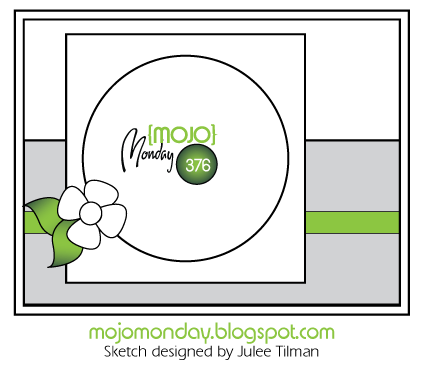
I used this week's sketch over at Mojo Monday as the inspiration for the layout of my card and decided to stick with the festive feel of our inspiration photo to make another Christmas card:
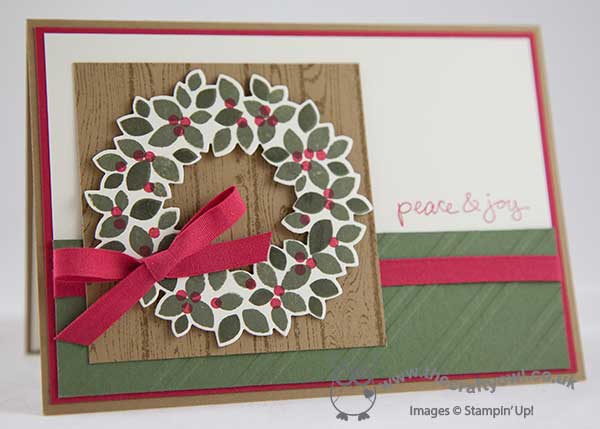
I used Baked Brown Sugar for my base with a mat of Real Red, then a split panel of Very Vanilla and Always Artichoke, the bottom layer of which I embossed with the Stylish Stripes TIEF. I stamped my Good Greetings sentiment onto the vanilla layer in red (this set is now available on the Year End Closeouts Clearance Rack if you want to pick up a bargain!). I stamped a piece of Baked Brown Sugar with the Hardwood stamp to create the background for my wreath, then stamped my wreath in Always Artichoke with red berries and cut it out with my wreath framelits and popped it up on a couple of dimensionals. To finish, I added a ribbon and bow in Real Red Cotton Ribbon.
Feel free to leave a comment on today's card, before hopping over to check out the amazing cards by the rest of the Colour Me...! team:
We look forward to seeing your playful creations - what does this palette inspire you to create?
Back tomorrow with another project; until then, happy stampin'!
Stampin' Up! Supplies Used:
8b2fffcb-a48f-4827-972a-8c4d72487220|0|.0|96d5b379-7e1d-4dac-a6ba-1e50db561b04
Tags: Christmas, Good Greetings, Wonderful Wreath Framelits, Wondrous Wreath, Shop online, Stampin' Up, Stampin' Up Card, Stampin' Up Card ideas, Stampin' Up Supplies, Clearance Rack, Colour Me...!, Hardwood
Cards | Stamping
by Joanne James14. October 2014 08:00DON'T FORGET: 10 DAYS LEFT UNTIL THE FREE PACK OF PAPER FOR 6 MONTHS SIGN UP DEAL ENDS - CLICK HERE TO FIND OUT MORE AND JOIN MY STAMPIN' UP! TEAM TODAY!

As promised, I have a Christmas card for you today! When I saw the colour palette over at Create with Connie and Mary this week I knew it was time to dust off my Wondrous Wreath set which hasn't seen much action of late and put it to good use:
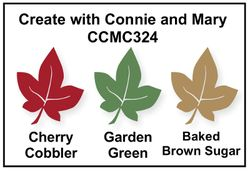
Before we get onto today's card, I want to give a big shout out to the lovely ladies over at the Create With Connie and Mary Design Team - I was fortunate to be one of their top picks for my Mingle All The Way snowflake card last week and as always have pinned the winners badge to my Pinterest page with pride (click here if you would like to check my progress against all the challenges I enter!) They are an amazing bunch who often share amazing cards and projects and I highly recommend you check them out. So, on to my card! I thought these colours would be perfect for a Christmas Wreath on a nice Hardwood front door, so this is what I came up with:
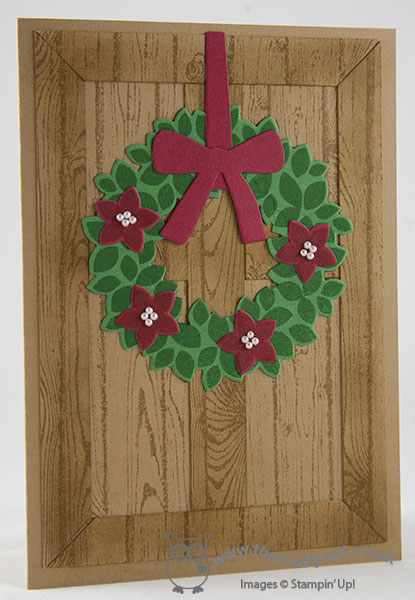
I created my panelled door using a base of Baked Brown Sugar and then layered some pieces in the same colour stamped with the Hardwood stamp in Baked Brown Sugar ink, having stamped the edges to add some definition. For my wreath, I decided to stamp the same colour ink onto the cardstock for both my wreath and flowers to give a deeper and more intense finish and added a die cut ribbon and bow to hang it from the door. I finished my flowers with some tiny pearls to add a little interest and contrast. I decided to mount my wreath flat so that my card can be added to my 'post friendly' pile. However I am in something of a quandary; this is one of the few cards I've made with no sentiment on the front because I wanted to be able to see my door, and whilst I really like it, I keep looking at it and wondering if it needs a red and white sentiment banner across the bottom. What do you think? I'm still undecided - feel free to leave a comment below if you think it needs modifying!
Back tomorrow with my Design Team card for Colour Me...! and the new Wednesday Weekly Deals - until then, happy stampin'!
Stampin' Up! Supplies Used:
by Joanne James14. September 2014 08:00Today I'm sharing my Design Team card for The Paper Players, where this week Anne Marie has chosen this beautiful Autumnal colour palette for us to work with:
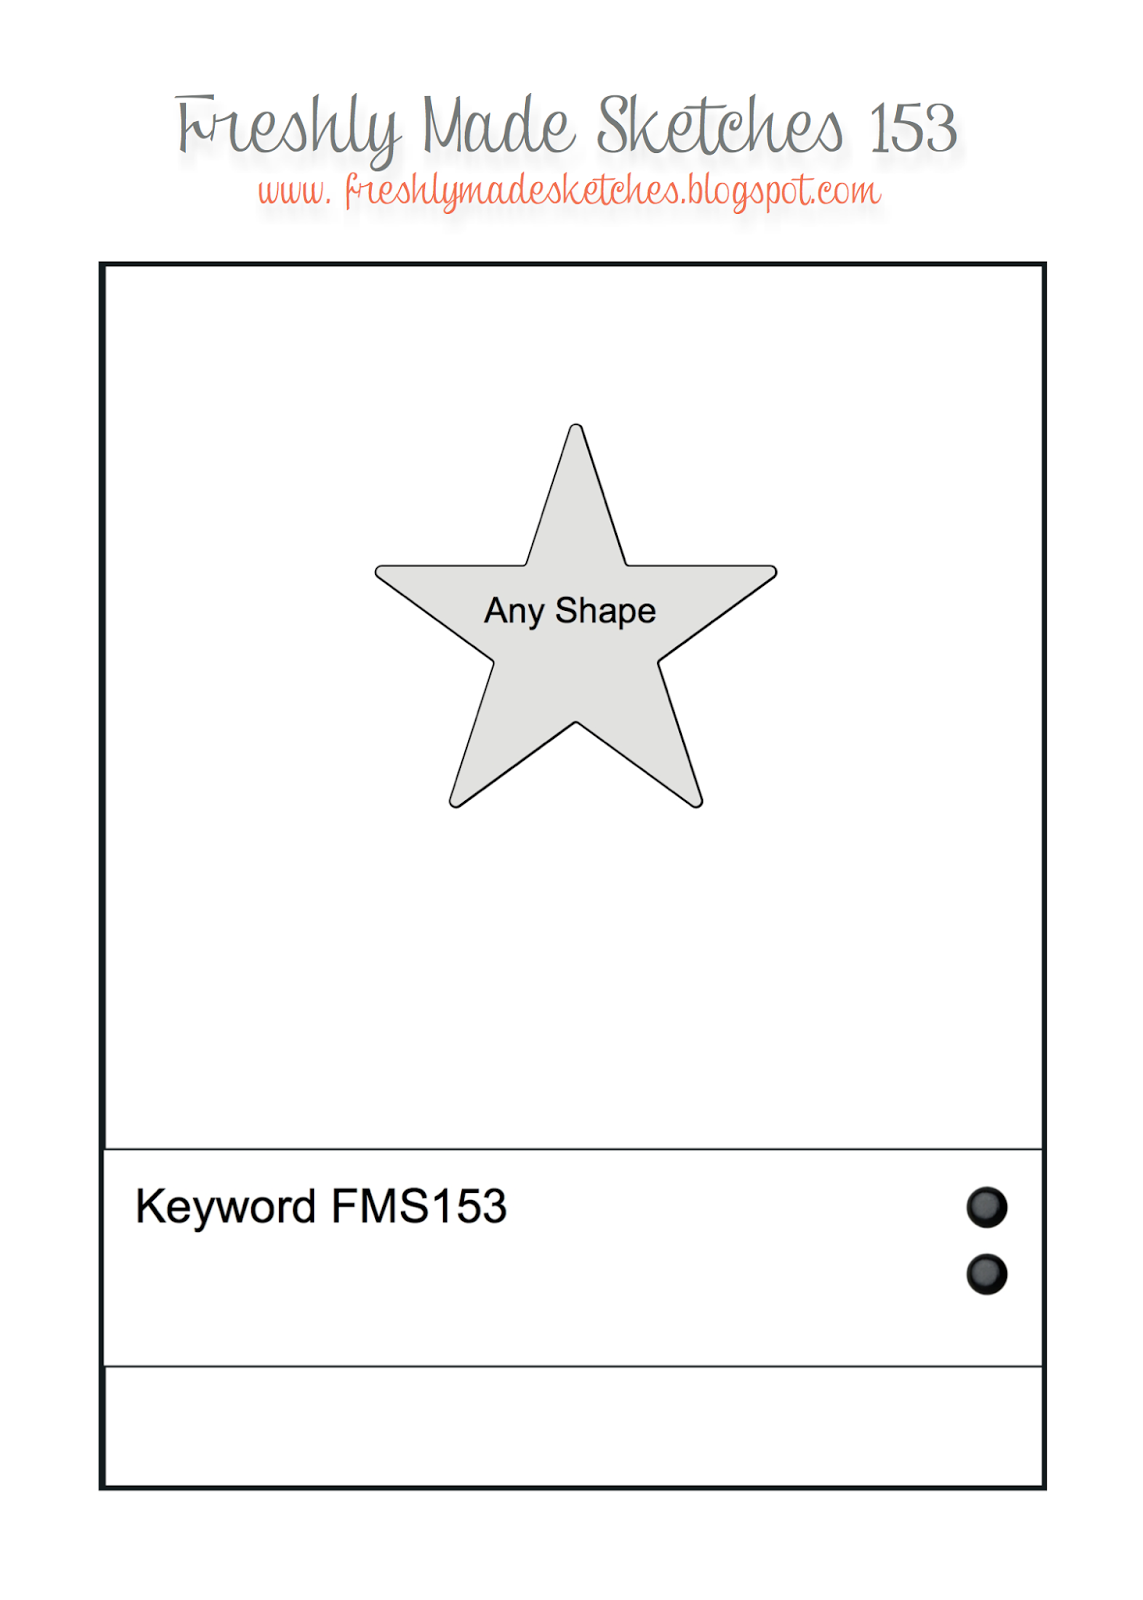
I also used the sketch over at Freshly Made Sketches this week for my layout. As soon as I saw this week's colours, I knew it was time to make an Autumn wreath card using my 'Wondrous Wreath' stamp set, as I've been wanting to do one of these for ages. Here's my card:
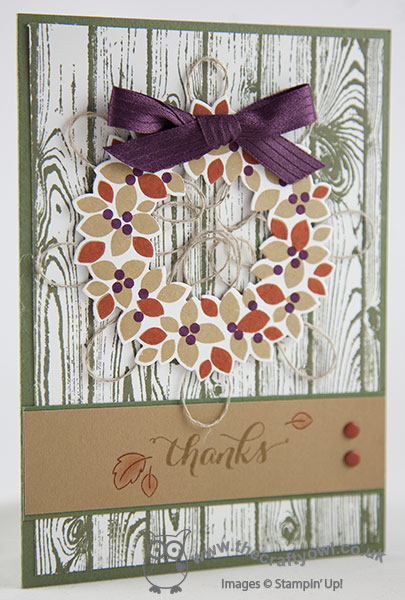
I used Baked Brown Sugar and Cajun Craze for the leaves on my wreath and stamped the berries in Blackberry Bliss. I cut it out using my Big Shot and the co-ordinating framelits and looped some linen thread behind it before adhering it with dimensionals to my Hardwood background, stamped in Always Artichoke (this panel reminds my of a mossy whitewashed shed!). I finished my wreath with a bow in the gorgeous Blackberry Bliss satin ribbon and a sentiment panel stamped with a simple 'thanks' and decorated with a few leaves from my 'Gratitude For Days' stamp set and a couple of candy dots. I love the rustic feel of this card - so fitting for this time of year.
Do pop by the challenge blog and see how the other Paper Players designers have used this week's colour combination - there are some fabulous cards from this talented bunch of designers.
I'm still playing catch up so am looking forward to a reasonably restful day today before the onslaught of another new and action-packed week. Back tomorrow with another project; until then, happy stampin'!
Stampin' Up! Supplies Used:
9fe17a29-10ff-4bb2-8de0-89b884066f38|1|5.0|96d5b379-7e1d-4dac-a6ba-1e50db561b04
Tags: Wondrous Wreath, Hardwood, Big Shot, Magnetic Platform, Another Thank You, Candy Dots, Shop online, Stampin' Up, Stampin' Up Card, Stampin' Up Card ideas, Stampin' Up Supplies, Gratitude For Days
Cards | Stamping
by Joanne James27. July 2014 08:00Good morning everyone - it's Sunday and time for my Design Team card over at The Paper Players where Ann has a great sketch challenge for us this week:
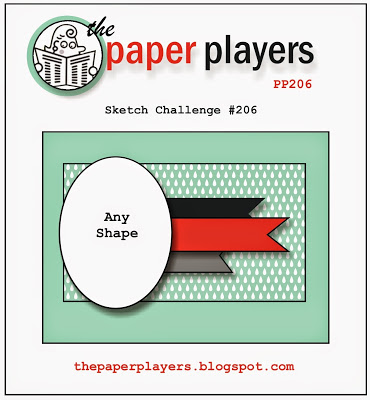
Now I love a sketch challenge and often I follow a sketch completely to the letter. Today is something of the exception to the rule though - when I saw the 'any shape' piece, I really wanted to use one of the flowers from the Bloom with Hope hostess stamp set that I had coloured with my set of Cherry Cobbler Blendabilities. As a consequence though, the layers didn't work for me - so I switched them about and offset them - I hope Ann doesn't mind! Take a look at this week's card to see what I mean:
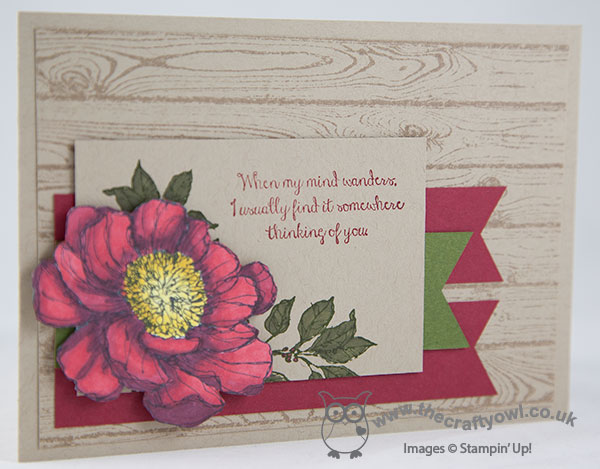
I wanted my flower to take centre stage so went with a neutral Crumb Cake card base, with a Hardwood stamped mat. I really wanted to use a sentiment alongside my flower - this stamp set has a great selection of really useful ones, but to follow the sketch literally I would have needed to stamp my sentiment on one of the banner flags to be seen, but this didn't work as I wanted them to bring some additional colour to my card. So I decided to tuck my banners behind my central rectangle; this allowed me to both stamp my sentiment onto it and add some leaves, which I stamped in Mossy Meadow and coloured with my Old Olive Blendabilities (they work on coloured cardstock too!). Here's a picture of my fussy cut flower, coloured with Cherry Cobbler and Daffodil Delight Blendabilities, in all its glory:
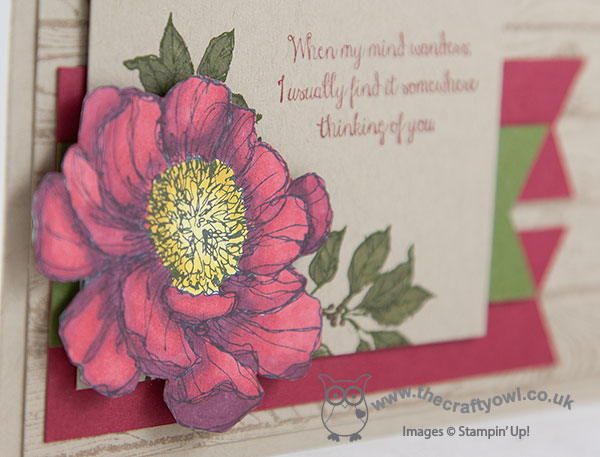
Isn't it just lovely? I'm still getting used to my alcohol markers and how they differ from water-based colouring. I am no expert (yet!) but I think this flower shows you can get great results without much experience - it looks much more 3D than with ordinary markers and a blender pen. I have a little tip for you too - when you fussy cut a coloured flower like this one, you invariably end up with some white that shows around the cut edge. If you run your marker around the edge of the flower, it takes that away and makes your flower look just a little more finished.
If you would like to know more about Blendabilities, do check back for more hints, tips, techniques and tricks as I learn what works best. Better still, if you live in Northampton and the surrounding area, get in touch about attending my August card class where we will be using Blendabilities, along with the lovely Blended Bloom stamp. Also, if the 'Bloom with Hope' set has caught your eye and you would like your own set, do get in touch to book to host a party or enquire about my new Stampers 6 Club that is beginning next month: for a monthly commitment of £25 a month for 6 months, you get to be the hostess one month and enjoy a minimum of £25 hostess credits to spend free on anything in the catalogue, including hostess sets. Party freebies without needing to actually invite your friends round! There is one space left in this current club - get in touch if you'd like it to be yours!
Do pop on over to The Paper Players blog to see what everyone else did with this sketch - there are some great cards there this week! I'll be back tomorrow with another card; until then, happy stampin'!
Stampin' Up! Supplies Used:
by Joanne James3. July 2014 22:32Good evening all - I've had a busy week so far, most of it out and about so have spent next to no time in my craft room. Good job I have a few things that I've already prepared to share with you! Today I'm sharing one of the cards I made for my new catalogue launch event, featuring the Work of Art stamp set:
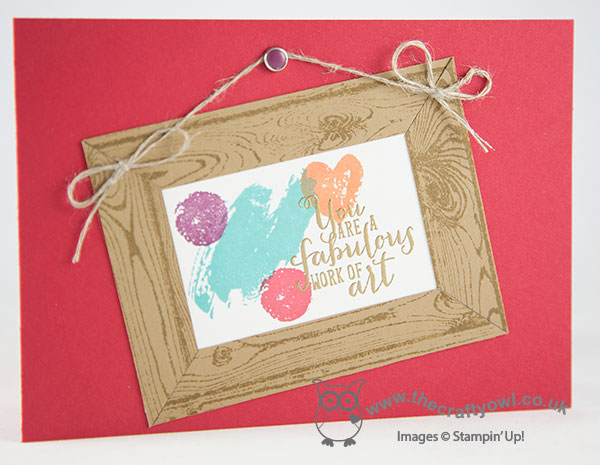
This set, comprising lots of brushstroke-type stamps can be used in lots of different ways and for this card I decided to use it to create my very own 'work of art'. I stamped four of the brushstroke stamps randomly on a piece of Whisper White cardstock, then stamped the sentiment in Versamark and heat embossed in gold. I then stamped the Hardwood stamp in Baked Brown Sugar on a piece of cardstock in the same colour and cut it into strips and created a frame for my picture. I finished off with some linen thread and a candy dot brad to hang it from on my Real Red wall.
Simple enough - but I like it! That's all from me today - a quick post as my bed is calling! Back tomorrow with another project; until then, happy stampin'!
Stampin' Up! Supplies Used: