Enjoy The Moment Note Card

by Joanne James18. October 2021 17:23

Happy Monday everyone! I had a little time today to work on some future projects, and following a lunch time walk with the eldest of the James Juniors who is on half-term break already, where we admired the falling conkers and autumnal leaves, got a little side-tracked into creating a card on my return using this week's Color Throwdown colour palette:

I really loved this mix of browns and aqua and took the opportunity to use some items that haven't gotten much love lately - take a look:


Here's the low-down on today's card:

Enjoy The Moment - I really like the detailing on the seed heads in the 'Enjoy The Moment' stamp set and had it on my desk for another project, but couldn't resist another card with then in these colours. Found on page 26 of the annual catalogue, this is a great set for autumnal cards and works well in neutral colours. 

Everyday Label Punch - After stamping and colouring each of my images, I punched them out with my Everyday Label Punch, as I realised I hadn't used a punch on a card in ages and this label punch is super useful for both tags and cards alike. 

Cork Border - Did you notice the strip of cork paper I added beneath the gingham behind the punched pieces? This is some of the new cork specialty paper that is featured in the current mini catalogue. It's great for adding texture without bulk and really easy to cut with your paper trimmer. You can see it more closely on this image:


A little stamping on the inside completes my card:


Here is the visual summary of the key products used on today's project for you to pin for easy reference:


You can see all of my 'How To' summaries on my 'How To - Tips and Techniques' Pinterest board in case you've missed any. 

Enjoy your day and I'll be back tomorrow with another project for this week's new challenge over at CAS Colours & Sketches. I am also the Featured Designer over at The Color Throwdown this week so be sure to come back for another post featuring their new colours on Wednesday. Until tomorrow, happy stampin'!


Stampin' Up! Supplies Used:

Table built using Product Table Builder by The Crafty Owl - Independent Stampin' Up! Demonstrator.

Springtime Joy Welcome Spring Bunny Card

by Joanne James29. March 2021 11:30

Today I have another card to share that I made using Julee's Mojo Monday layout and those yummy pastels over at The Color Throwdown this week: 


I needed a few more Easter cards and those bunny-ear cakes definitely lend themselves to a cute Easter card  - take a look:


Here's the low-down on today's card:

I used Highland Heather for my card base and gingham panel and used the sweet bunny from the 'Springtime Joy' stamp set as the focal point of my card, added some pretty colours to her flowers, then picked up the flower colour and detail in the horizontal border, by adding a trio of flowers made using the medium daisy punch. I finished each with some oversize retired sparkly gems and tucked in my 'Welcome Spring' sentiment that I stamped on an Everyday Label punched piece. I added another sentiment from the set to the inside of my card:


How sweet are those pretty colours? Gorgeous! I love the added sparkle from the gems too!


Here is the visual summary of the key products used on today's project for you to pin for easy reference:


You can see all of my 'How To' summaries on my 'How To - Tips and Techniques' Pinterest board in case you've missed any. 

That really is it from me today! Enjoy your day and I'll be back tomorrow with another project for the new challenge over at CAS Colours & Sketches where it's the double this week! Until then, happy stampin'!


Stampin' Up! Supplies Used:

Table built using Product Table Builder by The Crafty Owl - Independent Stampin' Up! Demonstrator.

Country Floral Colours of Spring Birthday Card

by Joanne James2. March 2019 06:00

Today I'm sharing a card for this week's challenge over at Inspire.Create Challenges where they have a beautiful Spring colour palette this week:


With the unseasonably warm weather we have been having here in the UK this past week or so, I am definitely feeling like Spring is around the corner. The flowers in the garden are waiting to burst into bloom so I just had to use these fresh colours for another dry embossed card using one of my current favourites from the second Sale-A-Bration release that went live on 15th February, the new Country Floral Dynamic Textured Impressions Embossing Folder: 


Here's the low-down on today's card:

Country Floral - I couldn't resist the opportunity to create another card using the new Country Floral dynamic embossing folder. This time I tried something else new that is the reverse of this card that I shared with you the other day - I embossed a piece of Whisper White cardstock and then used my Blends markers in the challenge colours to colour the individual flowers. A little quicker than my previous card and a great way to include all of these lovely spring colours. 

A Perennial Birthday - I used a sentiment from the Perennial Birthday set in the annual catalogue on my card - the script compliments the embossing folder I think. I stamped mine using Pool Party ink on Whisper White and punched it out using the Everyday Label Punch and trimmed it slightly so that it could be matted with a Daffodil Delight base. 

Sale-A-Bration New Releases - My card today does use some of the Sale-A-Bration organdy ribbon that sold out some weeks ago. I don't like to tempt you with something you can no longer get your hands on, but it was the perfect finishing touch for my card. There is good news though - as of March 1st there are even more FREE product choices for the remainder of Sale-A-Bration (you can read all about them in my earlier post here if you missed it) so there is lots more to choose from!

Here is the visual summary of the key products used on today's project for you to pin for easy reference:


You can see all of my 'How To' summaries on my 'How To - Tips and Techniques' Pinterest board in case you've missed any. 

I am busy hosting my first residential crafting retreat of the year this weekend so I have a whole day of crafting fun ahead with some fabulous ladies. I will have more to share with you about it later this week, but in the meantime, if this is the kind of thing that appeals to you, why not check out the details for my next one in October here. It's open for booking and I would love to welcome you!

Enjoy your day and I'll be back tomorrow with this week's project for our new challenge over at The Paper Players. Until then, happy stampin'!


Stampin' Up! Supplies Used:

Table built using Product Table Builder by The Crafty Owl - Independent Stampin' Up! Demonstrator.

Strong & Beautiful Country Floral Monochromatic Card

by Joanne James26. February 2019 22:00

Today I'm sharing a card for this week's challenge over at Just Add Ink where the focus is on embossing:


Dry embossing, heat embossing, embossing paste - so many possibilities and all are in the mix with some great samples from the design team this week. I'm also linking up over at SUO Challenges for #SUOC217 since I am using one of my current favourites from the second Sale-A-Bration release that went live on 15th February, the new Country Floral Dynamic Textured Impressions Embossing Folder: 


Here's the low-down on today's card:

Country Floral - I really wanted to make the most of those flowers and decided to try out a technique that I hadn't tried before, where I inked the inside of my embossing folder before embossing my white cardstock so that my flowers remained white on an inked negative space. Whilst I liked the effect, the ink was too bold for the effect I wanted, so I decided to try something else that was new to me - I used my Light Petal Pink Blends marker and coloured the space completely. Time consuming? Yes. Worth it? Totally! The card looks even better in real life than in the photo; so soft and pretty.

Strong And Beautiful - Whilst my card is delicate and feminine in colour and style, the sentiment is from a great set in the seasonal catalogue that is perfect for cards for strong, confident women. It's called 'Strong and Beautiful' and contains some wonderful and uplifting sentiments. I stamped mine using Petal Pink ink on Whisper White and punched it out using the Everyday Label Punch and positioned it alongside a fancy bow made from the Floral Romance Variegated Ribbon which ties beautiful, soft bows. My sentiment resolves on the inside of my card with 'Thank you for always being there for me'. How lovely is that?

One Colour Wonder - I've made a few monochromatic cards lately - I must be on a roll! This one is particularly soft and pink and feminine and with good reason: it's headed to a dear friend of mine who is Mum to two boys so, along with her husband, is rather outnumbered in her household so rarely does the 'girly' thing so this is most definitely for her.

Here is the visual summary of the key products used on today's project for you to pin for easy reference:


You can see all of my 'How To' summaries on my 'How To - Tips and Techniques' Pinterest board in case you've missed any. 

I really love this embossing folder and have another card showcasing an alternative colouring technique to share with you later this week, so do pop back if you would like to see more samples.

Enjoy your evening and I'll be back tomorrow with another project. Until then, happy stampin'!


Stampin' Up! Supplies Used:

Table built using Product Table Builder by The Crafty Owl - Independent Stampin' Up! Demonstrator.

Three Ks and Three Colours

by Joanne James25. September 2018 07:00

Today I'm sharing a card that I designed for this week's challenge over at Just Add Ink. I also used this week's CAS(E) This Sketch layout and coincidentally my card also features the current colour palette over at the Global Design Project:


Here's my card that I created - take a look:


Here's the low-down on today's card:

Just Add K - I have been enjoying playing along with the team over at Just Add Ink lately but must confess that this week I nearly did not rise to the challenge! Just Add K - despite their helpful suggestions and lovely design team cards, when it came down to it, nothing beginning with K came to mind. Intrigued, since this really did now feel like a challenge, I got a pencil and paper and got my thinking cap on. Not only did I come up with one K, but three. Can you spot them? Yes, my three Ks are Kindness, Kraft and Knots! 

A Label For Everyday - The K for Kindness comes from the sentiment that can be found in the Waterfront stamp set. I stamped it in Blakberry Bliss onto Mint Macaron cardstock and punched it out with my Everyday Label Punch, snipping off the bottom piece and slipping it behind my horizontal coloured strip.

Three Colours - The three colours on my card were inspired by the Nature's Twine that I used for my knots around contrasting strips of coloured cardstock. I also used a piece of Nature's Poem Blackberry Bliss patterned paper for my mat layer. My third and final K is for Kraft (a handy storecupboard neutral). I found this piece of clear pre-embossed kraft cardstock in my scraps box (its retired and I can't remember what it was called) that I decided to use for my central panel for subtle pattern and interest. 

Here is the visual summary of the key products used on today's project for you to pin for easy reference:


You can see all of my 'How To' summaries on my 'How To - Tips and Techniques' Pinterest board in case you've missed any. 

So what do you think of this card? Whilst it was fun to solve the 'k conundrum', I'm not sure about the end result. The knots are a little rustic for me and this trio of colours is a little harsh. Oh and did I mention that every time I look at the sentiment label I see a tombstone?! Must be the time of year!! Not my finest creation perhaps but I figured I'd share with you anyway to see what you think. Do leave me a comment below - I'm really interested to hear your thoughts!

Enjoy your day and I'll be back tomorrow with another project. Until then, happy stampin'!


Stampin' Up! Supplies Used:

Table built using Product Table Builder by The Crafty Owl - Independent Stampin' Up! Demonstrator.

Country Lane Thank You Card and Chocolate Slider Gift Packaging

by Joanne James3. September 2018 09:00


Today I'm sharing a card and co-ordinating chocolate slider gift package that I actually made for last week's challenge over at Just Add Ink  but didn't get to photograph in time to play along;luckily for me, it is perfect for this week's Just Add Ink challenge too - if you take a look at the challenge badges, you will see what I mean: 


I absolutely loved the JAI colour palette last week and I couldn't resist breaking out some of my new products to create a card and matching gift packaging - luckily there's plenty of texture in there too! Firstly, here's the card I created:


Here's the low-down on today's projects:

Country Home - From the Country Lane Suite in the new Autumn-Winter catalogue, the Country Home stamp set is all about country living, with some great thanks sentiments and it's perfect for colouring too. I used my Blends to add colour to my Fall florals and fussy cut them out ready to layer onto my card. I also stamped a border using the tiled stamp in the set for some 'faux texture' with some Bermuda Bay tone-on-tone stamping, tucked under my sentiment.

Tin Tile Metallics - The background panel of my card is a piece of silver foil cardstock that has been embossed with the new Tin Tile Dynamic Textured Impressions Embossing Folder and given a slightly aged/distressed look by sponging with some Soft Suede ink. I just love the embossed pattern of this folder; it's so pretty. I know I'm going to use it lots!

Thankful For ... Chocolate - I loved my card so much, I thought I would create a matching slider gift package using exactly the same layout and design to make a slider wrap for one of my favourite bars of chocolate, ready to gift to someone; it's always nice to be able to share a sweet treat, especially when beautifully packaged I think - I love going to the trouble to make something quite ordinary appear to be rather special: 


These wraps are very straightforward - and when you pull the ribbon bow and tag, the chocolate bar slides outwards:


Finally, here's a shot of both items together:


Here is the visual summary of the key products used on today's project for you to pin for easy reference:


You can see all of my 'How To' summaries on my 'How To - Tips and Techniques' Pinterest board in case you've missed any. 

I think this set will be heading for my local postmaster as a thank you for his help with my Autumn-Winter catalogue mailings this week (yes, if you're one of my customers the catalogues are in the post!) He is used to me appearing with bags full of catalogues to be mailed at this time of year and we have a great system going now, which makes the process efficient and keeps ongoing queues to a minimum! I like to give him a bar of chocolate as a thank you for his help and to keep him sweet :-) On the subject of Autumn-Winter catalogues: if you don't have a demonstrator and would like me to add you to my list, then do get in touch and I can pop one in the post to you too. The electronic version of the catalogue will be available here online tomorrow when it launches.

Enjoy your day and I'll be back tomorrow with another project. Until then, happy stampin'!


Stampin' Up! Supplies Used:

Table built using Product Table Builder by The Crafty Owl - Independent Stampin' Up! Demonstrator.

Wild About You Animal Expedition PP399

by Joanne James24. June 2018 09:00

Another busy week in the James household with little time for crafting - boohoo! I did have a great technique class earlier this week where we made cards using the 'Share What You Love' Suite and have had the opportunity to chat with lots of my lovely customers this week as they have been collecting their new catalogue orders, so it's not all bad. And today it's Sunday and time for this week's new challenge over at The Paper Players - yay! It's the turn of our very own queen of diecuts, the lovely Laurie, to host this week and she has my favourite, a sketch challenge, for you to work with:
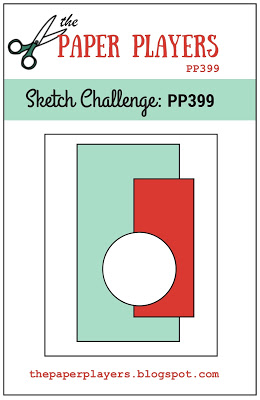
 

I decided that the sketch layers lent themselves to featuring some new designer series paper and having just taken delivery of the Animal Expedition papers I had to start cutting them up for my card this week - take a look:
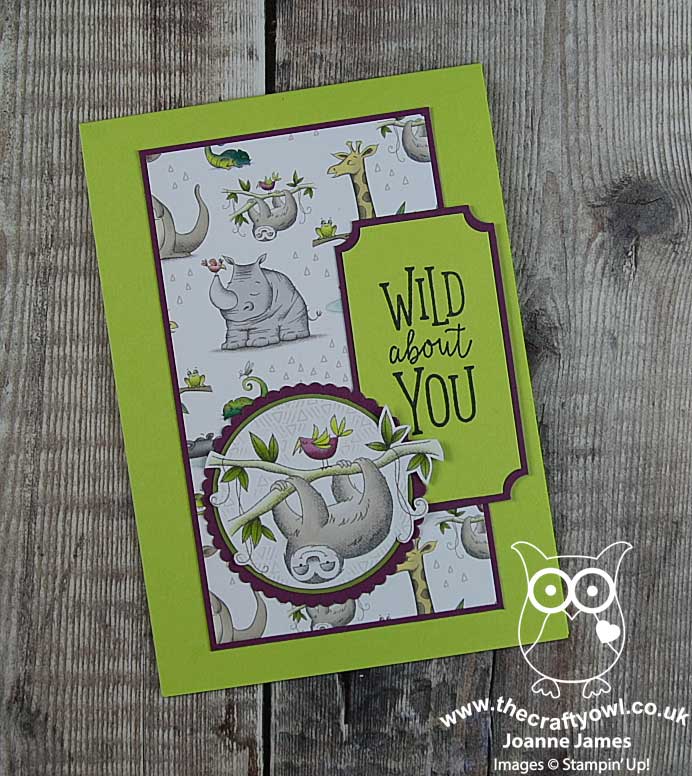
 

Here's the low-down on today's card:

Animal Antics - My card today contains very little stamping - it really is all about the paper. Oh and how I love designer series paper! I used two different designs from the Animal Expedition DSP on my card: a background panel featuring a selection of cute animals, including the animals to be found in the co-ordinating 'Animal Outing' stamp set along with a few extras too, including crocodiles and a sloth. For my circle element, I used one of the other paper designs featuring larger versions of the same animals and cut out a sloth with a circle framelit, allowing the fussy cut edges to overhang the border of my mount - isn't he just the cutest?

Wild About ... My Everyday Label - The only stamped element on my card is the sentiment. I punched this out using my Everyday label punch by feeding the cardstock into the punch from the back in order to create the longer rectangle, then snipped off the circular elements top and bottom in order to create a uniform shape that was easier to mount. 

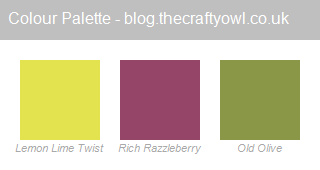
A Bright Colour Combo - I chose to use Lemon Lime Twist for my card base and label, to provide a bright contrast to my busy patterned paper. I mounted all of my panels on Rich Razzleberry, pulling the colour from the little purple bird that is chatting to the sloth. I also added a thin border of Old Olive to frame my sloth. Feel free to save this colour combination for your future projects:
Here is the visual summary of the key products used on today's project for you to pin for easy reference:
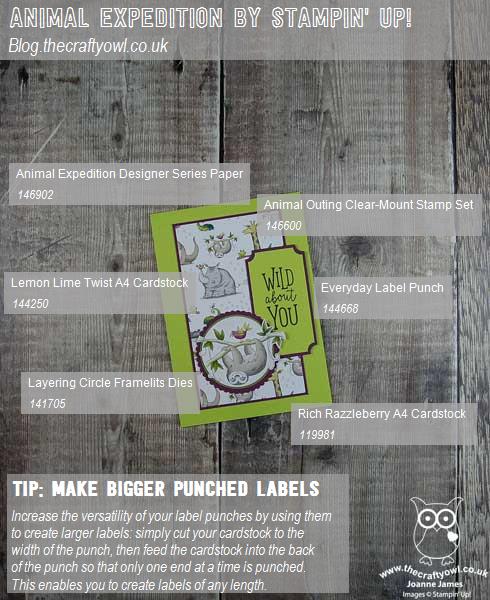
 

You can see all of my Product and 'How To' summaries on my 'How To - Tips and Techniques' Pinterest board in case you've missed any. 

Before you reach for your ink and papers, check out what our amazing team has created to inspire you this week:

Here's a quick recap of our challenge rules:
 
1.  Create a new paper project
2.  Upload your creation to your blog with a link back to us and provide a direct link to the post featuring your challenge submission.
3.  Please link your card to no more than four challenges, TOTAL.
4.  Have FUN!

I can't wait to see what you create with this week's sketch and look forward to visiting your blogs this week! Enjoy the rest of your weekend as it will be over all too quickly. We have the last bits of the kitchen to pack away before major building work starts tomorrow on the new one, along with another school project - last week it was Eid cards, this time a map of the Tour de France route - to assist in the completion of. Thank heavens for Stampin' Up! and a ready stash of onhand craft supplies! I'm hoping to get some crafting done this week in between making copious cups of builders tea so will be back soon with more projects sharing some new makes.

Either way, you are definitely going to want to pop by next Sunday for the next Paper Players challenge; we will be celebrating our 400th anniversary and have a ton of fun in store for you! Until next time, happy stampin'!


Stampin' Up! Supplies Used: 

Table built using Product Table Builder by The Crafty Owl - Independent Stampin' Up! Demonstrator.

Swirly Snowflakes Thinlits Square Easel Christmas Card

by Joanne James8. December 2017 12:00

It's Friday and finally I've managed to squeeze in a blog post to share with you - hurrah! Today I'm sharing another card using the Snowflake Sentiments bundle - and just like my card for The Paper Players on the Sunday before last (you can see that card here if you missed it), it uses the thinlits in a rather unusual way. I'm also linking up with the team over at Stamp Ink Paper who are looking for snow-themed creations this week:

I decided to make an easel card  - this is what it looks like closed:


This is what it looks like open:


And finally here's another shot from above, that shows the detail of the front edge and my sentiment, which I stamped in Versamark and heat embossed onto a label punched with the Everyday Label Punch:


I wanted to make a special card that really showcased the versatility of the Swirly Snowflakes Thinlits Dies, so I used the edge thinlits to create two layered squares and finished it with a stitched square, onto which I stamped a snowflake from the co-ordinating Snowflake Sentiments set in Versamark and heat embossed it in gold. I finished with one of the super-sparkly faceted gems to create a focal centrepiece. Creating a card like this is not for the faint-hearted - it took a fair amount of partial die cutting and snipping of the gold piece to remove excess pieces in order to have a symmetrical design, but it was so worth it - the finished card has a real 'wow' factor, I love it!

I'm pleased to see that the Snowflake Sentiments stamp set and Swirly Snowflakes Thinlits Dies are on carryover and will remain available beyond the end of the Autumn-Winter catalogue - this means lots more opportunities to create with this set! They won't be available as a bundle though, so if you want the 10% saving, be sure to snap them up before January 2nd - just click on the link in the supplies list at the bottom of today's post.

Here is the visual summary of the key products used on today's project for you to pin for easy reference:


You can see all of my 'How To' summaries on my 'How To - Tips and Techniques' Pinterest board in case you've missed any. 

Enjoy your day and I'll be back around lunchtime tomorrow with a special post as I'm the guest designer over at Inspired By All The Little Things this week. My project contains a Spring-Summer sneak-peek too so be sure to come back and take a look. Until then, happy stampin'!


Stampin' Up! Supplies Used:

Table built using Product Table Builder by The Crafty Owl - Independent Stampin' Up! Demonstrator.

Labels To Love Quick and Easy Christmas Cards Two Ways

by Joanne James25. October 2017 20:19

I've been busy hosting a few Stampin' Up! parties this month - the current hostess promotion to earn the Merry Patterns stamp set means that it's a great time to gather with friends for an evening of creative fun. Today I'm sharing a couple of the cards that my hostesses and friends have had the opportunity to make:


Here's the low-down on today's cards:

Labels To Love - The Merry Little Labels stamp set and Everyday Punch bundle have been very popular with my customers and I wanted to share the other stamp set in the catalogue that also co-ordinates with the Everyday Label Punch: Labels To Love. There are sentiments for a variety of occasions in this set, not just Christmas, and each of them fits the Everyday Label Punch - that makes for a winner in my book! We used a couple of the Christmas sentiments and paired it with the festive Quilted Christmas papers. I even decorated the envelope flaps with a piece of co-ordinating paper in the alternating colourway. Here's one of them - you can see the second one at the bottom of this post:


Add Sparkle With Tinsel - The Mini Tinsel Trim is great for decorating your Christmas packages but is also great for adding a touch of sparkle to your cards. here we tied knots in each end and created a loop behind the label for a quick touch of glitz. 

A Quick Card Solution - These cards are a slightly smaller than a standard card size, measuring 12.7cm x 8.9cm, as we used Stampin' Up!'s white notecards and envelopes for speed. They arrive pre-scored and with envelopes included and are great if you are mass-producing or want to make some quick and easy cards, for Christmas or any time. They are also great for children's cards - both the James Juniors go through a pack of these when making up their Christmas cards for classmates.

Here is the visual summary of the key products used on today's project for you to pin for easy reference:


You can see all of my 'How To' summaries on my 'How To - Tips and Techniques' Pinterest board in case you've missed any. 

I've had lots of fun making these cards with some of my party groups; check out my Facebook page if you'd like to see some of the action. Equally if you would like to get together with friends for an evening of crafty fun in the run up to Christmas, do get in touch - I would love to share Stampin' Up! with you.

I'll be back tomorrow with another project. Until then, happy stampin'!


Stampin' Up! Supplies Used:

Table built using Product Table Builder by The Crafty Owl - Independent Stampin' Up! Demonstrator.

Give Thanks For Labels To Love And The Paper Players PP365

by Joanne James8. October 2017 09:00

It's Sunday and time for this week's new challenge over at The Paper Players! I am your host this week and I have a colour challenge for us to work with:


I took the opportunity to make a fall-inspired thank you card this week that works for a few additional challenges too; I used the sketch over at Just Add Ink, the middle vertical column of the tictactoe board over at Paper Craft Crew and the theme challenge over at Global Design Project:

Tic Tac Toe PCC Challenge 262         

My starting point for today's card was this gorgeous patterned paper from the Painted Harvest designer series paper pack - take a look:


Here's the low-down on today's card:

Even More Painted Autumn For Your Pennies - You all know how much I love designer series paper, and the Painted Autumn collection is definitely up there as one of this season's favourites. Bold, watercoloured images in beautiful autumnal colours what could be better? How about more for less? Yes, Painted Autumn is one of the designer series papers that is included in the 'Buy 3, get 1 free' sale that is running throughout October. You can read more about that here or purchase directly from my online store - I for one will be stocking up for sure. 

Give Thanks For Labels To Love - I used the sentiment and border stamp from the 'Labels To Love' stamp set on my card today. This set, on page 45 of the seasonal catalogue, is an additional set that coordinates with the Everyday Label Punch besides the 'Merry Little Labels' set that the punch is bundled with. There are some great sentiments in this set but I think this one is my favourite - we all have so much to be thankful for. I added a couple of the Touches of Nature wooden flowers that I heat embossed with some now-retired Crushed Curry embossing powder to my label, along with some vellum leaves and a leaf-embossed stitched circle behind to create a bit of a collage of my focal point. 

Not Just An Everyday Label - The Everyday Label Punch is proving a very popular choice for many of my customers and it's easy to see why: in addition to punching out the standard shape, there are a number of ways the punch can be used to make either shorter or longer labels, to create layers or even to create different shapes. By shortening my punched label I created more of a square shape for the sentiment on my card today. I love a punch that is versatile and has lots of alternative uses! 

Here is the visual summary of the key products used on today's project for you to pin for easy reference:


You can see all of my Product and 'How To' summaries on my 'How To - Tips and Techniques' Pinterest board in case you've missed any. 

Before you reach for your ink and papers, check out what our amazing team has created to inspire you this week:

The Paper Players Design Team
 
 
Here's a quick recap of our challenge rules:
 
1.  Create a new paper project
2.  Upload your creation to your blog with a link back to us and provide a direct link to the post featuring your challenge submission.
3.  Please link your card to no more than four challenges, TOTAL (that includes any you design for) .
4.  Have FUN! 


I look forward to seeing what you create with this week's colour palette. Enjoy the rest of your weekend as it will be over all too quickly; my niece is celebrating her 18th birthday this coming week so we are off for a family gathering of 'cake and cocktails' this evening to celebrate, which we are all looking forward to.

I'll be back tomorrow with another project; until then, happy stampin'!


Stampin' Up! Supplies Used: 

Table built using Product Table Builder by The Crafty Owl - Independent Stampin' Up! Demonstrator.

Mini Catalogue

BROWSE THE CATALOGUE

The mini catalogue is now live! Read and download your copy here.

Shop Online

Access my online shop 24 x 7, 365 days of the year:

Current March hostess code:

S9F2XJJW

Shop Online

Join My Team

It's always a great time to join Stampin’ Up! New team members can get £130 worth of products for only £99 + free business supplies + free shipping + all the fun being a part of Stampin’ Up! Stampin' Up! has something for everyone: join my growing team and benefit from my support to enjoy Stampin' Up! however you choose.

If you're interested, call me for a chat to understand how I can help you realise your goals. Alternatively, if you have already decided to sign up and you just can't wait, please click here for the link to the online form where you can sign up and order your starter kit right away! 

Latest Kit!

Stampin Cut and Emboss

The Rock Legend Kit has all you need to make 8 cards with coordinating envelopes. Along with the new Panda Friends Kit, both are available from January 4th for just £14 each - get yours here!

2023-24 Annual Catalogue

BROWSE THE CATALOGUE

Click on the catalogue for a full list of current SU! supplies - if you would like to order any of the items featured, please drop me a line at [email protected] or give me a call on 07773 421446 - I'd be happy to help.

New Online Exclusives

There will be new products available exclusively in the online store from 5 March - check them out here.

About Me

Hi I'm Joanne and live in Northampton and when I'm not looking after my husband and two beautiful children, am an avid crafter with a passion for all things Stampin' Up!

I must confess that I have never been a big rubber stamper - until I discovered Stampin' Up! that is. I love the fact that I can get such great results with co-ordinating stamps, inks, papers and punches - the possibilities are endless! Join me on my stamping journey as I share the things I love and be inspired to create amazing things yourself!

Follow Me

Monthly Newsletter

Box Builder

Click the button above to use Box Buster to create your custom box design using the Envelope Punch Board!

Kits Collection Now Available!

Stampin Cut and Emboss

The new Kits Collection from Stampin' Up! is now available!

Click here to see the current kits available and order yours online today.

I Design For


Stampin' Up Stuff

This is my personal blog and is not endorsed by Stampin’ Up! I hope you find it a plentiful source of ideas and personal inspiration but please don't copy my designs for contest submission or use for classes, publication or sale without express permission.