Mediterranean Moments Cafe Note Card

by Joanne James6. April 2019 21:00

I've had a busy week that's kept me away from my blog but I have managed to get lots made over the past couple of days so I should be better prepared this week! Today I'm sharing a card for the current challenge over at Just Add Ink that also uses the sketch layout at The Paper Craft Crew:

   Paper Craft Crew Sketch Challenge PCC332

I missed playing with the ladies over at Just Add Ink last week as I just didn't manage to get my card finished and blogged (one for another time!) but as soon as I saw their inspiration photo this week I knew exactly which set I was going to use. Here's my card:


Mediterranean Moments is a stamp set that I've used many times, but not recently so it was a good opportunity to dust off this favourite from the annual catalogue and get to work. The photo reminded me of the cafe scene so this formed the basis of my main focal point, stamped on white and coloured with my Stampin' Blends. I used the PPC sketch to push me to consider a different layout to any I've used previously with this set. I did some tone-on-tone stamping using one of the other stamps in the set and embossed the main panel with a brick pattern for added texture and interest, and added a few wooden leaf embellishments from my box. I added a sentiment from Itty Bitty Greetings to finish my 'just because' note card.

Here is the visual summary of the key products used on today's project for you to pin for easy reference:


You can see all of my 'How To' summaries on my 'How To - Tips and Techniques' Pinterest board in case you've missed any. 

Enjoy your evening and I'll be back tomorrow with another project. Until then, happy stampin'!


Stampin' Up! Supplies Used:

Table built using Product Table Builder by The Crafty Owl - Independent Stampin' Up! Demonstrator.

At Home With You Christmas Card and Matching Gift Bag Punch Board Gift Box

by Joanne James21. September 2017 18:59

Happy Friday everyone! I'm not sure where the time goes - I can't believe it's the end of the working week already - well, for some anyway! Today I'm sharing a another card along with a matching gift box from one of last month's monthly technique classes using the At Home With You bundle - take a look:


Here's the low-down on today's card:

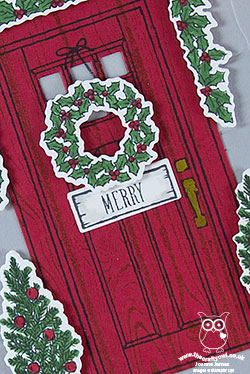
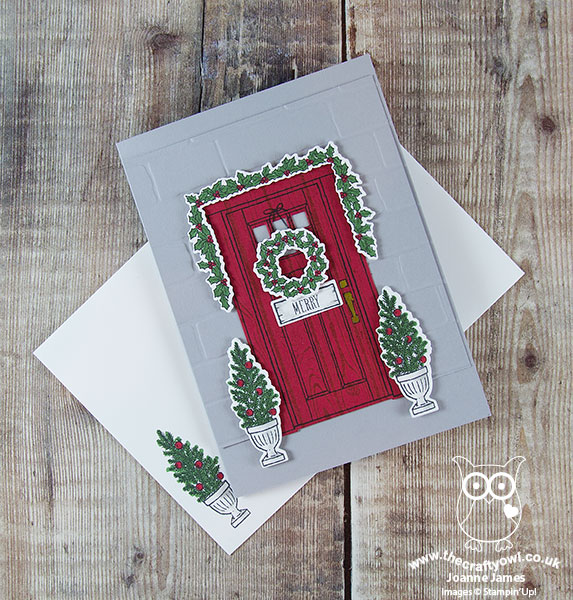
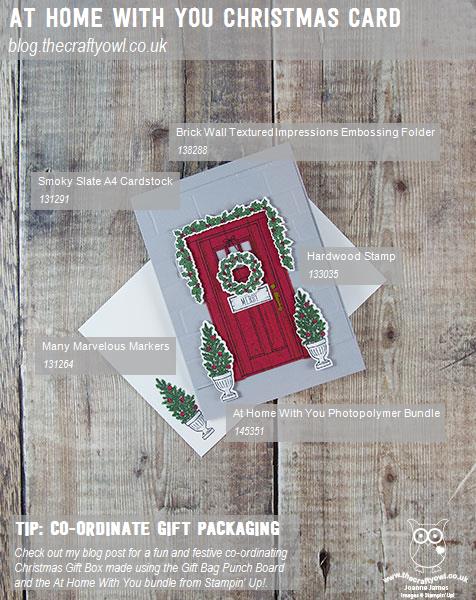
At Home With You At Christmas - The At Home With You bundle is so versatile and works for lots of different seasons. Today's card features the gorgeous holly bough around the door, along with the holly wreath and the ornamental trees either side of the front door. I coloured them with my Stampin' Write markers and they were easily cut out with the framelits. I even decorated the inside and envelope for complete co-ordination.

More Ways To Add Texture - As with the last card I shared featuring this set (you can see that card here if you missed it), today's card has another three ways in which you can incorporate texture into your projects:

Adding Texture 1: Stamping To add to the Christmas feel, I wanted a red front door; by stamping my Real Red cardstock with the Hardwood stamp in Real Red, before stamping with the door outline in black, to add some tone-on-tone interest and texture for added kerb appeal.

Adding Texture 2: Dry Embossing On both my card and box I embossed the Smoky Slate base cardstock with my Brick Wall textured embossing folder to create some textured walls as a backdrop for my festive entrance.

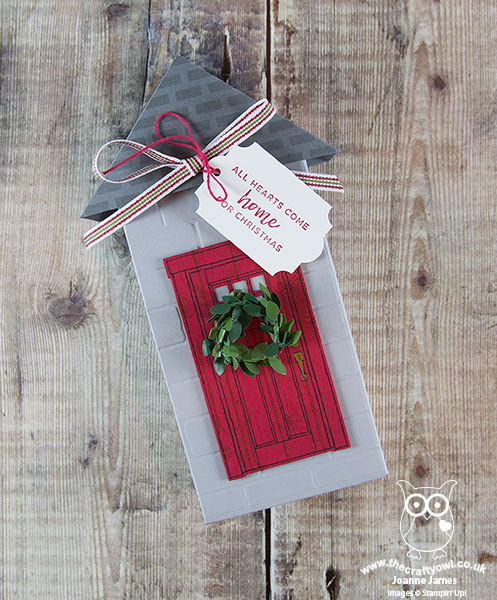
Adding Texture 3: Embellish Sometimes on a card it helps to minimise bulk especially if you need it to be post-friendly, however this is rarely the case with packaging and the addition of bulky embellishments is less of an issue. On my gift box, in addition to a tag and ribbon, I added a boxwood wreath to my front door - I love the extra texture this adds.

A Matching Gift Box - It's always nice to be able to create fancy packaging for gifts and no more so than at this time of year. I made my simple gift box using the Gift Bag Punch Board (I just didn't score the side indents to make the bag shape) and created a little triangle roof for a lid (it's a simple hinged closure that is held in place with washi tape) that I stencilled some tile on using some Basic Grey ink and my brick pattern Patterned Party Decorative Mask and added a tag punched with the super-useful Everyday Label Punch:

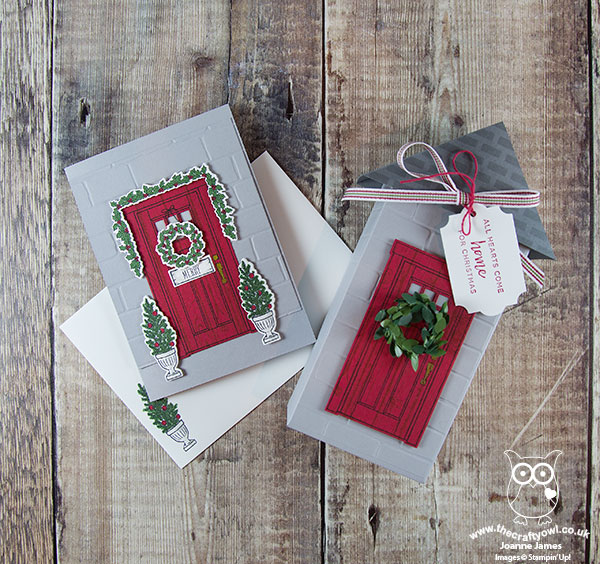
This box measures approx. and is a reasonable size, big enough to accommodate most small gifts. Here's a picture of both items together:


Here is the visual summary of the key products used on today's project for you to pin for easy reference:


You can see all of my 'How To' summaries on my 'How To - Tips and Techniques' Pinterest board in case you've missed any. 

Enjoy the rest of your day and I'll be back tomorrow with another project. Until then, happy stampin'!


Stampin' Up! Supplies Used:

Table built using Product Table Builder by The Crafty Owl - Independent Stampin' Up! Demonstrator.

Hearth & Home Thinlits Roman Blind Card

by Joanne James27. May 2016 08:00

Happy Friday everyone! Today I'm sharing a card that I made in my shaker card technique class that featured the Hearth & Home Thinlits at the back end of last year:


So long ago I know, and whilst some of the products on this card are retiring (namely the flower and bird punches, the Alphabet Rotary Stamp and the ribbon), the Hearth & Home Thinlits are staying so it's still worth a share! Not only that, but the new Foam Adhesive Strips that are coming in the new catalogue will make this kind of card a breeze. 

This one isn't a shaker card; I made a little video tutorial to show how I created my colourful roman blind window treatment and have finally got around to editing it, so here it is:


I'm so glad the Hearth & Home Thinlits are staying, they really are so useful. I'm looking forward to seeing what new ribbons are coming our way to see how I can give my next window a makeover!

Here is the visual summary of the key products used on today's project for you to pin for easy reference:


You can see all of my 'How To' summaries on my 'How To - Tips and Techniques' Pinterest board in case you've missed any. 

That's all from me today; back tomorrow with another project. Until then, happy stampin'!


Stampin' Up! Supplies Used: 

Table built using Product Table Builder by The Crafty Owl - Independent Stampin' Up! Demonstrator.

Awesomely Artistic Against A Brick Wall

by Joanne James30. July 2015 08:00

Today it's time for a new challenge over at Create With Connie and Mary and this week we have a great colour combination for you:

As soon as I saw these colours I knew they would be another great combination for work with my Awesomely Artistic stamp set, this time with the fabby new Brick Wall embossing folder:


I used Mint Macaron for my base with a mat of Perfect Plum, then on a piece of Whisper White I stamped the flower spray in Mint Macaron and a few grunge splatters in Perfect Plum, before running it through my Big Shot with the Brick Wall embossing folder in order to create my cottage garden effect. It's important you stamp before running this piece through the embossing folder rather than the other way around, otherwise you will be unable to achieve an even stamp on account of the cement grooves (I hope that makes sense!) I then sponged the whole of my card front with Sahara Sand ink to emphasise the brick shapes and texture of the wall. I wrapped a piece of Blackberry Bliss Striped Cotton Ribbon around my card front (the colour is sufficiently muted on the cotton that it is a good match for Perfect Plum) before adhering to the base, then tucked in the circle embellishment behind it before adding my sentiment, which I heat embossed in white onto Mint Macaron, and the beautiful dragonfly, which I stamped in Perfect Plum and Versamark then sprinkled liberally with Iridescent Ice to add a lovely sparkle. A last minute sprinkle of pearls finishes my card. 

I love the versatility of this set. On account of working ahead this card was made a couple of weeks ago, however I wanted to give a little 'shout out' to a fellow Stampin' Up! demonstrator friend of mine, Julie Kettlewell, who blogged something quite similar last week (I am abroad and sans stamping supplies, so have had no opportunity to work up something substantially different!). Julie has made some lovely cards using the Awesomely Artistic stamp set, so if this is a set that appeals to you, I recommend you check out her Pinterest board for more inspiration. Also, do visit the other Design Team members to see how they used this week's challenge colours; there's lots of inspiration over on their blogs too!

Right, I'm off to top up my tan! Enjoy your day and I'll be back tomorrow with another project; until then, happy stampin'!


Stampin' Up! Supplies Used:

  • Awesomely Artistic Clear-Mount Stamp Set
  • Big Shot
  • Brick Wall Textured Impressions Embossing Folder
  • Project Life Cards & Labels Framelits Dies
  • Mint Macaron Classic Stampin' Pad
  • Mint Macaron A4 Cardstock
  • Perfect Plum Classic Stampin' Pad
  • Perfect Plum A4 Cardstock
  • Sahara Sand Classic Stampin' Pad
  • Sahara Sand A4 Cardstock
  • Whisper White A4 Cardstock
  • Blackberry Bliss 5/8" Striped Cotton Ribbon
  • Pearl Basic Jewels
  • 3/4" Circle Punch
  • Sponge Daubers
  • Embossing Buddy
  • Heat Tool (Uk)
  • White Stampin' Emboss Powder
  • Iridescent Ice Stampin' Emboss Powder
  • Versamark Pad


Tags: , , , , , , ,

Cards | Stamping

Mini Catalogue

BROWSE THE CATALOGUE

The mini catalogue is now live! Read and download your copy here.

Shop Online

Access my online shop 24 x 7, 365 days of the year:

Current April hostess code:

VDKNV7BH

Shop Online

Join My Team

It's always a great time to join Stampin’ Up! New team members can get £130 worth of products for only £99 + free business supplies + free shipping + all the fun being a part of Stampin’ Up! Stampin' Up! has something for everyone: join my growing team and benefit from my support to enjoy Stampin' Up! however you choose.

If you're interested, call me for a chat to understand how I can help you realise your goals. Alternatively, if you have already decided to sign up and you just can't wait, please click here for the link to the online form where you can sign up and order your starter kit right away! 

Latest Kit!

Stampin Cut and Emboss

The Rock Legend Kit has all you need to make 8 cards with coordinating envelopes. Along with the new Panda Friends Kit, both are available from January 4th for just £14 each - get yours here!

2023-24 Annual Catalogue

BROWSE THE CATALOGUE

Click on the catalogue for a full list of current SU! supplies - if you would like to order any of the items featured, please drop me a line at [email protected] or give me a call on 07773 421446 - I'd be happy to help.

New Online Exclusives

There are new products available exclusively in the online store from 5 March - check them out here.

About Me

Hi I'm Joanne and live in Northampton and when I'm not looking after my husband and two beautiful children, am an avid crafter with a passion for all things Stampin' Up!

I must confess that I have never been a big rubber stamper - until I discovered Stampin' Up! that is. I love the fact that I can get such great results with co-ordinating stamps, inks, papers and punches - the possibilities are endless! Join me on my stamping journey as I share the things I love and be inspired to create amazing things yourself!

Follow Me

Monthly Newsletter

Box Builder

Click the button above to use Box Buster to create your custom box design using the Envelope Punch Board!

Kits Collection Now Available!

Stampin Cut and Emboss

The new Kits Collection from Stampin' Up! is now available!

Click here to see the current kits available and order yours online today.

I Design For


Stampin' Up Stuff

This is my personal blog and is not endorsed by Stampin’ Up! I hope you find it a plentiful source of ideas and personal inspiration but please don't copy my designs for contest submission or use for classes, publication or sale without express permission.