Santa Express Memories and More Christmas Shaker Card PP614

by Joanne James23. October 2022 08:00

Today it's Sunday and time for this week's new challenge over at The Paper Players! It's the turn of the fabulous Ann to host this week and she has my favourite, a sketch challenge for us to work with:


I saw Ann's sketch and immediately knew what I wanted to do with it - I love it when that happens! I mirror-flipped the sketch on the vertical and this is what I came up with - take a look:


Here's the low-down on today's card:

A Christmas Shaker - Who can resist a shaker, let alone one that is this colourful and festive?! I thought that central frame would be perfect for a feature shaker, filled with red, white and silver sequins. I made a frame using my Rectangle Stitched Framelits and used one of the patterned acetates from the Santa Express Memories and More Cards for my shaker front: 

I chose some complimentary papers from the Santa Express designer series paper pack in Poppy Parade and a colourful 'ho, ho, ho' design for my frame and central border element to tie in with my shaker frame.

Ho Ho Santa - I accented my shaker frame with a jolly santa that I fussy cut from one of the Santa Express Memories and More cards, to which I added one of the flat jingle bell trinkets using some co-ordinating (retired) festive baker's twine.

Don't Forget The Inside - I finished the inside of my card with another offcut of designer paper and a sentiment from the Sweet Candy Canes stamp set - I also used a narrow one from the same set on the front of my card:

I just love this card - so fun!! The Santa Express Memories & More cards are just fantastic - so useful for cards and scrapbooking alike! This is the first one of the included acetates that I've used; I also love the wood word diecuts too. An all-round, super useful set!

Here is the visual summary of the key products used on today's project for you to pin for easy reference:


You can see all of my Product and 'How To' summaries on my 'How To - Tips and Techniques' Pinterest board in case you've missed any. 

Before you reach for your ink and papers, check out what our amazing team has created to inspire you this week:

Here's a quick recap of our challenge rules:
 
1.  Create a new paper project
2.  Upload your creation to your blog with a link back to us and provide a direct link to the post featuring your challenge submission.
3.  Please link your card to no more than four challenges, TOTAL.
4.  Have FUN!

Enjoy your day; we are taking it easy following our early start; I think ironing and an afternoon movie might be required! I'll be back tomorrow with another project. Until then, happy stampin'!


Stampin' Up! Supplies Used: 

Table built using Product Table Builder by The Crafty Owl - Independent Stampin' Up! Demonstrator.

Hippest Hippos CAS Snorkelling Shaker Card PP602

by Joanne James31. July 2022 08:00

Today it's Sunday and time for this week's new challenge over at The Paper Players! It's the turn of the fabulous Claire to host this week and she has a fun theme challenge for you to work with:


Claire's board has a distinctly beachy theme this week, so I went across the middle with diecut, blue and patterned paper and yes, you've guessed it - I decided to create another shaker card featuring my favourite Sale-A-Bration stamp set, Hippest Hippos - this time a more clean and simple version than the one I shared with you a few days ago (you can see that card here if you missed it). Time to check out today's card:


Here's the low-down on today's card:

For today's challenge I used up a little more of the (retired) Whale of A Time designer series paper to create an underwater paradise for my snorkelling hippo. This time I cut a partial circle for my frame and used the wave die from the Hippo dies to create the 'surface' of the sea for my hippo to swim along, placing my hippo outside my shaker element rather than inside as on my previous card. Once again I added a pair of handcut customised fins, along with snorkel and mask to my hippo - this time in bright Parakeet Party green:


For this card, my shaker element is a flat 'pocket' shaker - a great way to reduce bulk and a great way to introduce a shaker element to an otherwise clean and simple card. Not forgetting the inside, I used the 'Whale Done' stamp set for some co-ordinated stamping and added a strip of left over designer paper:


Today's hippo's underwater apparel was inspired by my own snorkel, mask and fins which are also bright green in colour - just to make sure Jason doesn't lose me as I'm floating around the Caribbean. I've not done that for a while - happy memories!

Here is the visual summary of the key products used on today's project for you to pin for easy reference:


You can see all of my Product and 'How To' summaries on my 'How To - Tips and Techniques' Pinterest board in case you've missed any. 

I'm also linking today's card up over at Sparkles Monthly Challenges for a second entry into their shaker cards challenge and over at Just Add Ink for another 'Under the Sea' card. Finally I'm linking up over at Addicted to CAS where the theme is 'nautical' - I'm pretty sure I've met that brief, I just hope they think my card is sufficiently clean and simple! 

Before you reach for your ink and papers, check out what our amazing team has created to inspire you this week:

Here's a quick recap of our challenge rules:
 
1.  Create a new paper project
2.  Upload your creation to your blog with a link back to us and provide a direct link to the post featuring your challenge submission.
3.  Please link your card to no more than four challenges, TOTAL.
4.  Have FUN!

Enjoy your day; I'll be back tomorrow with another project. Until then, happy stampin'!


Stampin' Up! Supplies Used: 

Table built using Product Table Builder by The Crafty Owl - Independent Stampin' Up! Demonstrator.

Hippest Hippos Snorkelling Birthday Shaker Card TTT 172

by Joanne James28. July 2022 16:00

It's Thursday and time for a new challenge over at TicTacToe! It's the turn of Team X to host this week and the lovely Betty is our featured designer. This is the fun board that we are playing along with: 


I went right across the middle this week with enamel dots/sequins, free and shaker and - surprise, surprise! - another card featuring my favourite Sale-A-Bration stamp set, Hippest Hippos - take a look:


Here's the low-down on today's card:

I couldn't resist another outing with Hippest Hippos and today's challenge gave me the perfect opportunity to use up some (retired) Whale of A Time designer series paper to create an underwater paradise for my snorkelling hippo. I cut my frame and background out of the same piece of paper, so that my scene extends across the whole of the front of my card. I added my stamped and diecut hippo, complete with snorkel and mask - but there is one thing missing in the Hippo Dies set: everyone knows that to scuba or snorkel effectively, you need fins, right? So I made a pair for my hippo (nothing fancy - cut by hand) - what do you think?

I filled my shaker with a collection of green, silver and clear sequins and beads and added a custom birthday sentiment, courtesy of the 'Amazing Phrasing' and 'Sending Smiles' stamp sets - thank you to the talented Melody Hyde for this great Instagram tip. 

Not forgetting the inside, I used the 'Whale Done' stamp set for some co-ordinated stamping and a fun sentiment:

So what do you think of today's hippo-tastic creation? And using free stamp sets too - yippee!

Here is the visual summary of the key products used on today's project for you to pin for easy reference:


You can see all of my Product and 'How To' summaries on my 'How To - Tips and Techniques' Pinterest board in case you've missed any. 

I'm also linking today's card up over at Sparkles Monthly Challenges where their theme this month is shaker cards and over at Just Add Ink where the theme is 'under the sea'.

A tictactoe board offers so many creative possibilities - how does this week's board inspire you? Why not have a go? We would love to see you in the gallery and who knows - you might be selected for Designer's Choice and be eligible to be a guest designer on a future challenge. 

Enjoy your day; nothing much to report in the James household - all told, a pretty unremarkable week! I'll be back tomorrow with another project. Until then, happy stampin'!


Stampin' Up! Supplies Used: 

Table built using Product Table Builder by The Crafty Owl - Independent Stampin' Up! Demonstrator.
 

Waves of Inspiration CAS Shaker Card CCS 470

by Joanne James17. May 2022 12:00

It's Tuesday and time for a new challenge over at CAS Colours & Sketches. Shannon is hosting this month and this week we have our second colour challenge of the month: 


I love Shannon's fresh colour palette of aquas with a touch of silver this week! These colours immediately made me think of the sea so for my card today I had to make another card using the Waves of Inspiration bundle - take a look: 


Here's the low-down on today's card:

Waves of Inspiration - These beautiful sea greens were perfect to showcase another of those cresting waves from the Waves of Inspiration stamp set. Since this card is all about the clean and simple, I wanted to minimise the layers on my card and be sure to preserve my 'white space'. I masked off the centre of my card base so that only a portion of the wave would be visible, leaving me a wide unstamped border. The Stamparatus is a must for easily achieving this kind of stamping - masking paper would be easier, but this is how I did it using post-it notes:


To Shake Or Not To Shake? - I decided to create a simple shaker card, using a mix of sparkle & shine sequins for a touch of silver along with a few odd Coastal Cabana coloured sequins from my stash, and a simple window frame in white made using my Stitched Rectangle Dies:


I debated with myself whether a shaker card could be considered clean and simple, but having consulted with my lovely teamies we agreed it could: this card meets our 'clean and simple' criteria of 'uncluttered, with white or open space and minimal layers and embellishments' - so I hope you like it!

Silver Surfer - I decided to add a touch more silver and cut out one of the wave dies from some retired metallic silver glimmer paper and added it to the front of my shaker window for some extra sparkle. 

Here is the visual summary of the key products used on today's project for you to pin for easy reference:


You can see all of my 'How To' summaries on my 'How To - Tips and Techniques' Pinterest board in case you've missed any. 

As a reminder, for our colour challenges, you must use all of the stated challenge colours. You may also use neutral colours; however, the challenge colours should be the most noticeable ones featured on your card. We use Stampin' Up! colour names for reference, but you are welcome to use any other companies' products as long as you match the challenge colours as closely as possible.

I'm also linking today's card up over at Paper Craft Crew where their 'shiny celebration' inspiration challenge closes today.

Enjoy your day and I'll be back tomorrow with another project. Until then, happy stampin'!


Stampin' Up! Supplies Used:

Table built using Product Table Builder by The Crafty Owl - Independent Stampin' Up! Demonstrator.

Waves of The Ocean Pocket Edge To Edge Shaker Card

by Joanne James2. May 2022 10:00

Happy Bank Holiday Monday to my UK readers! Today I'm sharing a card that uses the colour palette over at Hand Stamped Sentiments

I'm loving all of the blue colour palettes that are about at the moment, especially since I have been giving my Waves of The Ocean Suite a workout and the two pair perfectly! I thought the HSS colours were perfect for a little project that I've been wanting to have a go at for a while - an edge to edge pocket shaker card. My good blog friend and fellow Tic Tac Toe challenge team member Stef Perry over at Perry Papercrafts made this fabulous card a while ago and I have been wanting to have a go and thought that the Waves of Inspiration bundle would be just the thing to make my own version - take a look:


Here's the low-down on today's card:

Waves Of The Ocean - Since this card is really all about the shaker, the stamping is fairly simple. I used all three ink colours to create my blended seascape background using my blending brushes and stamped a single wave in Versamark and heat embossed it in white; this forms the base of my shaker. 

A Pocket Shaker - creating the shaker itself is rally easy. You just need a flimsy acetate pocket - the wrapping that your new dies come in is perfect for this - then you attach it to the back of the panel on three sides to form a pocket, fill with the sequins on your choice (I used some retired ones from the Whale of a Time suite, minus the pink shells, along with some clear, white and silver ones) before taping the fourth side shut. You then mount this panel on your card front, and add any additional diecuts to the front of your card; I layered a Coastal Cabana foil and white cardstock pair of waves cut with the Waves Dies over my stamped image, and snipped a sentiment and added it to the opposing corner:


The sequins still move around the front of the card, although a little less freely than with a traditional shaker. On the upside there is less bulk though so this kind of card is great for posting. I just love this idea and am really happy with how this card turned out - thanks Stef for the inspiration, I knew I'd get around to making one eventually!

Going, Going, Gone - Today is your final reminder that lots of things are ending today - it is the last day that the following items will be available:

  • Last Chance Products, stamps and accessories from the current 2020-21 Stampin' Up! Annual Catalogue
  • All Together exclusive paper, stamps and dies (only the skin tone Blends are carrying over to the new annual catalogue)
  • Waves of The Ocean Suite exclusive papers, foils and embellishments (only the stamp set and dies are carrying over to the new annual catalogue)

When tomorrow comes, it will be all about the new annual catalogue so if any of the above are still on your list, you best click the links below and hop over to the online store today! 

Here is the visual summary of the key products used on today's project for you to pin for easy reference:


You can see all of my 'How To' summaries on my 'How To - Tips and Techniques' Pinterest board in case you've missed any. 

Enjoy your day; I will be back later with one (maybe two!) posts as I have a few makes 'in progress' on my desk along with news of a great new joining offer that will be starting tomorrow to coincide with the new annual catalogue launch - exciting stuff! Until then, happy stampin'!


Stampin' Up! Supplies Used:

Table built using Product Table Builder by The Crafty Owl - Independent Stampin' Up! Demonstrator.

Playful Alphabet Brilliant Rainbow and Sequins CAS Shaker Cards CCS 467

by Joanne James26. April 2022 13:00

00It's Tuesday and time for a new challenge over at CAS Colours & Sketches. This week it's our final challenge for the month of April and Bhavya has asked that we create something with three distinct sentiment elements for her final sketch challenge:
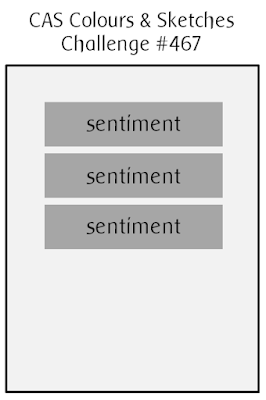
 

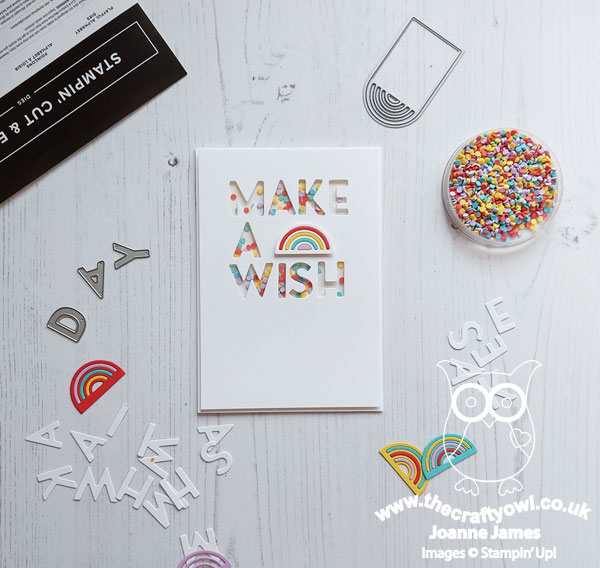
Feel free to flip or rotate the sketch when making your card. For my card today I ended up creating not one, not two but three cards! I'm sharing my favourite one first - a clean and simple shaker card - take a look:
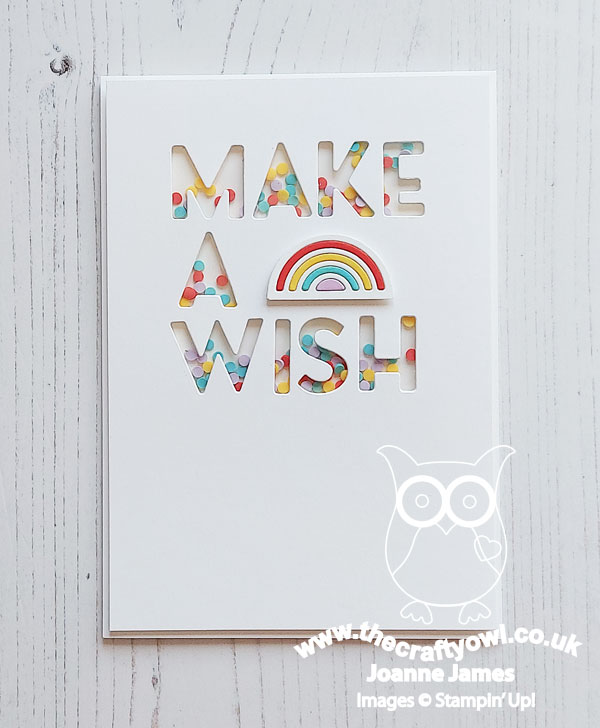
 

Here's the low-down on today's card:

Farewell Playful Alphabet Dies - Time to say goodbye to a craftroom staple - the Playful Alphabet Dies! Yes, they are retiring with current annual catalogue next week and newsflash - there are NO alphabet die sets in the new annual catalogue, so not only will I be hanging on to my set, if you don't have them you have just one week to nab a set! I can't recommend them highly enough: they are so useful for personalising cards, but also to create bespoke messages or greetings. Use them flat or on dimensionals, or as I've done here to create a bespoke message that I then backed with window sheet to create a fun clean and simple shaker card! How cool is this?
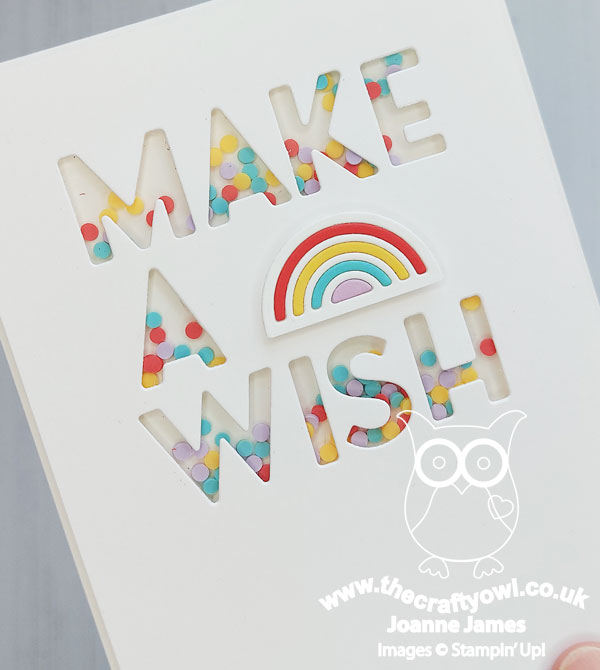
 

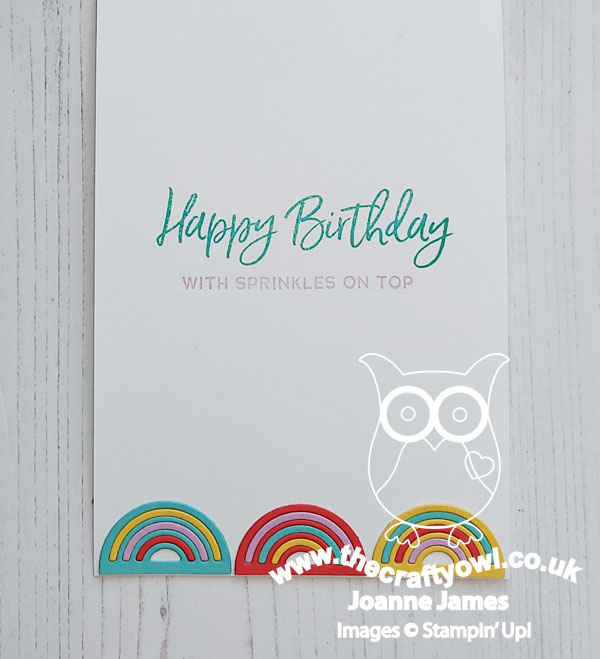
Rainbows or Candles? - My initial shaker was inspired by the inspiration challenge of 'make a wish - rainbows' over at TGIF Challenges this week and I paired my simple message with a paper-pieced rainbow made using my Beautiful Rainbow Dies and some scraps of cardstock in Poppy Parade, Daffodil Delight, Coastal Cabana and Fresh Freesia to co-ordinate with the (retired) Ice Cream Shaker Sprinkles that I used inside my shaker. I used my rainbow offcuts to add a decorative border to the inside of my card, along with a sentiment from the retiring 'Sweet Ice Cream' stamp set:
 

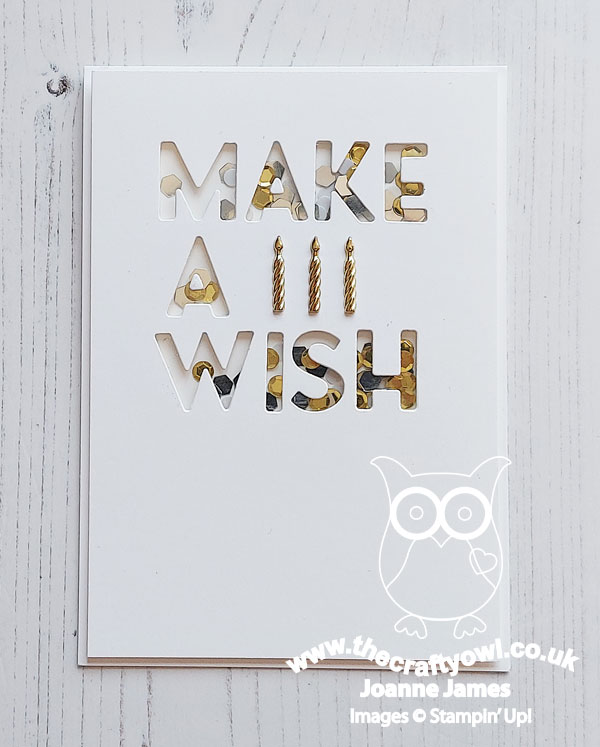
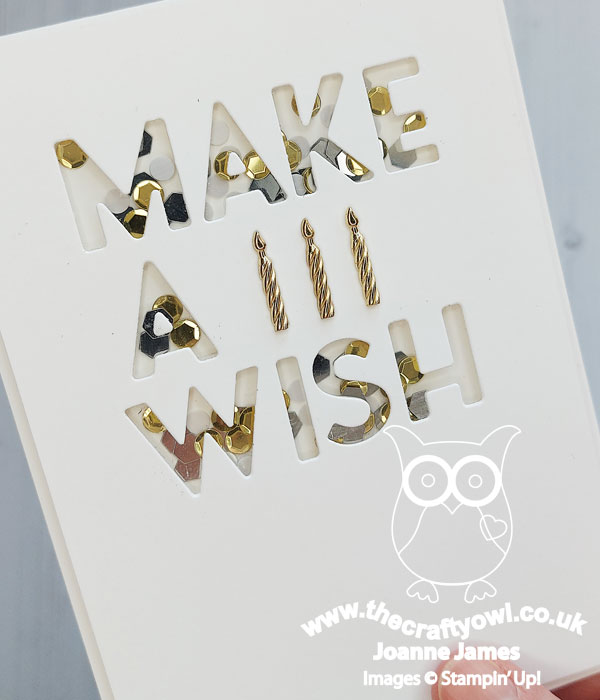
I liked this card so much, I made another one, this time using the retiring white, gold and silver Sequins For Everything (currently half price) for my shaker and a trio of (retired) gold Candle Embellishments I found on my shelf:
 

Check out the sparkles - how fun!
 

Here are both shakers together - which one do you prefer?
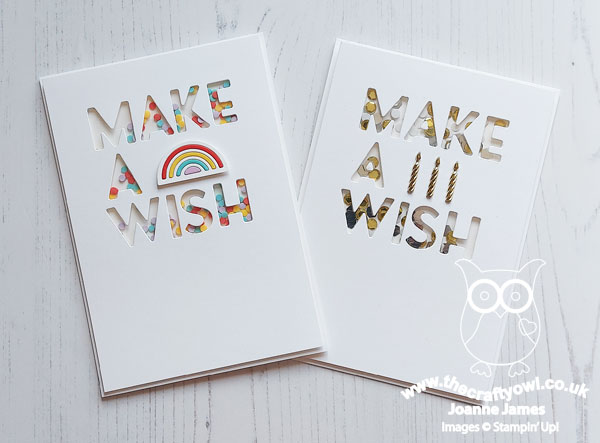
 

I honestly can't decide - I love this design so much I think I'm going to make a whole bunch more!!

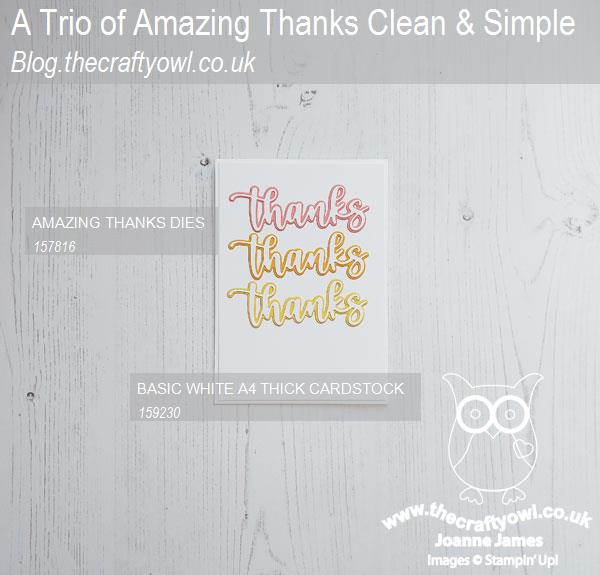
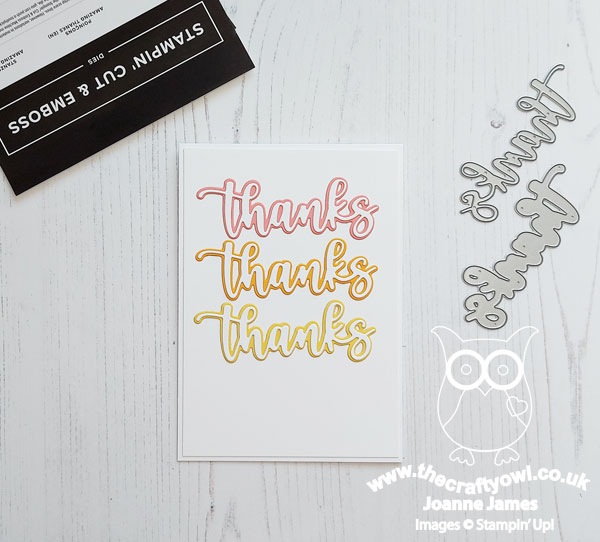
A CAS Thankyou Trio - Finally I have one extra 'bonus' card for you, that was the one I made before my shakers - a super simple repeating 'thanks' sentiment using a trio of dies cut with the Amazing Thanks Dies, with each one backed by the fresh colours of the current Color Dare challenge:
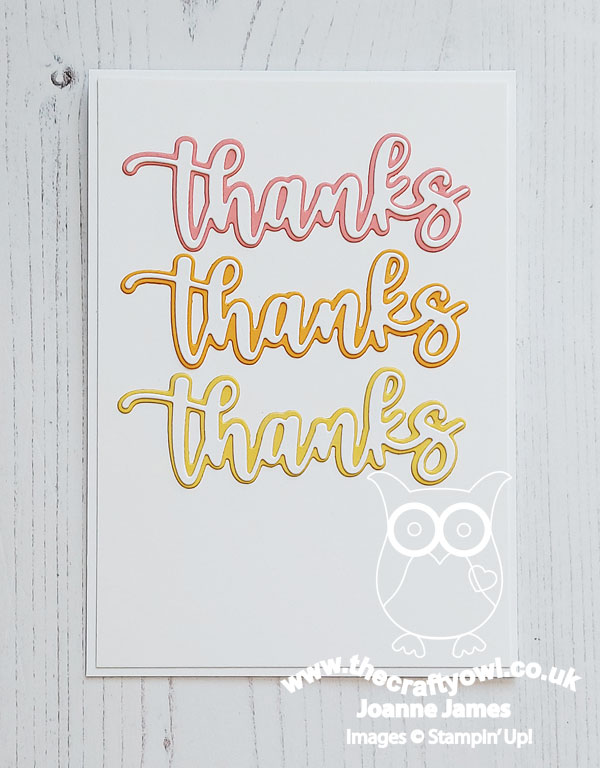
 

By using the colour for the base layer of the diecut and making the top layer white, it allows for a white base and preserves the clean and simple feel with all that 'white space'. This is a great way to use up scraps and whilst I love the fresh colour combo I used on today's card - Flirty Flamingo, Mango Melody, Daffodil Delight - this simple layout would work with whatever colours you have available.

Here are the visual summaries of the key products used on today's projects for you to pin for easy reference:
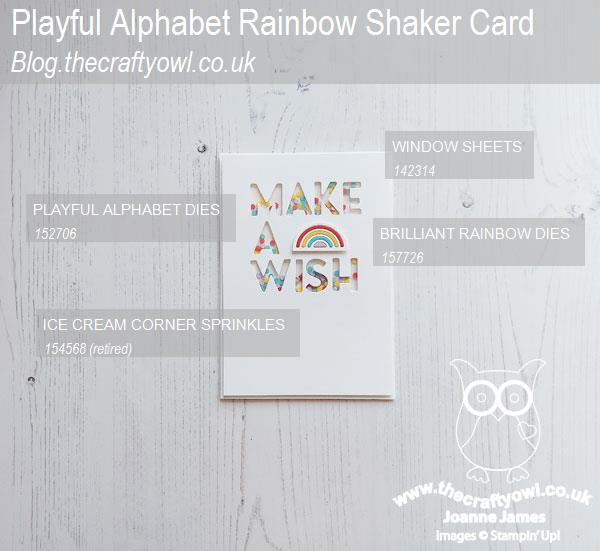
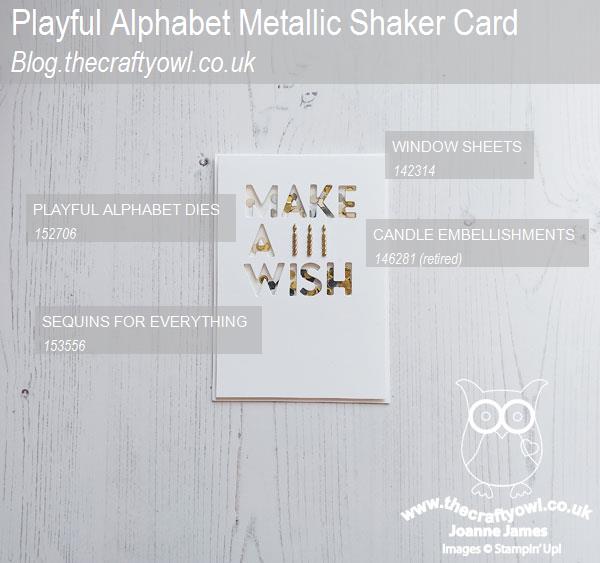


You can see all of my 'How To' summaries on my 'How To - Tips and Techniques' Pinterest board in case you've missed any. 

I actually made four cards for today's challenge; the first one was mediocre at best; I had an idea that just didn't look right when I made it - so much so, I'm not even going to share it with you!  So I left it and when I went back to desk 24 hours later, I started fresh and came up with my thankyou trio, quickly followed by my fun shaker cards - suddenly I was on a creative roll! Does that ever happen to you when your creating? How do you combat that feeling you get when you've made something but are just not 'feeling' it? Do leave me a comment below - I'd love to hear from you!

Enjoy your day; the James Juniors are both back to school today following the Easter break so I will be aiming to get more work done this week. This is a super-busy term, with everything from cricket fixtures to the school musical production, internal exams, speech days, university open days and lots more besides! I really do need to get organised!! On that note, I'll be back tomorrow with another project. Until then, there's work to do - happy stampin'!
    

Stampin' Up! Supplies Used:

Table built using Product Table Builder by The Crafty Owl - Independent Stampin' Up! Demonstrator.


Brilliant Rainbow Dies Shaker Card PP576

by Joanne James30. January 2022 09:00

Today it's Sunday and time for this week's new challenge over at The Paper Players! It's my turn to host this week and since it is the fifth Sunday of the month I have a tic-tac-toe challenge for you to work with:


I designed this board with lots of things that I wanted to use so that when it came to making my card, I was spoilt for choice! In my excitement I duplicated the 'birthday' square and didn't notice until my dear teamie Nance had already made the challenge graphic, so I decided to go with it - we all need lots of excuses for birthday cards, right?! That said, I ended up going in a completely different direction! I used the layout from Jen M's sketch over at Freshly Made Sketches this week (I rotated the sketch 90 degrees to the left and flipped it on the vertical edge for a mirror image) and went across the top row of my board with rainbow/sparkle/diecut and made a fun rainbow shaker card - take a look:


Here's the low-down on today's card:

A Brilliant Rainbow - Having firstly used some Pool Party ink and a blending brush to create a cloudy sky background, I used the largest of the Brilliant Rainbow Dies to cut the windows for my half rainbow. I backed these with a piece of window sheet, ready to create my shaker. 

Frosted Shaker - I chose the four colours for my rainbow stripes, then selected some co-ordinating beads from the frosted beads assortment in the mini catalogue for my shaker element. For added sparkle, I brushed the coloured back panels with clear Wink of Stella. The rainbow shaker effect is so pretty - here's a close-up to show it in more detail:


I used the foam adhesive strips to create four individual shaker elements so that I could keep the colours separate. It's worth noting that because of the size of the frosted beads, the shaker does need a double thickness of foam strips to allow your beads to shake freely. This does made the card quite thick, but I think it's worth it!

All Things Stitched - I used my Basic Borders Dies to create a border of white clouds and to make a stencil for my background, with a combination of a stitched circle and four layered stitched triangles behind for my sunshine. The sentiment is from the free Sale-A-Bration set 'Special Moments' and I paired it with another from the same set on the inside, with some faintly stencilled clouds behind:


I think this will make a nice special card to show appreciation for someone who went the extra mile, don't you?

Here is the visual summary of the key products used on today's project for you to pin for easy reference:


You can see all of my Product and 'How To' summaries on my 'How To - Tips and Techniques' Pinterest board in case you've missed any. 

Before you reach for your ink and papers, check out what our amazing team has created to inspire you this week:

Here's a quick recap of our challenge rules:
 
1.  Create a new paper project
2.  Upload your creation to your blog with a link back to us and provide a direct link to the post featuring your challenge submission.
3.  Please link your card to no more than four challenges, TOTAL.
4.  Have FUN!

Enjoy your day; I'll be back soon with another project. Until then, happy stampin'!


Stampin' Up! Supplies Used: 

Table built using Product Table Builder by The Crafty Owl - Independent Stampin' Up! Demonstrator.

Edit: Jen B chose my card as one of the princesses for FMS520 - yay!

See the source image

Seasons of Fun Easy Autumn Leaves Shaker Card

by Joanne James2. October 2021 18:00

Happy World Card Making Day everyone! Have you crafted today? Today I'm sharing a card for the current challenges over at Global Design Project and Double D Challenge where they are both about leaves:


I’ve changed things up a little for my card with a super easy shaker card to really make the most of those autumn falling leaves - take a look:


Isn’t it just the cutest? Here's the low-down on today's card:

Seasons of Fun - The little boy having fun playing in the leaves is from the ‘Seasons of Fun’ hostess set in the mini catalogue and was the perfect background for my shaker. I stamped him onto a stitched rectangle and coloured him in with a variety of Stampin’ Blends, matching the colours to those of my falling diecut leaves to create a seamless picture.

How To Create An Easy Shaker Card - The shaker card element on today’s card was so easy and straightforward to create: all you need to do is place your shaker pieces - I used leaves cut with the Seasonal Swirls Dies and some gold sequins for a little sparkle - onto your background image and panel and carefully slide into an acetate sleeve, the kind you sometimes put finished cards into for sale, and fold the sides and tape behind. This creates a flat pocket with less depth and freedom of movement than a traditional shaker card, which is better for posting, but still allows the contents to move around and ‘shake’. 

Pattern Party With Colour - I placed my shaker pocket onto a background of leafy paper from the Pattern Party hostess paper pack. This is a black and white paper, but I coloured the leaves in with my Stampin’ Blends to further continue my leafy theme tie in my frame with the central image:


I deliberately left the front of my card sentiment-free, as I didn’t want to obscure my shaker and central image. I’m also not sure who I’m going to send this card to so it made more sense to add one at a later date if needed.

Here is the visual summary of the key products used on today's project for you to pin for easy reference:


You can see all of my 'How To' summaries on my 'How To - Tips and Techniques' Pinterest board in case you've missed any. 

Enjoy your day and I'll be back tomorrow with another project. Until then, happy stampin'!


Stampin' Up! Supplies Used:

Table built using Product Table Builder by The Crafty Owl - Independent Stampin' Up! Demonstrator.

Happy Birthday Lemon Shaker Card TTT124

by Joanne James29. July 2021 17:00

It's Thursday and time for a new challenge over at TicTacToe! It's the turn of Team X to host this week and I am the featured designer this week! This is the fun board that I came up with: 


I chose lots of my favourite things for my board this week and I am thrilled that the Design Team truly rose to the challenge - especially with the fabulous shaker cards in the mix this week! I went on the top left-bottom right diagonal with fruit/designer series paper/shaker for my card today and used both the sketch layout and the lemons in those hydrangea vases over at Fusion as the inspiration for my shaker card today - take a look:


Here's the low-down on today's card:

Yellow is one of my favourite colours to create with, especially bright yellow - there is something so cheery about yellow! I used some retired paper covered in lemons for the background to my shaker, and used a combination of sequins, gems and bits and pieces on my shelf for the contents of my shaker. I added a semi-circle with a sentiment from the 'In Symmetry' stamp set to the front of my shaker and modified the happy birthday sentiment from the 'In Bloom' stamp set for the inside of my card: 


I thought this punny sentiment would raise a smile and added a smiley lemon to finish too. I made this card for one of Rebecca's friends - I know it will appeal to her quirky sense of humour!

Here you can see my shaker elements in more detail - so sparkly!


Here is the visual summary of the key products used on today's project for you to pin for easy reference:


You can see all of my Product and 'How To' summaries on my 'How To - Tips and Techniques' Pinterest board in case you've missed any. 

A tictactoe board offers so many creative possibilities - how does this week's board inspire you? Why not have a go? We would love to see you in the gallery and who knows - you might be selected for Designer's Choice and be eligible to be a guest designer on a future challenge. 

Enjoy your evening; I'll be back tomorrow with another project. Until then, happy stampin'!


Stampin' Up! Supplies Used: 

Table built using Product Table Builder by The Crafty Owl - Independent Stampin' Up! Demonstrator.

Jar of Flowers Sunflower Shaker Card PP549

by Joanne James11. July 2021 09:00

Today it's Sunday and time for this week's new challenge over at The Paper Players! Ann is hosting this week's challenge with a trio of colours chosen by the lovely Jaydee:


Now before you think I'm completely mad sharing a Mother's Day card in July, there is a reason I'm sharing this card today! I made this card back in February and when I went to make my card for today, Rebecca reminded me that we had made this card that featured Jaydee's colours and I hadn't blogged it, so although the papers are now retired, she wanted me to share it - so here it is:


Here's the low-down on today's card:

This super-simple shaker card was a Mother's Day project that I made with a group of local Brownie Guides that I work with. For ease, we used the (retired) in-colour Memories & More card bases, onto which we heat embossed a Mother's Day sentiment (from the retired 'Strong and Beautiful' stamp set). We used the jar punch to punch a jar shape out of a piece of (retired) Flowers of the Season designer series paper that we had cut out using a scalloped stitched die, then inserted a mason jar shaker dome into the aperture and filled it with sunflower seeds, before attaching it to the card base. We stamped and coloured some co-ordinating sunflowers from the 'Jar of Flowers' stamp set and added these with a dimensional to the top of our jar, before finishing our shaker jar with a Bumblebee ribbon bow. 


The intention was that once Mother's Day had passed, the Brownies would then be able to remove their sunflower seeds from an opening in the back of the card, plant them and enjoy them in their gardens all summer long. The Mother's Day card that keeps on giving, you might say! I hope that their Mums are still enjoying their cards, several months on.

These mason jar domes are a great way to make an easy shaker card - have you used them in your crafting? What did you put in yours? Share with me in the comments below - I would love to hear your ideas!

Here is the visual summary of the key products used on today's project for you to pin for easy reference:


You can see all of my Product and 'How To' summaries on my 'How To - Tips and Techniques' Pinterest board in case you've missed any. 

   I'm also linking up today's card with the girls over at The Flower Challenge where they are asking us to add spots or stripes to our card - my DSP has spots and my floral panel has a dotty border :-). 

Before you reach for your ink and papers, check out what our amazing team has created to inspire you this week:

Here's a quick recap of our challenge rules:
 
1.  Create a new paper project
2.  Upload your creation to your blog with a link back to us and provide a direct link to the post featuring your challenge submission.
3.  Please link your card to no more than four challenges, TOTAL.
4.  Have FUN!

You can see all of my 'How To' summaries on my 'How To - Tips and Techniques' Pinterest board in case you've missed any. 

Enjoy your day; I spent much of my day yesterday in the garden jet washing patios and paths, before catching the end of a thrilling Wimbledon ladies final. Today I will be getting my jobs out of the way in the morning before settling in for an afternoon and evening of sport: the men's finals at Wimbledon before I have to give way to the men of the house for football and the finals of the European Championship, England v Italy - wish me luck! I'll be back tomorrow with another project. Until then, happy stampin'!


Stampin' Up! Supplies Used: 

Table built using Product Table Builder by The Crafty Owl - Independent Stampin' Up! Demonstrator.

Mini Catalogue

BROWSE THE CATALOGUE

The mini catalogue is now live! Read and download your copy here.

Shop Online

Access my online shop 24 x 7, 365 days of the year:

Current March hostess code:

S9F2XJJW

Shop Online

Join My Team

It's always a great time to join Stampin’ Up! New team members can get £130 worth of products for only £99 + free business supplies + free shipping + all the fun being a part of Stampin’ Up! Stampin' Up! has something for everyone: join my growing team and benefit from my support to enjoy Stampin' Up! however you choose.

If you're interested, call me for a chat to understand how I can help you realise your goals. Alternatively, if you have already decided to sign up and you just can't wait, please click here for the link to the online form where you can sign up and order your starter kit right away! 

Latest Kit!

Stampin Cut and Emboss

The Rock Legend Kit has all you need to make 8 cards with coordinating envelopes. Along with the new Panda Friends Kit, both are available from January 4th for just £14 each - get yours here!

2023-24 Annual Catalogue

BROWSE THE CATALOGUE

Click on the catalogue for a full list of current SU! supplies - if you would like to order any of the items featured, please drop me a line at [email protected] or give me a call on 07773 421446 - I'd be happy to help.

New Online Exclusives

There will be new products available exclusively in the online store from 5 March - check them out here.

About Me

Hi I'm Joanne and live in Northampton and when I'm not looking after my husband and two beautiful children, am an avid crafter with a passion for all things Stampin' Up!

I must confess that I have never been a big rubber stamper - until I discovered Stampin' Up! that is. I love the fact that I can get such great results with co-ordinating stamps, inks, papers and punches - the possibilities are endless! Join me on my stamping journey as I share the things I love and be inspired to create amazing things yourself!

Follow Me

Monthly Newsletter

Box Builder

Click the button above to use Box Buster to create your custom box design using the Envelope Punch Board!

Kits Collection Now Available!

Stampin Cut and Emboss

The new Kits Collection from Stampin' Up! is now available!

Click here to see the current kits available and order yours online today.

I Design For


Stampin' Up Stuff

This is my personal blog and is not endorsed by Stampin’ Up! I hope you find it a plentiful source of ideas and personal inspiration but please don't copy my designs for contest submission or use for classes, publication or sale without express permission.