by Joanne James20. July 2016 07:00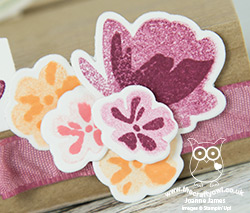
Today I'm sharing the third and final card from my second of this month's technique class featuring the very on-trend Jar of Love stamp set and co-ordinating Everyday Jars Framelits Dies. Each of the ladies received the bundle and as always I was on a mission to use as wide a variety as possible of the stamps in this set to showcase its versatility.
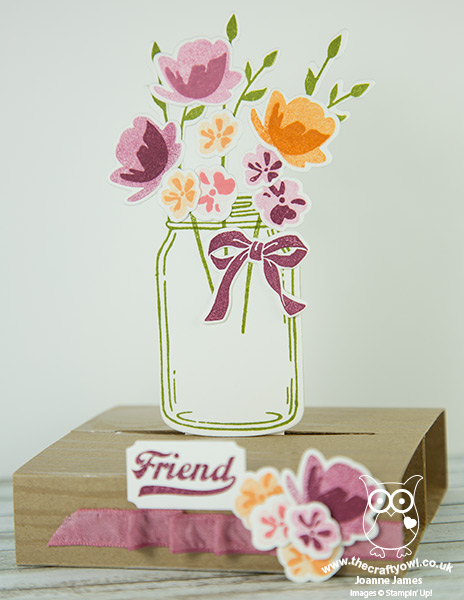
This card is a lovely freestanding pop-up card that was inspired by this card created by Lou Kitzelman. I loved it so much I had to have a go at making my own so here's my version:
Here's the low-down on today's card:
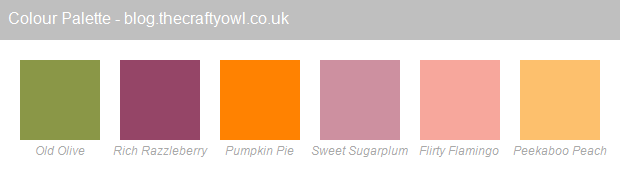
Jar of Flowers - Here I've used the Jar of Love set to create a jam jar full of pretty flowers. I love the little flowers in this set and the co-ordinating Everyday Jar Framelits make light work of cutting them out. Each flower is done in a single colour, with the base flower stamped off once to give the contrast with the smaller piece. I chose a mix of purples, pink and orange for my little posy - feel free to hover and pin this colour combination if it's one that appeals to you too:
Kraft Hardwood Table - I used some retired pre-embossed kraft cardstock in my class, however by stamping the Hardwood stamp in Versamark and clear embossing on plain kraft cardstock you can achieve a similar woodgrained effect for your 'table' base.
Another Fun Fold - This freestanding pop-up card is easier to re-create than it looks. It is a great statement card that also folds completely flat for postage which is always a bonus.
Here's a quick step-by-step tutorial should you wish to have a go:
Freestanding Pop-Up Jar of Love card - Metric Version
Using the diagram below as your guide:
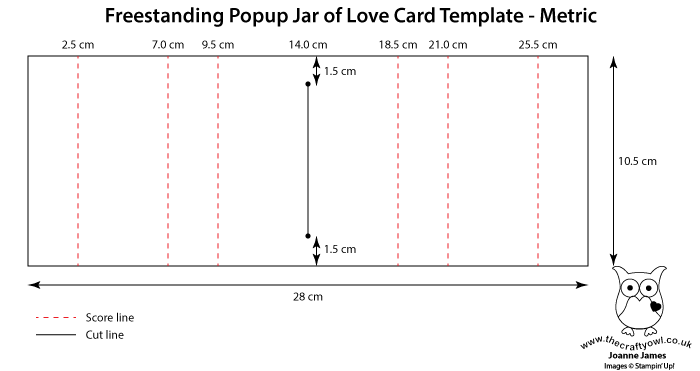
- Cut a piece of kraft cardstock to 10.5cm wide x 28cm long
- Stamp the cardstock in Versamark with the Hardwood stamp and heat emboss with clear embossing powder for a woodgrain effect.
- LANDSCAPE score as per dotted lines:
- 2.5cm, 7cm, 9.5cm, 18.5cm, 21cm and 25.5cm
- At 14cm, punch a small hole using a 1/8" punch or crop-a-dile 1.5cm in from both ends and cut a narrow channel approx. 2mm wide between them (i.e. 1.5-9cm)
- Fold each of the score lines with mountain folds
- Cut a small strip of Whisper White measuring 3cm x 8cm and attach this using fast fuse in the centre of the end panel on the front (right side)
- Turn the base over, and folding the end section in a mountain fold from the front back on itself, feed this white piece through the slit from the back of the card to the front.
- Folding the base in on itself to form a figure 8 shape, adhere both of the front ends together, making sure the white card is through the slit as this is what your jar will be stuck to. As you pull this piece upwards, your freestanding table mechanism forms.
- This completes your base - you then need to adhere your jars and flowers to the front of the white piece of card, and add a plain jar to the back when complete to neaten things up and give you space to write your sentiment.
Isn't this such a fun way to create a pop-up? I'm sure there are lots of other ways that this design could be used too.
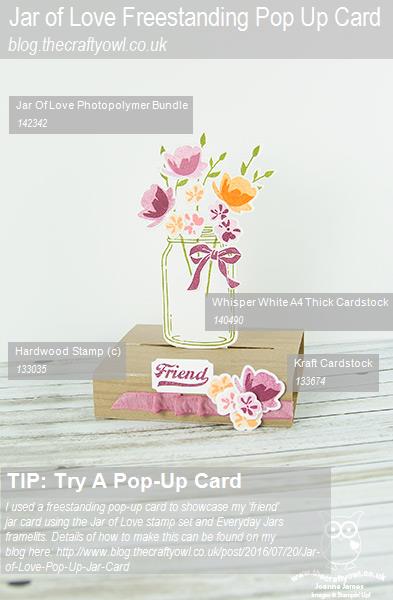
Here is the visual summary of the key products used on today's project for you to pin for easy reference:
You can see all of my 'How To' summaries on my 'How To - Tips and Techniques' Pinterest board in case you've missed any.

The Jar of Love and Everyday Jars Framelits bundle is another of those that has just has so many creative possibilities! If you haven't bought yours yet, this month would be the perfect time to do so; if you purchase the bundle at £48.50 you will earn yourself a £4.50 money-off coupon any purchases next month too - bargain! Just click on the links below to hop on over to my online store to order yours today - and don't forget to add this month's hostess code 63RNATE3 to get a little thank you in the post from me too.
I'll be back tomorrow with the second of the cards from my Jar of Love class; come back then, you won't want to miss it! Until then, happy stampin'!
Stampin' Up! Supplies Used:
231b968a-d8f7-45c5-b4ed-fa460b0dc7ba|0|.0|96d5b379-7e1d-4dac-a6ba-1e50db561b04
Tags: Everyday Jars Framelits, Jar of Love, Shop online, Shop Stampin' Up online, Promotions, Stampin' Up, Stampin' Up Card, Stampin' Up Card ideas, Stampin' Up Supplies, Fancy Fold, Hardwood, pop up cards
Cards | Shop Online | Stamping