Circle Sayings Beachy Peek A Boo Fancy Fold For AYSI 306

by Joanne James25. August 2023 12:00

Today I'm sharing my design team card for our new challenge over at As you See It where it's time for a seasonal theme challenge chosen by Deborah:


At the beach - wouldn't I like to be there right now? I most definitely would, but instead a card will have to do! I decided to feature sun, sea and sand on today's card which is also a fancy fold - take a look:


 Here's the low-down on today's card:

Circle Sayings - Today's card is a Peek-A-Boo fancy fold: when closed you see one thing in the window, then as you open the card the panel slips aside to reveal a second image or message. The Circles Sayings stamp set is perfect for this style of fancy fold card - it has lots of co-ordinating stamp images and sentiments that can be mixed and matched to create fun combinations. I used the sea and sun image for my first image, along with a fussy-cut partial sentiment attached to the frame and I paired it with the 'warm hello' sentiment, along with shells and sand for the peek-a-boo reveal:


Rays of Light - I wanted to add some additional colour to the front of my card, but without distracting from my seaside image. I decided on some ton-on-tone stamped detail using the Rays of Light stamp set, radiating out from the stamped image and fading into the base. Because I wanted my rays to radiate from the image, they wouldn't reach to the opposite edge of my card, so I added an Azure Afternoon ribbon and bow to balance my design. You can see the detail on the stamped image below, including some snowflake puff paint that I added to the wave foam for some extra dimension:


Peek-A-Boo Fancy Fold - This fold is really not tricky to execute - you just need to ensure the circle aperture is positioned correctly on each layer to ensure they align and that each of the mechanism panels are cut to the correct size. Here's a video that shows the peek-a-boo action:

Isn't that fun?! You can see another example of a card I made with this design here. I'm linking this one up over at The Paper Craft Crew where 'fun folds' is their theme this week.

Here is the visual summary of the key products used on today's project for you to pin for easy reference:


You can see all of my 'How To' summaries on my 'How To - Tips and Techniques' Pinterest board in case you've missed any. 

Here's a summary of our challenge rules:

  • Create any card, scrapbooking page, 3D project or packaging project that fits the challenge.
  • Please include the challenge graphic and link back to the challenge in your blog post. Turn off word verification so we can leave you lots of lovely comments. Make sure you link the post not the whole blog to the Linky. Use #AYSIXXX when uploading to a public gallery.
  • If you’re unsure about ‘the rules’, check the details under the Challenge Guidelines tab on the As You See It Challenge homepage.
We look forward to seeing your creations in the AYSI gallery.

Enjoy your day and I'll be back tomorrow with another project. Until then, happy stampin'!


Stampin' Up! Supplies Used:

Table built using Product Table Builder by The Crafty Owl - Independent Stampin' Up! Demonstrator.

Beautifully Happy Mother's Day Fancy Fold Card AYSI293

by Joanne James24. February 2023 12:00

Today I'm sharing my design team card for our new challenge over at As you See It where our leader and chief organiser, the lovely Heather C, has a recipe challenge for us with a distinctly feminine feel:


Recipe challenges usually send me into a bit of a spin, but this one actually worked out surprisingly well for me! I was inspired to have a go at a fancy fold card layout that was recently shared by Stampin' Up's CEO, Sara Douglas and decided to take the opportunity to make my Mother's Day card and use a new floral stamp set that will be available for just a few more days - take a look:


This is a photo-heavy post, so time to get comfy! Here's the low-down on today's card:

Beautifully Happy - The flower at the centrepiece of today's card is from the 'Beautifully Happy' stamp set - one of the items that can be yours FREE with a £90 purchase during the current Sale-A-Bration promotion. Can you believe I've had this set for almost 2 months and this is the first time I've used it?! So many stamp sets, so little time! Anyway, I digress - this is a two-step stamp set, with an outline that can be used along and coloured freehand, or alternatively used with the infill stamps. I wanted to heat-emboss my flower, so my Stamparatus was key here: I stamped the flower outline in Sahara Sand, then added the infills without removing from my Stamparatus, then stamped the outline again in Versamark and heat-embossed in gold. I fussy cut the main stem and added a gold pearl for the stamen and used this flower  as the centrepiece of my card:


I also added a stemless version inside and a single bloom to my envelope label, and I used the outline for some tone-on-tone stamping on the first inside layer of my card - you can see below how the card opens:


The sentiment in the heart on the front of my card is also from this stamp set. If 'Beautifully Happy' is on your Sale-A-Bration wishlist, you have just 4 days to place your £90 order and receive this stamp set for free. Time to get shopping!

Texture Chic - The recipe ingredient of 'distressed paper' sent me immediately reaching for my Distressed Gold Specialty Paper and Texture Chic Specialty Designer Series Papers - both add a distressed look without any tearing or self-made grunge, neither of which are my style! The Texture Chic papers also include various shades of pink to compliment my Petal Pink stamped flower and lots of faux-texture. I also added actual texture with my Painted Texture Embossing Folder on the panel behind my fussy cut flower stem. 

The Distressed Gold paper is just beautiful; I used it to add some hatched diecut details on both the front and left inside panels:


Here's a close-up of that detail on the left (the diecut sentiment uses the now retired Word Wishes Dies):


I also used the Distressed Gold Paper to create a pocket using the Split Textures Dies:


I handwrote my Mother's Day message, along with a poem, on a separate card that I tucked in here after photographing.

Fancy Inside and Out - A fancy card with a little bulk requires a fancy envelope too, so I created a simple file folder style, adding some retired ribbon and a scalloped address label. You can see in properly below:


Here is the visual summary of the key products used on today's project for you to pin for easy reference:


You can see all of my 'How To' summaries on my 'How To - Tips and Techniques' Pinterest board in case you've missed any. 

It's not Mother's Day here in the UK until next month (March 19th) but it pays to be organised! Equally, if you don't make or send Mother's Day cards, this could be easily adapted and used as a fancy birthday card for someone special. These kinds of card do take a long time to make, however for someone special it's totally worth it. I'm linking up today's card over at The Flower Challenge where they are asking us to use our newest flower stamps and dies - it looks like I'm getting there just in time!

Here's a summary of our challenge rules:

  • Create any card, scrapbooking page, 3D project or packaging project that fits the challenge.
  • Please include the challenge graphic and link back to the challenge in your blog post. Turn off word verification so we can leave you lots of lovely comments. Make sure you link the post not the whole blog to the Linky. Use #AYSIXXX when uploading to a public gallery.
  • If you’re unsure about ‘the rules’, check the details under the Challenge Guidelines tab on the As You See It Challenge homepage.
We look forward to seeing your creations in the AYSI gallery.

Enjoy your day. I'm off to the hairdressers first thing then am collecting the eldest of the James Juniors and a friend for a trip up north to Newcastle for a university offer day tomorrow, so that should be fun. I'll be back Sunday with my project for this week's Paper Players challenge so do join me then. Until then, happy stampin'!


Stampin' Up! Supplies Used:

Table built using Product Table Builder by The Crafty Owl - Independent Stampin' Up! Demonstrator.

Peaceful Place Double Box Fancy Fold Christmas Cards PP567

by Joanne James14. November 2021 08:00

Today it's Sunday and time for this week's new challenge over at The Paper Players! It's my turn to host this week and I have a colour challenge for you to work with:


I made a couple of cards to share with you today, both variations on the same theme. Here's the first one - take a look:


Here's the low-down on today's card:

Peaceful Place - So I had an ulterior motive in choosing today's colour combination. I've had a pack of Peaceful Place Specialty Designer Series Paper in my collection since I did my mini catalogue preorder in August, but had yet to use it. I had a feeling that would be the case; I love these papers, but didn't buy the bundle that features in the Peaceful Place Suite. I chose the colour combination that is found in these papers for this week's challenge because it would both force me to cut into these papers and also I am hoping the gallery will have lots of inspiration for me too! I used a combination of two paper patterns from the pack on each of my cards, one for the main panel and a contrasting or co-ordinating one to frame it. The papers are stunning, with beautiful silver foil detailing. Great for special cards!

Merry Snowflakes Seasonal Label - Fancy fold aside (more about that in a moment), today's cards really are a showcase of these beautiful papers. Apart from some sequins, rhinestones and a mesh ribbon bow, the only other element to my card is a heat-embossed sentiment from the Merry Snowflakes set, in silver on black or white respectively, and cut out with one of the Seasonal Labels Dies. The words of this sentiment seemed to be perfectly suited to the snowy scenes on my card:


 The only other stamping is on the reverses of the card, where I've stamped a further greeting and left space for a personal message:


A Fancy Fold - I thought for today's card I would ring the changes with a fancy fold. I decided on a double box fancy fold because I wanted something with a feature panel and this card is really quite straightforward to create. I had seen this design in an A6 card size on the internet, but adapted the basic principle to suit my own requirements. My finished card measures 6"x6" and easily folds flat for posting, which is a bonus! 


I struggled to photograph this one so well - I'm blaming the dark, winter days that we are experiencing here now - so here's another at an angle to try and capture the sentiment detail of the embossed silver against the white:


If anyone is interested in the measurements I sued to create my version of a double box fancy fold card, then do leave me a message below and I'll add them in to my post (I would write them in now but don't have them to hand). 

Here is the visual summary of the key products used on today's project for you to pin for easy reference:


And here's the second one:


You can see all of my Product and 'How To' summaries on my 'How To - Tips and Techniques' Pinterest board in case you've missed any. 

So what do you think? Which of today's cards do you prefer and what do you think of today's fancy fold? Please do leave me a comment below - I'd love to hear your thoughts!

Before you reach for your ink and papers, check out what our amazing team has created to inspire you this week:

Here's a quick recap of our challenge rules:
 
1.  Create a new paper project
2.  Upload your creation to your blog with a link back to us and provide a direct link to the post featuring your challenge submission.
3.  Please link your card to no more than four challenges, TOTAL.
4.  Have FUN!

You can see all of my 'How To' summaries on my 'How To - Tips and Techniques' Pinterest board in case you've missed any. 

Enjoy your day; Ben is on parade with the other army cadets from school at a Remembrance Day parade and service this morning, so this afternoon will be spent completing homework and the like. I'll be back soon with another project. Until then, happy stampin'!


Stampin' Up! Supplies Used: 

Table built using Product Table Builder by The Crafty Owl - Independent Stampin' Up! Demonstrator.

Woodland Wonder Concertina Birthday Card TTT104

by Joanne James11. March 2021 18:00

It's Thursday and time for a new challenge over at TicTacToe! It's the turn of Team X to host this week and I have the honour of being the featured designer this week. This is the fun board that we are playing along with: 


Lots of options for you to create with this one! I went down the first column with animal, stitching and birthday for a fun card with a difference today - take a look:


Here's the low-down on today's card:

Woodland Wonder - I don't have any really little people in my life, however I couldn't resist the Woodland Wonder stamp set! In addition to birthday cards, it's also great if you need to make a card from lots of people or even if you use elements of the set for a different purpose - that pink bunny could totally be going on an Easter egg hunt, right?! 

A Fun Fold - Whilst my card looks pretty standard at first glance, you may have noticed the fold across the centre - that's because it's a concertina fun fold. I loved the sample on page 53 of the January-June mini catalogue, so thought I'd have a go at making one myself. Once you slide the tulle ribbon bow off the cardfront, the card opens up to reveal the remainder of the bunny's friends:


I had a lot of fun stamping and colouring the various elements of this card, which folds up to a standard card size. The stamps are really easy to align; my one top tip for you is that you make sure you know where the front fold will sit on your back panel when closed, so that you don't have any elements that end up being partially visible when it's closed up, such as a cloud or part of an animal (ask me how I know!!)

Behind the concertina fold the card also opens up in the conventional way, for you to write a message. I couldn't resist adding another trunk full of cute critters waving their respective birthday wishes:

Isn't that just the cutest?! This is what the card looks like when it stands up in its concertina design:


It's In The Details - There are only two other main elements to my card besides my fun fold and stamped design: the lovely soft polka dot tulle ribbon that holds the card closed for mailing, and the stitched banner diecut I used for my happy birthday sentiment, that is from the Smooth Sailing Die set - such a useful little die:


I think this card could be adapted for lots of other uses too, such as welcome to the team, farewell and good luck cards and more besides!  

Here is the visual summary of the key products used on today's project for you to pin for easy reference:


You can see all of my Product and 'How To' summaries on my 'How To - Tips and Techniques' Pinterest board in case you've missed any. 

I'm also linking today's card up over at Just Us Girls where the theme is 'animals' and at SUO Challenges for a second entry in the 'things that fly' - today's card has birds, butterflies an owl - and at a stretch, a balloon too!

A tictactoe board offers so many creative possibilities - how does this week's board inspire you? Why not have a go? We would love to see you in the gallery and who knows - you might be selected for Designer's Choice and be eligible to be a guest designer on a future challenge. 

Enjoy your evening; I'll be back tomorrow with another project. Until then, happy stampin'!


Stampin' Up! Supplies Used: 

Table built using Product Table Builder by The Crafty Owl - Independent Stampin' Up! Demonstrator.

Blossoms In Bloom Rainbow Glimmer Acetate Front Easel Card

by Joanne James5. July 2020 09:00

Today it's Sunday and time for this week's new challenge over at The Paper Players! It's the turn of the super-talented Ann to host this week and she has a fun theme challenge for you to work with:


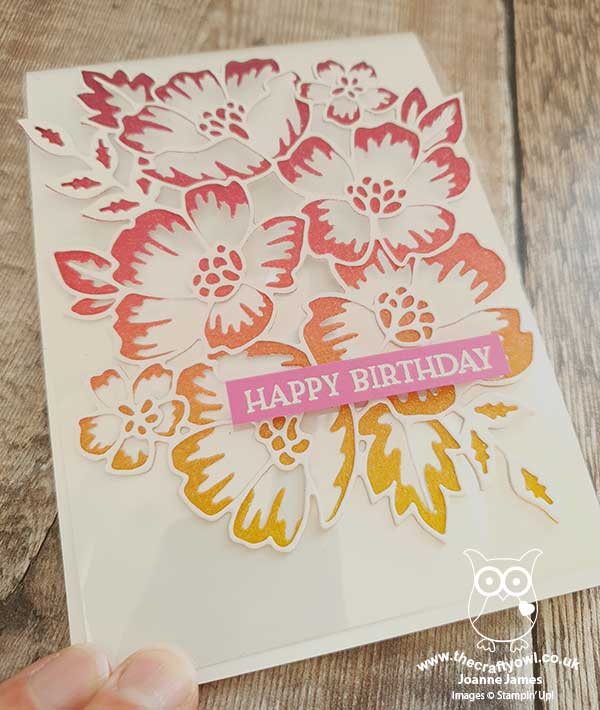
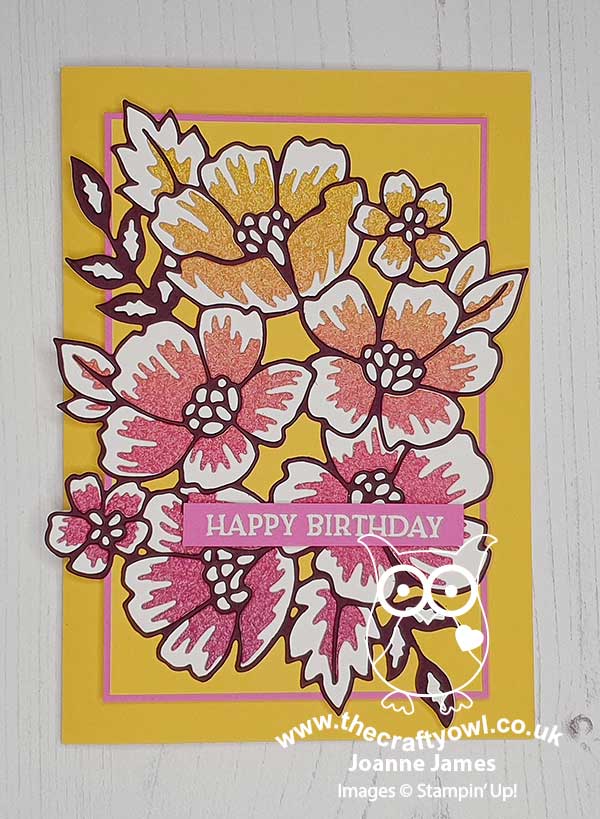
I have a rather special card for you today - in fact, I have two cards for you! My sister-in-law celebrated a significant birthday recently and so I wanted something fancy to mark the occasion. I had seen an easel card using the Blossoms in Bloom bundle by Kylie Bertucci and decided to take the idea but step it up a notch with my own design and one of my favourite new products from the new annual catalogue - take a look:


Here's the low-down on today's card:

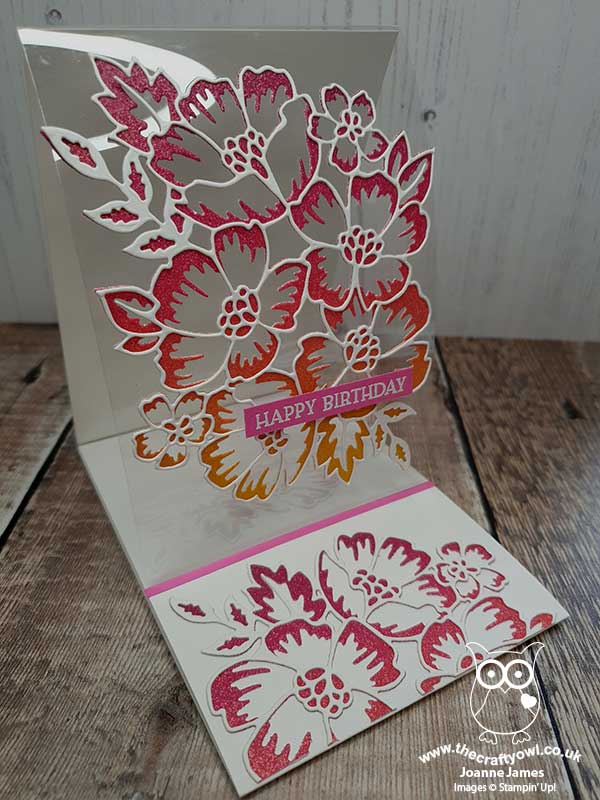
An Easel Card Fancy Fold - Today's post is super picture-heavy, as this is the easiest way to explain how I made my card and show each of the layers/folds. Here is the card in its standing position, with an acetate front panel to showcase the Many Layered Blossoms Dies, which is attached to a trifold panel of white cardstock:


This is the card with both of the outer flaps folded in, which shows the ledge that holds the easel up when on display:


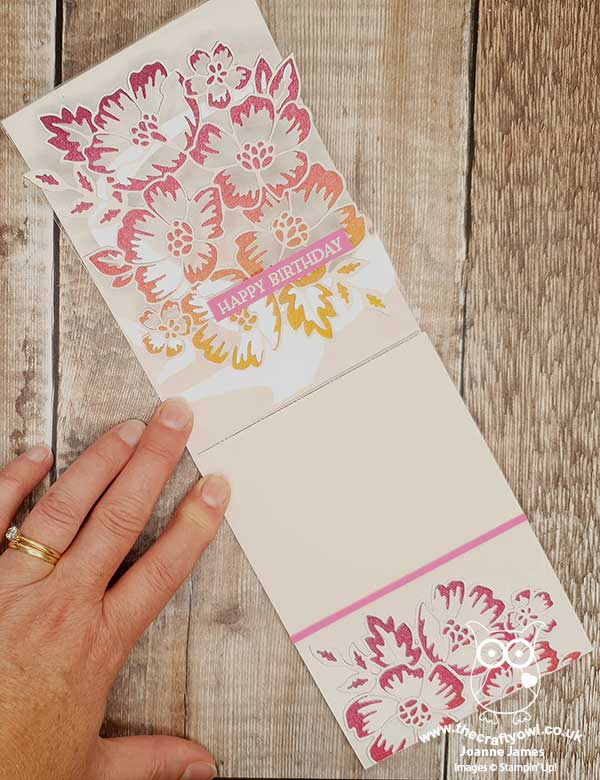
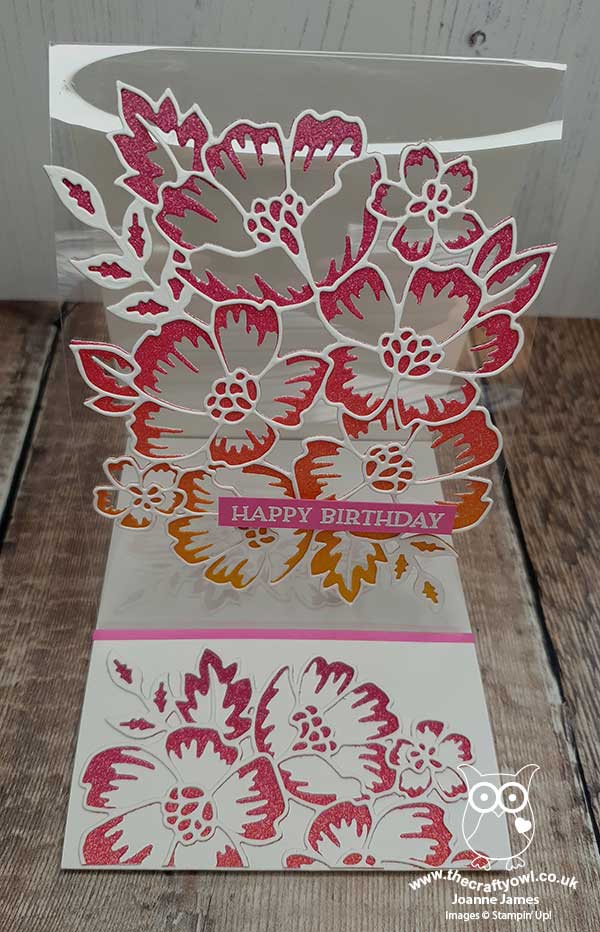
And this is how the card opens out fully, to show the inside panels, ready for my birthday message:


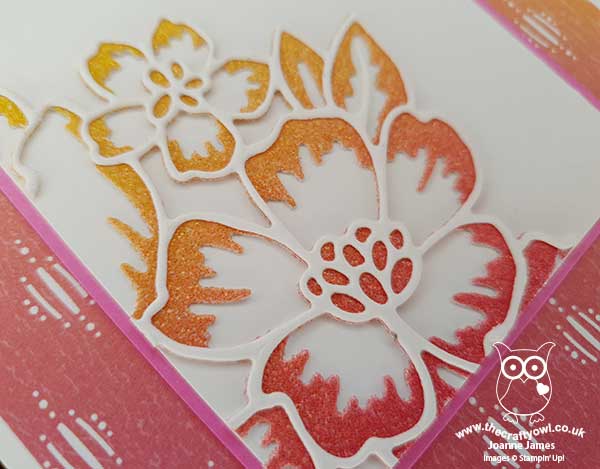
I decorated both of these panels with a co-ordinating pattern in the Artistry Blooms designer series paper pack, in a pretty ombre pattern that matches the pink-orange-yellow tones of the rainbow glimmer paper:


And this is the inside of the outermost flap (the one with the ledge that holds up the acetate panel on the reverse) - I used one additional layered diecut split into three pieces to decorate the outer edge and both of the inner panels:


This is how the card folds flat for mailing, although with all of those layers it is still quite bulky and probably worthy of delivery by hand:


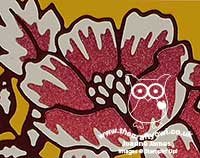
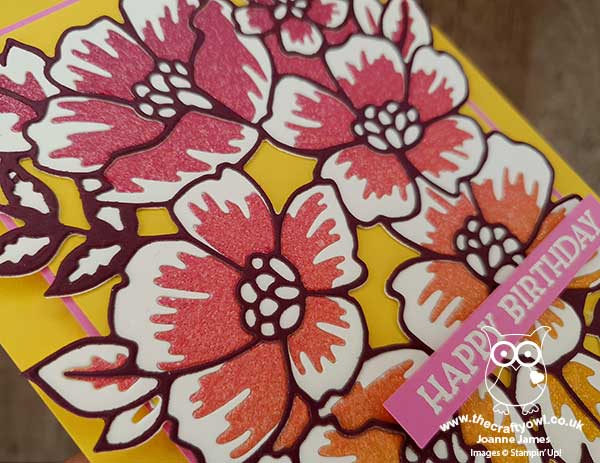
Rainbow Glimmer Love - So the rainbow glimmer paper is definitely one of my favourite products in the new annual catalogue. Whether it's the green-blue-purple hues of yesterday's project or the pink-yellow-oranges of today, I love it!! Just look at the variation on colour and the sparkle and shimmer it has:


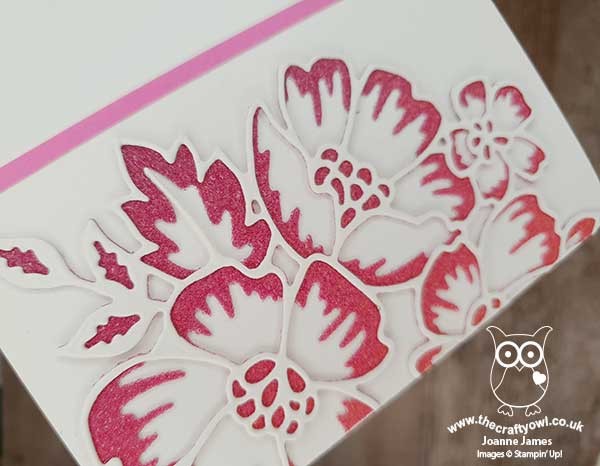
You can achieve a totally different look, depending on where you cut from the sheet - and as with all of our glimmer papers, there is no shedding and no mess!


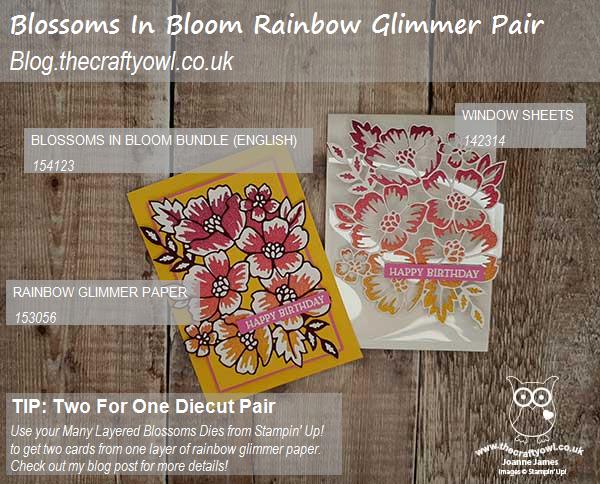
Two For One - I love this glimmer paper so much, I couldn't bear to see any of it go to waste. I used some Press and Seal to keep all of the waste diecut pieces from the above card together, then created a second card where I paper-pieced these into a white outline die - take a look at both cards together to get a better idea of what I'm talking about: 

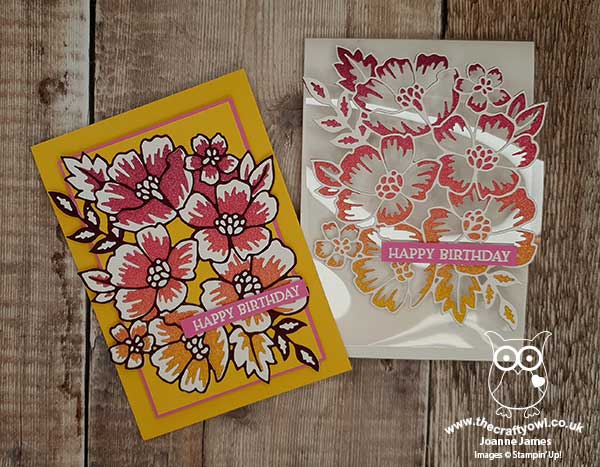
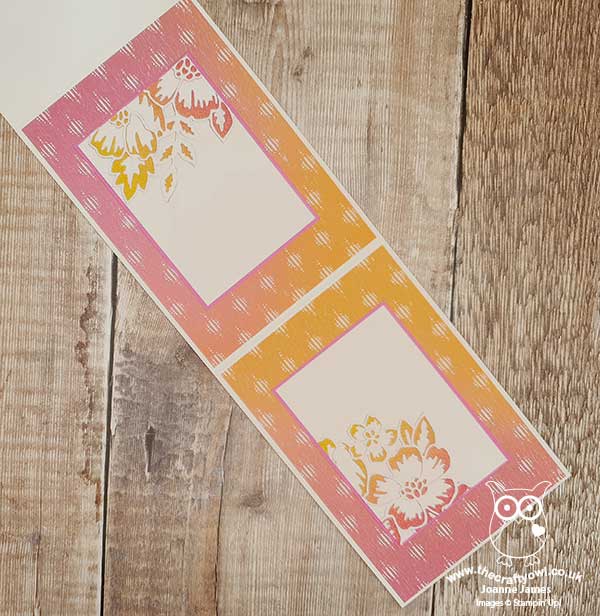
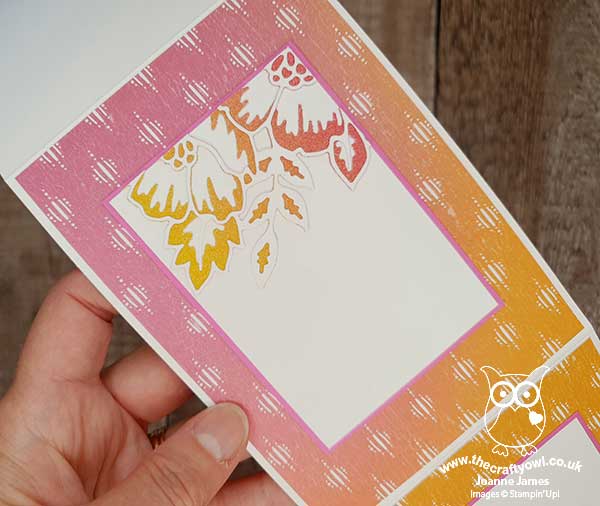
Here's my yellow card on its own - no fancy fold this time, but a yellow base and then after paper-piecing the rainbow glimmer pieces into a white layer, I then added a Blackberry Bliss outer layer for additional definition:

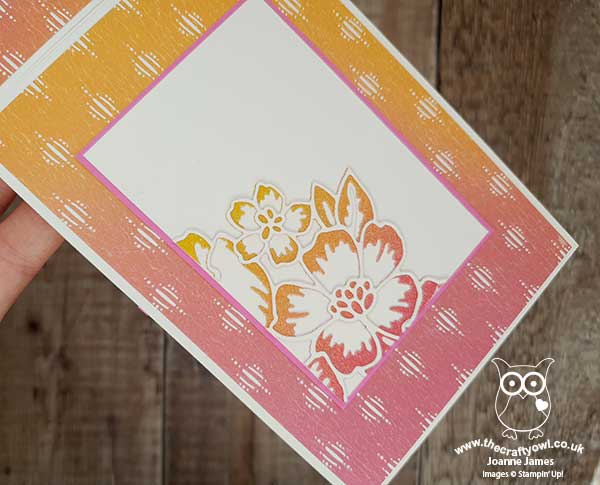
Here you can see the detail of the paper-piecing and layering:

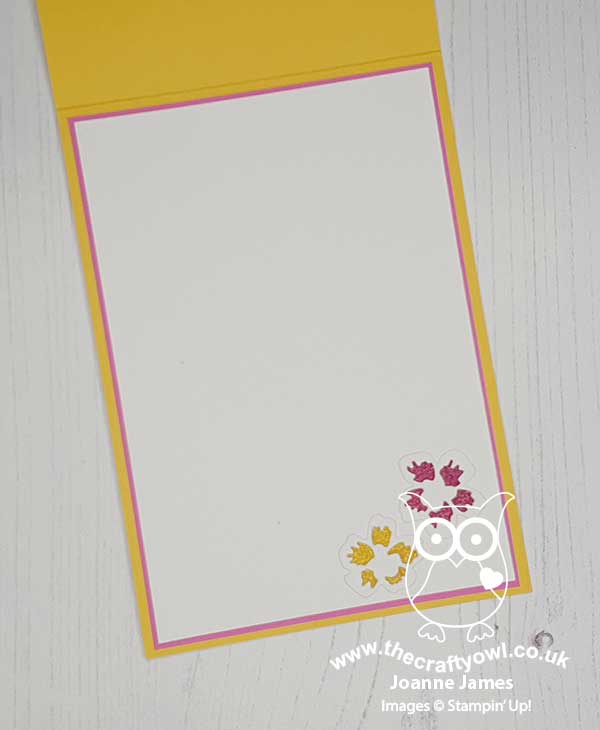
I also used my offcuts to get a couple of single flowers cut and used them to decorate this inside of this card:


I know I'm biased but is that not just the prettiest pair of cards you've ever seen?! I really love both of them. A fancy fold is always fun and the rainbow glimmer paper totally moves this card up a notch in my book!

Here is the visual summary of the key products used on today's project for you to pin for easy reference:


You can see all of my Product and 'How To' summaries on my 'How To - Tips and Techniques' Pinterest board in case you've missed any. 

Before you reach for your ink and papers, check out what our amazing team has created to inspire you this week:

Here's a quick recap of our challenge rules:
 
1.  Create a new paper project
2.  Upload your creation to your blog with a link back to us and provide a direct link to the post featuring your challenge submission.
3.  Please link your card to no more than four challenges, TOTAL.
4.  Have FUN!

You can see all of my 'How To' summaries on my 'How To - Tips and Techniques' Pinterest board in case you've missed any. 

Enjoy your day; for my fellow Paper Player teamies and my US readers I hope you continue to enjoy and celebrate your Independence Day weekend; we have no special plans so will likely just potter today. I'll be back tomorrow with another project. Until then, happy stampin'!


Stampin' Up! Supplies Used:

Table built using Product Table Builder by The Crafty Owl - Independent Stampin' Up! Demonstrator.


Let It Snow Card In A Box For PP470

by Joanne James1. December 2019 09:00

Today it's Sunday and time for this week's new challenge over at The Paper Players! It's the turn of the lovely Laurie to host this week and she has a fun theme challenge for you to work with:


I have a fancy card to share with you today that is perfect to give someone special for the festive season - take a look:


Here's the low-down on today's card:

A Card In A Box - Is it a gift? Is it a card? I guess it's a little of both! When closed it looks like a gift box, but undo the ribbon and the top and bottom of the box separate to reveal an accordion-style expanding card:


I made a holly-themed 'card in a box' project at my October Creative Escapes Craft Retreat using the Christmas Gleaming Stamp Set and made a few other versions to show the attendees how they could use the same concept using other papers and stamp sets - this is one of them. They are quite straightforward to make and rather addictive; I've had lots of photos from my retreat weekend attendees after the event showing me more examples of ones they've created too, so it must be catching! One of my top tips when making this type of card is to use temporary adhesive or a couple of glue dots to hold the last panel in place so that you can remove it to write your message to the recipient before gluing it in place; this is much easier than trying to write it when it's already in the box.

Let It Snow - I used the 'Let It Snow' papers for the accordion-fold of my card and the letters that spell out 'snow', which I diecut using the Hand-Lettered Prose dies and I used the adorable Let It Snow Embellishment Kit to dress up the snowman on the front of my box - how cute are those little felt accessories?!


Snowman Season - The sentiment on the front and inside my card are from the 'Snowman Season' stamp set. The 'Let It Snow' stamp was perfect for a partial stamp to then finish the sentiment with the diecut letter panels. I also used the snowflakes in the stamp set with some Stampin' Glitter to add some sparkle to each of the Coastal Cabana panels and a snowman on the first panel that I coloured with co-ordinating Stampin' Blends markers:


Here is the visual summary of the key products used on today's project for you to pin for easy reference:


You can see all of my Product and 'How To' summaries on my 'How To - Tips and Techniques' Pinterest board in case you've missed any. 

I'm also linking today's project up with the current fancy fold challenge over at Inspire Create.

Before you reach for your ink and papers, check out what our amazing team has created to inspire you this week:

Here's a quick recap of our challenge rules:
 
1.  Create a new paper project
2.  Upload your creation to your blog with a link back to us and provide a direct link to the post featuring your challenge submission.
3.  Please link your card to no more than four challenges, TOTAL.
4.  Have FUN!

You can see all of my 'How To' summaries on my 'How To - Tips and Techniques' Pinterest board in case you've missed any. 

Enjoy your day; as it's the first of December we are going to begin decorating the house for Christmas today, much to the children's delight! Especially as we have a couple of extra Christmas trees and some new rainbow baubles too. I'll be back tomorrow with another project. Until then, happy stampin'!


Stampin' Up! Supplies Used:

Table built using Product Table Builder by The Crafty Owl - Independent Stampin' Up! Demonstrator.

Best Catch Masculine Bendi-Fold Card for PP449

by Joanne James7. July 2019 09:00

Today it's Sunday and time for this week's new challenge over at The Paper Players! It's the turn of the fabulous Laurie to host this week and she has a fun theme challenge for you to work with:


I held a class featuring the 'Best Catch' stamp set a few months ago when it was in the Spring-Summer catalogue. Since this set carried over into the new annual catalogue, today's challenge gave me the perfect opportunity to share one of the fun folds we made - take a look:


Here's the low-down on today's card:

Best Catch -  If you or someone you know is a fan of fishing, then the 'Best Catch' is perfect for you. When I think of watersports, I tend to think of swimming or scuba diving as they are the watersports that I love, yet angling is one of the most popular past-times globally, fly fishing in particular. There are some great images and sentiments in the set, and there is also a useful set of co-ordinating dies, 'Catch Of The Day', that make cutting out the shapes super quick and easy. My favourite image is the fish and he is definitely the star of this card; so many options to colour him, and when you use the framelits to cut him out you get a fun fin detail too that is great on a fancy fold card. I stamped my fisherman and fish on Shimmery White cardstock as this allowed me to watercolour them with inks and an aquapainter and gives the fish a nice sparkly sheen too - just like fish scales!

A Fancy Fold Bendi Card - A bendi-fold card seemed like a fun way to add extra dimension and interest to my fishing card. Using a standard sized A6 cardbase for my backpiece, I then added a narrow panel to each outside edge; one in brown the same colour as my card base, and the other in Pool Party to the other side. To made the bendi fold mechanism, I simply cut a small slit in the back panel approx. one third from the opposite edge and slid the edge of the brown panel into it, creating a bend, then repeated this on the other side with the blue panel, tucking it into the first brown fold (just under the bulrushes).

Making Waves - Aside from my fun fancy fold, I added some texture and interest to my 'river' by running my Pool Party section through my Big Shot with my (now retired) Seaside Embossing Folder. If you don't have this, the new High Seas 3D embossing folder could be used to create a similar effect. Along with some die cut bulrushes and a little stamping, this finished my scene.

Here is the visual summary of the key products used on today's project for you to pin for easy reference:


You can see all of my Product and 'How To' summaries on my 'How To - Tips and Techniques' Pinterest board in case you've missed any. 

So what do you think? Have you ever tried to make a bendi-card? What is your favourite type of fancy fold? Do let me know in the comments below - I love to read your thoughts.

Before you reach for your ink and papers, check out what our amazing team has created to inspire you this week:

Here's a quick recap of our challenge rules:
 
1.  Create a new paper project
2.  Upload your creation to your blog with a link back to us and provide a direct link to the post featuring your challenge submission.
3.  Please link your card to no more than four challenges, TOTAL.
4.  Have FUN!

You can see all of my 'How To' summaries on my 'How To - Tips and Techniques' Pinterest board in case you've missed any. 

Enjoy your day; we will be hoping the weather is slightly warmer than yesterday so that we can spend some time outside. I am also going to be busy getting the oldest of the James Juniors ready for her school exchange trip to Germany this week.  I'll be back tomorrow with another project. Until then, happy stampin'!


Stampin' Up! Supplies Used:

Table built using Product Table Builder by The Crafty Owl - Independent Stampin' Up! Demonstrator.

Garden Impressions Floral Pocket Card

by Joanne James21. August 2018 10:00

It's Tuesday and I have my third post of the week! Today I'm sharing another of the cards that I made in one of my recent technique classes featuring the Garden Impressions Product Suite that is perfect for the current floral challenge over at Inspire.Create:


I made a pocket card featuring one of my favourite Garden Impressions paper designs with an over-the-top diecut embellishment - take a look: 


Here's the low-down on today's card:

Impressionist Inspiration - You now what a fan of designer series paper I am and the Garden Impressions paper is no exception; I just love these bold bright colours and the Impressionistic style of the patterns and florals in this pack. I like each and every pattern in this pack and this is already my most-used papers. Here I used it to decorate the flaps of my pocket card, which I made from co-ordinating Pacific Point cardstock using my trusty Envelope Punch Board and Envelope Expert tool (my finished card measures 10.5cm x 15cm).

Paper-Pieced Springtime Impressions - Not content with the florals on my basic pocket card sleeve, I decided to add the fabulous corner diecut from the Springtime impressions Thinlits set. I diecut a base in Shaded Spruce, then cut the whole thing again in Melon Mambo and Calypso Coral and snipped out some of the flowers and paper-pieced them onto my base piece. This may seem extravagant, but if you keep the offcuts you can use them to create another one in an alternative colourway, so there is very little waste really. I finished the whole thing with a Mango Melody butterfly. Bold? yes. Bright? Absolutely. Yet I love it! 

Abstract Florals - I added my sentiment to a banner tag on the front of my pocket, so that the whole of my inside card is blank for my message. I couldn't leave this piece 'naked' though, so I added a row of bright pink flowers courtesy of the Abstract Impressions stamp set across the bottom. I love this stamp set - so easy to use as it really is easy to line up the images for the two-step stamping required.

Here is the visual summary of the key products used on today's project for you to pin for easy reference:


You can see all of my 'How To' summaries on my 'How To - Tips and Techniques' Pinterest board in case you've missed any. 

Enjoy your day and I'll be back tomorrow with another project. Until then, happy stampin'!


Stampin' Up! Supplies Used:

Table built using Product Table Builder by The Crafty Owl - Independent Stampin' Up! Demonstrator.

Never-Ending Garden Impressions and A Designer Paper Obsession!

by Joanne James8. August 2018 07:00

A midweek post for you before I head out on today's activities with the James Juniors! Today I'm sharing a card that is perfect (and just in time!) for the current challenge over at As You See It:

This was an easy one for me! There are lots of things that fall in and out of love with as I craft, but there is one thing that I will always be obsessed with - and that's designer series paper! I have boxes and boxes of the stuff, old and new (about 25 12"x12" storage boxes at the last count!!). I use it - but I hoard it too! One of my team jokingly shared the attached image on our team page recently saying 'I wonder if you know anyone like this?'

Image may contain: text

Of course, she knew it was perfect for me :-) I know that some of you reading this will also share my passion for patterned paper, so if you would like to see a fun project that showcases all those lovely patterns, read on! 

In my recent technique class featuring the Garden Impressions Suite, we made a never-ending card featuring the gorgeous Garden Impressions papers. This is a photo-heavy post, so that you can see each of the sides of these fun-fold cards. So first up, here is the version we made in class:

This is the front:


The card then opens from the centre to reveal the next 'side':


Followed by a third fold:


And then the final 'side', with space above the sentiment to write a personal message:


The next fold then takes you back to the beginning. Whilst the still photos show you each of the sides, they don't really highlight the mechanism; I shot a  short video of one of the ladies at my class demonstrating how hers worked which will give you a much better idea of why it's called a never-ending card -you can see this over on my Facebook page below:.


After the class I also made another one using the same papers in an alternative colourway, and decorated it with some of the diecut pieces from the Springtime Impressions thinlits dies set - take a look:


The basic mechanism for these cards, which measure 6" x 6" finished size, is fairly straightforward; it's choosing how to decorate them and which papers to use that takes the thought - especially when your collection is as vast as mine!

Here is the visual summary of the key products used on today's project for you to pin for easy reference:


You can see all of my 'How To' summaries on my 'How To - Tips and Techniques' Pinterest board in case you've missed any. 

Enjoy your day and I'll be back tomorrow with another project. Until then, happy stampin'!


Stampin' Up! Supplies Used:

Table built using Product Table Builder by The Crafty Owl - Independent Stampin' Up! Demonstrator.

Hand Delivered Balloons Pop-Up Slider Card To Celebrate The Paper Players 400th Birthday!

by Joanne James1. July 2018 09:00

It's Sunday and time for this week's new challenge over at The Paper Players! It's the turn of  the lovely Jaydee to host this week and we have something very special in store for you as The Paper Players is celebrating our 400th birthday - how awesome is that?! It is only right therefore that our theme challenge FOR THE NEXT TWO WEEKS - yes, we are running our challenge for two weeks in total, is all about celebration:


First and foremost, we are celebrating all of the lovely people who play along with The Paper Players challenge each week for 50 weeks of the year - it is for you and because of you that we are still going strong! It is without doubt the best team I have ever worked with - these gals are simply THE BEST! For our special celebration challenge this week, we are also joined by two of the original members of the Paper Players team: Ann Schach and Anne Marie Hile. And there are PRIZES this week - so many prizes!! 40 in fact, from our many generous sponsors across the crafting community - check out our post for more details but here is the full list to whet your appetite:

Listed in alphabetical order:

  1. Altenew - $30 gift card
  2. Atenew Academy - $20 gift card  - compliments of Jaydee
  3. Avery Elle - $20 store credit
  4. Butterfly Reflections - Breathe Rainbows Stamp Set (US only)
  5. CAS-ual Fridays - $25 store credit
  6. Cheery Lynn - $20 gift card  
  7. Cheery Lynn - $20 gift card - compliments of Laurie
  8. Concord & 9th - $25 gift card
  9. Craftin Desert Diva's - $10 store cedit
  10. Dies R Us - $15 gift card
  11. Ellen Hutson -  20 gift cards - compliments of Annie 
  12. Ellen Hutson $20 gift card - compliments of Eliz
  13. Happy Little Stampers - $20 store credit
  14. Heffy Doodle - Sticky Friends Stamp Sets (exclusive - not available for purchase)
  15. Heffy Doodle - Sticky Friends Stamp Set (exclusive - not available for purchase)
  16. Heffy Doodle - Sticky Friends Stamp Set (exclusive - not available for purchase)
  17. Heffy Doodle - Sticky Friends Stamp Set (exclusive - not available for purchase)
  18. Lawn Fawn - $25 gift card
  19. My Favorite Things - $25 store credit
  20. Neat & Tangled - $15 store credit 
  21. Newton's Nook - $20 store credit
  22. Pink & Main - $20 store credit
  23. Power Poppy - $10 store credit
  24. Stampendous - $20 rewards cards (US only)
  25. Stampendous - $20 reward card (US only)
  26. Stampendous - $20 reward card (US only)
  27. Stamplorations - $20 gift certificate
  28. Stampin' Up - $20 gift certificates compliments of Nance (US only)
  29. Stampin' Up! $20 gift certificate - compliments of LeAnne (US only)
  30. Stampin' Up! £20 gift certificate - compliments of Joanne (UK only)
  31. Stampin' Up! $20 gift certificate - compliments of Claire (US only)
  32. Stampin' Up $20 gift certificate - compliments of Jan (NZ only)
  33. Technique Tuesday - $20 gift card
  34. The Foiled Fox - $25 store credit
  35. Trinity Stamps - Let it Grow and Lady Liberty Stamp Sets
  36. Tutti Designs - $15 gift card
  37. Uniko - any in-stock stamp set of winner's choice
  38. Verve Stamps - stamp & accessory bundle - compliments of Sandy (US only)
  39. Verve Stamps - stamp & accessory bundle - compliments of Sandy (US only)
  40. Waffle Flower - $15 gift card

Isn't that fantastic?! All prizes will be awarded randomly between challenge participants - so if you enter, you are in with a chance of winning!

Whilst balloons are not mandatory for this challenge, I couldn't help but be inspired by the wonderful badge Nance created for us this week, so I pulled out my Hand Delivered hostess set and set to work on a fun fold for you - take a look:


Here's the low-down on today's card:

Hand Delivered - I used my favourite of the new hostess sets, Hand Delivered, for my card today. I love the way the pieces of this set mix and match; I've used the balloons again on today's card, but unlike my previous versions, this birthday girl is wearing the flowered skirt - so pretty! This is a great set with lots of variety - I used the birthday sentiments from this set on my card too, as you can see in the picture below. It's worth hosting a Stampin' Up! party just to get your hands on this set, so if you would like to talk to me about hosting one so that you can get your hands on exclusive hostess sets like this one, then do get in touch.

Pop-Up Slider Fancy Fold Card - I decided I would mimic the 'hidden' nature of the young lady behind her balloon with a pop-up slider card. I haven't made one of these cards in ages, but I loved the idea of a hidden message too. When the card is 'closed' it lies flat as in the picture above; when you pull the ribbons upwards, the girl moves into a vertical position and the hidden messages are revealed:

Isn't that fun?! And space still available to write a personalised message too.

New In Colours - I really love the palette of 2018-20 in colours; so much so, since I still can't decide which ones I like best I used them all! They work really well together and the bright colours definitely appeal to me. I used Lovely Lipstick for my cardbase, then used a combination of all 5 colours to colour the lady with my aquapainter. I also used ribbon in all 5 colours to create my pull tassel. Lastly, a liberal coat of Wink of Stella finished my balloons. I'm also linking up my card with the team over at Fab Friday, since they are featuring the new in colours too:

Here is the visual summary of the key products used on today's project for you to pin for easy reference:


You can see all of my Product and 'How To' summaries on my 'How To - Tips and Techniques' Pinterest board in case you've missed any. 

Before you reach for your ink and papers, check out what our amazing team has created to inspire you this week:

Here's a quick recap of our challenge rules:
 
1.  Create a new paper project specifically for this challenge.
2.  Upload your creation to your blog with a link back to us and provide a direct link to the post featuring your challenge submission.
3.  Please link your card to no more than four challenges, TOTAL.
4.  Please be considerate of our requests; entries that do not follow any of these rules will be deleted without notification and will not be eligible for our prizes.
5.  Have FUN!
 
We also have an additional rule for this challenge only: please do not submit more than TWO cards for this challenge. This is simply so that everyone can have an equal opportunity to win a prize.
 
Remember: PP400 will run for two weeks (the challenge closes on Friday 13th July)- the Design Team will be posting a second card for our theme next Sunday, to give you even more inspiration and encouragement to participate All challenge winners will be announced on Saturday, June 14th. All prizes awarded to participants will be drawn from random.org from ALL participants and announced with our reminder post for challenge PP401 on Wednesday 18th July.

I can't wait to see how you interpret this week's theme and look forward to visiting your blogs this week and next! Enjoy the rest of your weekend - I'll be hoping to have a slightly more restful one than of late, catching up on a few chores and hopefully enjoying some of the lovely sunshine we've been having here in the UK these past few weeks. I'll be back soon with another project; until then, happy stampin'!


Stampin' Up! Supplies Used: 

Table built using Product Table Builder by The Crafty Owl - Independent Stampin' Up! Demonstrator.

Mini Catalogue

BROWSE THE CATALOGUE

The mini catalogue is now live! Read and download your copy here.

Shop Online

Access my online shop 24 x 7, 365 days of the year:

Current March hostess code:

S9F2XJJW

Shop Online

Join My Team

It's always a great time to join Stampin’ Up! New team members can get £130 worth of products for only £99 + free business supplies + free shipping + all the fun being a part of Stampin’ Up! Stampin' Up! has something for everyone: join my growing team and benefit from my support to enjoy Stampin' Up! however you choose.

If you're interested, call me for a chat to understand how I can help you realise your goals. Alternatively, if you have already decided to sign up and you just can't wait, please click here for the link to the online form where you can sign up and order your starter kit right away! 

Latest Kit!

Stampin Cut and Emboss

The Rock Legend Kit has all you need to make 8 cards with coordinating envelopes. Along with the new Panda Friends Kit, both are available from January 4th for just £14 each - get yours here!

2023-24 Annual Catalogue

BROWSE THE CATALOGUE

Click on the catalogue for a full list of current SU! supplies - if you would like to order any of the items featured, please drop me a line at [email protected] or give me a call on 07773 421446 - I'd be happy to help.

New Online Exclusives

There will be new products available exclusively in the online store from 5 March - check them out here.

About Me

Hi I'm Joanne and live in Northampton and when I'm not looking after my husband and two beautiful children, am an avid crafter with a passion for all things Stampin' Up!

I must confess that I have never been a big rubber stamper - until I discovered Stampin' Up! that is. I love the fact that I can get such great results with co-ordinating stamps, inks, papers and punches - the possibilities are endless! Join me on my stamping journey as I share the things I love and be inspired to create amazing things yourself!

Follow Me

Monthly Newsletter

Box Builder

Click the button above to use Box Buster to create your custom box design using the Envelope Punch Board!

Kits Collection Now Available!

Stampin Cut and Emboss

The new Kits Collection from Stampin' Up! is now available!

Click here to see the current kits available and order yours online today.

I Design For


Stampin' Up Stuff

This is my personal blog and is not endorsed by Stampin’ Up! I hope you find it a plentiful source of ideas and personal inspiration but please don't copy my designs for contest submission or use for classes, publication or sale without express permission.