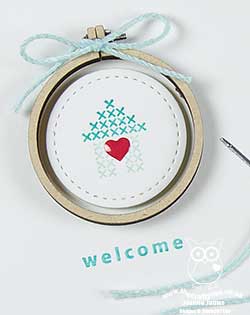
Fairies and Cherries For The Paper Players PP406

by Joanne James19. August 2018 09:00

Another week of school summer vacation in the James household this week! Today it's Sunday and time for this week's new challenge over at The Paper Players. It's the first challenge for our returning Paper Players designer, the lovely Anne-Marie Hile, this week so be sure to pop by her blog with a friendly 'hello'. It's the turn of the super-talented Sandy to host this week and she has a clean and simple challenge for us to work with:


Remember in addition to the theme of "fruits and vegetables", this week is a Clean-and-Simple (CAS) challenge!  What do we mean by CAS?

  • Minimal layers and embellishments
  • Plenty of open space, aka "white" space
  • Simple and uncluttered

Having trawled through my collection of current stamps, it turns out I have very few with fruit (or veg!) for that matter, so a little creative stamping was called for. I actually found some fruit 'hidden' in the Fairy Celebration stamp set - take a look:


Here's the low-down on today's card:

This little fairy happens to be hanging from a cherry tree, so a little watercolouring using my new watercolour pencils and an aquapainter (I am so happy that we have more of these now, the new colours in the second pack available exclusively this month extend the variety of colours and allow much greater flexibility - don't leave it too late to get yours!) was all I needed to create a focal point for my card. I added some clear Wink of Stella to the fairy wings and some fine tip glue to the cherries to give them a glossy finish - both of which are difficult to see from the photos, but add subtle detail in real life.

I decided to use the sketch over at CAS(E) This Sketch this week for my layout, and used a couple of pieces cut with my Stitched Labels Framelits then trimmed to add interest behind my main image. I have seen these Stitched Labels Framelits used on some fabulous cards elsewhere on the internet and hold my Paper Player team mate LeAnne responsible for me 'needing' to add them to my own collection (check out her blog for some great examples of how to use them!) so thought I would try something a little different with them. The two blocks of colour mirror the colouring on my cherries and leaves and add detail, without encroaching too much into my white space and maintaining my overall clean and simple feel.

And that's all there is to it: clean and simple - done!

Here is the visual summary of the key products used on today's project for you to pin for easy reference:


You can see all of my Product and 'How To' summaries on my 'How To - Tips and Techniques' Pinterest board in case you've missed any. 

Before you reach for your ink and papers, check out what our amazing team has created to inspire you this week:

Here's a quick recap of our challenge rules:
 
1.  Create a new paper project
2.  Upload your creation to your blog with a link back to us and provide a direct link to the post featuring your challenge submission.
3.  Please link your card to no more than four challenges, TOTAL.
4.  Have FUN!

You can see all of my 'How To' summaries on my 'How To - Tips and Techniques' Pinterest board in case you've missed any. 

Enjoy your day and I'll be back tomorrow with another project: a Christmas card featuring some sneak peeks of some great new products from the forthcoming seasonal catalogue. Do come back then, you won't want to miss it. Until then, happy stampin'!


Stampin' Up! Supplies Used: 

Table built using Product Table Builder by The Crafty Owl - Independent Stampin' Up! Demonstrator.

Never-Ending Garden Impressions and A Designer Paper Obsession!

by Joanne James8. August 2018 07:00

A midweek post for you before I head out on today's activities with the James Juniors! Today I'm sharing a card that is perfect (and just in time!) for the current challenge over at As You See It:

This was an easy one for me! There are lots of things that fall in and out of love with as I craft, but there is one thing that I will always be obsessed with - and that's designer series paper! I have boxes and boxes of the stuff, old and new (about 25 12"x12" storage boxes at the last count!!). I use it - but I hoard it too! One of my team jokingly shared the attached image on our team page recently saying 'I wonder if you know anyone like this?'

Image may contain: text

Of course, she knew it was perfect for me :-) I know that some of you reading this will also share my passion for patterned paper, so if you would like to see a fun project that showcases all those lovely patterns, read on! 

In my recent technique class featuring the Garden Impressions Suite, we made a never-ending card featuring the gorgeous Garden Impressions papers. This is a photo-heavy post, so that you can see each of the sides of these fun-fold cards. So first up, here is the version we made in class:

This is the front:


The card then opens from the centre to reveal the next 'side':


Followed by a third fold:


And then the final 'side', with space above the sentiment to write a personal message:


The next fold then takes you back to the beginning. Whilst the still photos show you each of the sides, they don't really highlight the mechanism; I shot a  short video of one of the ladies at my class demonstrating how hers worked which will give you a much better idea of why it's called a never-ending card -you can see this over on my Facebook page below:.


After the class I also made another one using the same papers in an alternative colourway, and decorated it with some of the diecut pieces from the Springtime Impressions thinlits dies set - take a look:


The basic mechanism for these cards, which measure 6" x 6" finished size, is fairly straightforward; it's choosing how to decorate them and which papers to use that takes the thought - especially when your collection is as vast as mine!

Here is the visual summary of the key products used on today's project for you to pin for easy reference:


You can see all of my 'How To' summaries on my 'How To - Tips and Techniques' Pinterest board in case you've missed any. 

Enjoy your day and I'll be back tomorrow with another project. Until then, happy stampin'!


Stampin' Up! Supplies Used:

Table built using Product Table Builder by The Crafty Owl - Independent Stampin' Up! Demonstrator.

I'm Dreaming of a White Christmas for PP404

by Joanne James5. August 2018 09:00

Today it's Sunday and time for this week's new challenge over at The Paper Players - yay! It's the turn of the lovely Laurie to host this week and she has a fun theme challenge for you to work with:


I decided to use this week's CAS(E) This Sketch for my layout and by complete coincidence have another card for you using the Half Full stamp set I featured last week, although this week's is decidedly more festive - take a look:


Here's the low-down on today's card:

I'm Dreaming of a White Christmas -  When I came to make my card for today's challenge, I realised I actually don't own that many overtly funny stamp sets - clearly something to be rectified another time! However the principle reason that I purchased the Half Full stamp set that I used on last week's card was for the sentiment that I used on today's card - what a fun play on words! Along with some fussy cut holly it makes for the perfect festive tipple.

Humour on the Inside - The real humour in this set comes when this sentiment on the front of the card is combined with the one I used on the inside. I actually made two of these cards at the same time (I wanted to make a dent in my Christmas card stash!) which made it easy to photograph both the inside and outside at the same time to get the full effect:


I just love that - makes me chuckle very time I read it! So perfect for my wine-loving besties, who I know will appreciate the sentiment too.

Under The Mistletoe Plaid - I wanted to add some festive colour to my card and settled on this warming plaid from the Under The Mistletoe designer series paper set. The warm colours were just what I was looking for to go with my glass of wine - here's the colour combination if you would like to save it for a future project:


Here is the visual summary of the key products used on today's project for you to pin for easy reference:


You can see all of my Product and 'How To' summaries on my 'How To - Tips and Techniques' Pinterest board in case you've missed any. 

Before you reach for your ink and papers, check out what our amazing team has created to inspire you this week:

Here's a quick recap of our challenge rules:
 
1.  Create a new paper project
2.  Upload your creation to your blog with a link back to us and provide a direct link to the post featuring your challenge submission.
3.  Please link your card to no more than four challenges, TOTAL.
4.  Have FUN!

You can see all of my 'How To' summaries on my 'How To - Tips and Techniques' Pinterest board in case you've missed any. 

Enjoy your day. I'm off for a day at the waterpark with a bunch of 11 year old boys to begin the birthday celebrations of the youngest of the James Juniors. To be followed by a BBQ, football and Nerf wars, so a fairly full-on day - wish me luck!

I'll be back tomorrow with another project. Until then, happy stampin'!


Stampin' Up! Supplies Used: 

Table built using Product Table Builder by The Crafty Owl - Independent Stampin' Up! Demonstrator.

My First Animal Outing For The Paper Players PP396

by Joanne James3. June 2018 09:00

It's Sunday and time for this week's new challenge over at The Paper Players! It's my turn to host this week and I have a fun theme challenge for you to work with - I used the sketch over at CAS(E) This Sketch and the colour palette at TGIF Challenges as the basis for my card too:


I chose my theme for this challenge ages ago but knew as soon as I received the set 'Animal Outing' in my bag at Onstage that it would have to be my set of choice for my card today - take a look:


Here's the low-down on today's card:

Animal Antics - I didn't think it was possible for a rhino to look cute, but the chap on my card today with his birdie friend is definitely a cutie to me! Along with a koala-carrying kangaroo, a giraffe and a frog, this pair make up the collection of animals in the 'Animal Outing' stamp set, which forms part of the Animal Expedition suite - a bundle of animal themed stamps and framelits with a range of sentiments that make this set work for a variety of of occasions: thank you, new baby, friend, birthday, anniversary and more. There are also co-ordinating papers, leaf ribbon and wooden frames elements - this is a set that I'm sure I'm going to get lots more use out of in the coming months so watch this space for more projects! I stamped my cute pair onto a stitched circle and coloured them with my Stampin' Blends.

Layered Leaves - I layered my stitched circle onto a rectangle of Old Olive cardstock, embossed with the Lovely Leaves embossing folder - this is a firm favourite of mine, it adds great detail and texture and I really like the way the random leaf pattern. There is just enough detail to add interest behind the image whilst still retaining an overall CAS feel to my card.

A New Trio - My embellishments are minimal, in fact just some Night of Navy baker's twine, but I did want to point out something that you might have missed both on my card and in the new catalogue: I rounded the corners on my embossed panel, as per the sketch, using the new Detailed Trio Punch. Found on page 211 of the new catalogue, this punch rounds corners, creates an oval-shaped eyelet and a pretty trio of petals that will add a subtle detail to your layers. Very useful!

Here is the visual summary of the key products used on today's project for you to pin for easy reference:


You can see all of my Product and 'How To' summaries on my 'How To - Tips and Techniques' Pinterest board in case you've missed any. 

Before you reach for your ink and papers, check out what our amazing team has created to inspire you this week:

Here's a quick recap of our challenge rules:
 
1.  Create a new paper project
2.  Upload your creation to your blog with a link back to us and provide a direct link to the post featuring your challenge submission.
3.  Please link your card to no more than four challenges, TOTAL.
4.  Have FUN!

I can't wait to see how you interpret this week's theme and look forward to visiting your blogs this week! Enjoy the rest of your weekend as it will be over all too quickly. I'll be back tomorrow with another project; until then, happy stampin'!


Stampin' Up! Supplies Used: 

Table built using Product Table Builder by The Crafty Owl - Independent Stampin' Up! Demonstrator.

Flying Home Baby Card For The Paper Players PP391

by Joanne James29. April 2018 09:00

It's Sunday and time for this week's new challenge over at The Paper Players! It just so happens there are 5 Sundays in April, so we have an extra challenge week! It's my turn to host and as it's tic-tac-toe week there really are so many creative possibilities. Check out my board: 


Choices, choices! I decided to use this week's sketch over at Just Add Ink for my layout and grabbed my Blends again for a spot of colouring to share with the teams at Stamp Ink Paper and SUO Challenges and went across the bottom of my board - yellow, circle, bird (my card also works for the central column of die-cut, ribbon, circle too) - for a sweet baby card, take a look:


Here's the low-down on today's card:

Flying Home - I love the bird house designs in this set and will be sad to see this set retire next month. Perfect for welcome cards - new home, new baby or even new team member - the selection of images are perfect for colouring too. This is the first time I've used this sweet mama bird and her babies; I went with bright yellow for a unisex baby card and coloured with my Blends; I actually made a whole batch of these so that I have some blanks and can colour the other birds specifically pink or blue too if I need something a little more tailored. 

Circles, Circles - There are lots of different circle elements to my card: the Picture Perfect Party background paper has a fun circle pattern and my main image has been cut out with the largest of my Stitched Circle Framelits. Even the sprinkle of Pool Party sequins add to the theme.

What No Bear? - My sentiment comes from the 'Baby Bear' stamp set. split between the little front banner and finished on the inside of my card. No bears, just birds on today's baby card ;-). Here's a look at the inside, finished off with a couple of yellow birdies too:


Here is the visual summary of the key products used on today's project for you to pin for easy reference:


You can see all of my Product and 'How To' summaries on my 'How To - Tips and Techniques' Pinterest board in case you've missed any. 

Before you reach for your ink and papers, check out what our amazing team has created to inspire you this week:

Here's a quick recap of our challenge rules:
 
1.  Create a new paper project
2.  Upload your creation to your blog with a link back to us and provide a direct link to the post featuring your challenge submission.
3.  Please link your card to no more than four challenges, TOTAL.
4.  Have FUN!

I can't wait to see what you create with this week's board - there really are so many different combinations! I'm so looking forward to visiting your blogs this week! Enjoy the rest of your weekend as it will be over all too quickly. I'll be back tomorrow with another project; until then, happy stampin'!


Stampin' Up! Supplies Used: 

Table built using Product Table Builder by The Crafty Owl - Independent Stampin' Up! Demonstrator.

Ready For Christmas?!

by Joanne James31. March 2018 20:00

I'm back for a second post today! I had a little time for a spot of crafting this morning - I feel like I haven't been in my craft room to make something 'just because' in such a long time! So somewhat ironically, given that it's Easter weekend, I made a Christmas card! Yes - I couldn't resist making a card to join in with the challenge over at Merry Monday this week: 


I decided to use the cute little sausage dog from the Ready For Christmas stamp set, still available on carryover from the last Autumn-Winter seasonal catalogue, along with some retired Christmas Around The World tartan designer series paper:


I had a little fun with this card, and paper pieced both the occasional table and the dog using two different patterns from the Wood Textures DSP stack - don't you just love the honey-colour of that naughty-but-cute dachshund?! And a simple sentiment on the inside from the same set completes my card:


Here is the visual summary of the key products used on today's project for you to pin for easy reference:


You can see all of my 'How To' summaries on my 'How To - Tips and Techniques' Pinterest board in case you've missed any. 

Back soon with another project. Until then, happy stampin'!


Stampin' Up! Supplies Used:

Table built using Product Table Builder by The Crafty Owl - Independent Stampin' Up! Demonstrator.

A Picture Perfect Party Birthday Celebration PP386

by Joanne James25. March 2018 09:00

It's Sunday and time for this week's new challenge over at The Paper Players! It's the turn of my amazing friend Claire to host this week and she has my favourite, a sketch challenge, for you to work with:


I could have gone so many ways with this sketch! I have not one, but two cards, to share with you today - both with a fun party theme. Here's the first one - take a look:


Here's the low-down on today's card:

Picture Perfect Party - Both of my cards today feature papers with the bold, photographic images featured in the Picture Perfect Party DSP Stack. In bright, celebratory colours, these papers are perfect for a large expanse of background and work really well as the background for my fun, party-themed cards. I used the offcut from my card panel to continue the decoration through to my envelope to with a colourful envelope liner.

Picture Perfect Birthday - I used the co-ordinating Picture Perfect Birthday stamp set to decorate the sentiment circles on the front of my card. I was lucky to receive this set free when I attended Onstage last November, which really was fortunate for me as I think this is a set I might otherwise have overlooked. It contains some great, scripted fonts that work for birthdays and more general celebrations and has some fun confetti, candle, tooter and ribbon bow images too. In addition to using it to decorate the outside of my card, I added a little colour to the inside too:


Finishing Touches - To finish my cards, I added some gold tinsel trim and a strip of fringed cardstock to the one above and some silver baker's twine and mini silver sequin trim with a strip of fringed cardstock to the card below:


And here's the inside of this card too:

Two cards using the same layout and supplies, each with a different pattern and sentiment. The Picture Perfect Party Suite is perfect for creating batches of birthday cards with a minimum of supplies. Here is the visual summary of the key products used on today's project for you to pin for easy reference:


You can see all of my Product and 'How To' summaries on my 'How To - Tips and Techniques' Pinterest board in case you've missed any. 

Before you reach for your ink and papers, check out what our amazing team has created to inspire you this week:

Here's a quick recap of our challenge rules:
 
1.  Create a new paper project
2.  Upload your creation to your blog with a link back to us and provide a direct link to the post featuring your challenge submission.
3.  Please link your card to no more than four challenges, TOTAL.
4.  Have FUN!

I can't wait to see what you create with this week's sketch and look forward to visiting your blogs this week! Enjoy the rest of your weekend as it will be over all too quickly. We are minus one James Junior who is away on a short hockey tour for a few days, so will be spending the day researching hurricanes with James Junior number 2 for a geography project in between a little crafting too I hope!

I'll be back tomorrow with another project that also uses this same sketch but has a totally different feel, so do come back and take a look at that card; until then, happy stampin'!


Stampin' Up! Supplies Used: 

Table built using Product Table Builder by The Crafty Owl - Independent Stampin' Up! Demonstrator.

Retro Hoop La La Mini Embroidery Hoop Clean and Simple Card PP381

by Joanne James18. February 2018 09:00

It's Sunday and time for this week's new challenge over at The Paper Players! It's my fabulous friend LeAnne's turn to host this week and she has a clean and simple challenge for you to work with:
    

This week's challenge was indeed 'sew' much fun and I have not one but two super clean-and-simple cards to share with you this week! This is also something of a 'something old, something new' post for me and perfect for the current challenge over at As You See It where they are asking us to remember the first tool or stamp set we bought or the one that made us fall in love with stamping, so I have a story for you today! First things first though - here is card number one:
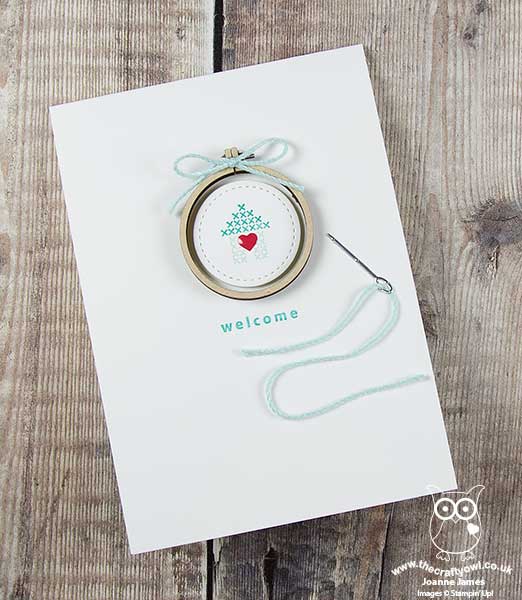
 

Here's the low-down on today's card:

Take A Hoop - I've been wanting to use these cute little mini embroidery hoops in the seasonal catalogue and today gave me the perfect opportunity. Perfect for framing miniature works of art, they are just like the real thing. 

Cross Stitch With Hoop La La - The stamp set I've used today is an old set called 'Hoop La La'. It isn't the first stamp set I ever bought (that was called 'Sweetheart' I think and you could make treat cup cards with it - I still have it somewhere but couldn't find it anywhere when I looked this week!) but this was one of the first. I chose it because it combined two of my favourite hobbies: my love of cross stitch and my new passion for card making - I just had to have it and haven't been able to part with it since. On this card I used the house, coloured with my Stampin' Write markers in Pool Party and Bermuda Bay and added a red enamel heart. Another 'new home' card - I seem to be needing a lot of these lately! The stamp set includes a stamp of an embroidery hoop, but I love the dimension that the little wooden hoops give to the card.

Get Stitching - To continue the stitching theme, I used my stitched circle framelits to cut out my circle to sit inside the hoop (I popped it up on dimensionals). I also added a diecut needle from last season's Quilt Builder Framelits and threaded it with some Pool Party baker's twine. I also added a twine bow to the top of my hoop for decoration. 

Here's the second of my cards, this time using the smaller size embroidery hoop and adhering my stitched circle to the top of the frame for an alternative mount:
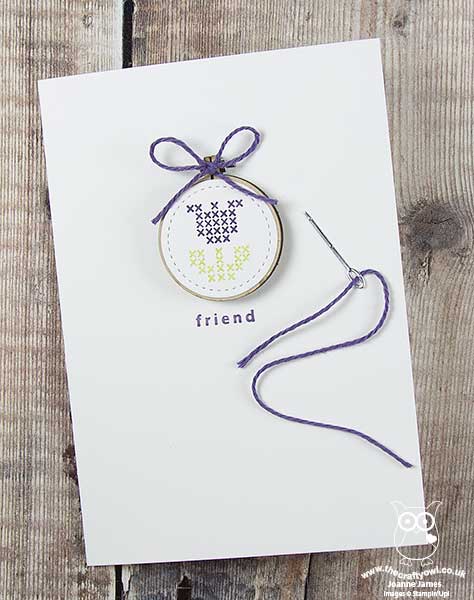
 

This one shows up a little better with the darker purple colour against the white - here is a close up of the hoop so that you can see the alternative mount on the smaller embroidery hoop:
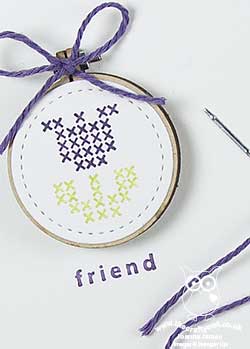
 

I like this mix of old and new so much I think I'm going to have to get another pack of hoops and make up some more of these cards! 

Here is the visual summaries of the key products used on today's project for you to pin for easy reference:
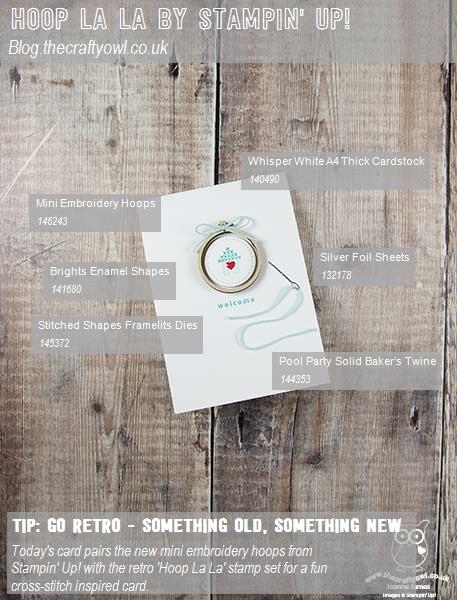
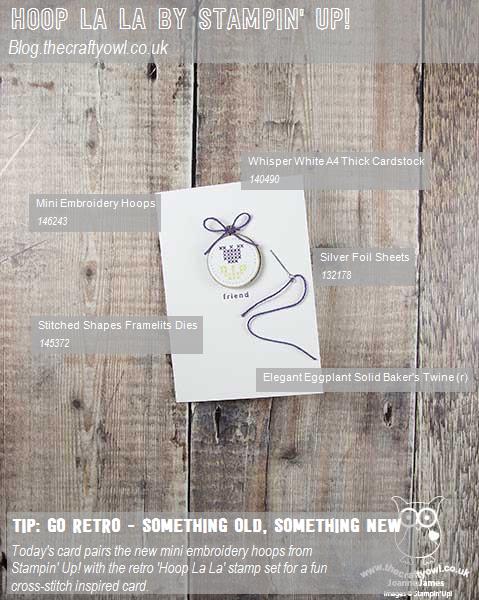


You can see all of my Product and 'How To' summaries on my 'How To - Tips and Techniques' Pinterest board in case you've missed any. 

Before you reach for your ink and papers, check out what our amazing team has created to inspire you this week:

Here's a quick recap of our challenge rules:
 
1.  Create a new paper project
2.  Upload your creation to your blog with a link back to us and provide a direct link to the post featuring your challenge submission.
3.  Please link your card to no more than four challenges, TOTAL.
4.  Have FUN!

Don't forget the theme is clean and simple this week - so minimal layers and embellishments and lots of white space. I can't wait to see what you create and look forward to visiting your blogs this week! Enjoy the rest of your weekend as it will be over all too quickly. I'll be back tomorrow with another project; until then, happy stampin'!


Stampin' Up! Supplies Used: 

Table built using Product Table Builder by The Crafty Owl - Independent Stampin' Up! Demonstrator.

Flying Home Welcome To Your New Home Card PP378

by Joanne James28. January 2018 09:00

It's Sunday and time for this week's new challenge over at The Paper Players! It's the turn of our wonderful team leader Nance to host this week and she has my favourite, a sketch challenge, for you to work with:


Whether you stay with the circle or use an alternative shape, this is a sketch with many possibilities. I decided to keep with the circle as it was perfect to showcase a new stamp I haven't used yet and have fun with a little colouring - take a look:


I've had a few friends that have either recently moved or are in the process of moving, so I needed to replenish my stock of 'new home' cards and the 'Flying Home' stamp set had the perfect image. Here's the low-down on today's card:

Flying Home - I was lucky enough to receive the 'Flying Home' stamp set at Onstage in November, but had yet to ink it up. This set is perfect for a new home card, or even a new baby card; in fact the whimsical line drawings work for lots of card types. The other great thing about this set is that it is made for colouring. I used my Stampin' Blends to colour in my main image and I stamped the little bird twice so that I could fussy cut one and pop him up on a tiny piece of a dimensional for added lift.

A Petal Garden Colour Combo - I pulled the colours for my stamped image directly from the Petal Garden designer series paper that I used for my background panel and added a co-ordinating ribbon trim too. I love these fresh colours, perfect for spring - here's the colour palette for you to save if you'd like to use it for your future projects:


New Home Congratulations - The 'Flying Home' stamp set is sentiment-free, so I decided to go on the hunt through my other sets for a small sentiment that I could add to my horizontal Pool Party strip. I found the perfect stamp in 'At Home With You'  - and followed up inside my card with 'congratulations'.

Here is the visual summary of the key products used on today's project for you to pin for easy reference:


You can see all of my Product and 'How To' summaries on my 'How To - Tips and Techniques' Pinterest board in case you've missed any. 

Before you reach for your ink and papers, check out what our amazing team has created to inspire you this week:

Here's a quick recap of our challenge rules:
 
1.  Create a new paper project
2.  Upload your creation to your blog with a link back to us and provide a direct link to the post featuring your challenge submission.
3.  Please link your card to no more than four challenges, TOTAL.
4.  Have FUN!

I can't wait to see what you create with this week's sketch and look forward to visiting your blogs this week! Enjoy the rest of your weekend as it will be over all too quickly. I'm hoping to fit in a little more crafty time today along with some precious family time. I'll be back tomorrow with another project; until then, happy stampin'!


Stampin' Up! Supplies Used: 

Table built using Product Table Builder by The Crafty Owl - Independent Stampin' Up! Demonstrator.

Layered Gingerbread In A Jar - The Perfect Homemade Christmas Gift PP373

by Joanne James3. December 2017 09:00

It's Sunday and time for this week's new challenge over at The Paper Players! The lovely Laurie is the hostess this week and she has a rather delicious seasonal theme for us to work with:


I'm also linking up with the team over at Stamp Ink Paper this week who are looking at Christmas wrapping and packaging solutions. I love to make gingerbread at this time of year but it's still a little early for me to have baked and wrapped creatively, so instead I decided to share with you a little something that I've been preparing for Ben's school Christmas Fayre the week after next that fits Laurie's theme perfectly. They are having a 'Jam Jar Tombola' stall, so I've been busy making up jars of all kinds for the children to win, including some jars of dry ingredients that they can use for their own festive baking. Here's one of my jars for gingerbread cookies - take a look:


These really are so easy to make: you simply layer the dry ingredients into a kilner jar, then decorate and add a tag with the details of any ingredients you need to add and the method. 

I used the 'December Deliciousness' stamp from the 'My Little Things' stamp set to decorate my jar, using my markers to selectively colour each of the elements in and adding a heat-embossed sentiment banner across the middle to create a decorated top to my jar. I paired it with some retired paper that fits perfectly with my theme for a folded tag that includes the ingredients and recipe, some ribbon and a wooden spoon that I will be tying to the side of the jar too ready for stirring - you could also add a gingerbread cutter if you have one.

I'm a big fan of homemade gifts at Christmas and there is no limit to the things you can put in a jar; with a little decoration this kind of thing can make a thoughtful, presentable gift.

If you would like to make a jar like mine, I've included the details from the inside of my folded tag below:

Easy Gingerbread Biscuits

This jar contains:

  • 100g soft light brown sugar
  • 1 tsp ginger, ¼ tsp allspice
  • ¼ tsp cinnamon, 225g plain flour
  • ½ tsp baking powder
  • ½ tsp bicarbonate of soda


You will need to add:

  • 150g melted butter
  • 1 tbsp golden syrup
  • 1 egg yolk


Method:

  • Mix 150g melted butter with 1 tbsp golden syrup and 1 egg yolk.
  • Add to the dry ingredients, mix well, then knead to a dough.
  • Chill for 15 mins then roll out.
  • Cut into biscuits and bake at 200C/180C fan/gas 6 for 8-10 mins. Cool on a wire rack.


Here is the visual summary of the key products used on today's project for you to pin for easy reference:


You can see all of my Product and 'How To' summaries on my 'How To - Tips and Techniques' Pinterest board in case you've missed any. 

Before you reach for your ink and papers, check out what our amazing team has created to inspire you this week:

The Paper Players Design Team
 
 
Here's a quick recap of our challenge rules:
 
1.  Create a new paper project
2.  Upload your creation to your blog with a link back to us and provide a direct link to the post featuring your challenge submission.
3.  Please link your card to no more than four challenges, TOTAL.
4.  Have FUN! 


I look forward to seeing what you create with this week's theme. Enjoy the rest of your weekend as it will be over all too quickly; my Christmas festivities have truly started in earnest this week and I am busier than ever! I am off to run a pre-Christmas Stampin' Up! party for a customer and her friends this afternoon, then will be returning home to put the finishing touches to my class preparations for my Delightful Daises Technique Class tomorrow and complete my 100 card challenge for the Ronald McDonald Christmas Cheer campaign that is happening in the UK this weekend.

I'll be back as soon as time allows with more projects; until then, happy stampin'!


Stampin' Up! Supplies Used: 

Table built using Product Table Builder by The Crafty Owl - Independent Stampin' Up! Demonstrator.

New Online Exclusives

There are new products available exclusively in the online store from 5 November - check them out here.

Latest Kits!

Stampin Cut and Emboss

The Perpetual Beauty Calendar Kit and Cherry Blossoms Treat Boxes Kit are the latest kits in the online store - get yours here!

Shop Online

Access my online shop 24 x 7, 365 days of the year:

Current December hostess code:

9NKXDTTR

Shop Online

Mini Catalogue

BROWSE THE CATALOGUE

'Tis The Season - the new Stampin' Up! Mini Catalogue is here! For more details and to download your copy click here

Scrapbooking

Stampin' Up! has introduced a new range of 12x12" scrapbooking product and kit - the full range is now available to purchase online. To download a copy of the new digital Scrapbooking Catalogue click here.

2024-25 Annual Catalogue

BROWSE THE CATALOGUE

Click on the image to download your copy of the 2024-25 annual catalogue. For a full list of current SU! supplies, go to my online store. If you would like any help or advice, please drop me a line at joanne@thecraftyowl.co.uk or give me a call on 07773 421446 - I'd be happy to help.

Join My Team

It's always a great time to join Stampin’ Up! New team members can get £130 worth of products for only £99 + free business supplies + free shipping + all the fun being a part of Stampin’ Up! Stampin' Up! has something for everyone: join my growing team and benefit from my support to enjoy Stampin' Up! however you choose.

If you're interested, call me for a chat to understand how I can help you realise your goals. Alternatively, if you have already decided to sign up and you just can't wait, please click here for the link to the online form where you can sign up and order your starter kit right away! 

About Me

Hi I'm Joanne and live in Northampton and when I'm not looking after my husband and two beautiful children, am an avid crafter with a passion for all things Stampin' Up!

I must confess that I have never been a big rubber stamper - until I discovered Stampin' Up! that is. I love the fact that I can get such great results with co-ordinating stamps, inks, papers and punches - the possibilities are endless! Join me on my stamping journey as I share the things I love and be inspired to create amazing things yourself!

Follow Me

Monthly Newsletter

Box Builder

Click the button above to use Box Buster to create your custom box design using the Envelope Punch Board!

Kits Collection Now Available!

Stampin Cut and Emboss

The new Kits Collection from Stampin' Up! is now available!

Click here to see the current kits available and order yours online today.

I Design For


Stampin' Up Stuff

This is my personal blog and is not endorsed by Stampin’ Up! I hope you find it a plentiful source of ideas and personal inspiration but please don't copy my designs for contest submission or use for classes, publication or sale without express permission.

DSP Special Release

Check out 3 popular designer series paper designs in fresh new colourways! Available exclusively in the online store from 3 December - check them out here

Last Chance Products

Last Chance Products will now be updated every other month - check them out here.