Hooray For Surprises Gender Reveal Card AYSI316

by Joanne James2. February 2024 13:00

Today I'm sharing my design team card for our new challenge over at As you See It where it's time for a 'fill in the blank' challenge chosen by my dear friend Jan:


Time to confess, crafty shoppers - what was the last thing you purchased? At first glance you might be thinking I'm pulling your leg today, as my card features the 'Sweet Songbirds' stamp set and co-ordinating punch, both of which I've had for ages and shared several times before. Look more closely though and you will see I paired them with my most recent craft purchase: the 'Hooray For Surprises' bundle - take a look:


Here's the low-down on today's card:

Hooray For Surprises - The 'Hooray For Surprises' bundle is so fun! The dies create perforated edges with a tab that allow you to easily create your own interactive cards. Simply pull the tab to reveal the message inside! I've been creating with this bundle a lot in recent weeks as it features in the next 'Join In With Joanne and Jan' craft tutorial bundle that I create with the lovely Jan Clothier. There are so many different ways you can create with the stamp set and dies together in this bundle, but for my card today I wanted to use one of the dies to show that there are tons of possibilities when you combine them with other sets too. I used Jen T's fabulous sketch over at Freshly Made Sketches this week as my starting point (turned through 90 degrees) and paired the largest of the round circle tab dies with my pair of birds and nest for a fun gender reveal card.

Here's the card front with a close up of the tab before opening:


It's A ... - When the tab is removed, there is a message underneath that reveals whether or not the mummy and daddy bird parents are expecting a boy or a girl - check it out below:

Isn't that so fun?! I made two cards, showing both boy and girl inserts. Here's a close up of the baby girl version: 

 And here's the baby boy version:


I stamped the surprise greeting with a combination of sets: the 'It's a' is from a couple of the sets in the Sweet Songbirds set and the 'Baby Boy/Baby Girl' comes from a long-retired set called 'Itty Bitty Baby', but you could just as easily hand write your own message or type one on the computer. So what do you think? I think this would make a lovely card to announce an impending birth to soon-to-be grandparents, for example, but I'd love to hear your thoughts - why not leave me a comment below!

Here is the visual summary of the key products used on today's project for you to pin for easy reference:


You can see all of my 'How To' summaries on my 'How To - Tips and Techniques' Pinterest board in case you've missed any. 

Remember if you purchase the 'Hooray For Surprises' bundle from either myself if you are in the UK or Europe or Jan if you are in New Zealand, then you will receive our tutorial featuring this set for FREE, along with access to our Private Facebook Group for more tips and tricks too. In addition, if you purchase before the end of February you will only be £1 away from a free Sale-A-Bration gift too!

Here's a summary of our challenge rules:

  • Create any card, scrapbooking page, 3D project or packaging project that fits the challenge.
  • Please include the challenge graphic and link back to the challenge in your blog post. Turn off word verification so we can leave you lots of lovely comments. Make sure you link the post not the whole blog to the Linky. Use #AYSIXXX when uploading to a public gallery.
  • If you’re unsure about ‘the rules’, check the details under the Challenge Guidelines tab on the As You See It Challenge homepage.
  • In a Fill in the Blank challenge, complete the sentence in the Challenge Banner with the phrase that is true for you and create your project using the words you used. Tell us what you said in your blog or on your site.
We look forward to seeing your creations in the AYSI gallery.

Enjoy your day and I'll be back tomorrow with another project. Until then, happy stampin'!


Stampin' Up! Supplies Used:

Table built using Product Table Builder by The Crafty Owl - Independent Stampin' Up! Demonstrator.

Welcome Bunny Pastel New Baby Card

by Joanne James2. March 2020 20:30

Happy Monday everyone! I need to have a productive week this week - my to-do list is long! - this week's post maybe a little short and sweet - so let's go!


I still had the 'Welcome Easter' stamp set out on my desk having made this card last week, so decided to use the colours over at Just Add Ink where I haven't managed to play along in a while (hello lovely JAI ladies!) and this week's CAS(E) This Sketch layout from the lovely Brian King and an altogether different look to create a sweet baby card - take a look:


Here's the low-down on today's card:

I grabbed a piece of Pleased As Punch DSP for the pink check layer and added a horizontal piece with a stitched diecut border detail before anchoring with my bunny. I stamped him on Shimmery White cardstock in Smoky Slate, then used my aquapainter to colour him in, keeping the colours soft and muted and layered on a scalloped circle.

Now whilst I used the CAS(E) This Sketch layout, I may well get thrown out with this card as I broke my own clean and simple rule here - not only did I add a sprinkle of adhesive-backed sequins, but I also tied the Soft Sea Foam panel with a piece of Whisper White crinkle seam binding ribbon! In my defence, this ribbon is so soft and lightweight, it squishes to nothing (good for cards that need to be mailed!) and I kind of figured since it was a new baby card, a little embellishment makes it special. Not much of a defence to Brian and the CTS design team - if it helps, I used this sketch for another card that I'm going to share later in the week that is perfectly CAS in everyway, as Mary Poppins would say. 

So what do you think - is that little guy sweet or what?! He reminds me of Thumper from the Disney classic 'Bambi', (another Disney reference - not that I'm counting down to a special vacation to the happiest place on earth or anything...) but I digress...! 

Here is the visual summary of the key products used on today's project for you to pin for easy reference:


You can see all of my 'How To' summaries on my 'How To - Tips and Techniques' Pinterest board in case you've missed any. 

Enjoy your evening and I'll be back tomorrow with some exciting Sale-A-Bration news so do come back to find out more. Until then, happy stampin'!


Stampin' Up! Supplies Used:

Table built using Product Table Builder by The Crafty Owl - Independent Stampin' Up! Demonstrator.


Baby We've Grown New Parent Congratulations Card

by Joanne James20. July 2019 22:00

Today I'm sharing a card that I made because it is perfect for the current challenge over at Festive Friday and uses the current Color Throwdown colours:

#festivefridaychallenge, #FF0038, Parent's Day, Watercolor cards   

Using both watercolouring and with Parent's Day in mind (or at least two new parents in particular) and this soft and sweet colour palette, I created this card for some new parents:

Not much to say about my card today! I stamped my image on watercolour paper and then heat embossed it in silver, watercoloured it and added a stitched frame to finish. No product table for this card because it uses a whole bunch of retired bits and pieces: one of my favourite baby-themed retired stamp sets, Baby We've Grown, a retired colour in Pink Pirouette (a perfect baby pink) and some retired co-ordinating ribbon and foil doily. All of these were chosen deliberately though, as they are just perfect for the recipients: a Stampin' Up! demonstrator friend of mine and her husband have finally this week received their much longed-for adopted child, a baby girl, so their family of two has (almost overnight) grown to become three. This stamped image of three owls seemed just so appropriate to celebrate the arrival of Little Miss Wilson as she is affectionately known, and the oh-so girly pink complimented with the pale grey seemed like the perfect palette.

Enjoy your evening; I am typing this having spent the evening at the swimming pool watching the youngest of the James Juniors race with some great race times and a couple of wins, so it's nice to be sat in the cool again. I'll be back tomorrow with another project and this week's post over at The Paper Players. Until then, happy stampin'!


Tags: , , , , , ,

Cards | Shop Online | Shop Stampin' Up! Online | Stamping

Perfectly Paired Decoupage Welcome New Baby Card

by Joanne James3. May 2019 08:00

Today I'm sharing a card for the current baby theme challenge over at Inspire.Create:

 There are a couple of cute baby sets in the Spring-Summer catalogue and both are set to retire at the end of the month. I used my favourite, Perfectly Paired, to create a colourful and fun baby card - take a look:


Here's the low-down on today's card:

I've created a whole host of cards with the Perfectly Paired stamp set (check out this post here if you missed it) but they have all involved using the stamp in a single colour. This is such a fabulous stamp set to colour though and I spent a pleasant couple of hours with my Blends markers creating this card. I haven't listed them all out in the table below as I pretty much used all of them in one way or another! I stamped the image twice and coloured a few of the animals and fussy cut them and popped them up on dimensionals to create a fun decoupage detail. you can see that in this close up here:

I added a border using my favourite gingham paper and a stitched diecut edge using the Be Mine Stitched Framelits to finish my card.

Here is the visual summary of the key products used on today's project for you to pin for easy reference:


You can see all of my 'How To' summaries on my 'How To - Tips and Techniques' Pinterest board in case you've missed any. 

Enjoy your day and I'll be back tomorrow with another project. Until then, happy stampin'!


Stampin' Up! Supplies Used:

Table built using Product Table Builder by The Crafty Owl - Independent Stampin' Up! Demonstrator.

First Steps New Baby Boy Welcome Card for AYSI197

by Joanne James9. April 2019 14:00

Today I'm sharing a card for the current challenge over at As You See It where the ladies have a great sketch to play with:

This is one of those versatile sketches that is a 'keeper' and can be used in so many ways. I still had my gingham papers out on my desk following Sunday's cards and decided it was perfect for a baby card - take a look:


Here's the low-down on today's card:

First Steps - My focal point sentiment comes from the 'First Steps' stamp set, an adorable collection of sweet baby images that are perfect for cards, invites, showers, samplers and more. I stamped my sentiment using my Stamparatus so that I could ink it several times and get a really solid image, then having stamped off first stamped the tiny footprints behind it in the same colour.  

Subtle Textures - I embossed my top panel with the Subtles embossing folder to add a little texture without detracting from the sentiment. I added a little more detail with the soft organdy ribbon and used my layers and scalloped border/mat detail to add a little more interest and to tie in my panel of Balmy Blue gingham check across the bottom. 

Monochromatic Blue - I kept my card simple with a monochromatic Balmy Blue and Whisper White colour combination however this design could be easily replicated in pink for a girl or any of the other colours in the Gingham Gala designer series paper stack for a more gender-neutral design.

Here is the visual summary of the key products used on today's project for you to pin for easy reference:


You can see all of my 'How To' summaries on my 'How To - Tips and Techniques' Pinterest board in case you've missed any. 

Enjoy your day and I'll be back tomorrow with another project. Until then, happy stampin'!


Stampin' Up! Supplies Used:

Table built using Product Table Builder by The Crafty Owl - Independent Stampin' Up! Demonstrator.

#SimpleStamping Baby Cards With Perfectly Paired

by Joanne James22. March 2019 17:00

Today I'm sharing a card for the current challenge over at CASology where there is watery theme:


I also decided to combine it with this month's #SimpleStamping challenge set by Stampin' Up!, which was to create an occasion card (new baby, wedding, sympathy) with nothing more than stamps, ink, paper and ribbon. I decided to make a card to welcome a new baby using the 'Perfectly Paired' and created both boy and girl versions. First up, I have an ultra quick and easy #SimpleStamping card - the boy version: 

Here is my second #SimpleStamping card - the girl version: 


This really took just a minute to make - I even made a video to show you how I did it! Here you go:

Easy, right? #SimpleStamping with minimal supplies to produce great results (even if I say so myself!!)

Perfectly Paired is a great set for new baby cards if you're starting out: one main image with a couple of smaller ones too and three sentiments that work for the inside and outside of your cards, tags or even a home decor piece for a new baby's nursery. You could also adapt it to form the basis of christening invitations, so lots of creative possibilities for a single stamp set.

The images can be inked in a single colour or coloured using Blends or watercolour pencils, or you can choose to highlight certain parts of the main image by masking or spotlighting specific area of the main image. Adding a simple bow in a co-ordinating ribbon colour adds a simple touch of luxury to a #SimpleStamping card.

Here's an example of the above card coloured with my combo of Pool Party Stampin' Blends to show how a little extra colour really brings the image to life, but still making it a relatively inexpensive card with only a couple of extra supplies needed:


To really get the most from my supplies, I also stamped a partial image on the front of my envelope and this sentiment on the inside of my card:

Not a naked piece of paper in sight! By keeping things simple and using a basic monochromatic colour scheme, this is a card that can be easily mass-produced with limited supplies and would work well in pretty much any colour. 

Having created my #SimpleStamping cards, I decided to create a stepped up version that is still super simple in style and design but introduces a new technique - heat embossing - for the more adventurous casual or avid crafter. I went with a neutral pale yellow base for this card (always useful to have in your stash if you need a quick baby card but don't know the gender) and this time using a white ribbon - a good choice if you've limited supplies and will go with any colour theme:


You could also add a little selective colour to these images to highlight some of the images if you have a marker of the same colour to give some tonal highlights and just pick out a few of the animals.

Here are the visual summaries of the key products used on each of today's projects for you to pin for easy reference:


You can see all of my 'How To' summaries on my 'How To - Tips and Techniques' Pinterest board in case you've missed any. 

Enjoy your day and I'll be back tomorrow with another project. Until then, happy stampin'!


Stampin' Up! Supplies Used:

Table built using Product Table Builder by The Crafty Owl - Independent Stampin' Up! Demonstrator.
 
 
Table built using Product Table Builder by The Crafty Owl - Independent Stampin' Up! Demonstrator.
 
 
Table built using Product Table Builder by The Crafty Owl - Independent Stampin' Up! Demonstrator.
 
 
Table built using Product Table Builder by The Crafty Owl - Independent Stampin' Up! Demonstrator.

Flying Home Baby Card For The Paper Players PP391

by Joanne James29. April 2018 09:00

It's Sunday and time for this week's new challenge over at The Paper Players! It just so happens there are 5 Sundays in April, so we have an extra challenge week! It's my turn to host and as it's tic-tac-toe week there really are so many creative possibilities. Check out my board: 


Choices, choices! I decided to use this week's sketch over at Just Add Ink for my layout and grabbed my Blends again for a spot of colouring to share with the teams at Stamp Ink Paper and SUO Challenges and went across the bottom of my board - yellow, circle, bird (my card also works for the central column of die-cut, ribbon, circle too) - for a sweet baby card, take a look:


Here's the low-down on today's card:

Flying Home - I love the bird house designs in this set and will be sad to see this set retire next month. Perfect for welcome cards - new home, new baby or even new team member - the selection of images are perfect for colouring too. This is the first time I've used this sweet mama bird and her babies; I went with bright yellow for a unisex baby card and coloured with my Blends; I actually made a whole batch of these so that I have some blanks and can colour the other birds specifically pink or blue too if I need something a little more tailored. 

Circles, Circles - There are lots of different circle elements to my card: the Picture Perfect Party background paper has a fun circle pattern and my main image has been cut out with the largest of my Stitched Circle Framelits. Even the sprinkle of Pool Party sequins add to the theme.

What No Bear? - My sentiment comes from the 'Baby Bear' stamp set. split between the little front banner and finished on the inside of my card. No bears, just birds on today's baby card ;-). Here's a look at the inside, finished off with a couple of yellow birdies too:


Here is the visual summary of the key products used on today's project for you to pin for easy reference:


You can see all of my Product and 'How To' summaries on my 'How To - Tips and Techniques' Pinterest board in case you've missed any. 

Before you reach for your ink and papers, check out what our amazing team has created to inspire you this week:

Here's a quick recap of our challenge rules:
 
1.  Create a new paper project
2.  Upload your creation to your blog with a link back to us and provide a direct link to the post featuring your challenge submission.
3.  Please link your card to no more than four challenges, TOTAL.
4.  Have FUN!

I can't wait to see what you create with this week's board - there really are so many different combinations! I'm so looking forward to visiting your blogs this week! Enjoy the rest of your weekend as it will be over all too quickly. I'll be back tomorrow with another project; until then, happy stampin'!


Stampin' Up! Supplies Used: 

Table built using Product Table Builder by The Crafty Owl - Independent Stampin' Up! Demonstrator.

A Little Wild Elephant Baby Boy Congratulations Card

by Joanne James24. April 2018 17:00

With the birth of a Royal baby yesterday, a second son and third child for the Duke and Duchess of Cambridge, it seemed only fitting today to share a card to welcome the arrival of a baby boy to the world that fits perfectly for the following challenges: 


I used both the sketch and photo inspiration over at Fusion and coloured my sweet baby elephant with my Smoky Slate Stampin' Blends for the challenge over at StampInkPaper - take a look:


 Here's the low-down on today's card:

A Little Wild Elephant - The little animals in the 'A Little Wild' stamp set are just the cutest and so perfect for a card to welcome a new arrival. Today's card just had to feature the elephant, given the Fusion photo inspiration; I also used a strip of retired designer series paper (from the A Little Foxy DSP stack) for my horizontal strip as it was perfect to tie my colours in together. 

It's All In The Curve - I decided to curve my sentiment to follow the line of my layered circle, so chose to use the 'congratulations' stamp from the Beautiful Bouquet set. It's photopolymer which means that even though it is a straight stamp, it is flexible enough to be moulded to an alternative shape.  

Fun On The Inside - One of the cute features of the 'A Little Wild' animal stamps is that as they are designed to work as a gift tag, they include both front and back of the animals. This doesn't preclude them from being used on cards - in fact, it's a fun way to decorate both the front and back of your envelope and the inside of your card. I added a sentiment from the same stamp set, a strip of left over DSP and a cute enamel heart  - and for once, I remembered to take a photograph to share it with you! Here it is:

How sweet is that?! The blues could easily be switched out for pinks to make a girl card with the same details - an idea for another day, perhaps!

Here is the visual summary of the key products used on today's project for you to pin for easy reference:


You can see all of my 'How To' summaries on my 'How To - Tips and Techniques' Pinterest board in case you've missed any. 

Enjoy your evening and I'll be back tomorrow with another project. Until then, happy stampin'!


Stampin' Up! Supplies Used:

Table built using Product Table Builder by The Crafty Owl - Independent Stampin' Up! Demonstrator.

A Little Wild Baby Blue Elephant For Laurie's TicTacToe At The Paper Players

by Joanne James30. July 2017 10:00

It's Sunday, I'm back after my two week vacation and excited to be back with my lovely team over at The Paper Players! This week we are all about team here at The Paper Players: the lovely Laurie was due to host this week but has unfortunately had to deal with a family bereavement and needed some time out so I am lending a helping hand. Laurie has done all the hard work and has designed a fun tic-tac-toe board to challenge us all as it's the fifth week of the month; I am picking up with the comments and visits to your blogs and get the honour of choosing this week's top pick. So, without further ado, here is this week's challenge board:
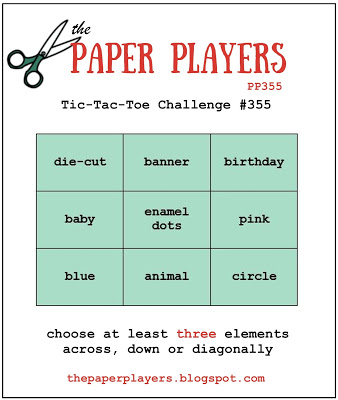
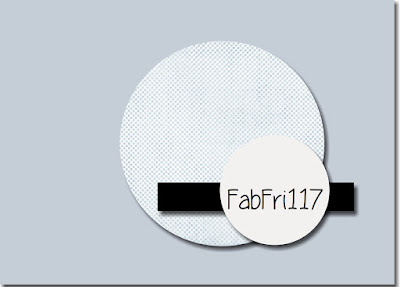
    

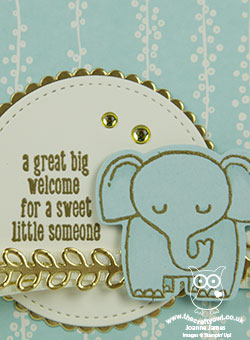
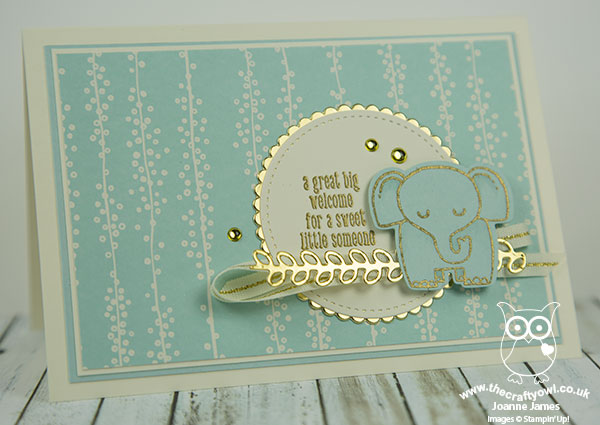
When considering my make for today, I just knew I would have to include the option of 'diecut' since I consider Laurie to be the absolute queen when it comes to diecutting, her creativity knows no bounds. I decided to go down the first vertical column and took the opportunity to make a baby card using the current sketch over at Fab Friday - it turns out I also fulfilled the bottom horizontal row too - take a look:
 

Here's the low-down on today's card:

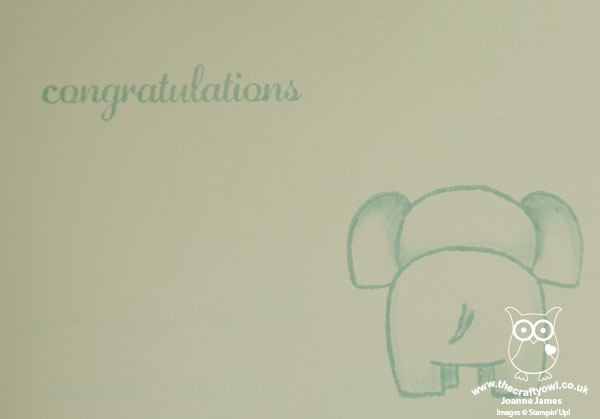
A Little Wild - So how adorable is that little elephant?! I know - he is off the cuteness scale, for sure! He comes from the stamp set 'A Little Wild' and is part of a trio that includes a sweet bear and a lion too that is perfect for baby makes. The best part though? He is actually double-sided; each animal comes with a front and back and the co-ordinating Little Loves Framelits Dies will cut both pieces out as one, enabling them to be used as a gift tag too. I actually cut my elephant away here as I just wanted to the front, but I couldn't resist adding the reverse to the inside of my card:
 

Blue For A Boy - I decided to use a piece of the Bundle of Love Specialty Designer Series Paper for the blue for my card; it was tough not to use the gorgeous gold embossed foil pattern on the reverse, however I did use the Soft Sky/Very Vanilla/Gold colour combination to bring the elements of my card together. I added some subtle Soft Sky shading to my elephant using ink and a blender pen just to give him a little more depth and dimension.

Touches Of Gold - I wanted to add a touch of luxury to my card, the birth of a baby is a special occasion after all, and inspired by the designer series paper, added in a few gold elements - a die cut, layered scalloped circle, gold natural trim ribbon, some gold heat embossing and metallic enamel dots - to finish. 

Here is the visual summary of the key products used on today's project for you to pin for easy reference:
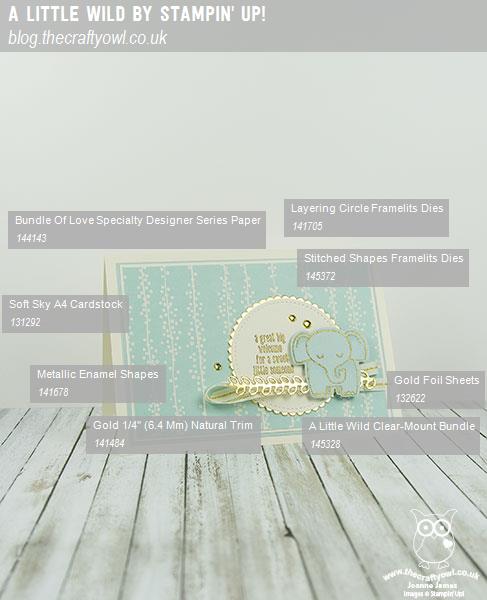
 

You can see all of my Product and 'How To' summaries on my 'How To - Tips and Techniques' Pinterest board in case you've missed any. 

I just love this card and can't wait to make a pink one for a girl and some co-ordinating packaging adorned with little elephant tags too!

Before you reach for your ink and papers, check out what our amazing team has created to inspire you this week:

The Paper Players Design Team
 
 
Here's a quick recap of our challenge rules:
 
1.  Create a new paper project
2.  Upload your creation to your blog with a link back to us and provide a direct link to the post featuring your challenge submission.
3.  Please link your card to no more than four challenges, TOTAL.
4.  Have FUN! 


I look forward to seeing what you create with our board this week. All of the Design Team love it when your return our visits and leave a friendly blog comment or two, however this week more than most it would be great if you could pop by Laurie's blog at Stampin' Up North and leave her a little Paper Players love - I know she would appreciate it. 

Enjoy the rest of your weekend; I have some trampolining to attend to (watching not bouncing thankfully!) and some preparation for the first of this month's technique classes on Tuesday.

I'll be back tomorrow with another project; until then, happy stampin'!


Stampin' Up! Supplies Used:

Table built using Product Table Builder by The Crafty Owl - Independent Stampin' Up! Demonstrator.

Showers Of Happiness To Welcome Little Miss Croghan Blog Hop

by Joanne James25. March 2017 14:00

Today I'm sharing a special baby card for a very special person!  The wonderfully talented and amazing Lesley Croghan, designer and creator of many popular online papercraft challenges, and her husband Corey, are expecting their first child, a little girl. To this end the lovely Lori Turner of Caffeinated Creativity has organised a fabulous blog hop to celebrate the forthcoming new arrival into the Croghan family.

No automatic alt text available.

I have participated in many of Lesley's challenges, am a regular reader of her blog, Always Playing With Paper and I am privileged to be a designer with The Paper Players, a challenge that Lesley founded some years ago that is still going strong. I have a lot to thank her for and am thrilled to be participating in this hop to celebrate the arrival of Little Miss Croghan.

I knew immediately what kind of card I wanted to create - it had to feature one of the cuties from the Moon Baby stamp set:


As my card was going to have to travel from the UK to Canada to reach Lesley, I decided I was best to stick to my clean and simple style. Here's the low-down on today's card:

Sugar and Spice and All Things Nice - I just had to go with 'Moon Baby' for my baby card this week - this is such a perfect baby set! You know how I am a fan of partial die cutting and today decided to use my sweet umbrella baby to overhang the top layer of my card for added visual interest. I watercoloured my baby and umbrella in Melon Mambo using my aquapainter to add a pop of colour to my pale pink card.

Hello, Hello, Hello - I decided to use one of the sentiments in the 'Moon Baby' set to create a repeat 'Hello Baby' background panel - a great way to combine the sentiments in the set. I used my stamp-a-ma-jig to get everything nicely lined up and staggered the words on each row to create a uniform pattern. 

A Shower of Hearts - I felt like my baby needed a shower of something to warrant the umbrella, so decided to use the hearts framelit from the Umbrella Weather set to create my shower. With the pink layer beneath, the little hearts against the beautiful lustre of the Shimmery White top layer look so pretty: 

Here is the visual summary of the key products used on today's project for you to pin for easy reference:


You can see all of my 'How To' summaries on my 'How To - Tips and Techniques' Pinterest board in case you've missed any. 

There are a huge number of people participating in today's blog hop; you can see the full collection of cards on Lori's blog here and it would be great if you could visit as many of these as possible and leave the owners some love. We have also sent our cards to Lesley for her to open today en masse, so you will get a sense of the wonderful shower of love we sent to the Croghan family this morning!

Enjoy the rest of your day and I'll be back tomorrow with another project for this week's challenge over at The Paper Players. Until then, happy stampin'!


Stampin' Up! Supplies Used:

Table built using Product Table Builder by The Crafty Owl - Independent Stampin' Up! Demonstrator.


Mini Catalogue

BROWSE THE CATALOGUE

The mini catalogue is now live! Read and download your copy here.

Shop Online

Access my online shop 24 x 7, 365 days of the year:

Current April hostess code:

VDKNV7BH

Shop Online

Join My Team

It's always a great time to join Stampin’ Up! New team members can get £130 worth of products for only £99 + free business supplies + free shipping + all the fun being a part of Stampin’ Up! Stampin' Up! has something for everyone: join my growing team and benefit from my support to enjoy Stampin' Up! however you choose.

If you're interested, call me for a chat to understand how I can help you realise your goals. Alternatively, if you have already decided to sign up and you just can't wait, please click here for the link to the online form where you can sign up and order your starter kit right away! 

Latest Kit!

Stampin Cut and Emboss

The Rock Legend Kit has all you need to make 8 cards with coordinating envelopes. Along with the new Panda Friends Kit, both are available from January 4th for just £14 each - get yours here!

2023-24 Annual Catalogue

BROWSE THE CATALOGUE

Click on the catalogue for a full list of current SU! supplies - if you would like to order any of the items featured, please drop me a line at [email protected] or give me a call on 07773 421446 - I'd be happy to help.

New Online Exclusives

There are new products available exclusively in the online store from 5 March - check them out here.

About Me

Hi I'm Joanne and live in Northampton and when I'm not looking after my husband and two beautiful children, am an avid crafter with a passion for all things Stampin' Up!

I must confess that I have never been a big rubber stamper - until I discovered Stampin' Up! that is. I love the fact that I can get such great results with co-ordinating stamps, inks, papers and punches - the possibilities are endless! Join me on my stamping journey as I share the things I love and be inspired to create amazing things yourself!

Follow Me

Monthly Newsletter

Box Builder

Click the button above to use Box Buster to create your custom box design using the Envelope Punch Board!

Kits Collection Now Available!

Stampin Cut and Emboss

The new Kits Collection from Stampin' Up! is now available!

Click here to see the current kits available and order yours online today.

I Design For


Stampin' Up Stuff

This is my personal blog and is not endorsed by Stampin’ Up! I hope you find it a plentiful source of ideas and personal inspiration but please don't copy my designs for contest submission or use for classes, publication or sale without express permission.