Just Because 2019-21 In Color Embossed Frame Cards for PP442

by Joanne James19. May 2019 09:00

Today it's Sunday and time for this week's new challenge over at The Paper Players! It's the turn of the fabulous Laurie to host this week and she has a clean and simple challenge for you to work with:


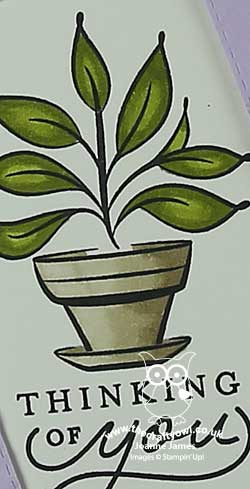
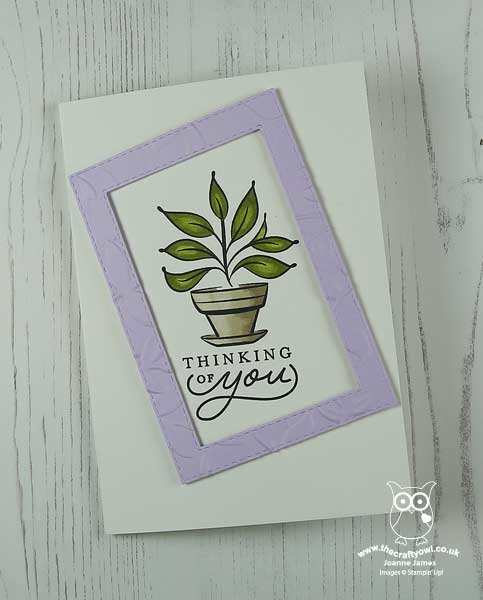
I was inspired by Nance's challenge badge this week so decided to go down the houseplant route and ink up another soon-to-be retired stamp set, but with a sneak peek of something new too - take a look:


Here's the low-down on today's card:

Goodbye Just Because - The houseplant on today's card is from one of the hostess sets in the Spring-Summer seasonal catalogue, 'Just Because'. These exclusive sets are sometimes overlooked, but they are a great perk for party hostesses who can claim them with Stampin' Rewards for a special price when they host a qualifying party. They can also be claimed if you place one large qualifying order and are always worth a look. I can confirm that the new annual catalogue has some fabulous hostess sets, so if you would like to host a party post the new catalogue launch, then do get in touch with me now to book a suitable date.

An Embossed Frame - The houseplant on today's card is rather green and uninteresting on its own, so I needed something that would add interest whilst still keeping to Laurie's 'clean and simple' theme. I decided on a stitched embossed frame, placed at a jaunty angle. I used my rectangle stitched framelits to cut a frame that I then ran through my Layered Leaves Dynamic Textured Embossing Folder; an easy way to draw the eye to the image and sentiment.  

Hello New 2019-21 In-Colours - My jaunty frame also gave me an opportunity to give you a sneak peek of the new 2019-21 in-colours. My main card showcases my favourite, Purple Posy, and I created a set with a frame in each new in-colour: left to right you can just see Terracotta Tile, Pretty Peacock, Rococo Rose, Seaside Spray and Purple Posy. 


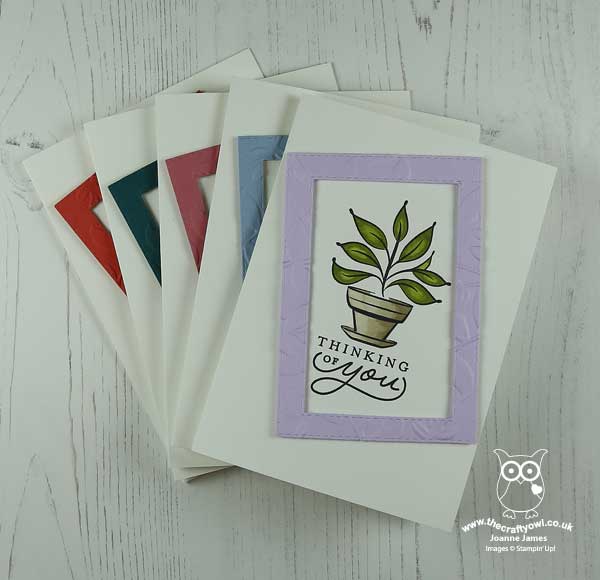
My cards are a little 'unfinished' in as much as I wanted to add one of the new in-colour faceted dots to the right of my sentiment on each card, but alas we are having shipping issues here in the UK and mine hadn't arrived in time to make my card. For anyone local to me that is attending my Open House catalogue launch event on 5th June, you will be able to see the 'completed' card.

Here is the visual summary of the key products used on today's project for you to pin for easy reference:


You can see all of my Product and 'How To' summaries on my 'How To - Tips and Techniques' Pinterest board in case you've missed any. 

Before you reach for your ink and papers, check out what our amazing team has created to inspire you this week:

Here's a quick recap of our challenge rules:
 
1.  Create a new paper project
2.  Upload your creation to your blog with a link back to us and provide a direct link to the post featuring your challenge submission.
3.  Please link your card to no more than four challenges, TOTAL.
4.  Have FUN!
 

Also remember: this is clean and simple week. What do we mean by 'clean and simple' ? Create a card that has:

  • Minimal layers and embellishments
  • Plenty of open space, also known as 'white space'
  • Is simple and uncluttered

Enjoy your day; I am hoping to spend some time pottering in my garden and enjoying the sunshine. I'll be back tomorrow with another project. Until then, happy stampin'!


Stampin' Up! Supplies Used: 

Table built using Product Table Builder by The Crafty Owl - Independent Stampin' Up! Demonstrator.

Botanical Bliss Anniversary Cards

by Joanne James18. May 2019 09:00

Hurrah for the weekend! Today I'm sharing a couple of cards I made using the current sketch over at Fab Friday that are also perfect for the celebrations over at AsYouSeeIt where it's all about the twos as they celebrate their 200th challenge - woohoo!:


I needed an anniversary card so decided to make something using my Botanical Tags Thinlits as one of them features a pair of birds - take a look:


Here's the low-down on today's card:

Botanical Tags - I bought this bundle because I fell in love with the detail on these tags, but I think this is the first time I've used them properly on a card and the detail is so pretty. I decided to go with a dark colour and back it with a handcut tag using a scrap of Wood Textures DSP left over from another project. I think this tag works well for a wedding or anniversary card - they could be love birds, right? 

Layers and Textures - My card feels quite busy for me: tags, twine, banners, an embossed background and a stitched rectangle sentiment and foliage branch - that's a lot going on in one place! Aside from the diecut tag, the shapes are all quite simple and my patterned papers are used in quite small quantities so as not to overwhelm and I quite like the effect.  

Take Two In Green - I liked my first card so much, I decided to create another one in a green Mint Macaron/Tranquil Tide colourway. I switched out the embossed background from Subtle to Layered Leaves which adds a little more detail, and the back piece of DSP comes from the Tranquil Textures DSP as opposed to Share What You Love, and I added a flower embellishment to my slightly larger sentiment piece, but otherwise the cards are the same:

The colour scheme for the first card was inspired by the piece of floral DSP I used for my banner, but I quite partial to greens, particularly in home decor. What do you think - which one do you prefer? 

Here is the visual summary of the key products used on today's project for you to pin for easy reference:


You can see all of my 'How To' summaries on my 'How To - Tips and Techniques' Pinterest board in case you've missed any. 

Enjoy your day and I'll be back tomorrow with another project. Until then, happy stampin'!


Stampin' Up! Supplies Used:

Table built using Product Table Builder by The Crafty Owl - Independent Stampin' Up! Demonstrator.

Double-Embossed Feathers and Frost Christmas Card

by Joanne James18. September 2018 07:00

Today I'm sharing a card for this week's challenge over at Just Add Ink where the team have my favourite kind of challenge - a sketch!

I initially thought I would replace the diamond shape in the centre with a circular wreath, until I was browsing my stamp sets and realised it would work perfectly with the foliage square in Feathers and Frost, so I set to work. Here's what I came up with:


 Here's the low-down on today's card:

Double-Embossing - I decided to heat emboss my leaves and sentiment on my card with silver embossing powder for some festive sparkle, adding a little more colour with my light Smoky Slate Blend pen, and also added some dry embossing to my white card base with the Layered Leaves dynamic embossing folder. Whilst this isn't especially Christmassy and is also quite difficult to see on the photograph, I love the extra texture and interest that it adds. 

Layered Shapes and Lots of Berries - I added a fussy-cut poinsetta from the same set to the centre of my leaves and coloured it with my Real Red Blends. I decided to use Real Red as an accent colour on my card, both in my layered mats and the many red rhinestones I used as berries. Yes, I used a ton of these sparkly beauties, however I wanted something more than flat colour and love the way they catch the light. Besides, there are 220 in a single pack - so plenty to go around!

Not Just Joy - I used the word 'Joy' as the circular element on the front of my card and completed my sentiment with two more sentiments from the set inside my card:


Here is the visual summary of the key products used on today's project for you to pin for easy reference:


You can see all of my 'How To' summaries on my 'How To - Tips and Techniques' Pinterest board in case you've missed any. 

Enjoy your day and I'll be back tomorrow with another project. Until then, happy stampin'!


Stampin' Up! Supplies Used:

Table built using Product Table Builder by The Crafty Owl - Independent Stampin' Up! Demonstrator.

My First Animal Outing For The Paper Players PP396

by Joanne James3. June 2018 09:00

It's Sunday and time for this week's new challenge over at The Paper Players! It's my turn to host this week and I have a fun theme challenge for you to work with - I used the sketch over at CAS(E) This Sketch and the colour palette at TGIF Challenges as the basis for my card too:


I chose my theme for this challenge ages ago but knew as soon as I received the set 'Animal Outing' in my bag at Onstage that it would have to be my set of choice for my card today - take a look:


Here's the low-down on today's card:

Animal Antics - I didn't think it was possible for a rhino to look cute, but the chap on my card today with his birdie friend is definitely a cutie to me! Along with a koala-carrying kangaroo, a giraffe and a frog, this pair make up the collection of animals in the 'Animal Outing' stamp set, which forms part of the Animal Expedition suite - a bundle of animal themed stamps and framelits with a range of sentiments that make this set work for a variety of of occasions: thank you, new baby, friend, birthday, anniversary and more. There are also co-ordinating papers, leaf ribbon and wooden frames elements - this is a set that I'm sure I'm going to get lots more use out of in the coming months so watch this space for more projects! I stamped my cute pair onto a stitched circle and coloured them with my Stampin' Blends.

Layered Leaves - I layered my stitched circle onto a rectangle of Old Olive cardstock, embossed with the Lovely Leaves embossing folder - this is a firm favourite of mine, it adds great detail and texture and I really like the way the random leaf pattern. There is just enough detail to add interest behind the image whilst still retaining an overall CAS feel to my card.

A New Trio - My embellishments are minimal, in fact just some Night of Navy baker's twine, but I did want to point out something that you might have missed both on my card and in the new catalogue: I rounded the corners on my embossed panel, as per the sketch, using the new Detailed Trio Punch. Found on page 211 of the new catalogue, this punch rounds corners, creates an oval-shaped eyelet and a pretty trio of petals that will add a subtle detail to your layers. Very useful!

Here is the visual summary of the key products used on today's project for you to pin for easy reference:


You can see all of my Product and 'How To' summaries on my 'How To - Tips and Techniques' Pinterest board in case you've missed any. 

Before you reach for your ink and papers, check out what our amazing team has created to inspire you this week:

Here's a quick recap of our challenge rules:
 
1.  Create a new paper project
2.  Upload your creation to your blog with a link back to us and provide a direct link to the post featuring your challenge submission.
3.  Please link your card to no more than four challenges, TOTAL.
4.  Have FUN!

I can't wait to see how you interpret this week's theme and look forward to visiting your blogs this week! Enjoy the rest of your weekend as it will be over all too quickly. I'll be back tomorrow with another project; until then, happy stampin'!


Stampin' Up! Supplies Used: 

Table built using Product Table Builder by The Crafty Owl - Independent Stampin' Up! Demonstrator.

A Purple Floral Sentiment for PP388

by Joanne James8. April 2018 09:00


I've been away at Stampin' Up!'s UK Onstage event for the last couple of days, having a ball with some of my team and lots of my fellow Stampin' Up! demonstrators. Today it's Sunday though, I'm back and it's time for this week's new challenge over at The Paper Players! It's the turn of my awesome friend LeAnne to host this week and she has a fun colour challenge for you to work with:


I love purples although was a little short on time to prepare my card for this week so I decided to go for a large focal sentiment to help me along the way this week. It was a good opportunity to open my as yet un-inked Floral Sentiments stamp set  - take a look:


Here's the low-down on today's card:

Floral Statements - I chose the feature the large 'Thanks' sentiment from the Floral Statements stampset and coloured it with a mix of markers: my 3 retired Wisteria Wonder Blandabilities for the petals and my Tranquil Tide Stampin' Write marker for the leaves. This stamp set is great as it really does much of the work for you - it doesn't leave room for much else! 

Layered Leaves - I backed my stamped panel with an offset panel of Elegant Eggplant that I embossed with my layered leaves Dynamic Textured Impressions Embossing Folder; I know you can't see much of it, yet the peeks of texture add a welcome added detail.

Drops of Glitter - I added a few of the Glitter and Clear epoxy dots, along with some clear Wink of Stella on the flower petals and a sliver of doily, to complete my card.

This card really was quick to put together with some built in de-stress as a result of the time it took to colour it in too - bonus! In hindsight, I wish I'd heat embossed the stamp in black for a little more shine and contrast; something to try next time.

Here is the visual summary of the key products used on today's project for you to pin for easy reference:


You can see all of my Product and 'How To' summaries on my 'How To - Tips and Techniques' Pinterest board in case you've missed any. 

Before you reach for your ink and papers, check out what our amazing team has created to inspire you this week:

Here's a quick recap of our challenge rules:
 
1.  Create a new paper project
2.  Upload your creation to your blog with a link back to us and provide a direct link to the post featuring your challenge submission.
3.  Please link your card to no more than four challenges, TOTAL.
4.  Have FUN!

I can't wait to see what you create with this week's colours and look forward to visiting your blogs this week! Enjoy the rest of your weekend; my day will hopefully be a quiet one as I relax with my new catalogue for the umpteenth time to drool over the new stamp sets and product coming our way. Do come  back tomorrow as I will have lots of important announcements with regard to this month's retirement list; until then, happy stampin'!


Stampin' Up! Supplies Used: 

Table built using Product Table Builder by The Crafty Owl - Independent Stampin' Up! Demonstrator.

Give Thanks For Labels To Love And The Paper Players PP365

by Joanne James8. October 2017 09:00

It's Sunday and time for this week's new challenge over at The Paper Players! I am your host this week and I have a colour challenge for us to work with:


I took the opportunity to make a fall-inspired thank you card this week that works for a few additional challenges too; I used the sketch over at Just Add Ink, the middle vertical column of the tictactoe board over at Paper Craft Crew and the theme challenge over at Global Design Project:

Tic Tac Toe PCC Challenge 262         

My starting point for today's card was this gorgeous patterned paper from the Painted Harvest designer series paper pack - take a look:


Here's the low-down on today's card:

Even More Painted Autumn For Your Pennies - You all know how much I love designer series paper, and the Painted Autumn collection is definitely up there as one of this season's favourites. Bold, watercoloured images in beautiful autumnal colours what could be better? How about more for less? Yes, Painted Autumn is one of the designer series papers that is included in the 'Buy 3, get 1 free' sale that is running throughout October. You can read more about that here or purchase directly from my online store - I for one will be stocking up for sure. 

Give Thanks For Labels To Love - I used the sentiment and border stamp from the 'Labels To Love' stamp set on my card today. This set, on page 45 of the seasonal catalogue, is an additional set that coordinates with the Everyday Label Punch besides the 'Merry Little Labels' set that the punch is bundled with. There are some great sentiments in this set but I think this one is my favourite - we all have so much to be thankful for. I added a couple of the Touches of Nature wooden flowers that I heat embossed with some now-retired Crushed Curry embossing powder to my label, along with some vellum leaves and a leaf-embossed stitched circle behind to create a bit of a collage of my focal point. 

Not Just An Everyday Label - The Everyday Label Punch is proving a very popular choice for many of my customers and it's easy to see why: in addition to punching out the standard shape, there are a number of ways the punch can be used to make either shorter or longer labels, to create layers or even to create different shapes. By shortening my punched label I created more of a square shape for the sentiment on my card today. I love a punch that is versatile and has lots of alternative uses! 

Here is the visual summary of the key products used on today's project for you to pin for easy reference:


You can see all of my Product and 'How To' summaries on my 'How To - Tips and Techniques' Pinterest board in case you've missed any. 

Before you reach for your ink and papers, check out what our amazing team has created to inspire you this week:

The Paper Players Design Team
 
 
Here's a quick recap of our challenge rules:
 
1.  Create a new paper project
2.  Upload your creation to your blog with a link back to us and provide a direct link to the post featuring your challenge submission.
3.  Please link your card to no more than four challenges, TOTAL (that includes any you design for) .
4.  Have FUN! 


I look forward to seeing what you create with this week's colour palette. Enjoy the rest of your weekend as it will be over all too quickly; my niece is celebrating her 18th birthday this coming week so we are off for a family gathering of 'cake and cocktails' this evening to celebrate, which we are all looking forward to.

I'll be back tomorrow with another project; until then, happy stampin'!


Stampin' Up! Supplies Used: 

Table built using Product Table Builder by The Crafty Owl - Independent Stampin' Up! Demonstrator.

Mini Catalogue

BROWSE THE CATALOGUE

The mini catalogue is now live! Read and download your copy here.

Shop Online

Access my online shop 24 x 7, 365 days of the year:

Current March hostess code:

S9F2XJJW

Shop Online

Join My Team

It's always a great time to join Stampin’ Up! New team members can get £130 worth of products for only £99 + free business supplies + free shipping + all the fun being a part of Stampin’ Up! Stampin' Up! has something for everyone: join my growing team and benefit from my support to enjoy Stampin' Up! however you choose.

If you're interested, call me for a chat to understand how I can help you realise your goals. Alternatively, if you have already decided to sign up and you just can't wait, please click here for the link to the online form where you can sign up and order your starter kit right away! 

Latest Kit!

Stampin Cut and Emboss

The Rock Legend Kit has all you need to make 8 cards with coordinating envelopes. Along with the new Panda Friends Kit, both are available from January 4th for just £14 each - get yours here!

2023-24 Annual Catalogue

BROWSE THE CATALOGUE

Click on the catalogue for a full list of current SU! supplies - if you would like to order any of the items featured, please drop me a line at [email protected] or give me a call on 07773 421446 - I'd be happy to help.

New Online Exclusives

There will be new products available exclusively in the online store from 5 March - check them out here.

About Me

Hi I'm Joanne and live in Northampton and when I'm not looking after my husband and two beautiful children, am an avid crafter with a passion for all things Stampin' Up!

I must confess that I have never been a big rubber stamper - until I discovered Stampin' Up! that is. I love the fact that I can get such great results with co-ordinating stamps, inks, papers and punches - the possibilities are endless! Join me on my stamping journey as I share the things I love and be inspired to create amazing things yourself!

Follow Me

Monthly Newsletter

Box Builder

Click the button above to use Box Buster to create your custom box design using the Envelope Punch Board!

Kits Collection Now Available!

Stampin Cut and Emboss

The new Kits Collection from Stampin' Up! is now available!

Click here to see the current kits available and order yours online today.

I Design For


Stampin' Up Stuff

This is my personal blog and is not endorsed by Stampin’ Up! I hope you find it a plentiful source of ideas and personal inspiration but please don't copy my designs for contest submission or use for classes, publication or sale without express permission.