Jar of Flowers Sunflower Shaker Card PP549

by Joanne James11. July 2021 09:00

Today it's Sunday and time for this week's new challenge over at The Paper Players! Ann is hosting this week's challenge with a trio of colours chosen by the lovely Jaydee:


Now before you think I'm completely mad sharing a Mother's Day card in July, there is a reason I'm sharing this card today! I made this card back in February and when I went to make my card for today, Rebecca reminded me that we had made this card that featured Jaydee's colours and I hadn't blogged it, so although the papers are now retired, she wanted me to share it - so here it is:


Here's the low-down on today's card:

This super-simple shaker card was a Mother's Day project that I made with a group of local Brownie Guides that I work with. For ease, we used the (retired) in-colour Memories & More card bases, onto which we heat embossed a Mother's Day sentiment (from the retired 'Strong and Beautiful' stamp set). We used the jar punch to punch a jar shape out of a piece of (retired) Flowers of the Season designer series paper that we had cut out using a scalloped stitched die, then inserted a mason jar shaker dome into the aperture and filled it with sunflower seeds, before attaching it to the card base. We stamped and coloured some co-ordinating sunflowers from the 'Jar of Flowers' stamp set and added these with a dimensional to the top of our jar, before finishing our shaker jar with a Bumblebee ribbon bow. 


The intention was that once Mother's Day had passed, the Brownies would then be able to remove their sunflower seeds from an opening in the back of the card, plant them and enjoy them in their gardens all summer long. The Mother's Day card that keeps on giving, you might say! I hope that their Mums are still enjoying their cards, several months on.

These mason jar domes are a great way to make an easy shaker card - have you used them in your crafting? What did you put in yours? Share with me in the comments below - I would love to hear your ideas!

Here is the visual summary of the key products used on today's project for you to pin for easy reference:


You can see all of my Product and 'How To' summaries on my 'How To - Tips and Techniques' Pinterest board in case you've missed any. 

   I'm also linking up today's card with the girls over at The Flower Challenge where they are asking us to add spots or stripes to our card - my DSP has spots and my floral panel has a dotty border :-). 

Before you reach for your ink and papers, check out what our amazing team has created to inspire you this week:

Here's a quick recap of our challenge rules:
 
1.  Create a new paper project
2.  Upload your creation to your blog with a link back to us and provide a direct link to the post featuring your challenge submission.
3.  Please link your card to no more than four challenges, TOTAL.
4.  Have FUN!

You can see all of my 'How To' summaries on my 'How To - Tips and Techniques' Pinterest board in case you've missed any. 

Enjoy your day; I spent much of my day yesterday in the garden jet washing patios and paths, before catching the end of a thrilling Wimbledon ladies final. Today I will be getting my jobs out of the way in the morning before settling in for an afternoon and evening of sport: the men's finals at Wimbledon before I have to give way to the men of the house for football and the finals of the European Championship, England v Italy - wish me luck! I'll be back tomorrow with another project. Until then, happy stampin'!


Stampin' Up! Supplies Used: 

Table built using Product Table Builder by The Crafty Owl - Independent Stampin' Up! Demonstrator.

Save 15% on In The Wild Designer Series Paper and More AYSI254

by Joanne James9. July 2021 12:00

Today I'm sharing my design team card for our new challenge over at As you See It where it's time for a sketch challenge:


I thought the layered rectangles of this sketch provided the perfect opportunity to showcase some designer series paper - especially since lots of those in the annual catalogue are currently available at 15% off - so I had a look through my collection and settled on something wild for you today - take a look:


Here's the low-down on today's card:

In The Wild And A DSP Paper Sale - Between July 1st and August 2nd, a number of the designer series papers in the annual catalogue are available at 15% off. As a reminder, here's a snapshot of all those that are discounted:


Lots to choose from! I chose to feature the 'In The Wild' papers on my card today. I don't have any of the other products in this suite, but I think the papers are great for snipping. I used two different patterns for my rectangles and then fussy-cut a co-ordinating tiger for my feature shape - isn't he so majestic-looking? 


You Got This - I decided my brave tiger would make a good thinking of you/encouragement card, so paired it with the sentiment 'You can do this' from the stamp set 'Forever Fern'. I think it works. When perusing my stamp shelf, I found a few other stamps that would work well with the animals in this set too; you don't always need all of the items in a suite to complete a card, you just need to get creative!

A Paper Trick - I have one last trick to share with you on my card today: when fussy-cutting shapes from designer series paper, don't disgard any shapes that are incomplete. I used one of the tigers on the edge of my paper to decorate the inside of my card; his position looks just like I intended him to be 'off the page', whereas the reality was my tiger only had half a body in the first place!


This is a great #SimpleStamping card that uses stamps, ink, cardstock and makes a feature of the designer series paper in a number of creative ways. 

Here is the visual summary of the key products used on today's project for you to pin for easy reference:


You can see all of my 'How To' summaries on my 'How To - Tips and Techniques' Pinterest board in case you've missed any. 

 So what will you make with our sketch this week? Will you be stocking up on designer series paper whilst you can save - for those paper-addicts among us (yes, I'm one!) there's no better time than the present!

Here's a summary of our challenge rules:

  • Create any card, scrapbooking page, 3D project or packaging project that fits the challenge.
  • Please include the challenge graphic and link back to the challenge in your blog post. Turn off word verification so we can leave you lots of lovely comments. Make sure you link the post not the whole blog to the Linky. Use #AYSIXXX when uploading to a public gallery.
  • If you’re unsure about ‘the rules’, check the details under the Challenge Guidelines tab on the As You See It Challenge homepage.
  • In a sketch challenge, you are welcome to rotate or flip a sketch. You can replace shapes used such as substituting a circle panel for a square panel. However, we must be able to still see the basis of the original sketch in your finished product.
We look forward to seeing your creations in the AYSI gallery.

Enjoy your day and I'll be back tomorrow with another project. Until then, happy stampin'!


Stampin' Up! Supplies Used:

Table built using Product Table Builder by The Crafty Owl - Independent Stampin' Up! Demonstrator.

Colour Block Celebrate Sunflowers Thank You Card Trio CASC&S 427

by Joanne James6. July 2021 12:00

It's Tuesday and time for a new challenge over at CAS Colours & Sketches. It's a new month and Holly is hosting and our first challenge is a colour challenge: 


These colours made me think of autumn so for my card today I pulled out an old favourite and set to work - take a look:


Here's the low-down on today's card:

Celebrate Sunflowers - These colours really reminded me of sunflowers so I pulled my 'Celebrate Sunflowers' set from the shelf and set to work. I didn't want to have any leaves on my flower, so I decided to focus on the large image and stamp it in a neutral Early Espresso. I couldn't decide whether to go with white or a more natural Crumb Cake for my base, so I made one of each.  I love the detail on this large bloom and also added a partial stamp in Crushed Curry to decorate the inside of my card too: 


Colour Blocking - I used a technique called 'colour blocking' on my card today. I stamped the sunflower once onto cardstock in each of the three challenge colours, then using my rectangle stitched framelits I cut each image into three identical rectangles and then mixed the pieces to create three, pieced images using one piece of each of the three blocks of colour, hence the name. This is a great technique for clean and simple cards. 

Added Texture - Since I had three more pieces, I created a third card, this time using a Crumb Cake base and this time I added some dry embossing using my Tasteful Textile embossing folder to the base of my card - you can hopefully see the subtle added detail below:


Here's a photo of all three versions together - which one is your favourite?

I'm also linking my cards up over at Inspire.Create today where they are looking for thank you cards. I will be sending these cards out in the post to my Stampin' Up! customers - so if you'd like to receive one, head on over to my Stampin' Up! store by clicking on the links below!

Here is the visual summary of the key products used on today's project for you to pin for easy reference:


You can see all of my 'How To' summaries on my 'How To - Tips and Techniques' Pinterest board in case you've missed any. 

As a reminder, for our colour challenges, you must use all of the stated challenge colours. You may also use neutral colours; however, the challenge colours should be the most noticeable ones featured on your card. We use Stampin' Up! color names for reference, but you are welcome to use any other companies' products as long as you match the challenge colours as closely as possible.

Enjoy your day and I'll be back tomorrow with another project. Until then, happy stampin'!

Stampin' Up! Supplies Used:

Table built using Product Table Builder by The Crafty Owl - Independent Stampin' Up! Demonstrator.

Christmas Tidings & Trimmings Copper Star Trio PP548

by Joanne James4. July 2021 09:00

Today it's Sunday and time for this week's new challenge over at The Paper Players! It's the turn of the fabulous Anne Marie to host this week and she has a timely theme challenge for you to work with:


With today being the fourth of July and American Independence Day, Anne Marie's patriotic stars and/or stripes theme is very topical indeed. I wish all of my fellow teamies and readers on the other side of the pond a very happy Independence Day, yet I actually decided to jump forward to another holiday with my stars this week - yes, the (dreaded) 'C' word: Christmas! I took Amy's fabulous Sunday Stamps sketch and a little something old paired with something new for today's card - take a look:


Here's the low-down on today's card:

Something Old - Whilst the stars in my 'something new' were the starting point for my card today, I couldn't resist digging out some of my retired Brightly Gleaming designer paper from last season to use as the basis for my colour scheme on today's card. I just love this paper and the copper/gold combination is such a winner in my book. I went with the graphic star pattern for my main panel to further compliment the 'stars and/or stripes' theme.

Something New - The starting point for today's card was most definitely some new goodies I received this week with the Tidings & Trimmings bundle from the annual catalogue. The layered star dies in this set were the first things to catch my eye, but the stamp set also includes some lovely sentiments too. In addition to the one stamped onto my label on the front of my card, I stamped this one inside:


 The real scene-stealers on today's card though are the diecut stars on the front of the card, with the centre one a combination of layered (retired) copper glimmer paper and copper foil:


Aren't those stars just fabulous?! This is such a sparkly Christmas card in real life and I love how my trio of stars has given new life to my stash of hoarded DSP too.

Holiday Bling - Last but not least, I added a Night of Navy rhinestone from the Holiday Rhinestones pack to the centre of each of my stars to compliment the navy and really draw your eye to the diecut detail.

Here is the visual summary of the key products used on today's project for you to pin for easy reference:


You can see all of my Product and 'How To' summaries on my 'How To - Tips and Techniques' Pinterest board in case you've missed any. 

I can't wait to play more with the Tidings and Trimmings stamp set and those Christmas Trimmings Dies - I think they are going to become a staple in my Christmas craft room and you will definitely be seeing more of them in the coming months.

Before you reach for your ink and papers, check out what our amazing team has created to inspire you this week:

Here's a quick recap of our challenge rules:
 
1.  Create a new paper project
2.  Upload your creation to your blog with a link back to us and provide a direct link to the post featuring your challenge submission.
3.  Please link your card to no more than four challenges, TOTAL.
4.  Have FUN!

You can see all of my 'How To' summaries on my 'How To - Tips and Techniques' Pinterest board in case you've missed any. 

Enjoy your day; I have no special plans today but am hoping to find a little crafting time and with any luck will be back tomorrow with another project. Until then, happy stampin'!


Stampin' Up! Supplies Used: 

Table built using Product Table Builder by The Crafty Owl - Independent Stampin' Up! Demonstrator.

Rainbow Blended Daisy Garden Anniversary Card TTT120

by Joanne James1. July 2021 17:00

It's Thursday and time for a new challenge over at TicTacToe! It's the turn of Team X to host this week and the lovely Ashwini is our featured designer this week. This is the fun board that we are playing along with: 


I went across the middle row with embossing/flowers/anniversary and taking my inspiration from the rainbow of colours of the feathers on the fabulous peacock in the Color Dare challenge inspiration photo I decided to break out a new stamp set and have some fun with my background - take a look:


Here's the low-down on today's card:

Daisy Garden - I'm not usually one for background stamps, but there are two in the current annual catalogue that I absolutely love. One is 'Festive Foliage' that I shared with you for the first time last week in this post here; the second one I'm sharing with you today and it's called 'Daisy Garden'. A field of daisies - so pretty! Today I heat-embossed them in white and then used by blending brushes to create a rainbow background (colours detailed below), adding some water droplets flicked with my aquapainter for added detail. Another great way to add colour to a background stamp!

Daisy Lane - One of the reasons I like the new Daisy Garden stamp is because it co-ordinates beautifully with the existing 'Daisy Lane' stamp set. Having used this set in my card on Tuesday (you can scroll back if you missed it), it occurred to me that the sentiment I used would make a wonderful feature on an anniversary card - so I used it again today too.

Tasteful Labels - I stamped my sentiment on a label cut with the Tasteful Labels Dies, and added some clear sequins and frosted enamel dots along with some sparkly white ribbon to finish my card:


What do you think - do you like to use background stamps? Do leave me a comment below - I'd love to hear your thoughts.

Here is the visual summary of the key products used on today's project for you to pin for easy reference:


You can see all of my Product and 'How To' summaries on my 'How To - Tips and Techniques' Pinterest board in case you've missed any. 

A tictactoe board offers so many creative possibilities - how does this week's board inspire you? Why not have a go? We would love to see you in the gallery and who knows - you might be selected for Designer's Choice and be eligible to be a guest designer on a future challenge. 

Enjoy your day; I'll be back tomorrow with another project. Until then, happy stampin'!


Stampin' Up! Supplies Used: 

Table built using Product Table Builder by The Crafty Owl - Independent Stampin' Up! Demonstrator.


Picture This With Bright Daisies

by Joanne James29. June 2021 20:00

Today I managed to get a little extra crafting time so I'm sharing a second card that I made with a couple of challenges in mind:


I couldn't resist those Inspired By brightly coloured dotty flip flops with their daisy embellishments, so I took those elements and paired them with the current Paper Craft Crew sketch and this is what I came up with:


I used the new Picture This Dies to create my trio of apertures, backed them with some retired brights collection DSP and added some coloured daisies centred with some retired gems that I coloured with my Blends markers and added a sentiment from the 'Daisy Lane' stamp set on one of the stitched circles cut out with the other die in the set.


Here is the visual summary of the key products used on today's project for you to pin for easy reference:


You can see all of my 'How To' summaries on my 'How To - Tips and Techniques' Pinterest board in case you've missed any. 

Enjoy your evening and I'll be back tomorrow with another post. Until then, happy stampin'!


Stampin' Up! Supplies Used:

Table built using Product Table Builder by The Crafty Owl - Independent Stampin' Up! Demonstrator.

A Party Puffins Pair For The Double CCS 426

by Joanne James29. June 2021 12:00

It's Tuesday and time for a new challenge over at CAS Colours & Sketches. It's Shannon's last challenge this month and since it's the fifth Tuesday of the month we have a double - a trio of retired colours and an old sketch to be used together:


I was struggling to work out what to do with this trio of colours this week, then I had a brainwave - and ended up making not one but two cards! Both of which feature some cute party puffins - here's the first one: 


I substituted Peekaboo Peach for Peach Parfait, as I don't have this colour. I used the peach for my base and added Tangerine Tango banners on both cards, then stamped my puffin and cake onto a scalloped edge diecut piece, incorporating the pink into the icing on my cake and added a heat-embossed sentiment:


I chose another of the puffin images for my second card:


How cute is that little goldfish present he's holding?!


I also added a little detail to the inside of both cards:


So which one of these is your favourite? Here's a photo of them together:


Here is the visual summary of the key products used on today's project for you to pin for easy reference:


You can see all of my 'How To' summaries on my 'How To - Tips and Techniques' Pinterest board in case you've missed any. 

As a reminder, for our colour challenges, you must use all of the stated challenge colours. You may also use neutral colours; however, the challenge colours should be the most noticeable ones featured on your card. We use Stampin' Up! color names for reference, but you are welcome to use any other companies' products as long as you match the challenge colours as closely as possible.

I'm a little late posting today; I have spent the last couple of days recovering form my second Covid jab, which truly knocked me for six. I'm thankfully feeling much better today and am now fully vaccinated, so it was worth it! Enjoy your day and I'll be back tomorrow with another project. Until then, happy stampin'!


Stampin' Up! Supplies Used:

Table built using Product Table Builder by The Crafty Owl - Independent Stampin' Up! Demonstrator.

Hand Penned Create With Friends PP547

by Joanne James27. June 2021 08:00

Today it's Sunday and time for this week's new challenge over at The Paper Players! It's the turn of the fabulous Laurie to host this week and she has my favourite, a sketch challenge for you to work with:


I decided that the central rectangle was perfect to showcase a piece of designer paper so I grabbed a pretty pattern from the Hand Penned DSP pack and set to work. This is what I came up with:


Here's the low-down on today's card:

Hand Penned - I chose a beautiful pattern of soft blues, pinks and yellow from the Hand Penned paper pack and used one of the Hand Penned Memories and More Cards for my base for additional subtle colour and pattern. These watercolour effect papers are so pretty!

Penned Flowers - I added one of the detailed diecuts from the co-ordinating Penned Flowers Dies in white, having backed it with vellum cut with the larger outline die. This enabled the diecut to standout from the patterned paper a little more, whilst still giving a hint of colour and pattern behind. I added some loop fronds of stripped Pool Party sheen ribbon behind my diecut and added a sprinkling of pink and white Elegant Faceted Gems to decorate.


Amazing You - I finished my card with a fussy-cut sentiment from the 'Create With Friends' set. This is a set that allows you to create an endless combination of words to make a wide range of phrases and sentiments.

Here is the visual summary of the key products used on today's project for you to pin for easy reference:


You can see all of my Product and 'How To' summaries on my 'How To - Tips and Techniques' Pinterest board in case you've missed any. 

Before you reach for your ink and papers, check out what our amazing team has created to inspire you this week:

Here's a quick recap of our challenge rules:
 
1.  Create a new paper project
2.  Upload your creation to your blog with a link back to us and provide a direct link to the post featuring your challenge submission.
3.  Please link your card to no more than four challenges, TOTAL.
4.  Have FUN!

You can see all of my 'How To' summaries on my 'How To - Tips and Techniques' Pinterest board in case you've missed any. 

Enjoy your day; we had a busy day yesterday with the final school cricket match of the season (where did that term go?!) and a long bike ride around Grafham Water before finishing the day with my second Covid vaccination. Fortunately today should be a quiet one, so if I am feeling at all under the weather I will have the perfect excuse to craft or put my feet up and watch a movie! I'll be back tomorrow with another project. Until then, happy stampin'!

Stampin' Up! Supplies Used: 

Table built using Product Table Builder by The Crafty Owl - Independent Stampin' Up! Demonstrator.

One Layer Monograms for Less Is More

by Joanne James26. June 2021 07:00

Today I'm here bright and early to share a couple of cards for the new challenge over at Less Is More where I was delighted to be asked to be Guest Designer following my recent accolade as overall winner for April. 


I would like to say I am delighted - although I did break into something of a cold sweat when the lovely Anita told me the challenge for the next fortnight is not only 'Monogram' but yes - ONE LAYER monograms!
 

She did give me the option to defer, but never one to shy away from a challenge I started researching - this challenge really did necessitate me getting my thinking cap on! So first things first - the definition we are using for the term 'monogram' is:

Monogram: a motif of two or more interwoven letters, typically a person's initials, used to identify a personal possession or as a logo.

A design consisting of two or more alphabetic letters combined or interlaced, commonly one's initials.

My first card uses my own initials. One of the challenges for me in creating a card to meet the brief was that it needed two or more letters. I explored various ways to combine the two Js in my name. I explored various ways of combining the letters and in the end went for a rotational pattern in a Tiffany & Co.-inspired design of black on Coastal Cabana - take a look:
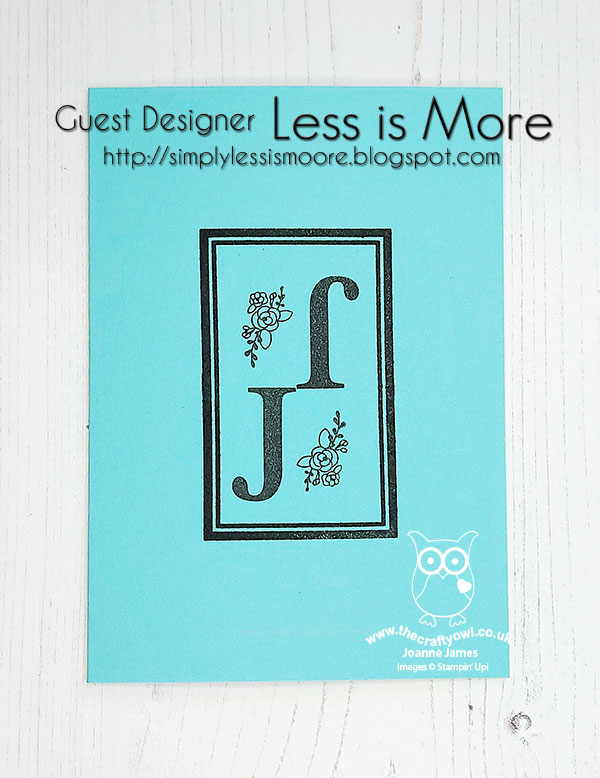
 

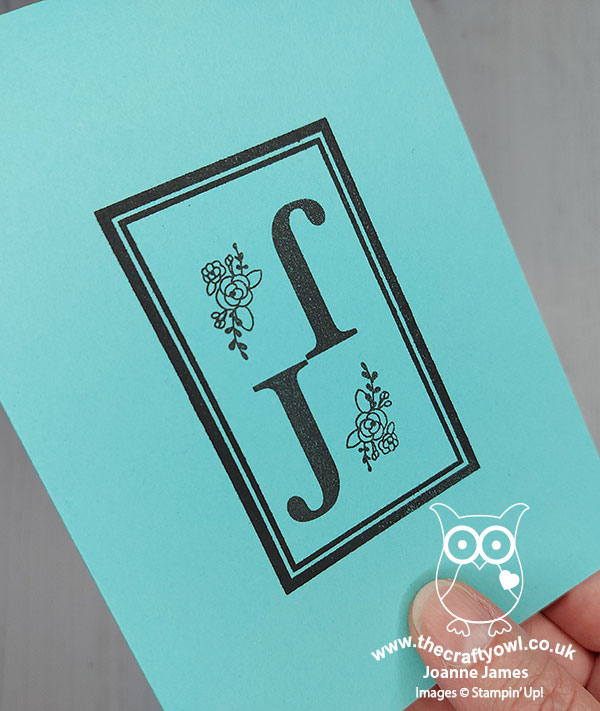
This card uses a long-retired set called 'Sophisticated Serifs' which I'm not sure I ever blogged with, but is a set I love for its clearly defined alphabet. I added some flowers and a strong black border to draw the eye to my monogram:
 

Once I'd started, I tried out a few other ideas too. Another way monograms are often used is to create fun patterns for wedding or anniversary cards. The thing is, both my husband and I share exactly the same initials - JLJ - so in preference to a trio of Js, which whilst quirky wasn't that interesting, I created a second card using someone else's initials to create a fun monogram - can you guess who they belong to?
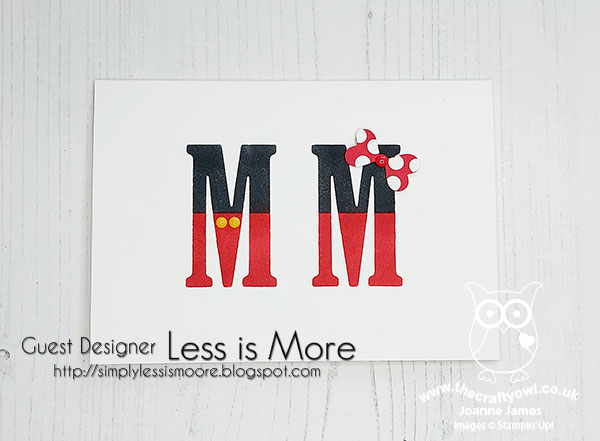
 

If you guessed Mickey and Minnie Mouse then you are as big a fan as I am! I created a couple of stencils using my retired Large Letter Die Framelits and sponged in the red and black base colours. I added some buttons for Mickey and a bow for Minnie - whilst this challenge is one layer, small embellishments are allowed in the LIM Rules (that's my story and I'm definitely sticking to it!) I thought this would make a fun anniversary card with an appropriate sentiment inside; I like the way that the colours and embellishments make the letters recognisable as a monogram because of how they are decorated:
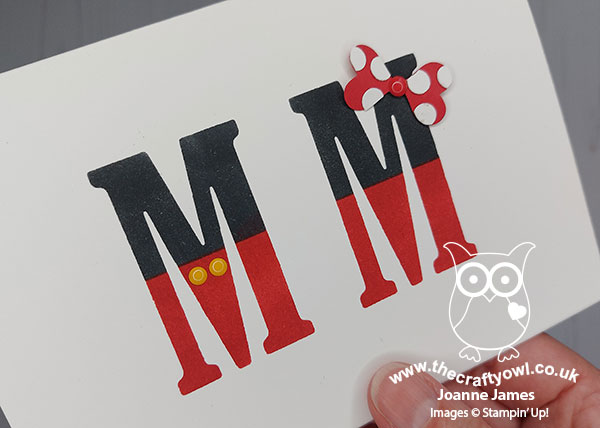
 

I considered adding an ampersand, but decided against it, given that MM could mean both 'Mickey Mouse' and 'Mickey and Minnie', with the former really being the true monogram although my decoration suggests the latter.

This turned out to be quite a fun creative diversion - you should definitely check out the LIM gallery to see what the Design Team have created! Whilst my cards today used items from my retired stash, I hope they provide you with some inspiration. I'm also linking up with the lovely gals over at SUO Challenges today where funnily enough they also have an 'initials' theme this week (it doesn't have to be one layer though!). If you decide to have fun with initials and are using Stampin' Up! products, you should go and pay them a visit too.

You can see all of my 'How To' summaries on my 'How To - Tips and Techniques' Pinterest board in case you've missed any. 

Enjoy your day and I'll be back tomorrow with another project. Until then, happy stampin'!


Festive Foliage Shaded Spruce Monochrome Christmas Card AYSI 253

by Joanne James25. June 2021 12:00

Today I'm sharing my design team card for our new challenge over at As you See It where it's time for our speed-stamping challenge:


I usually have to spend a long time planning for a speed challenge, however my idea this week came together in a jiffy - take a look:


I went all-out for Christmas with my card today! Here's the low-down:

Festive Foliage - My favourite new background stamp in the new annual catalogue is the Festive Foliage stamp I've used on my card today - so perfect for festive Christmas backgrounds and featuring holly, pine, mistletoe and more. Using my Stamparatus, I stamped it tone-on-tone in Shaded Spruce on the same colour cardstock - this is one of my favourite Christmas greens. 

Playful Alphabet - I added the word 'NOEL' in gold foil and cut with my Playful Alphabet dies, raised on foam adhesive sheets, across my card front for a simple sentiment. I added a liberal sprinkling of (retired) gold glitter enamel dots in place of some of the dots in the stamped design.

Keep It Simple - The key to a speed challenge is always to 'keep it simple' and this card definitely does: the stamping took no time at all using my Stamparatus and I stamped it on a panel to make it easy to cut to an even size afterwards, a simple gold foil diecut sentiment and a liberal sprinkling of glittery enamel dots. My card was completed in 9 minutes 8 seconds - and most of that time was taken peeling and placing my enamel dots! They add a nice touch of sparkle amongst the green though, don't you think?


After I'd completed today's card, I went back to my Stamparatus and stamped another bunch of these green panels to make a few more stepped-up cards; I'll share those with you another day.

Here is the visual summary of the key products used on today's project for you to pin for easy reference:


You can see all of my 'How To' summaries on my 'How To - Tips and Techniques' Pinterest board in case you've missed any. 

Here's a summary of our challenge rules:

  • Create any card, scrapbooking page, 3D project or packaging project that fits the challenge.
  • Please include the challenge graphic and link back to the challenge in your blog post. Turn off word verification so we can leave you lots of lovely comments. Make sure you link the post not the whole blog to the Linky. Use #AYSIXXX when uploading to a public gallery.
  • If you’re unsure about ‘the rules’, check the details under the Challenge Guidelines tab on the As You See It Challenge homepage.
  • In a speed stamping challenge, please time yourself and say in your post how long your card took to complete. 
We look forward to seeing your creations in the AYSI gallery.
 
It just so happens that today is the 25th of the month so the perfect time to link up with this month's Rudolf Days Challenge where their latest Christmas card challenge goes live today. There is something quite satisfying not only about creating a card in under 10 minutes, but a Christmas card for my stash to boot! 

Enjoy your day and I'll be back tomorrow with another project. Until then, happy stampin'!


Stampin' Up! Supplies Used:

Table built using Product Table Builder by The Crafty Owl - Independent Stampin' Up! Demonstrator.

Mini Catalogue

BROWSE THE CATALOGUE

The mini catalogue is now live! Read and download your copy here.

Shop Online

Access my online shop 24 x 7, 365 days of the year:

Current April hostess code:

VDKNV7BH

Shop Online

Join My Team

It's always a great time to join Stampin’ Up! New team members can get £130 worth of products for only £99 + free business supplies + free shipping + all the fun being a part of Stampin’ Up! Stampin' Up! has something for everyone: join my growing team and benefit from my support to enjoy Stampin' Up! however you choose.

If you're interested, call me for a chat to understand how I can help you realise your goals. Alternatively, if you have already decided to sign up and you just can't wait, please click here for the link to the online form where you can sign up and order your starter kit right away! 

Latest Kit!

Stampin Cut and Emboss

The Rock Legend Kit has all you need to make 8 cards with coordinating envelopes. Along with the new Panda Friends Kit, both are available from January 4th for just £14 each - get yours here!

2023-24 Annual Catalogue

BROWSE THE CATALOGUE

Click on the catalogue for a full list of current SU! supplies - if you would like to order any of the items featured, please drop me a line at [email protected] or give me a call on 07773 421446 - I'd be happy to help.

New Online Exclusives

There are new products available exclusively in the online store from 5 March - check them out here.

About Me

Hi I'm Joanne and live in Northampton and when I'm not looking after my husband and two beautiful children, am an avid crafter with a passion for all things Stampin' Up!

I must confess that I have never been a big rubber stamper - until I discovered Stampin' Up! that is. I love the fact that I can get such great results with co-ordinating stamps, inks, papers and punches - the possibilities are endless! Join me on my stamping journey as I share the things I love and be inspired to create amazing things yourself!

Follow Me

Monthly Newsletter

Box Builder

Click the button above to use Box Buster to create your custom box design using the Envelope Punch Board!

Kits Collection Now Available!

Stampin Cut and Emboss

The new Kits Collection from Stampin' Up! is now available!

Click here to see the current kits available and order yours online today.

I Design For


Stampin' Up Stuff

This is my personal blog and is not endorsed by Stampin’ Up! I hope you find it a plentiful source of ideas and personal inspiration but please don't copy my designs for contest submission or use for classes, publication or sale without express permission.