Happy Holly-Days Meets Festive Foliage #GDP309

by Joanne James18. September 2021 20:06

Today I'm sharing a card with the current challenge over at Global Design Project  #GDP309:

This is another of my cards using the Festive Foliage stamp as my background, this time paired with the robin from the Happy Holly-Days stamp set - take a look:


Here's the low-down on today's card:

I kept to a black and white colour scheme for my background and sentiment label, with a pop of Real Red for my third choice - the perfect way to emphasise my lovely robin red breast and bring in a flash of festive colour:


I added some red sheer ribbon and rhinestone jewels to complete my card.

Here is the visual summary of the key products used on today's project for you to pin for easy reference:


You can see all of my 'How To' summaries on my 'How To - Tips and Techniques' Pinterest board in case you've missed any. 

Enjoy your evening and I'll be back tomorrow with another project. Until then, happy stampin'!


Stampin' Up! Supplies Used:

Table built using Product Table Builder by The Crafty Owl - Independent Stampin' Up! Demonstrator.
 

Festive Foliage Winter Wishes

by Joanne James15. September 2021 19:14

Today I'm sharing a card that I made for this week's Inspired By challenge - I went with the holiday option as I couldn't resist the white and turquoise of the inspiration photo:

I've been making lots of samples using my Festive Foliage background stamp for my online technique class that I held earlier this week and these colours were perfect to demonstrate heat embossing and the use of less traditional colours for a foliage-rich card - take a look:


Here's the low-down on today's card:

Festive Foliage - I heat embossed the 'Festive Foliage' background stamp in white onto Bermuda Bay cardstock and added a simple white mat border to accentuate it. Background stamps are a great way to cover a cardfront, but they don't need always need to be coloured. I did brush over the leaf details with some clear Wink of Stella; it's quite difficulty to see in the photos, but it adds a lovely subtle shimmer in real life.

Winter Wishes - I decided to add a 'Winter' sentiment to the front of my card using some retired Bermuda Bay ombre paper from Sale-A-Bration earlier in the year, popped up on a label and backed with a couple of co-ordinating ribbons. 


Well Defined - There was a reason why I chose 'Winter' as the greeting on the front of my card; I wanted it to follow through to my sentiment from 'Well Defined that I used on the inside:


Whilst this card would work for the holiday season, I thought it would be perfect for seasonal greetings or even to send to someone who celebrates a birthday during the winter months.

Here is the visual summary of the key products used on today's project for you to pin for easy reference:


You can see all of my 'How To' summaries on my 'How To - Tips and Techniques' Pinterest board in case you've missed any. 

Enjoy your day and I'll be back tomorrow with another project. Until then, happy stampin'!


Stampin' Up! Supplies Used:

Table built using Product Table Builder by The Crafty Owl - Independent Stampin' Up! Demonstrator.

Happy As Can Be Seaside Scrapbook Layout PP552

by Joanne James1. August 2021 08:00

Today it's Sunday and time for this week's new challenge over at The Paper Players! It's my turn to host this week and I have a timely theme challenge for you to work with:
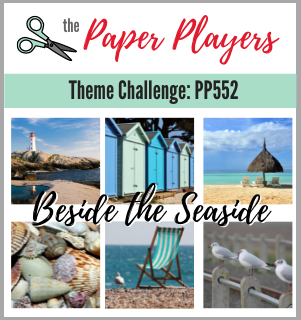
 

Whilst lots of us are already starting to work on Christmas projects, it is still very much summer time and I chose this week's theme with that in mind. As the rhyme goes, 'Oh I do like to be beside the seaside, oh I do like to be beside the sea' - sand between your toes, fish and chips, buckets and spades and more - the seaside is one of my favourite places to be. I decided to break from my usual card and make a scrapbook page to share with you for a change this week.

I live in Northampton which is very close to the very centre of England, so is about as far from the coast as you can get. I recently took the James Juniors to visit their grandparents, my parents, in Wales for the first time since the start of the Covid pandemic and the first place they always ask to visit is the beach. This left me with lots of great photos ready to scrapbook. I am mostly a Memories and More pocket scrapbooker, but occasionally I do make full 12" x 12" layouts and with the gorgeous 'Friends are Like Seashells' bundle in the annual catalogue I couldn't resist. Take a look at today's layout:
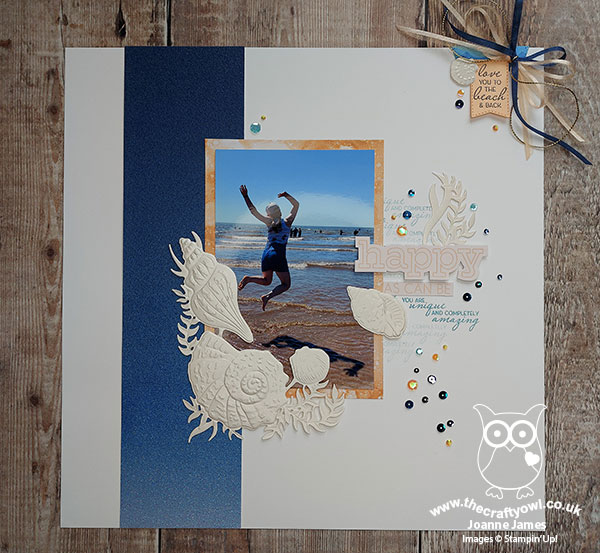
 

Here's the low-down on today's project:

I captured a great photo of Rebecca jumping the waves as I followed her down to the shoreline, so thought it would be perfect for my layout. Here's a close-up of my photo and the surrounding decoration in more detail: 
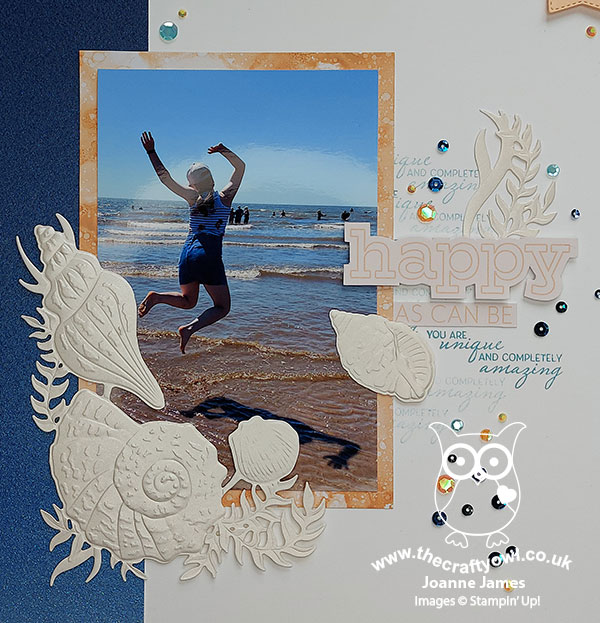
 

 I backed my photo with a piece of 'Expressions In Ink' designer paper and added a strip of the gorgeous Night of Navy ombre glimmer paper down the left side, to pick up on the bright blues of the sky in the photo. I embossed and diecut the seaside shells from pearlescent paper, then used the corner to decorate my photo whilst snipping the the other shells and seaweed apart to add as decoration elsewhere. I did a little background stamping beneath my layering and my main sentiment is fussy cut from one of the 'What A Year' Memories and More cards; you can see that more closely below:
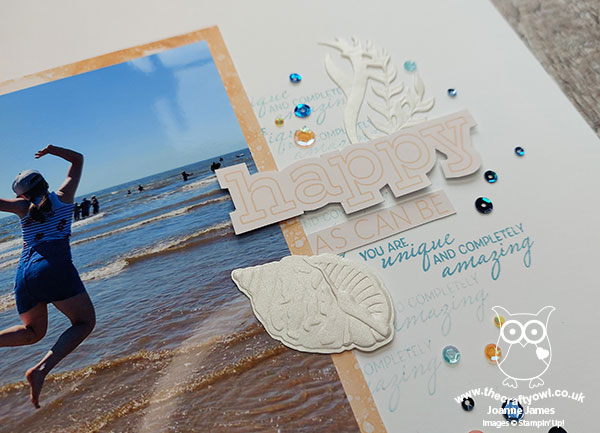
 

I love that sentiment and it totally sums up the mood of the day and Rebecca in particular in that moment. Both of the James Juniors were so thrilled to be at the beach that day, jumping the waves, fishing in rock pools and generally enjoying the sea air.

In addition to a sprinkling of sequins and gems, I also added a sentiment tag to the corner of my page, decorated with a fussy ribbon bow:
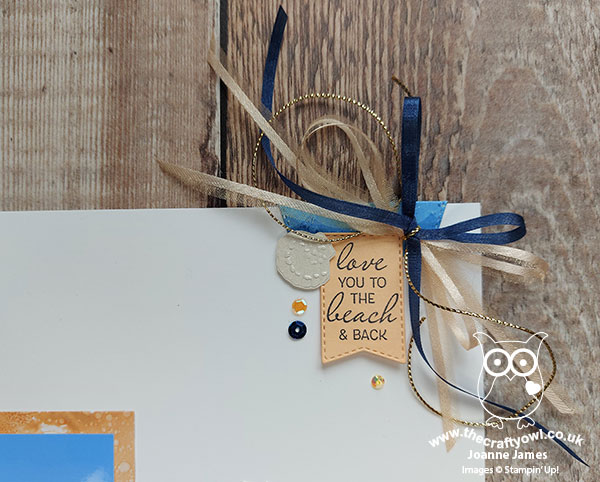
 

My layout is actually quite simple, and very much like my card making style - although if you could see the pile of patterned papers that covered my desk as I made this page you would think that it must have been anything but and I did procrastinate for quite some time before deciding on my final papers and design!

So what do you think? Did you enjoy my scrapbook layout today for a change? Should I share more of this kind of thing on my blog? Feel free to leave me a comment below - I'd love to hear your thoughts.

Before you reach for your ink and papers, check out what our amazing team has created to inspire you this week:

Here's a quick recap of our challenge rules:
 
1.  Create a new paper project
2.  Upload your creation to your blog with a link back to us and provide a direct link to the post featuring your challenge submission.
3.  Please link your card to no more than four challenges, TOTAL.
4.  Have FUN!

I can't wait to see how my theme inspires you this week!

Since I did something other than a card today, I am going to link up over at Just Us Girls where that happens to be their theme this week.

Enjoy your day; I have a family day at home today, with nothing special planned. I'll be back tomorrow with another project. Until then, happy stampin'!


Stampin' Up! Supplies Used: 

Table built using Product Table Builder by The Crafty Owl - Independent Stampin' Up! Demonstrator.
 
Edited to add - I was Chic of the Week with my scrapbook page over at Just Us Girls for the 'Anything But A Card' Challenge:
 

Festive Foliage Red and White Split Panel Christmas Card Times Two

by Joanne James28. July 2021 17:00

Today I have a couple of festive Christmas cards that I made using my favourite 'Festive Foliage' background stamp from the annual catalogue - here's the first one:


I stamped one background stamp in Real Red on Basic White and another in Versamark onto Real Red cardstock and heat embossed it in white, then split the panels and swapped them so that there is one of each on each card for contrast. Here's the second one:


I added a sentiment from 'Poinsettia Petals' on a label cut with my Tasteful Labels Dies and backed each with some white glittered organdy ribbon from the upcoming mini catalogue:  


Here is the visual summary of the key products used on today's project for you to pin for easy reference:


You can see all of my 'How To' summaries on my 'How To - Tips and Techniques' Pinterest board in case you've missed any. 

I've been looking at creative ways to use background stamps for my upcoming online class in September that features both the 'Festive Foliage' and 'Daisy Garden' background stamps and will look at ways to use them for all-year round cards. A split panel card is a great way to create two cards quickly using the same background stamp, so today's post is a nice taster for my class ladies who are already signed up for this class. If you would like to join them, you can find full details for this and all my online classes on my Facebook Page here or just message me for more information.

I used the sketch over at Inspire.Create and the monochromatic red colour scheme from over at The Rainbow Challenge as further inspiration for my cards today and since I'm still doing Christmas I'm also linking up with Christmas Craft Creations and their 'anything goes' theme.


The weather here has alternated today between brilliant sunshine and torrential downpours and apart from giving up on using the washing line completely, I have successfully managed to get a whole bunch of errands run whilst dodging the rain (mostly!) Since we are on the summer holidays, the children are taking turns to help out with cooking the evening meal. One is more enthusiastic than the other (I wonder if you can guess which one!) Needless to say, if I survive the flour tornado that is currently my kitchen, I will be eating Turkish-style flatbread pizzas for dinner this evening! Enjoy the rest of your day and I'll be back tomorrow with another project. Until then, happy stampin'!


Stampin' Up! Supplies Used:

Table built using Product Table Builder by The Crafty Owl - Independent Stampin' Up! Demonstrator.

Christmas Tidings & Trimmings Copper Star Trio PP548

by Joanne James4. July 2021 09:00

Today it's Sunday and time for this week's new challenge over at The Paper Players! It's the turn of the fabulous Anne Marie to host this week and she has a timely theme challenge for you to work with:


With today being the fourth of July and American Independence Day, Anne Marie's patriotic stars and/or stripes theme is very topical indeed. I wish all of my fellow teamies and readers on the other side of the pond a very happy Independence Day, yet I actually decided to jump forward to another holiday with my stars this week - yes, the (dreaded) 'C' word: Christmas! I took Amy's fabulous Sunday Stamps sketch and a little something old paired with something new for today's card - take a look:


Here's the low-down on today's card:

Something Old - Whilst the stars in my 'something new' were the starting point for my card today, I couldn't resist digging out some of my retired Brightly Gleaming designer paper from last season to use as the basis for my colour scheme on today's card. I just love this paper and the copper/gold combination is such a winner in my book. I went with the graphic star pattern for my main panel to further compliment the 'stars and/or stripes' theme.

Something New - The starting point for today's card was most definitely some new goodies I received this week with the Tidings & Trimmings bundle from the annual catalogue. The layered star dies in this set were the first things to catch my eye, but the stamp set also includes some lovely sentiments too. In addition to the one stamped onto my label on the front of my card, I stamped this one inside:


 The real scene-stealers on today's card though are the diecut stars on the front of the card, with the centre one a combination of layered (retired) copper glimmer paper and copper foil:


Aren't those stars just fabulous?! This is such a sparkly Christmas card in real life and I love how my trio of stars has given new life to my stash of hoarded DSP too.

Holiday Bling - Last but not least, I added a Night of Navy rhinestone from the Holiday Rhinestones pack to the centre of each of my stars to compliment the navy and really draw your eye to the diecut detail.

Here is the visual summary of the key products used on today's project for you to pin for easy reference:


You can see all of my Product and 'How To' summaries on my 'How To - Tips and Techniques' Pinterest board in case you've missed any. 

I can't wait to play more with the Tidings and Trimmings stamp set and those Christmas Trimmings Dies - I think they are going to become a staple in my Christmas craft room and you will definitely be seeing more of them in the coming months.

Before you reach for your ink and papers, check out what our amazing team has created to inspire you this week:

Here's a quick recap of our challenge rules:
 
1.  Create a new paper project
2.  Upload your creation to your blog with a link back to us and provide a direct link to the post featuring your challenge submission.
3.  Please link your card to no more than four challenges, TOTAL.
4.  Have FUN!

You can see all of my 'How To' summaries on my 'How To - Tips and Techniques' Pinterest board in case you've missed any. 

Enjoy your day; I have no special plans today but am hoping to find a little crafting time and with any luck will be back tomorrow with another project. Until then, happy stampin'!


Stampin' Up! Supplies Used: 

Table built using Product Table Builder by The Crafty Owl - Independent Stampin' Up! Demonstrator.

Rainbow Blended Daisy Garden Anniversary Card TTT120

by Joanne James1. July 2021 17:00

It's Thursday and time for a new challenge over at TicTacToe! It's the turn of Team X to host this week and the lovely Ashwini is our featured designer this week. This is the fun board that we are playing along with: 


I went across the middle row with embossing/flowers/anniversary and taking my inspiration from the rainbow of colours of the feathers on the fabulous peacock in the Color Dare challenge inspiration photo I decided to break out a new stamp set and have some fun with my background - take a look:


Here's the low-down on today's card:

Daisy Garden - I'm not usually one for background stamps, but there are two in the current annual catalogue that I absolutely love. One is 'Festive Foliage' that I shared with you for the first time last week in this post here; the second one I'm sharing with you today and it's called 'Daisy Garden'. A field of daisies - so pretty! Today I heat-embossed them in white and then used by blending brushes to create a rainbow background (colours detailed below), adding some water droplets flicked with my aquapainter for added detail. Another great way to add colour to a background stamp!

Daisy Lane - One of the reasons I like the new Daisy Garden stamp is because it co-ordinates beautifully with the existing 'Daisy Lane' stamp set. Having used this set in my card on Tuesday (you can scroll back if you missed it), it occurred to me that the sentiment I used would make a wonderful feature on an anniversary card - so I used it again today too.

Tasteful Labels - I stamped my sentiment on a label cut with the Tasteful Labels Dies, and added some clear sequins and frosted enamel dots along with some sparkly white ribbon to finish my card:


What do you think - do you like to use background stamps? Do leave me a comment below - I'd love to hear your thoughts.

Here is the visual summary of the key products used on today's project for you to pin for easy reference:


You can see all of my Product and 'How To' summaries on my 'How To - Tips and Techniques' Pinterest board in case you've missed any. 

A tictactoe board offers so many creative possibilities - how does this week's board inspire you? Why not have a go? We would love to see you in the gallery and who knows - you might be selected for Designer's Choice and be eligible to be a guest designer on a future challenge. 

Enjoy your day; I'll be back tomorrow with another project. Until then, happy stampin'!


Stampin' Up! Supplies Used: 

Table built using Product Table Builder by The Crafty Owl - Independent Stampin' Up! Demonstrator.


Clean and Simple Sweet Strawberry Card PP546

by Joanne James20. June 2021 08:00

Today it's Sunday and time for this week's new challenge over at The Paper Players! It's my turn to host this week and I have a clean and simple challenge for you to work with:


Fruit and berries - you can use either, or both, on your card this week but remember to keep it clean and simple! I decided to go with strawberries for my fruit today and paired them with this week's Color Throwdown colours and the CAS(E) The Designer challenge over at Global Design Project #GDP296 this week - take a look:


Here's the low-down on today's card:

I was intrigued by the idea of CASEing the lovely Emma Goddard's card and decided to use the strawberry blossom stamp and single strawberry from the 'Sweet Strawberry' stamp set in stamped-off Gray Granite to create the soft stamped panel that forms the basis of my card front. I added a panel of block stripes using the CTD colours which are perfect for strawberries along the left-hand side. I added a white-on-black heat-embossed sentiment onto a stitched label from the Tasteful Labels Dies and mounted it on some (retired) Poppy Parade ribbon. A trio of clear sequins complete my clean and simple card:

I haven't made a card like this before but I really like the effect. I think it could be quite addictive - I can think of lots of sets that would work in this way. 

Here is the visual summary of the key products used on today's project for you to pin for easy reference:


You can see all of my Product and 'How To' summaries on my 'How To - Tips and Techniques' Pinterest board in case you've missed any. 

Before you reach for your ink and papers, check out what our amazing team has created to inspire you this week:

Here's a quick recap of our challenge rules:
 
1.  Create a new paper project
2.  Upload your creation to your blog with a link back to us and provide a direct link to the post featuring your challenge submission.
3.  Please link your card to no more than four challenges, TOTAL.
4.  Have FUN!

You can see all of my 'How To' summaries on my 'How To - Tips and Techniques' Pinterest board in case you've missed any. 

Enjoy your day; as it's Father's Day that will be the focus here today. I'm not sure that it will be dry enough for a BBQ - the last few days have been quite a bit cooler, but either I'm sure there will be fun in store! I'll be back tomorrow with another project. Until then, happy stampin'!

Stampin' Up! Supplies Used:

Table built using Product Table Builder by The Crafty Owl - Independent Stampin' Up! Demonstrator.

Perennial Petals In Bloom Birthday Card PP545

by Joanne James13. June 2021 08:00

Today it's Sunday and time for this week's new challenge over at The Paper Players! It's the turn of the fabulous Claire to host this week and she has a colour challenge for us to work with:


I am a big lover of 'Brights' so Claire's colour choices this week were right up my street! I decided to pair them with this week's TGIF Challenges sketch to create a (slightly larger) birthday card for someone rather special who will be sweet sixteen this week - take a look:


Here's the low-down on today's card:

I decided to get another use out of my Perennial Petals Dies before they retire at the end of the month and used them to cut a large layered flower and leaf stem to flank a Bermuda Bay label cut with the Tasteful Labels Dies that is the basis for my sparkly diecut 16 numbers (retired Large Numbers Framelits - still so, so useful!). I overlaid my three elements with a heat-embossed sentiment from the 'In Bloom' stamp set that I cut in half horizontally, adding the upper portion to the outside and the lower portion to the inside of my card:

I love the TGIF sketch this week; I did take a more liberal interpretation on this one, although I think you can clearly see how it influenced the layout of my card this week. I'd like to give a shout out to the TGIF team who selected this card as their winner for Bree Renwick's Stampin' Blends challenge a couple of week's ago - thanks ladies!


This card is for the oldest of the James Juniors who turns 16 on Tuesday - where did that time go?! I'm safe to blog today as she doesn't read my blog, but I won't be sharing it to my social media channels until the big day; she has been helping me get to grips with Instagram and so checks that feed every day, so no spoiling the surprise!!

Here is the visual summary of the key products used on today's project for you to pin for easy reference:


You can see all of my Product and 'How To' summaries on my 'How To - Tips and Techniques' Pinterest board in case you've missed any. 

Before you reach for your ink and papers, check out what our amazing team has created to inspire you this week:

Here's a quick recap of our challenge rules:
 
1.  Create a new paper project
2.  Upload your creation to your blog with a link back to us and provide a direct link to the post featuring your challenge submission.
3.  Please link your card to no more than four challenges, TOTAL.
4.  Have FUN!

You can see all of my 'How To' summaries on my 'How To - Tips and Techniques' Pinterest board in case you've missed any. 

Enjoy your day; we spent the day at hockey and cricket respectively yesterday, so are looking forward to a day at home today, catching up on garden jobs and enjoying more of this glorious weather we are having before it breaks later this week. I'll be back tomorrow with another project. Until then, happy stampin'!


Stampin' Up! Supplies Used:

Table built using Product Table Builder by The Crafty Owl - Independent Stampin' Up! Demonstrator.

Expressions In Ink Gold Glimmer Birthday Card AYSI 251

by Joanne James28. May 2021 13:00

Today I'm sharing my design team card for our new challenge over at As you See It where it's time for a recipe challenge:


I'm afraid I couldn't resist dipping into my Expressions in Ink Suite again for the third time this week to find my ingredients to meet the recipe criteria for this challenge - take a look:


Here's the low-down on today's card:

Expressions In Ink - Today's card uses another of the beautiful alcohol-ink inspired backgrounds that feature in the Expressions in Ink designer series paper. This one features a loose floral pattern that I deliberately chose for today's card because it is a great match for the large floral die. 

All About The Die - Today's card really is all about showcasing the gorgeous large floral die. I cut it out of (retired) gold glimmer paper as I wanted it to make a real focal point on my card; can you see how the pattern of the florals behind align with the florals on the diecut? I'm not sure if this is by design, but I was rather pleased when I discovered it:


The Remaining Ingredients - So that is DSP and diecut sorted; I heat embossed my birthday sentiment in gold onto a Tasteful Label banner and added a simple gold twine bow so as not to detract from the diecut to complete the other elements of our recipe this week.

I am truly in love with this suite - so very pretty and easy to use. I can promise you haven't seen the last of this yet!

Here is the visual summary of the key products used on today's project for you to pin for easy reference:


You can see all of my 'How To' summaries on my 'How To - Tips and Techniques' Pinterest board in case you've missed any. 

Here's a summary of our challenge rules:

  • Create any card, scrapbooking page, 3D project or packaging project that fits the challenge.
  • Please include the challenge graphic and link back to the challenge in your blog post. Turn off word verification so we can leave you lots of lovely comments. Make sure you link the post not the whole blog to the Linky. Use #AYSIXXX when uploading to a public gallery.
  • If you’re unsure about ‘the rules’, check the details under the Challenge Guidelines tab on the As You See It Challenge homepage.
We look forward to seeing your creations in the AYSI gallery.

Enjoy your day and I'll be back tomorrow with another project. Until then, happy stampin'!


Stampin' Up! Supplies Used:

Table built using Product Table Builder by The Crafty Owl - Independent Stampin' Up! Demonstrator.

Hydrangea Haven Slimline Card

by Joanne James17. April 2021 18:42

Today I'm sharing a card using this week's sketch over at The Spot that was inspired by the gorgeous inspiration photo over at The Card Concept this week:


I thought the sketch layout would be perfect for a slimline card and whilst I don't have any lavender stamps in my collection currently, I was totally inspired by the purple tones for my hydrangea - take a look:


Here's the low-down on today's card:

The lavender purple tones were perfect for a hydrangea - I actually stamped my stem but diecut the flower head from a piece of the Hydrangea Hill DSP, adding a few extra pieces that I centred with some Gorgeous Grape coloured rhinestones for a little extra sparkle:

I mounted my hydrangea on a white panel diecut with one of the Ornate Layers Dies and used another piece of Hydrangea Hill DSP for the background that incorporated some blue tones, picking up on the blues from the gingham bow of the inspiration photo. I heat-embossed my sentiment onto a Misty Moonlight stitched banner and added a blue twine bow as per the sketch, with a piece of galvanised metal cardstock that I ran through a corrugated embossing folder beneath it - a nod to the lavender vase in the photo. I also added an outline hydrangea from the Suite Sampler hostess set to the inside of my card to finish:


And that, in summary, is how I created today's clean and layered card!

Here is the visual summary of the key products used on today's project for you to pin for easy reference:


You can see all of my 'How To' summaries on my 'How To - Tips and Techniques' Pinterest board in case you've missed any. 

Enjoy your day and I'll be back tomorrow with another project. Until then, happy stampin'!


Stampin' Up! Supplies Used:

Table built using Product Table Builder by The Crafty Owl - Independent Stampin' Up! Demonstrator.

Mini Catalogue

BROWSE THE CATALOGUE

The mini catalogue is now live! Read and download your copy here.

Shop Online

Access my online shop 24 x 7, 365 days of the year:

Current April hostess code:

VDKNV7BH

Shop Online

Join My Team

It's always a great time to join Stampin’ Up! New team members can get £130 worth of products for only £99 + free business supplies + free shipping + all the fun being a part of Stampin’ Up! Stampin' Up! has something for everyone: join my growing team and benefit from my support to enjoy Stampin' Up! however you choose.

If you're interested, call me for a chat to understand how I can help you realise your goals. Alternatively, if you have already decided to sign up and you just can't wait, please click here for the link to the online form where you can sign up and order your starter kit right away! 

Latest Kit!

Stampin Cut and Emboss

The Rock Legend Kit has all you need to make 8 cards with coordinating envelopes. Along with the new Panda Friends Kit, both are available from January 4th for just £14 each - get yours here!

2023-24 Annual Catalogue

BROWSE THE CATALOGUE

Click on the catalogue for a full list of current SU! supplies - if you would like to order any of the items featured, please drop me a line at [email protected] or give me a call on 07773 421446 - I'd be happy to help.

New Online Exclusives

There are new products available exclusively in the online store from 5 March - check them out here.

About Me

Hi I'm Joanne and live in Northampton and when I'm not looking after my husband and two beautiful children, am an avid crafter with a passion for all things Stampin' Up!

I must confess that I have never been a big rubber stamper - until I discovered Stampin' Up! that is. I love the fact that I can get such great results with co-ordinating stamps, inks, papers and punches - the possibilities are endless! Join me on my stamping journey as I share the things I love and be inspired to create amazing things yourself!

Follow Me

Monthly Newsletter

Box Builder

Click the button above to use Box Buster to create your custom box design using the Envelope Punch Board!

Kits Collection Now Available!

Stampin Cut and Emboss

The new Kits Collection from Stampin' Up! is now available!

Click here to see the current kits available and order yours online today.

I Design For


Tag cloud

    Stampin' Up Stuff

    This is my personal blog and is not endorsed by Stampin’ Up! I hope you find it a plentiful source of ideas and personal inspiration but please don't copy my designs for contest submission or use for classes, publication or sale without express permission.