Reindeer Days For AYSI 338

by Joanne James6. December 2024 12:00

Today I'm sharing my design team card for our new challenge over at As you See It where it's our final challenge of the year and it's a sketch challenge, designed by Jane:


I don't know whether it's pre-Christmas overwhelm, but I struggled with Jane's sketch this week. I decided to make a Christmas card and feature some of the cute reindeer on the Reindeer Days designer series paper - take a look:


 Here's the low-down on today's card:

I started with the image of the cute baby reindeer building a snowman and used my Stylish Shaped Dies to cut it out to give a little detail to the border edges. I backed this with a panel of snowflake-embossed white cardstock and added this to my Pool Party cardbase before adding a couple of additional strips of designer paper:


I took a slight liberty with the sentiment in terms of positioning; I used a pre-printed tag from last year's retired Memories & More Kit, tied with a little silver twine. Quite a quick and easy card, even with all the layers. This was actually the second card I made - here's the first one:


On this card I used one of the horizontal elements for the sentiment, again using a retired Memories & More banner sticker. I prefer my second card though - I think that little reindeer building his snowman is super cute! Here's a photo of both cards together - which one is your favourite? Do leave me a comment below - I'd love to hear your thoughts.

Here is the visual summary of the key products used on today's project for you to pin for easy reference:


You can see all of my 'How To' summaries on my 'How To - Tips and Techniques' Pinterest board in case you've missed any. 

Here's a summary of our challenge rules:

  • Create any card, scrapbooking page, 3D or packaging project that fits the challenge.
  • Please include the challenge graphic and link back to the challenge in your post.
  • Make sure you link the specific post and not the whole blog to the Linky. Use AYSI#(insert challenge number) when uploading to a public gallery
  • Please turn off word verification so that we can send you lots of feedback.
  • You can combine our challenge with up to 3 other compatible challenges. 
  • We do reserve the right to delete, or not consider for Top Pick and Featured Artist, entries that do not comply with these guidelines.
We look forward to seeing your creations in the AYSI gallery.

Enjoy your day and I'll be back tomorrow bright and early with another Christmas card as I am guesting over at AAA Cards. Until then, happy stampin'!


Stampin' Up! Supplies Used:

Table built using Product Table Builder by The Crafty Owl - Independent Stampin' Up! Demonstrator.

Sweet Thoughts Memories & More Interactive Card Using Hooray For Surprises Dies

by Joanne James24. April 2024 11:00

I have another card to share with you today, this time inspired by the challenges over at Festive Friday (I chose green, thread and interactive) and the butterfly inspiration over at TGIF Challenges:


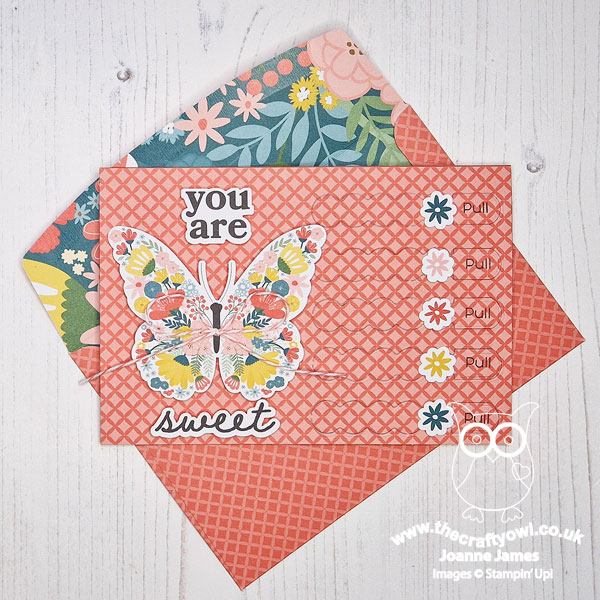
I love Memories & More cards both for scrapbooking and card making and I've used lots of them previously to make quick clean and simple cards. Today I've something a little different though; whilst my card still focuses on the Sweet Thoughts Memories & More card pack and card base and envelopes, I've paired with the Hooray For Surprises bundle to make a fun interactive card - take a look:
 

Here's the low-down on today's card:

Sweet Thoughts - The Sweet Thoughts Memories & More cards and card and envelope sets are perfect for quick cards. All of the main elements I used to decorate my printed card base came from the card pack - a large butterfly and two sentiments:
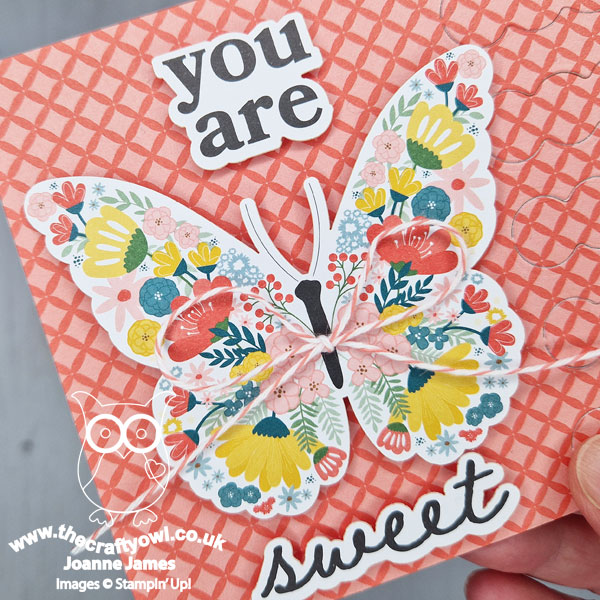
 

All of them are stickers so have self-adhesive backs, but you can easily add with dimensionals too if you'd prefer a little lift as I've done here. The only other thing I added was a twine bow using some coordinating retired thread that I had in my stash.

Hooray For Surprises - I could have stopped there, but I thought another of the cards in the Sweet Thoughts pack would make a fun 'reveal'. I spent a little time marking my card front where I needed to place my Hooray For Surprises long pull tab. The die is longer than I wanted, given the addition of my large butterfly, but this wasn't a problem; I simply used a partial diecutting technique to diecut each one in two stages, which allowed me to shorten it without issue. I stamped the word 'pull' onto the end of each tab, and added a flower sticker from the card pack to embellish each one:
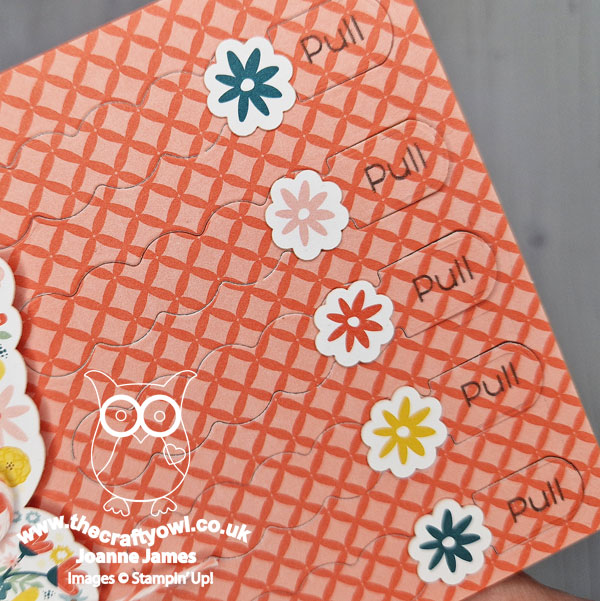
 

The second M&M card that I used is placed underneath the top layer, being careful to adhere around the edges and leave the tabbed area free.

The Big Reveal - So what's underneath the tabs? I created a 'false top' template using some spare card so that you can see what you'll see when those tabs are pulled:
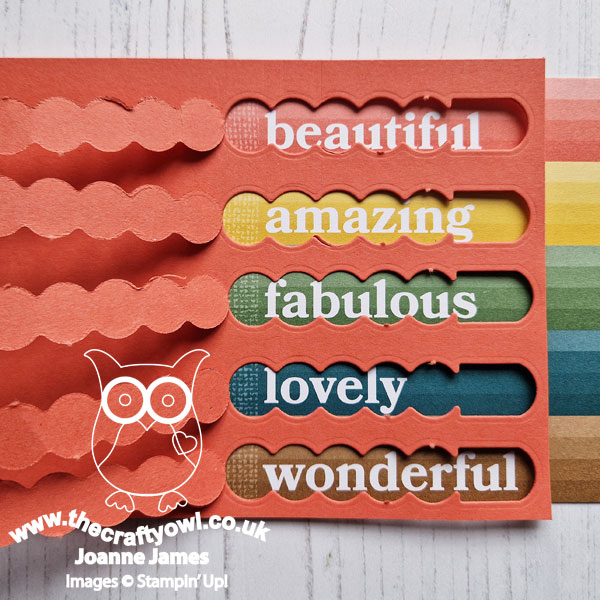
 

So not only is the recipient sweet - but beautiful, amazing, fabulous, lovely and wonderful too! The hooray For Surprises Dies are such a great way to add a fun interactive element to card. One last thing - you will notice that I needed to trim the second M&M card down so that the sentiment would appear where I wanted to. Don't discard the spare edge piece though - I added mine as a little extra decoration to the inside of my card. 

So what do you think? A fun way to combine these products, right? I will be sending this card to my lovely daughter who is at university - I'm sure she will love it. This is a great opportunity to remind you that the Hooray For Surprises bundle is just one of those featured in the monthly tutorials I create with my good friend and fellow demonstrator Jan Clothier. This tutorial contains lots more ideas and ways to use this bundle and is yours for FREE when you purchase the Hooray For Surprises bundle from either Jan or myself. So why not add it to your basket now - add some Memories & More cards and you can have a go at today's card too!
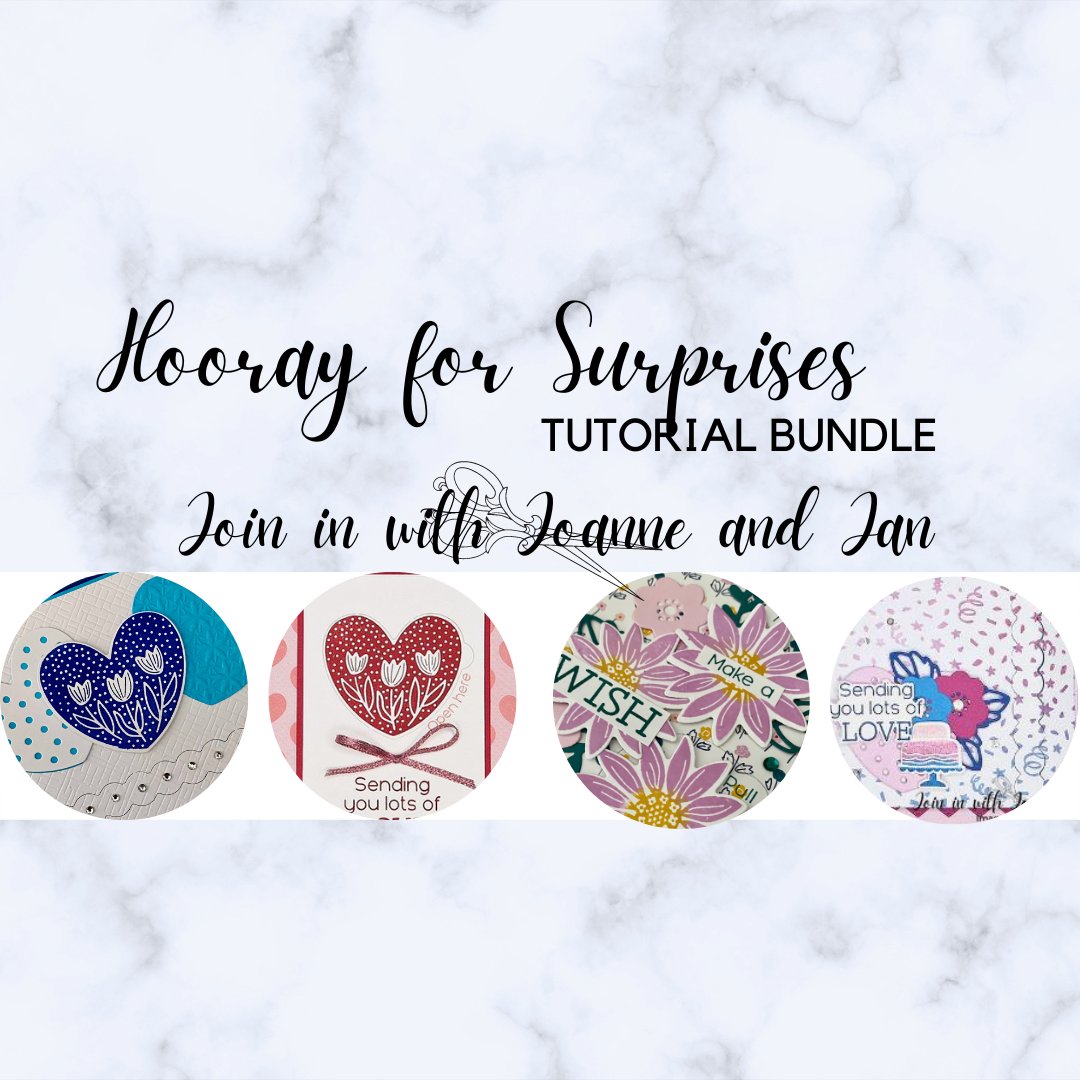
 

Here is the visual summary of the key products used on today's project for you to pin for easy reference:
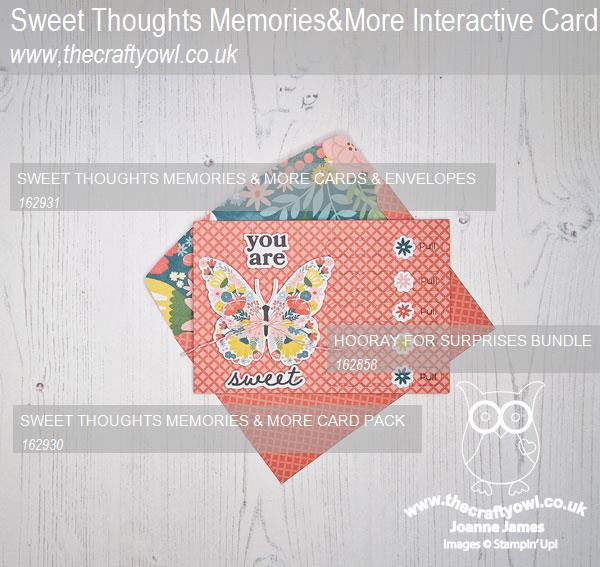
 

You can see all of my 'How To' summaries on my 'How To - Tips and Techniques' Pinterest board in case you've missed any. 

Enjoy your day and I'll be back on Friday with another project for our new challenge over at As You See It. Until then, happy stampin'!


Stampin' Up! Supplies Used:
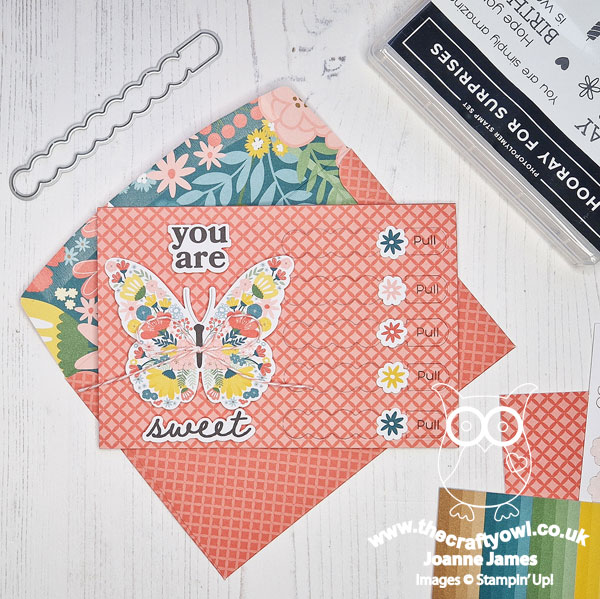
Table built using Product Table Builder by The Crafty Owl - Independent Stampin' Up! Demonstrator.


Birds Eye View Trio PP682

by Joanne James24. March 2024 08:00

Today it's Sunday and time for this week's new challenge over at The Paper Players! It's the turn of the fabulous LeAnne to host this week and she has my favourite, a sketch challenge for us to work with:


You don't have to stick with the squares on LeAnne's sketch, but they worked for my card so I kept them. I wanted to play along with the Birds of a Feather challenge over at Just Us Girls, so I grabbed my Stampin' Blends (I went down the first column of Color Dare's TicTacToe board) and Bird's Eye view stamp set and this is what I came up with:


Here's the low-down on today's card:

I stamped three of the birds, adding spectacles to the first one (this is my favourite bird in the set!) onto some squares cut with the Stylish Shapes Dies and placed them around the fourth square, onto which I added a diecut sentiment from the 'Charming Sentiments' stamp set, anchored with a Crushed Curry enamel dot:

I used a Sweet Thoughts Memories & More card for my base; the Pretty Peacock pattern complimented the colours of my birds and I added a contrasting Calypso Coral envelope to finish.

This was an easy card to pull together and the colours make for a trio of colourful feathered friends. The 'Bird's Eye View' stamp set is great if you are new to colouring: the small images are just large enough to practice your skills without any complicated details.

Here is the visual summary of the key products used on today's project for you to pin for easy reference:


You can see all of my Product and 'How To' summaries on my 'How To - Tips and Techniques' Pinterest board in case you've missed any. 

Before you reach for your ink and papers, check out what our amazing team has created to inspire you this week:

Here's a quick recap of our challenge rules:
 
1.  Create a new paper project
2.  Upload your creation to your blog with a link back to us and provide a direct link to the post featuring your challenge submission.
3.  Please link your card to no more than four challenges, TOTAL.
4.  Have FUN!

Enjoy your day; I had a new bird box and camera for Mother's Day a couple of weeks ago and today is the day we are switching over. My oldest bird box has seen better days and since the blue tits have not yet moved in, I need to get the new box in place ready for them hopefully to pay a visit! My new camera is full colour and is solar-powered, so I'm very excited! It can take stills and video and there's an app to use it with my mobile phone, so if there's any activity I'll be sure to share in a future blog post. I'll be back tomorrow with another project. Until then, happy stampin'!


Stampin' Up! Supplies Used: 

Table built using Product Table Builder by The Crafty Owl - Independent Stampin' Up! Demonstrator.
 

A Merry Beary Christmas PP663

by Joanne James22. October 2023 08:00

Today it's Sunday and time for this week's new challenge over at The Paper Players! It's the turn of the fabulous Jaydee to host this week and she has my favourite, a sketch challenge for us to work with:


I decided to use one of my Beary Christmas Memories & More cards with a pre-printed sentiment for the front layered panel of my card and the rest of the design evolved from there. Take a look at my finished card:


Here's the low-down on today's card:

I cut down one of the large Memories & More cards and used the colours of the card to create my card base and layers. Although I used the co-ordinating envelope from the co-ordinating pack, I didn't use the card base. Instead I added a Very Vanilla layer that I added some soft stencilling to using one of the retired Butterflies and Flowers Layering Decorative Masks, adding some red rhinestones to pick out the pattern centres. I also added some Real Red baker's twine to the card and a wooden snowflake element from my stash:


These Memories & More cards are great to use for quick and easy Christmas cards; they are easy to step up too with the addition of a few additional bits and pieces. I think this card has something of a Scandinavian feel to it - what do you think? Leave me a comment below - I'd love to hear your thoughts.

Here is the visual summary of the key products used on today's project for you to pin for easy reference:


You can see all of my Product and 'How To' summaries on my 'How To - Tips and Techniques' Pinterest board in case you've missed any. 

Before you reach for your ink and papers, check out what our amazing team has created to inspire you this week:

Here's a quick recap of our challenge rules:
 
1.  Create a new paper project
2.  Upload your creation to your blog with a link back to us and provide a direct link to the post featuring your challenge submission.
3.  Please link your card to no more than four challenges, TOTAL.
4.  Have FUN!

Enjoy your day; we are having a relaxing weekend as it is the start of the half-term break. I'll be back tomorrow with another project. Until then, happy stampin'!


Stampin' Up! Supplies Used: 

Table built using Product Table Builder by The Crafty Owl - Independent Stampin' Up! Demonstrator.

Summer Sunshine and Autumn Leaves

by Joanne James27. September 2023 11:45

Today I'm sharing a couple of cards - the first one is a quick clean and simple card for the current challenges over at CAS on Friday where the theme is 'SUNSHINE' and Inkspirational where they are all about clean and simple:

 The weather is decidedly autumnal here in the UK now, but I couldn't resist the opportunity to flirt with the last of the summer sun - take a look:


 I grabbed a retired What A Year Memories & More card for my base, then added a stamped and diecut sun and a couple of pink sequins to highlight my sentiment. Isn't this card just so, well, sunny?!


A couple of well-chosen embellishments are enough to elevate this CAS card without spoiling the clean feel. This card will be winging its way to my very own ray of sunshine, by daughter, who is very much enjoying her new university life. My second card, much more in keeping with the weather outside my window, was inspired by the nature photo over at Time Out:

So many interesting things in this photo; I took my inspiration from the tall trees with their autumn leaves reflecting the low autumn sun and decided to feature one of the beautiful photographic papers from the All About Autumn designer series paper pack:


I really wanted the trees to take centre stage, so added little more than a simple border (this is actually the reverse of the photographic image) and a little copper foil, along with one of my favourite sentiments for this kind of card, which is from the retired stamp set 'Lighthearted Leaves'. The sentiment is square but I stamped it on a diecut rectangle from the Nested Essentials Dies so that I could recreate the border detail from my main panel:


I think this adds to the cohesiveness of the design. And that's all there is to it!

Here is the visual summary of the key products used on my second card for you to pin for easy reference:


You can see all of my 'How To' summaries on my 'How To - Tips and Techniques' Pinterest board in case you've missed any. 

Enjoy your day and I'll be back tomorrow with another project, featuring another of the designs in the All About Autumn pack, so stay tuned! Until then, happy stampin'!


Stampin' Up! Supplies Used:

Table built using Product Table Builder by The Crafty Owl - Independent Stampin' Up! Demonstrator.


An Even Quicker Beary Christmas Card for PP656

by Joanne James3. September 2023 08:00

Today it's Sunday and time for this week's new challenge over at The Paper Players! It's my turn to host this week and I have a fun theme challenge for us to work with:


I feel like I need to start today's post with a confession! I am hosting this week - and for a variety of reasons I have been super busy with family commitments and not had a moment to craft all week! So when it came to making my card with limited time to spare, I remembered I had the cutest family of four-legged friends that would enable me to make a super-quick card - take a look:


Here's the low-down on today's card:

Yes - the Beary Christmas Memories & More Cards to the rescue! For this week's card, I used not only one of the printed cards but also a pre-printed card base with co-ordinating envelope; all I needed was to add a little ribbon loop detail and pop the card up on dimensionals and I was done. By using the pre-printed bases, this card was even quicker to pull together than last week. And isn't this cute family of polar bears just the cutest?


The Memories & More cards are perfect for crafting when time is of the essence - and this set of four legged friends is just adorable! They are making me sleepy just looking at them - so contented.

Here is the visual summary of the key products used on today's project for you to pin for easy reference:


You can see all of my Product and 'How To' summaries on my 'How To - Tips and Techniques' Pinterest board in case you've missed any. 

Before you reach for your ink and papers, check out what our amazing team has created to inspire you this week:

Here's a quick recap of our challenge rules:
 
1.  Create a new paper project
2.  Upload your creation to your blog with a link back to us and provide a direct link to the post featuring your challenge submission.
3.  Please link your card to no more than four challenges, TOTAL.
4.  Have FUN!

Enjoy your day; I'll be back soon with another project. Until then, happy stampin'!


A Quick Beary Christmas Card for PP655

by Joanne James27. August 2023 08:00

Today it's Sunday and time for this week's new challenge over at The Paper Players! It's the turn of the fabulous LeAnne to host this week and she has my favourite, a sketch challenge for us to work with:


I thought that the main panel on LeAnne's sketch was crying out to frame something, so decided to create a quick and easy Christmas card using the panel with an aperture to frame a Memories & More card from the Beary Christmas set in the upcoming mini catalogue. - take a look:


Here's the low-down on today's card:

The new Beary Christmas Memories & More cards feature polar bears, trees, presents and patterns and are just great for quick and easy Christmas cards. I added a small one featuring a large sentiment and trimmed slightly to a Balmy Blue card base, then taking a smaller panel of Balmy Blue, cut a square aperture using the Stylish Shapes Dies then ran the whole panel through my diecutting machine with my (retired) Wintry 3D embossing folder - check out the lovely embossed effect in more detail on the close up below:

I added a Real Red ribbon and bow to complete my card. So simple, yet the embossing adds a really pretty detail. I'm linking today's card up over at 52 Christmas Card Throwdown where they are asking us to make Christmas cards that feature an embossing folder this week.

Here is the visual summary of the key products used on today's project for you to pin for easy reference:


You can see all of my Product and 'How To' summaries on my 'How To - Tips and Techniques' Pinterest board in case you've missed any. 

Before you reach for your ink and papers, check out what our amazing team has created to inspire you this week:

Here's a quick recap of our challenge rules:
 
1.  Create a new paper project
2.  Upload your creation to your blog with a link back to us and provide a direct link to the post featuring your challenge submission.
3.  Please link your card to no more than four challenges, TOTAL.
4.  Have FUN!

Enjoy your day; I'll be back tomorrow with another project. Until then, happy stampin'!


Bright & Beautiful Memories & More Easiest Birthday Card Ever PP641 CAS

by Joanne James21. May 2023 08:00

Today it's Sunday and time for this week's new challenge over at The Paper Players! It's my turn to host this week and I have a fun theme for Clean And Simple challenge week:


I know they aren't everyone's cup of tea, but I love clean and simple (CAS) cards! Minimal layers, few embellishments and lots of white space all typify a clean and simple card. I often find it helpful if I'm designing a CAS card to choose a single image as my focal point - it's a great way to reduce clutter. With this in mind, my theme for our challenge this week is to choose one of something as the main feature of your card. 

For my card I made creating even easier by reaching for my new pack of Bright & Beautiful Memories and More cards that arrived this week - take a look:


Here's the low-down on today's card:

These cards are perfect not just for memory keeping, but great for quick handcrafted cards too. I chose one of the small Memories & More cards featuring a single balloon in Bubble Bath, Azure Afternoon and Lemon Lime Twist that also has a pre-printed birthday sentiment, added this to a piece of white cardstock and then adhered this to a pre-printed Bright & Beautiful Memories & More card base:


The pre-printed card bases come with pre-printed coloured envelopes too - literally no stamping and you have a clean, simple and colourful card ready in under 5 minutes! What's more with 50 double-sided cards and 20 card bases and envelopes, you could make a whole ton of cards in next to no time and still have cards left over for scrapbooking too!

Here is the visual summary of the key products used on today's project for you to pin for easy reference:


You can see all of my Product and 'How To' summaries on my 'How To - Tips and Techniques' Pinterest board in case you've missed any. 

Before you reach for your ink and papers, check out what our amazing team has created to inspire you this week:

Here's a quick recap of our challenge rules:
 
1.  Create a new paper project
2.  Upload your creation to your blog with a link back to us and provide a direct link to the post featuring your challenge submission.
3.  Please link your card to no more than four challenges, TOTAL.
4.  Have FUN!

Yesterday was a glorious day here in the UK and it was definitely a day for gardening as opposed to crafting, so it was the perfect week to making a quick card! Enjoy your day; the forecast is good again here so we are taking full advantage and having a BBQ lunch. If I can tear myself away from my garden, I'll be back tomorrow with another project. Until then, happy stampin'!


Stampin' Up! Supplies Used: 

Table built using Product Table Builder by The Crafty Owl - Independent Stampin' Up! Demonstrator.

What A Year Memories and More Hello Card PP636

by Joanne James16. April 2023 08:00

Today it's Sunday and time for this week's new challenge over at The Paper Players! It's the turn of the lovely LeAnne to host this week and she has a fun clean and simple challenge for us to work with:


Use a craft image on your card - hmm, this should be an easy one right? Turns out I had nothing in my current product stash that fitted the bill and due to the sorting out of stamp sets I couldn't find any stamps in my retired stash either (even though I know I have some somewhere!!) Then I remembered that I has a retired Memories and More pack called 'What a Year' that had some quirky images in - and today's no-stamping card was born! Here it is:


Here's the low-down on today's card:

A few of the cards in this pack feature scissors, so I chose one of them, added a background of (retired) Mango Melody Dandy Designs paper left over from Sale-A-Bration, and one of the sentiment stickers from the Memories & More pack too. The only extra I added was a diecut circle and banner behind:

And that was it - done! A little light on 'white space', but no stamping, minimal layers and embellishments and it took barely 10 minutes to put together - clean and simple at its best!

No visual summary of the key products used on today's project or supplies list, as apart from the Stylish Shapes Dies and basic cardstock I used, everything else is retired. I think this makes a fun and colourful notecard for a crafty friend - I'd love a fancy pair of scissors like the ones on this card too, wouldn't you?

Before you reach for your ink and papers, check out what our amazing team has created to inspire you this week:

Here's a quick recap of our challenge rules:
 
1.  Create a new paper project
2.  Upload your creation to your blog with a link back to us and provide a direct link to the post featuring your challenge submission.
3.  Please link your card to no more than four challenges, TOTAL.
4.  Have FUN!

Enjoy your day; I'll be back tomorrow with another project. Until then, happy stampin'!

Jolly Memories and More Santa PP620

by Joanne James4. December 2022 08:00

Today it's Sunday and time for this week's new challenge over at The Paper Players! It's the turn of the fabulous LeAnne to host this week and she has a fun and festive theme challenge for you to work with:


I knew exactly where I was headed for today's card - yes the Santa Express Suite and the Memories and More card pack - you know how I love these cards! I went with a quick and simple card that is super easy for you to recreate - take a look:


Here's the low-down on today's card:

I took a Petal Pink card base and used a retired snowflake stamp for a little tone-on-tone stamping for the background. I added a strip of red glimmer paper and an offcut of Santa Express designer paper, then used one of the wooden sentiments from the Memories & More pack along with a santa, fussy cut from one of the cards in the pack, for a jolly focal point:

I also used a couple of the wooden elements from the pack and a diecut snowflake for added detail. The stamped sentiment on the front of the card comes from the 'Jingle Jingle Jingle' stamp set, which I also used for the inside of my card:


Super easy using up lots of bits and pieces and really easy to recreate - just what we need now that we are into December! What's more, the Santa Express Memories and More card pack is reduced as part of the Last Chance promotion - I already treated myself to a couple of extra packs, and I would recommend you do too!

Here is the visual summary of the key products used on today's project for you to pin for easy reference:


You can see all of my Product and 'How To' summaries on my 'How To - Tips and Techniques' Pinterest board in case you've missed any. 

Before you reach for your ink and papers, check out what our amazing team has created to inspire you this week:

Here's a quick recap of our challenge rules:
 
1.  Create a new paper project
2.  Upload your creation to your blog with a link back to us and provide a direct link to the post featuring your challenge submission.
3.  Please link your card to no more than four challenges, TOTAL.
4.  Have FUN!

Enjoy your day; we are enjoying a family lunch and an extra session of hockey this evening; fortunately, this is practice for an indoor tournament so we will be out of the cold for once! I'll be back tomorrow with another project. Until then, happy stampin'!


Stampin' Up! Supplies Used: 

Table built using Product Table Builder by The Crafty Owl - Independent Stampin' Up! Demonstrator.

New Online Exclusives

There are new products available exclusively in the online store from 5 November - check them out here.

Latest Kits!

Stampin Cut and Emboss

The Perpetual Beauty Calendar Kit and Cherry Blossoms Treat Boxes Kit are the latest kits in the online store - get yours here!

Shop Online

Access my online shop 24 x 7, 365 days of the year:

Current December hostess code:

9NKXDTTR

Shop Online

Mini Catalogue

BROWSE THE CATALOGUE

'Tis The Season - the new Stampin' Up! Mini Catalogue is here! For more details and to download your copy click here

Scrapbooking

Stampin' Up! has introduced a new range of 12x12" scrapbooking product and kit - the full range is now available to purchase online. To download a copy of the new digital Scrapbooking Catalogue click here.

2024-25 Annual Catalogue

BROWSE THE CATALOGUE

Click on the image to download your copy of the 2024-25 annual catalogue. For a full list of current SU! supplies, go to my online store. If you would like any help or advice, please drop me a line at joanne@thecraftyowl.co.uk or give me a call on 07773 421446 - I'd be happy to help.

Join My Team

It's always a great time to join Stampin’ Up! New team members can get £130 worth of products for only £99 + free business supplies + free shipping + all the fun being a part of Stampin’ Up! Stampin' Up! has something for everyone: join my growing team and benefit from my support to enjoy Stampin' Up! however you choose.

If you're interested, call me for a chat to understand how I can help you realise your goals. Alternatively, if you have already decided to sign up and you just can't wait, please click here for the link to the online form where you can sign up and order your starter kit right away! 

About Me

Hi I'm Joanne and live in Northampton and when I'm not looking after my husband and two beautiful children, am an avid crafter with a passion for all things Stampin' Up!

I must confess that I have never been a big rubber stamper - until I discovered Stampin' Up! that is. I love the fact that I can get such great results with co-ordinating stamps, inks, papers and punches - the possibilities are endless! Join me on my stamping journey as I share the things I love and be inspired to create amazing things yourself!

Follow Me

Monthly Newsletter

Box Builder

Click the button above to use Box Buster to create your custom box design using the Envelope Punch Board!

Kits Collection Now Available!

Stampin Cut and Emboss

The new Kits Collection from Stampin' Up! is now available!

Click here to see the current kits available and order yours online today.

I Design For


Stampin' Up Stuff

This is my personal blog and is not endorsed by Stampin’ Up! I hope you find it a plentiful source of ideas and personal inspiration but please don't copy my designs for contest submission or use for classes, publication or sale without express permission.

DSP Special Release

Check out 3 popular designer series paper designs in fresh new colourways! Available exclusively in the online store from 3 December - check them out here

Last Chance Products

Last Chance Products will now be updated every other month - check them out here.