Relax In The Moment

by Joanne James16. March 2022 11:30

Today I'm sharing a card that I made using the current sketch over at TGIF Challenges:

Today's card features the 'In The Moment' stamp set and is also a sneak peek of things to come for the ladies attending my class next week that centres around this set. So many creative possibilities with this one in addition to straightforward colouring and this card showcases just one of them - take a look:


Here's the low-down on today's card:

I stretched the sketch as I needed my panel to be horizontal rather than vertical, to accommodate my stamped image and tag element and stamped my image onto a scalloped rectangle. I added a strip of Hand-Penned designer series paper to the left hand side, and having stamped and coloured my image using Stampin' Blends, I stamped the image a second time onto a piece of Hand-Penned paper and fussy cut both the blanket and pillows and paper-pieced them onto my coloured image to bring in some extra pattern. You can see the detail more closely on the image below:


I think this is quite a fun way to add extra interest to a coloured image. Some co-ordinating twine and a sentiment on a coloured tag completes my card.

I used one of the 2020-22 In Colors, Misty Moonlight, for the base of my card today and this is a good time to remind you that Misty Moonlight, along with the other 2020-22 In Colors Cinnamon Cider, Just Jade, Bumblebee and Magenta Madness, will all be retiring soon when the current annual catalogue retires. The retiring lists for the Annual Catalogue will be announced next week on Wednesday 23rd March and that is usually the point at which in-color products sell out, so if you need to stock up on ink, cardstock, reinkers or accessories, now is the time to get your order in!

Here is the visual summary of the key products used on today's project for you to pin for easy reference:


You can see all of my 'How To' summaries on my 'How To - Tips and Techniques' Pinterest board in case you've missed any. 

I'm looking forward to making a version of this card along with a couple of others at my card class next week. As a reminder, all of my classes are delivered online via Zoomm these days so if you're reading this and think you would like to join us do get in touch - you would be most welcome!

Enjoy your day; following yesterday's sunshine today it's pouring with rain, grey and freezing cold - clearly spring has not quite yet sprung!! I'll be keeping warm in my craft room and will be back tomorrow with another project. Until then, happy stampin'!


Stampin' Up! Supplies Used:

Table built using Product Table Builder by The Crafty Owl - Independent Stampin' Up! Demonstrator.

Daffodil Daydream Birthday Card PP582

by Joanne James13. March 2022 08:00

Today it's Sunday and time for this week's new challenge over at The Paper Players! It's my turn to host this week and I have chosen a sunny trio of colours for our colour challenge this week


I combined my colours with Amy's great sketch over at Freshly Made Sketches this week and used that central panel to showcase some spring daffodils - take a look:


Here's the low-down on today's card:

I used two pieces of Brights designer paper each with the same pattern, one in Daffodil Delight and one in Mango Melody, to cover my card base and added a scalloped stitched rectangle to the centre. I stamped and coloured the trio of daffodils from the Daffodil Daydream stamp set with my Stampin' Blends in the challenge colours and then diecut them with the co-ordinating Daffodil Dies and popped them up on dimensionals onto the diecut panel. A trio of yellow opaque sequins completes my card:


I also added a single daffodil to both the inside of my card and a co-ordinating envelope:


I love yellows and at this time of year daffodils were an obvious choice for me. The daffodils in my front garden border came into bloom this week and they looks so bright and cheery - like a little 'welcome home' party each time I pull my car onto the driveway!

Here is the visual summary of the key products used on today's project for you to pin for easy reference:


You can see all of my Product and 'How To' summaries on my 'How To - Tips and Techniques' Pinterest board in case you've missed any. 

So what will you create with this sunny colour palette? Before you reach for your ink and papers, check out what our amazing team has created to inspire you this week:

Here's a quick recap of our challenge rules:
 
1.  Create a new paper project
2.  Upload your creation to your blog with a link back to us and provide a direct link to the post featuring your challenge submission.
3.  Please link your card to no more than four challenges, TOTAL.
4.  Have FUN!

Enjoy your day; I am hoping that the weather will be as nice as it was here yesterday and that I will get to spend some time in the garden as there are lots of odd jobs that need doing. Otherwise, no special plans here in the James household this week. I'll be back tomorrow with another project. Until then, happy stampin'!


Stampin' Up! Supplies Used: 

Table built using Product Table Builder by The Crafty Owl - Independent Stampin' Up! Demonstrator.

Pastel Stencilled Flowers Thank You Card TTT152

by Joanne James10. March 2022 18:00

It's Thursday and time for a new challenge over at TicTacToe! It's the turn of Team X to host this week and the lovely Betty is our featured designer this week. This is the fun board that we are playing along with: 


I went both across the bottom row Diecut/Spring Colours/Floral and down the middle column with Butterfly/CAS/Spring Colours this week, also using the beautiful trio of pastels over at Hand Stamped Sentiments and the layout (but not the colours - I may have another go with some blues next week!) over at Fusion for my fresh thank you card - take a look:


Here's the low-down on today's card:

Flowers Layering Masks - As I said in my earlier post today, I think I am really enjoying experimenting with stencils, and this particular flower stencil in the Butterflies and Flowers Layering Decorative Masks is definitely one of my favourites! Today I incorporated two different coloured flowers, using the same colour to build up the layers on each, before adding leaves. I also added a touch of stencilling to the inside corner of my card:


Pretty Pastels - This is such a pretty spring colour combination that the HSS team chose this week. It just so happens to be the same colour combination I used for my daffodils and tulips Paper Players card earlier in the week too; you can see that card here if you missed it. I used Fresh Freesia for my card base and added a panel of in-color designer paper for a subtle tone-on-tone layer of pattern detail.

Brass Butterflies - To finish my card I added a couple of in-colour gems to my purple flowers and a couple of brass butterflies for a fun extra detail - you can just see the shine as they catch the light on the one on the upper left portion of the photo below:

A simple stamped sentiment from 'Flowing Flowers' in Basic Grey completes today's card.

Here is the visual summary of the key products used on today's project for you to pin for easy reference:


You can see all of my Product and 'How To' summaries on my 'How To - Tips and Techniques' Pinterest board in case you've missed any. 

A tictactoe board offers so many creative possibilities - how does this week's board inspire you? Why not have a go? We would love to see you in the gallery and who knows - you might be selected for Designer's Choice and be eligible to be a guest designer on a future challenge. 

Enjoy your day; I'll be back tomorrow with another project for our new challenge over at As You See It. Until then, happy stampin'!


Stampin' Up! Supplies Used: 

Table built using Product Table Builder by The Crafty Owl - Independent Stampin' Up! Demonstrator.

Awesome Otters Otterly Awesome Card

by Joanne James14. February 2022 14:00

Happy Valentine's Day everyone! Today I'm sharing a card for the current challenge over at Fusion where I used both the sketch and the pink and red hearts in the photo for my inspiration:

No cupcakes on today's card, although I did try and incorporate a little chocolate brown colour! I I have a card that would work for Valentine's, or any other time that you'd like to let someone know how awesome they are - take a look:


Here's the low-down on today's card:

Today's card features one of the cute otters from the 'Awesome Otters' stamp set - one of the many items that can be yours free with a £45 purchase during the current Sale-A-Bration promotion. I coloured him with my new skin tone Blends markers - so great to now have so many neutral tone Blends to choose from! - and then heat embossed a sentiment from the same set onto a red diecut heart for him to hold. I love that the heart is so big it looks like the otter can barely hold it up!


I backed the whole thing with more of my favourite Sweet Talk heart patterned paper, and for the horizontal banner added a red glimmer diecut; what to use for the horizontal caused me most of the thinking time on today's card and I tried a whole range of things before settling on this!

Did you know that otters hold hands so that they don't drift away from each other as they sleep? I think that's so sweet! My other half definitely does not display any otter-like tendencies, preferring plenty of space down the middle of the bed to ensure a good night's sleep! He's thoughtful in other ways though - and will be cooking Valentine's dinner for four this evening, so no complaints from me!

Here is the visual summary of the key products used on today's project for you to pin for easy reference:


You can see all of my 'How To' summaries on my 'How To - Tips and Techniques' Pinterest board in case you've missed any. 

Enjoy your day and I'll be back tomorrow with another project. Until then, happy stampin'!


Stampin' Up! Supplies Used:

Table built using Product Table Builder by The Crafty Owl - Independent Stampin' Up! Demonstrator.

A Wonderful Snowflake With Seasonal Sparkle CCS 450

by Joanne James14. December 2021 13:00

It's Tuesday and time for a new challenge over at CAS Colours & SketchesThis week's challenge is our final challenge of the year and as such Patricia has decided that we can have free reign this week! We can choose any challenge from 2021 and make it seasonal. So whether you decide on a sketch, colour palette or even the double, you can choose whichever you prefer - just make it seasonal! It's also our milestone 450th challenge and there are prizes to be won - yay! - so be sure to play along! I decided to go with challenge 443:


You can see my original card for sketch 443 here along with the sketch itself. For my card today I have definitely gone with a 'less is more' look and kept things simple - take a look:


Here's the low-down on today's card:

I decided to use one of the diecut snowflakes from the Wonderful Snowflakes pack and used that to accent my label, which is stamped and heat-embossed in white with one of the sentiments form the 'Snowflake Wishes' stamp set. It's difficult to see in the photo, but I then overstamped the word 'sparkle' again and sprinkled it with (retired) Dazzling Diamonds glitter before heat-embossing a second time. Along with the opal rounds, it adds such a lovely sparkle:

The white of the sentiment and snowflake really stand out against my bold blue background. I actually used (retired) Blueberry Bushel cardstock for my card, but you could achieve a similar effect with the current Pacific Point (links included below). A verse and simple border decoration using stamps from the same set inside complete my card: 

This is the perfect design for some last-minute festive card making as it would be really easy to put a batch of these together in no time. Definitely the kind of card I need this close to Christmas! 

Here is the visual summary of the key products used on today's project for you to pin for easy reference:


You can see all of my 'How To' summaries on my 'How To - Tips and Techniques' Pinterest board in case you've missed any.

This is our final CAS Colours & Sketches challenge of the year and we are sad to be saying goodbye to several of the team. On a positive note we are also welcoming a number of new members too - full details are over on the CAS Colours & Sketches main blog where you will also see our new members are playing along this week. Following this challenge the team will be taking a short break to enjoy the festivities with our loved ones before we return with a new challenge for the new year on January 4th when I will be hosting again and I will have a fun colour challenge for you!

Enjoy your day and I'll be back at some point with another project; my design commitments for 2021 are complete and I am about to start working with a whole new bunch of products to get ready for 2022. I will undoubtedly have projects to share over the festive break, but will be following a more relaxed schedule as I take time out to regroup and recharge, so watch this space. Until next time, happy stampin'!


Stampin' Up! Supplies Used:

Table built using Product Table Builder by The Crafty Owl - Independent Stampin' Up! Demonstrator.

Snowflake Wishes Wintry 3D Embossed Thank You TTT142

by Joanne James1. December 2021 18:00


It's Thursday and time for a new challenge over at TicTacToe! It's the turn of Team X to host this week and the lovely Betty is our featured designer this week. This is the fun board that we are playing along with: 


Betty made a fabulous board this week and I really was spoiled for choice! Having finally taken receipt of my Wintry 3D embossing folder this week after a very protracted wait, I knew I would have to use it on today's card. I went down the middle column of the grid with snowflakes/free/winter and used both the sketch layout over at Try Stamping on Tuesday and the sparkly snowflake in this week's Inspired By photo for a wintry card that is choc full of snowflakes and sparkle in equal measure - take a look:


Here's the low-down on today's card:

A Wintry Ombre - I embossed two panels of basic white cardstock and another of ombre glimmer paper with the snowflake Wintry 3D embossing folder for some textured panels - I love how the snowflakes appear to swirl with the design. On the ombre glimmer paper, which is in hues of Night of Navy, I lightly sanded the embossed areas to highlight the texture and detail - you can see it more closely on the photo below:

The ombre glimmer paper is gorgeous and embosses beautifully - I just love the effect!

Tag-tastic - I used one of my Tailored Tag Dies to cut my tag as per the sketch, and stamped it with snowflakes and swirls, adding a sentiment heat-embossed onto a stitched label. I added an over-the-top bow using some sparkly ribbons and accented my tag with some glimmer paper snowflakes in white and navy. I cut these with my Stitched Snowflakes Dies; if you've had your eye on these and not yet ordered, I'm afraid you will be disappointed as they were one of the first things to fly off yesterday's 'Last Chance Products' retiring items list. If you missed that post, check it out here.

Merry Snowflakes Inside - I used the 'Snowflake Wishes' stamp for the details and sentiment on the front of my card, but added decoration and a further sentiment from the 'Merry Snowflakes' set to decorate the inside:

I know I made today's card as a seasonal thank you, but I think it's still ok to have a Christmassy sentiment on the inside too, don't you think? 

Here is the visual summary of the key products used on today's project for you to pin for easy reference:


You can see all of my Product and 'How To' summaries on my 'How To - Tips and Techniques' Pinterest board in case you've missed any. 

A tictactoe board offers so many creative possibilities - how does this week's board inspire you? Why not have a go? We would love to see you in the gallery and who knows - you might be selected for Designer's Choice and be eligible to be a guest designer on a future challenge. 

Enjoy your day; I'll hopefully be back tomorrow with another project, but no promises - the Christmas rush is getting the better of me! Until next time, happy stampin'!


Stampin' Up! Supplies Used: 

Table built using Product Table Builder by The Crafty Owl - Independent Stampin' Up! Demonstrator.

Back On Your Feet Get Well Soon Card CC&S 429

by Joanne James20. July 2021 12:00

It's Tuesday and time for a new challenge over at CAS Colours & Sketches. Holly is hosting this month and our this week's challenge is a colour challenge: 


For my card today I decided to use the sketch over at Fusion for my layout, but instead of going with graphic blues, I chose ombre greens for a 'get well soon' card featuring an out-of-sorts tortoise - take a look:


Here's the low-down on today's card:

I used some retired paper that featured the challenge colours to create a background frame to compliment my tortoise, leaving the central panel clear with nothing other than my one word sentiment to leave all the focus on my sweet upside-down tortoise that I coloured with a combination of Stampin' Write Markers and Blends in the appropriate colours: 


I love the fun expression on this tortoise's face, and it pairs perfectly with the remainder of the sentiment that I stamped on the inside of my card: 


I made this card for a dear friend of mine who was out walking her sweet terrier dog when she was literally bowled over by an over-enthusiastic labrador that resulted in her falling to the ground to the sound of a loud 'crack' and a broken leg. Following surgery she is now confined to a wheelchair for at least the next 6 weeks, so this card seemed quite fitting and will hopefully raise a smile through the frustration she is most certainly feeling  at the moment.

Here is the visual summary of the key products used on today's project for you to pin for easy reference:


You can see all of my 'How To' summaries on my 'How To - Tips and Techniques' Pinterest board in case you've missed any. 

As a reminder, for our colour challenges, you must use all of the stated challenge colours. You may also use neutral colours; however, the challenge colours should be the most noticeable ones featured on your card. We use Stampin' Up! color names for reference, but you are welcome to use any other companies' products as long as you match the challenge colours as closely as possible.

Enjoy your day and I'll be back tomorrow with another project. Until then, happy stampin'!


Stampin' Up! Supplies Used:

Table built using Product Table Builder by The Crafty Owl - Independent Stampin' Up! Demonstrator.

Jar of Flowers Sunflower Shaker Card PP549

by Joanne James11. July 2021 09:00

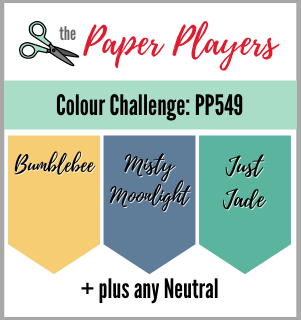
Today it's Sunday and time for this week's new challenge over at The Paper Players! Ann is hosting this week's challenge with a trio of colours chosen by the lovely Jaydee:
    

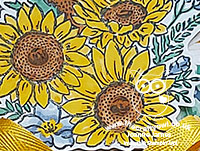
Now before you think I'm completely mad sharing a Mother's Day card in July, there is a reason I'm sharing this card today! I made this card back in February and when I went to make my card for today, Rebecca reminded me that we had made this card that featured Jaydee's colours and I hadn't blogged it, so although the papers are now retired, she wanted me to share it - so here it is:
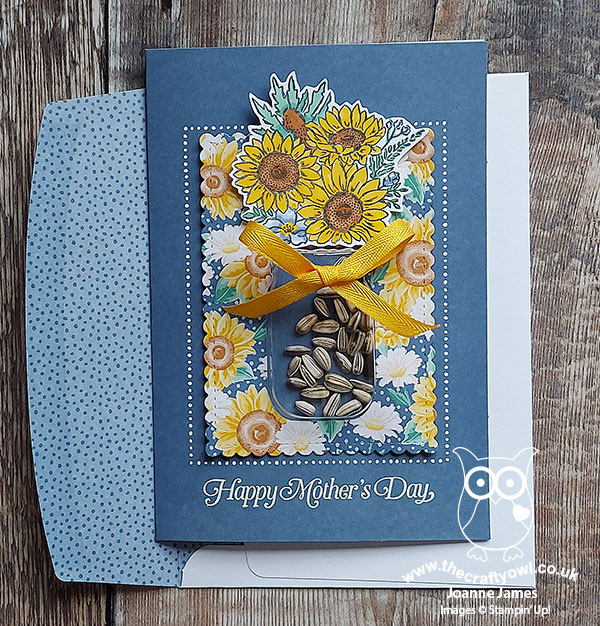
 

Here's the low-down on today's card:

This super-simple shaker card was a Mother's Day project that I made with a group of local Brownie Guides that I work with. For ease, we used the (retired) in-colour Memories & More card bases, onto which we heat embossed a Mother's Day sentiment (from the retired 'Strong and Beautiful' stamp set). We used the jar punch to punch a jar shape out of a piece of (retired) Flowers of the Season designer series paper that we had cut out using a scalloped stitched die, then inserted a mason jar shaker dome into the aperture and filled it with sunflower seeds, before attaching it to the card base. We stamped and coloured some co-ordinating sunflowers from the 'Jar of Flowers' stamp set and added these with a dimensional to the top of our jar, before finishing our shaker jar with a Bumblebee ribbon bow. 
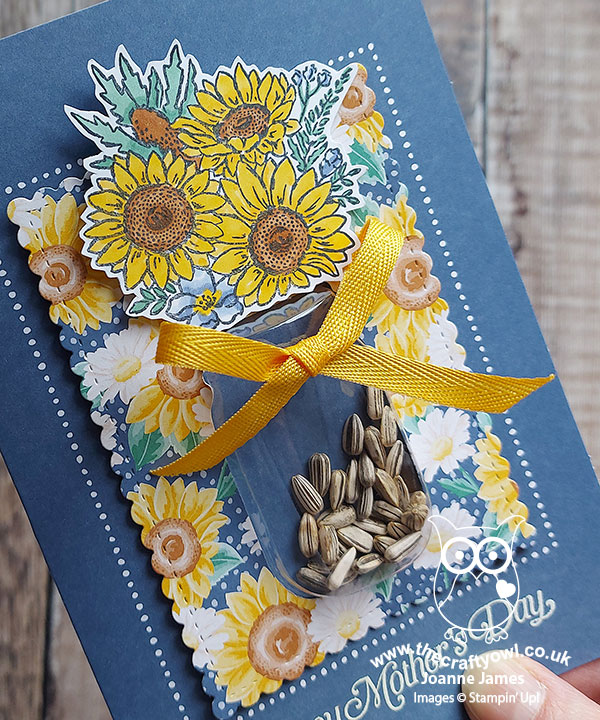
 

The intention was that once Mother's Day had passed, the Brownies would then be able to remove their sunflower seeds from an opening in the back of the card, plant them and enjoy them in their gardens all summer long. The Mother's Day card that keeps on giving, you might say! I hope that their Mums are still enjoying their cards, several months on.

These mason jar domes are a great way to make an easy shaker card - have you used them in your crafting? What did you put in yours? Share with me in the comments below - I would love to hear your ideas!

Here is the visual summary of the key products used on today's project for you to pin for easy reference:


You can see all of my Product and 'How To' summaries on my 'How To - Tips and Techniques' Pinterest board in case you've missed any. 
   I'm also linking up today's card with the girls over at The Flower Challenge where they are asking us to add spots or stripes to our card - my DSP has spots and my floral panel has a dotty border :-). 

Before you reach for your ink and papers, check out what our amazing team has created to inspire you this week:

Here's a quick recap of our challenge rules:
 
1.  Create a new paper project
2.  Upload your creation to your blog with a link back to us and provide a direct link to the post featuring your challenge submission.
3.  Please link your card to no more than four challenges, TOTAL.
4.  Have FUN!

You can see all of my 'How To' summaries on my 'How To - Tips and Techniques' Pinterest board in case you've missed any. 

Enjoy your day; I spent much of my day yesterday in the garden jet washing patios and paths, before catching the end of a thrilling Wimbledon ladies final. Today I will be getting my jobs out of the way in the morning before settling in for an afternoon and evening of sport: the men's finals at Wimbledon before I have to give way to the men of the house for football and the finals of the European Championship, England v Italy - wish me luck! I'll be back tomorrow with another project. Until then, happy stampin'!


Stampin' Up! Supplies Used: 

Table built using Product Table Builder by The Crafty Owl - Independent Stampin' Up! Demonstrator.

Gather Happy Moments with Hand Penned Memories and More

by Joanne James22. June 2021 08:00

Today I'm sharing a card using the sketch layout over at Paper Craft Crew and the colours from the latest Color Dare Challenge


Purple is one of my favourite colours and I thought the sketch would be perfect to showcase a Memories and More card so my card came together pretty quickly - take a look:


Here's the low-down on today's card:

I took one of the floral Memories and More cards that features purple and yellow flowers (yellow and green are my additional colours to accompany my Highland Heather purple) and I trimmed down the card, adding the floral section to a stitched scalloped mat. I added a second panel of a co-ordinating Highland Heather pattern from the Hand Penned patterned paper pack. A tied bow of crinkle white ribbon and a trio of clear sequins along with the printed sentiment that was fussy-cut from the remainder of the Memories and More card finish my card:


Here is the visual summary of the key products used on today's project for you to pin for easy reference:


You can see all of my 'How To' summaries on my 'How To - Tips and Techniques' Pinterest board in case you've missed any. 

Enjoy your day and I'll be back later with this week's project for our new CAS Colours & Sketches challenge. Until then, happy stampin'!


Stampin' Up! Supplies Used:

Table built using Product Table Builder by The Crafty Owl - Independent Stampin' Up! Demonstrator.

A Cut Above Pair For Father's Day AYSI 252

by Joanne James11. June 2021 12:00

Today I'm sharing my design team card for our new challenge over at As you See It where it's time for a theme challenge:


With Father's Day around the corner our masculine theme this week gave me the perfect opportunity to get organised and make my cards. It also allowed me to take some time out of my super-busy week to spend some time relaxing with my Stampin' Blends and indulge in a little colouring. I actually have two cards for you today, featuring each of the main images in the 'A Cut Above' stamp set. Take a look at the first one:


This is the card I made for my Dad and I coloured the hair, etc. accordingly - I love how you cam customise when you stamp your own card! And here's the second card I created:


Here's the low-down on today's cards:

A Cut Above - Both of my cards today feature images and sentiments from the 'A Cut Above' stamp set, a stand-alone stamp set that features in the January-June mini catalogue and will be retiring at the end of the month. Whilst I'll be sad to see this set go, as I think these images work for lots of recipients, so if this set is on your wish list, snap it up now before it's too late! These images are great to colour - I've listed all of the blends I used in my product table below. I don't profess to be an expert colourist, however I do find it wonderfully relaxing.

A Growing Garden - The layout for my card today was inspired by a TGIF Challenges sketch from a few weeks ago that I didn't play along with, but kept because I thought it would work well with my image panel. I added a strip of sky at the top of my panel, then below my image I added a number of strips of Granny Apple Green grass (cut with a retired Picnic Builders Die - you could also create something similar with fringe scissors or your paper snips if you don't have a grass die) that I had lightly sponged on the tips. Given that both of the images feature grass, I thought this was a fun way to add extra detail. I'm also linking up over at Global Design Project #GDP295 this week where their theme is 'Growing Garden' - I don't know about you, but of all the things in our garden, the grass is definitely the thing that grows the quickest, closely followed by the weeds! During the early summer months, our grass definitely resembles my card:

I know my husband will definitely see the funny side of this card - he spends many hours mowing the lawn!

A Die Comparison - The eagle-eyed amongst you will have noticed I used two different stitched scalloped rectangles on my cards. The card above uses one of the stitched rectangles in the Stitched So Sweetly Dies set; the card below uses one of the new stitched rectangles from the Scalloped Contours Dies. You will notice that the scallop detail is much larger on the card below; in addition to this detail, some of the other dies in this new set have cut outs or alternative stitched patterning, in addition to the overall sizes being larger. I wanted to show you the difference on two similar cards so that you can see how the new dies differ:


Here's both cards together - which one do you prefer? I like them both but would love to hear your thoughts, so do leave me a comment below.


The lovely team over at SUO Challenges are asking us to create projects created using markers, so I'll also be linking up over there too.

Here is the visual summary of the key products used on today's projects for you to pin for easy reference:


 And my second card:


You can see all of my 'How To' summaries on my 'How To - Tips and Techniques' Pinterest board in case you've missed any. 

Here's a summary of our challenge rules:

  • Create any card, scrapbooking page, 3D project or packaging project that fits the challenge.
  • Please include the challenge graphic and link back to the challenge in your blog post. Turn off word verification so we can leave you lots of lovely comments. Make sure you link the post not the whole blog to the Linky. Use #AYSIXXX when uploading to a public gallery.
  • If you’re unsure about ‘the rules’, check the details under the Challenge Guidelines tab on the As You See It Challenge homepage.
We look forward to seeing your creations in the AYSI gallery.

Enjoy your day; mine is set to be filled with housework, laundry and all that to the background of my piano being tuned - wish me luck! I'll be back tomorrow with another project. Until then, happy stampin'!


Stampin' Up! Supplies Used:

Table built using Product Table Builder by The Crafty Owl - Independent Stampin' Up! Demonstrator.


Current Promotions

Stampin Cut and Emboss

Save up to 30% off on all your favourite kits from 1 to 31 October! 

Click here to see the current kits available and order yours online today.

Join My Team

It's always a great time to join Stampin’ Up! During October you can get even more in your starter kit! New team members can get £160 worth of products for only £99 + free business supplies + free shipping + all the fun being a part of Stampin’ Up! Stampin' Up! has something for everyone: join my growing team and benefit from my support to enjoy Stampin' Up! however you choose.

If you're interested, call me for a chat to understand how I can help you realise your goals. Alternatively, if you have already decided to sign up and you just can't wait, please click here for the link to the online form where you can sign up and order your starter kit right away! 

Shop Online

Access my online shop 24 x 7, 365 days of the year:

Current October hostess code:

4XPEYCB9

Shop Online

Scrapbooking

Stampin' Up! has introduced a new range of 12x12" scrapbooking product and kit - the full range is now available to purchase online. To download a copy of the new digital Scrapbooking Catalogue click here.

Mini Catalogue

BROWSE THE CATALOGUE

'Tis The Season - the new Stampin' Up! Mini Catalogue is here! For more details and to download your copy click here

2024-25 Annual Catalogue

BROWSE THE CATALOGUE

Click on the image to download your copy of the 2024-25 annual catalogue. For a full list of current SU! supplies, go to my online store. If you would like any help or advice, please drop me a line at joanne@thecraftyowl.co.uk or give me a call on 07773 421446 - I'd be happy to help.

Latest Kits!

Stampin Cut and Emboss

The Christmas Ornaments Kit and Card Keeper Kit are the latest kits in the online store - get yours here!

New Online Exclusives

There are new products available exclusively in the online store from 5 November - check them out here.

About Me

Hi I'm Joanne and live in Northampton and when I'm not looking after my husband and two beautiful children, am an avid crafter with a passion for all things Stampin' Up!

I must confess that I have never been a big rubber stamper - until I discovered Stampin' Up! that is. I love the fact that I can get such great results with co-ordinating stamps, inks, papers and punches - the possibilities are endless! Join me on my stamping journey as I share the things I love and be inspired to create amazing things yourself!

Follow Me

Monthly Newsletter

Box Builder

Click the button above to use Box Buster to create your custom box design using the Envelope Punch Board!

Kits Collection Now Available!

Stampin Cut and Emboss

The new Kits Collection from Stampin' Up! is now available!

Click here to see the current kits available and order yours online today.

I Design For


Stampin' Up Stuff

This is my personal blog and is not endorsed by Stampin’ Up! I hope you find it a plentiful source of ideas and personal inspiration but please don't copy my designs for contest submission or use for classes, publication or sale without express permission.