Country Flowers In Yellow and Blue PP693

by Joanne James9. June 2024 08:00

Today it's Sunday and time for this week's new challenge over at The Paper Players! It's my turn to host this week and I have a pretty colour challenge for us to work with:


When I chose these colours, I didn't have anything in particular in mind - I just love the combination of blue and yellow. That said, when it came down to it I had no idea how to use them - go figure! After playing around with a few ideas, I finally settled on some slightly unconventionally coloured florals using the Country Flowers bundle. I loved Amy's sketch over at Freshly Made Sketches this week so I used that for my layout and set to work. This is what I came up with:


Here's the low-down on today's card:

Eyelet Embossing - I decided to use a Lemon Lolly card base and embossed the whole of the card front using the new Eyelet 3D embossing folder. I love the design of this folder and I love the texture and detail it adds to a project.

Countryside Inn - I used a small panel of Countryside Inn designer series paper in Night of Navy for one of the rectangle elements of the sketch. Did you realise that the Countryside Inn paper is still available? It's one of a few that carried over from last year's annual catalogue. The pattern is subtle and doesn't look out of place with the embossed background detail.

Country Flowers - The focal point for today's card is my bucket of flowers from the 'Country Flowers' stamp set. I used the three challenge colours for my unconventional floral bouquet, along with some additional diecut white leaves and flowers, and used Smoky Slate as my fourth colour for my metal bucket that they are standing in - check out the detail below:

I finished my card with a sentiment from the same set, wrapped with a little Boho Blue thread pulled from a ribbon to anchor it.

The Country Flowers bundle is one of those that is discounted by a further 10% until the end of June - that's in addition to the usual 10% bundle discount, so a whopping 20% off. There's never been a better time to add a bundle to your shopping basket!

Here is the visual summary of the key products used on today's project for you to pin for easy reference:


You can see all of my Product and 'How To' summaries on my 'How To - Tips and Techniques' Pinterest board in case you've missed any. 

Before you reach for your ink and papers, check out what our amazing team has created to inspire you this week:

Here's a quick recap of our challenge rules:
 
1.  Create a new paper project
2.  Upload your creation to your blog with a link back to us and provide a direct link to the post featuring your challenge submission.
3.  Please link your card to no more than four challenges, TOTAL.
4.  Have FUN!

Enjoy your day; I'll be back later this week with another project. Until then, happy stampin'!


Stampin' Up! Supplies Used: 

Table built using Product Table Builder by The Crafty Owl - Independent Stampin' Up! Demonstrator.

Festive And Fun With Spots and Stripes

by Joanne James21. August 2023 09:00

Another Monday, another week! I had a little time yesterday and I fancied a little colouring, so I decided to break out a new stamp set and create a couple of cards with Jen Mitchell's sketch layout over at Freshly Made Sketches this week. Here's her sketch:


Both my cards use the same layout: on the first one, I added the sentiment to the banner; on the second one I added my images to the banner and the sentiment on the panel. Both cards also feature the Merry Bold & Bright designer paper that will debut in the new mini catalogue - stripes on the first one, spots of the second one.

My first card I'm linking up over at 52 Christmas Card Throwdown where the theme is food - I thought this reindeer with his Christmas pudding would fit right in:


I made an extended banner for my sentiment using the Nested Essentials Dies and coloured the cute reindeer with my Blends markers for a smooth and streak-free finish:


My second card features a super colourful giraffe, decorating his tree for Christmas - take a look:


The sentiment is from the (retired) set 'Framed & Festive'. 

This is definitely the most colourful of the pair so I'm linking this one up over at TimeOut Challenges where their them is 'colourful' - I love the way the spots on the designer paper background mirror the spots on the giraffe too!


Nothing too fancy about these cards but they were definitely fun to make and great images to colour!

Here is the visual summary of the key products used on today's project for you to pin for easy reference:


You can see all of my 'How To' summaries on my 'How To - Tips and Techniques' Pinterest board in case you've missed any. 

The new Christmas products that you will see showcased on my blog this week will all be available to customers September 6th when the new mini catalogue goes live. I am currently packing up catalogues to send to my customers who have shopped with me in the last 12 months; if you aren't already on my mailing list and would like a copy of the new catalogue, do get in touch - I would be happy to help.

I have had a very productive start to the week - let's hope this continues! Enjoy the rest of your day and I'll be back tomorrow with another project. Until then, happy stampin'!


Stampin' Up! Supplies Used:

Table built using Product Table Builder by The Crafty Owl - Independent Stampin' Up! Demonstrator.

By My Side Friendship Card AYSI303

by Joanne James14. July 2023 12:00

Today I'm sharing my design team card for our new challenge over at As you See It where it's time for an interesting colour challenge, chosen by the lovely Heather H:


Whilst I love our challenge photo this week - isn't the colouring on that crab amazing?! - I wasn't sure how I was going to use it on my card. Turns out after a quick perusal of stamp sets, it wasn't that tricky after all - take a look:


Here's the low-down on today's card:

I thought a spot of colouring was in order and grabbed my Blends in each of the challenge colours and stamped and coloured an image from the 'By My Side' stamp set. I used the Grey Granite for my ground shadow, but it doesn't appear anywhere else on my card. I picked up the Tahitian Tide in my (retired) designer paper banner and made my base from Crumb Cake and Poppy Parade, adding interest with my Dots and Spots Die for my main panel. I did use a piece of in-colour twine that is actually white and Sweet Sorbet for my bow, but there is such a small hint of colour you really can't tell the difference and it blends in just fine. 

I stamped a simple sentiment next to my image, highlighting the word 'friend' by stamping it on Tahitian Tide cardstock and paper-piecing it in place:


And that's my card - a brightly coloured note to send a friend a little 'hello'.

Here is the visual summary of the key products used on today's project for you to pin for easy reference:


You can see all of my 'How To' summaries on my 'How To - Tips and Techniques' Pinterest board in case you've missed any. 

Here's a summary of our challenge rules:

  • Create any card, scrapbooking page, 3D project or packaging project that fits the challenge.
  • Please include the challenge graphic and link back to the challenge in your blog post. Turn off word verification so we can leave you lots of lovely comments. Make sure you link the post not the whole blog to the Linky. Use #AYSIXXX when uploading to a public gallery.
  • If you’re unsure about ‘the rules’, check the details under the Challenge Guidelines tab on the As You See It Challenge homepage.
  • In a colour challenge, black or other neutral can be used in outlines and sentiments but no other colours should be included. Stampin’ Up colours are used for reference but colours that are a close match are welcome.
We look forward to seeing your creations in the AYSI gallery.

Enjoy your day and I'll be back tomorrow with another project. Until then, happy stampin'!


Stampin' Up! Supplies Used:

Table built using Product Table Builder by The Crafty Owl - Independent Stampin' Up! Demonstrator.

Simple Stamping And A Zoo Crew Knitting Llama CCS 513

by Joanne James6. June 2023 13:00

It's Tuesday and time for a new challenge over at CAS Colours & Sketches. Shannon is hosting this month and our first challenge is a colour challenge: 


For my card today I went super clean and simple with a fun card perfect for a crafty friend - take a look:


Here's the low-down on today's card:

I decided to indulge in a spot of fussy cutting of my Zoo Crew designer paper and trim out one of the knitting llamas! The Zoo Crew paper is choc-full of animals doing all kinds of fun things - and what could be more comical than a knitting llama, right?! Some of the images are black and white, some partially coloured, and some completely coloured and ready to use. The chair and wool that the llama is knitting with were already coloured, so I just used my Blends to add in a little more light Old Olive to the wool, some Petal Pink to the ears and a little dark Smoky Slate to the skin and outline of my llama:

I added a sentiment from the 'Crafting With You' stamp set which seemed to fit the image perfectly. This is a great #simplestamping card - just stamps, ink and paper and a little designer paper. The Zoo Crew paper is another of those that are available at 15% discount in this month's designer series paper sale. If you fussy cut the images (you can also diecut many of them with the Zany Zoo co-ordinating dies too, but these are by no means essential - they are easy to cut out with scissors) you will be able to make an absolute ton of simple cards. They can be paired with whatever sentiments you have to hand - now is the time to stock up for sure! Links to the online store below - or contact me if you would like to participate in my current discounted paper share.

Here is the visual summary of the key products used on today's project for you to pin for easy reference:


You can see all of my 'How To' summaries on my 'How To - Tips and Techniques' Pinterest board in case you've missed any. 

As a reminder, for our colour challenges, you must use all of the stated challenge colours. You may also use neutral colours; however, the challenge colours should be the most noticeable ones featured on your card. We use Stampin' Up! colour names for reference, but you are welcome to use any other companies' products as long as you match the challenge colours as closely as possible. For this challenge, the colours include two of those that were retired in the recent current refresh, so feel free to substitute with Petal Pink and Old Olive as the nearest current alternatives, as I've done. 

For the second day running, it is decidedly cooler than the weather forecast and looking rather overcast. No matter - I am still wearing a summer dress and willing the sun to come out, although at this rate I may have to add socks and a cardigan later!! Enjoy your day and I'll be back tomorrow with another project. Until then, happy stampin'!


Stampin' Up! Supplies Used:

Table built using Product Table Builder by The Crafty Owl - Independent Stampin' Up! Demonstrator.

Perfectly Penciled Amazing You

by Joanne James26. April 2023 11:37

Today I'm sharing a card for the current Color Hues challenge:

Purple is one of my favourite colours so I knew I wanted to play along. I decided on some more colouring with my Stampin' Blends using up a little more retiring paper - take a look:


Here's the low-down on today's card:

The Perfectly Penciled papers are great for colouring with your Stampin' Blends markers - I made this card last week where I 'reverse coloured' the same pattern - you can see that card here if you missed it. This time I coloured the actual flowers in shades of purple and green and included a larger vertical panel, accenting with a diecut sentiment in black and white again using the Amazing Thanks Dies and pairing with a stamped 'YOU' from the 'Art Gallery' stamp set.


This paper and those fabulous Amazing Thanks Dies are all retiring at the end of this month - add them to your shopping basket via the links below whilst you still can!

Here is the visual summary of the key products used on today's project for you to pin for easy reference:


You can see all of my 'How To' summaries on my 'How To - Tips and Techniques' Pinterest board in case you've missed any. 

Enjoy your day and I'll be back tomorrow with another project. Until then, happy stampin'!


Stampin' Up! Supplies Used:

Table built using Product Table Builder by The Crafty Owl - Independent Stampin' Up! Demonstrator.

Mint Macaron Perfectly Penciled Thank You Card CCS 509

by Joanne James18. April 2023 12:00

It's Tuesday and time for a new challenge over at CAS Colours & SketchesThis week's challenge is a sketch challenge and Valerie has asked that we create a slimline card with a square feature and overlapping sentiment:


Feel free to flip or rotate the sketch when making your card but remember to make it a slimline if you'd like to be considered for the winner's spot for this challenge. 

For my card today I ended up making two cards; I'll share the first one tomorrow as it was a little less clean and simple than I'd have liked. This is the card I settled on to share with you today:


Here's the low-down on today's card:

This is actually a no-stamping card. I used a piece of the retiring black and white Perfectly Penciled designer series paper and coloured the negative space around the florals using my Mint Macaron Blends, before cutting it out using one of my square Stylish Shapes Dies. I added this to a base of thick Basix White cardstock, and then added a layered thanks sentiment cut with the Amazing Thanks Dies on dimensionals to complete my card:

The Perfectly Penciled papers are great for colouring with your Stampin' Blends markers and this 'reverse colouring' really allows the black and white design to stand out. This paper, along with Mint Macaron and all its accessories and those fabulous Amazing Thanks Dies are all retiring at the end of this month - add them to your shopping basket whilst you still can - or maybe wait until 11pm this evening when the 24 hour free shipping promotion starts - you can read more about the free shipping promotion here!

I'm also linking today's card to the black, white and one colour challenge over at Color Dare and the current 'anything goes' challenge at Less Is More.


Here is the visual summary of the key products used on today's project for you to pin for easy reference:


You can see all of my 'How To' summaries on my 'How To - Tips and Techniques' Pinterest board in case you've missed any. 

As a reminder, for our colour challenges, you must use all of the stated challenge colours. You may also use neutral colours; however, the challenge colours should be the most noticeable ones featured on your card. We use Stampin' Up! color names for reference, but you are welcome to use any other companies' products as long as you match the challenge colours as closely as possible.

Enjoy your day and I'll be back tomorrow with another project. Until then, happy stampin'!


Stampin' Up! Supplies Used:

Table built using Product Table Builder by The Crafty Owl - Independent Stampin' Up! Demonstrator.

Catch You Later And A Mother's Love AYSI274

by Joanne James6. May 2022 12:00

Today I'm sharing my design team card for our new challenge over at As you See It where it's time for a poignant 'fill in the blank' challenge:


I used this week's Global Design Project colour palette and the sketch layout over at Sunday Stamps and chose a set that might surprise you for my card this week - take a look:


Here's the low-down on today's card:

A Mother's Love - We have already had Mother's Day here in the UK, so instead of making a Mother's Day card I decided to make a card to send to my daughter. I filled in the blank for today's challenge with 'The best thing about Mothers is ...unconditional love' and I thought this sweet image of two birds from the 'Catch You Later' stamp set, alongside the sentiment of 'I'll always be here for you' sums this up nicely. The image of the protective mother bird keeping her little one close underlines the idea that a Mother is the one person who loves you - no matter what. As a Mother of two myself, that's exactly how I feel about my offspring and this simple card is a great way to make sure that they know it. 

Stylish Circles and Banners - I used the Stylish Shapes Dies both to edge my cutaway circle - I love that these dies have the stitched detail on both sides of the cut line - and for the trio of stitched banners that house my sentiment. This dieset is an absolute must-have!

Beautiful Blends - I coloured my pair of birds in this week's GDP colours; I think these birds are supposed to be quails, but since these are rather uninteresting, neutral coloured birds to look at, I thought a brighter look with a funky top feather was much more fun! 

Here is the visual summary of the key products used on today's project for you to pin for easy reference:


You can see all of my 'How To' summaries on my 'How To - Tips and Techniques' Pinterest board in case you've missed any. 

Here's a summary of our challenge rules:

  • Create any card, scrapbooking page, 3D project or packaging project that fits the challenge.
  • Please include the challenge graphic and link back to the challenge in your blog post. Turn off word verification so we can leave you lots of lovely comments. Make sure you link the post not the whole blog to the Linky. Use #AYSIXXX when uploading to a public gallery.
  • If you’re unsure about ‘the rules’, check the details under the Challenge Guidelines tab on the As You See It Challenge homepage.
  • In a Fill in the Blank challenge, complete the sentence in the Challenge Banner with the phrase that is true for you and create your project using the words you used. Tell us what you said in your blog or on your site.
We look forward to seeing your creations in the AYSI gallery.

Enjoy your day; I've a super busy end to my week but will hopefully be back tomorrow with another project. Until then, happy stampin'!


Stampin' Up! Supplies Used:

Table built using Product Table Builder by The Crafty Owl - Independent Stampin' Up! Demonstrator.

In The Moment And A Quick Rainbow For AYSI271

by Joanne James25. March 2022 12:00

Today I'm sharing my design team card for our new challenge over at As you See It where the lovely Heather H had a speed stamping challenge for us:


Heather's theme initially had me scratching my head this week, as I have no current stamps that are wellington boots or umbrellas; then I suddenly realised 'staying dry' can be as simple as taking the outside in! That thought led to another and I was away - take a look at what I came up with:


Here's the low-down on today's card:

Yes, another rainbow for you today! I still had the 'In The Moment' stamp set out on my desk having prepped for my class using this set earlier this week. In my class, we looked not only at how to colour with Stampin' Blends, along with pencils, Stampin' Write markers and blending tips for each medium, but also different ways in which you can use line drawn images, including ways of colouring beyond the obvious. This card is a 'bonus' for the ladies that attended my class as it looks at another way to colour an image that might not be immediately obvious: here I've focused less on the inside and more on the outside - what can be seen beyond the scene, which in this case is the stormy grey sky and a beautiful rainbow through the window itself.

I used all 10 minutes of my allotted time for this week's speed challenge, first cutting my card base, mat and white pieces and stamping the image and sentiment in Memento Black, using my Stamparatus to get a nice solid image, then I used the remainder of the time to colour my image. I went with a traditional rainbow and coloured it with my Blends, simply drawing in the arch of colour and blending between each to get a smooth-ish finish. I added some clear Wink of Stella to give my rainbow some sparkle and a few clear enamel raindrops to add to the effect:

In the interests of time, I coloured the rest of my sky in Smoky Slate and added a few grey highlights to the image of lady, but that was all. I really like the effect - the lack of colour on the main image really draws the eye to the rainbow outside and the pop of colour it adds. 

Here is the visual summary of the key products used on today's project for you to pin for easy reference:


You can see all of my 'How To' summaries on my 'How To - Tips and Techniques' Pinterest board in case you've missed any. 

This is my second entry over at The Paper Craft Crew's rainbow colour challenge this week - traditional rainbow colours this time - and another entry for the rain/rainbow challenge over at Global Design Project #GDP335.


Here's a summary of our challenge rules:

  • Create any card, scrapbooking page, 3D project or packaging project that fits the challenge.
  • Please include the challenge graphic and link back to the challenge in your blog post. Turn off word verification so we can leave you lots of lovely comments. Make sure you link the post not the whole blog to the Linky. Use #AYSIXXX when uploading to a public gallery.
  • If you’re unsure about ‘the rules’, check the details under the Challenge Guidelines tab on the As You See It Challenge homepage.
  • In a speed stamping challenge, please time yourself and say in your post how long your card took to complete. 
We look forward to seeing your creations in the AYSI gallery.

I hope you're enjoying my rainbows in all of their various guises this week because - spoiler alert! - I have another rainbow card for you tomorrow! Enjoy your day and I'll be back tomorrow with another project. Until then, happy stampin'!


Stampin' Up! Supplies Used:

Table built using Product Table Builder by The Crafty Owl - Independent Stampin' Up! Demonstrator.

Your Last Chance To Sale-A-Brate With Awesome Otters!

by Joanne James26. February 2022 20:00

I've spent a lovely day outside in the fresh air today watching back-to-back hockey matches, still chilly but with glorious sunshine - at last! So I've a super quick post today to share a clean and simple card that uses the colours over at Sunday Stamps and the sketch challenge over at AAA Cards:


I went for the middle rectangle of the nine grid split and chose a cute party-going otter as my favourite animal (of the moment!) as he won't be around for much longer - take a look:


Here's the low-down on today's card:

The Sunday Stamps challenge is entitled 'Winter Blues' but there's nothing sad about today's card! This cute little otter is from the 'Awesome Otters' stamp set: I stamped him and added a party hat from the same set and coloured him with a selection of Stampin' Blends markers (added below, plus a retired Coastal Cobana set) before finishing with a simple sentiment:


The 'Awesome Otters' stamp set is one of a number of items that can be yours FREE with a £45 purchase during Stampin' Up!'s current Sale-A-Bration promotion. If it's still on your wish list, you have until next Monday when the promotion ends to order yours before it's gone forever. Just click on the links below to go to my online store to get yours - remember to add the current host code for a special thank you from me.

Here is the visual summary of the key products used on today's project for you to pin for easy reference:


You can see all of my 'How To' summaries on my 'How To - Tips and Techniques' Pinterest board in case you've missed any. 

Enjoy your evening and I'll be back tomorrow with another project. Until then, happy stampin'!


Stampin' Up! Supplies Used:

Table built using Product Table Builder by The Crafty Owl - Independent Stampin' Up! Demonstrator.

Catch You Later Monkey Clean and Simple PP579

by Joanne James20. February 2022 09:00

Today it's Sunday and time for this week's new challenge over at The Paper Players! It's the turn of the fabulous Ann to host this week and she has a clean and simple challenge for you to work with:
    

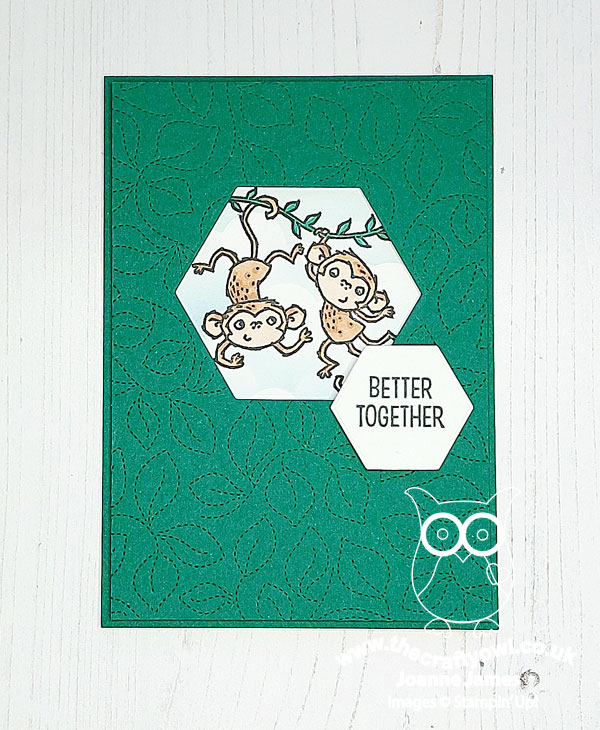
I decided to use the sketch over at Just Add Ink for my layout this week and used two overlappping hexagons, negative and positive, cut with the Beautiful Shapes Dies for my central shapes and chose to feature the two cute monkeys from the 'Catch You Later' stamp set for my wildlife - take a look:
 

Here's the low-down on today's card:

I stamped my monkeys onto some white cardstock and coloured them with my new skin tone Blends markers, then masked them off and used some Balmy Blue ink and a stencil I made using my Basic Borders Dies to create a soft and subtle background of clouds with my blender brush behind them:
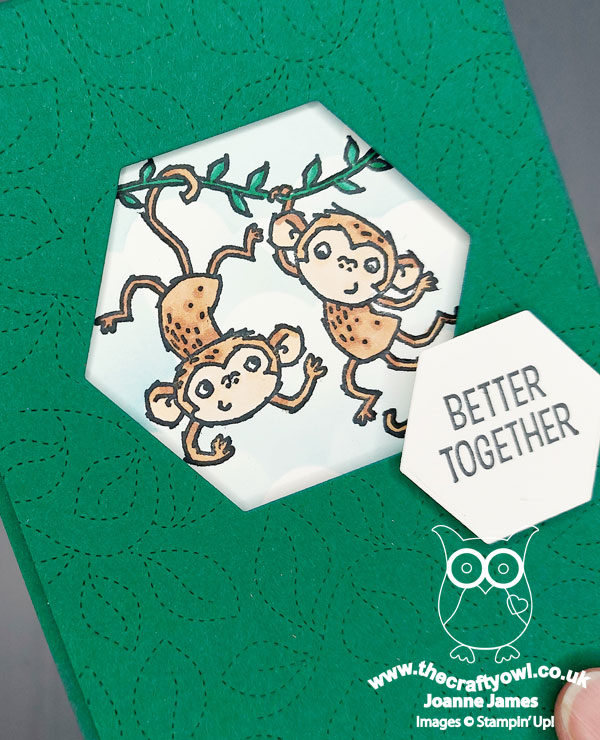
I added this to my Shaded Spruce card base and then added my top panel, which I ran through my diecutting machine with the Stitched Greenery Die before cutting out the hexagon shape and popping this panel up on dimensionals to frame my little jungle scene. I added a sentiment to another popped-up hexagon and finished my sentiment on the inside, with another stamped-off image of the monkeys too:
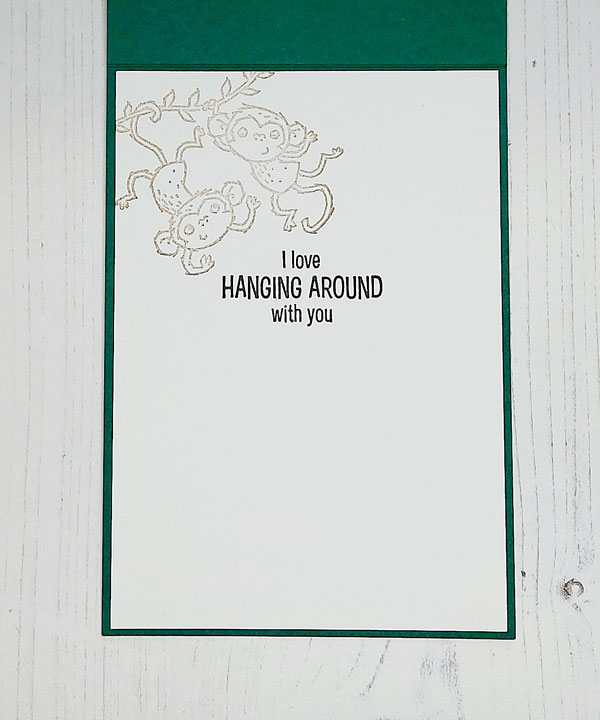
 

So what do you think? Cute, right?! It's my 23rd wedding anniversary today and whilst this didn't start out as a card for my DH, it may well be the one I send as he would appreciate the humour over sweet and smushy love hearts any day!

Here is the visual summary of the key products used on today's project for you to pin for easy reference:
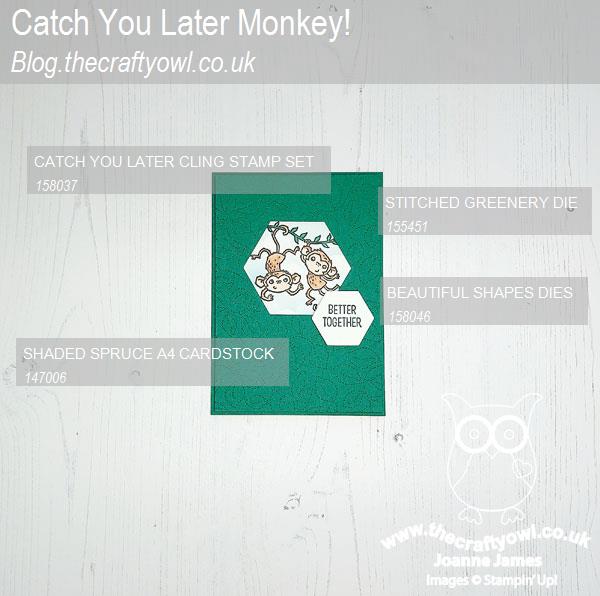
 

You can see all of my Product and 'How To' summaries on my 'How To - Tips and Techniques' Pinterest board in case you've missed any. 

Before you reach for your ink and papers, check out what our amazing team has created to inspire you this week:

Here's a quick recap of our challenge rules:
 
1.  Create a new paper project
2.  Upload your creation to your blog with a link back to us and provide a direct link to the post featuring your challenge submission.
3.  Please link your card to no more than four challenges, TOTAL.
4.  Have FUN!

Enjoy your day; one of the James Juniors had a friend stay for a sleepover yesterday, so apart from taking him home, we are having a quiet day indoors. The James girls definitely deserve it; as my regular readers know it is not uncommon for us to be out in all weathers either playing or watching hockey at the weekend. Well, despite storm Eunice and the incredible high winds and driving rain we've had here over the past few days, yesterday's match wasn't cancelled. We all turned up and despite a seriously waterlogged pitch, the umpires decided it was safe to play. The end result? Players and parents soaked to the skin and frozen to the bone - and just to give you a flavour of what I'm talking about, here's a photo I managed to snap during 'warm up' before the game started: 


I have genuinely never known anything like it! To make things worse the girls lost 4-2, despite their best efforts. So today we are staying warm - I think we might actually huddle under a blanket and watch 'Encanto' - it's about time we discovered why no-one talks about Bruno!

I'll be back tomorrow with another project. Until then, happy stampin'!


Stampin' Up! Supplies Used: 

Table built using Product Table Builder by The Crafty Owl - Independent Stampin' Up! Demonstrator.

Current Promotions

Stampin Cut and Emboss

Save up to 30% off on all your favourite kits from 1 to 31 October! 

Click here to see the current kits available and order yours online today.

Join My Team

It's always a great time to join Stampin’ Up! During October you can get even more in your starter kit! New team members can get £160 worth of products for only £99 + free business supplies + free shipping + all the fun being a part of Stampin’ Up! Stampin' Up! has something for everyone: join my growing team and benefit from my support to enjoy Stampin' Up! however you choose.

If you're interested, call me for a chat to understand how I can help you realise your goals. Alternatively, if you have already decided to sign up and you just can't wait, please click here for the link to the online form where you can sign up and order your starter kit right away! 

Shop Online

Access my online shop 24 x 7, 365 days of the year:

Current October hostess code:

4XPEYCB9

Shop Online

Scrapbooking

Stampin' Up! has introduced a new range of 12x12" scrapbooking product and kit - the full range is now available to purchase online. To download a copy of the new digital Scrapbooking Catalogue click here.

Mini Catalogue

BROWSE THE CATALOGUE

'Tis The Season - the new Stampin' Up! Mini Catalogue is here! For more details and to download your copy click here

2024-25 Annual Catalogue

BROWSE THE CATALOGUE

Click on the image to download your copy of the 2024-25 annual catalogue. For a full list of current SU! supplies, go to my online store. If you would like any help or advice, please drop me a line at joanne@thecraftyowl.co.uk or give me a call on 07773 421446 - I'd be happy to help.

Latest Kits!

Stampin Cut and Emboss

The Christmas Ornaments Kit and Card Keeper Kit are the latest kits in the online store - get yours here!

New Online Exclusives

There are new products available exclusively in the online store from 5 November - check them out here.

About Me

Hi I'm Joanne and live in Northampton and when I'm not looking after my husband and two beautiful children, am an avid crafter with a passion for all things Stampin' Up!

I must confess that I have never been a big rubber stamper - until I discovered Stampin' Up! that is. I love the fact that I can get such great results with co-ordinating stamps, inks, papers and punches - the possibilities are endless! Join me on my stamping journey as I share the things I love and be inspired to create amazing things yourself!

Follow Me

Monthly Newsletter

Box Builder

Click the button above to use Box Buster to create your custom box design using the Envelope Punch Board!

Kits Collection Now Available!

Stampin Cut and Emboss

The new Kits Collection from Stampin' Up! is now available!

Click here to see the current kits available and order yours online today.

I Design For


Stampin' Up Stuff

This is my personal blog and is not endorsed by Stampin’ Up! I hope you find it a plentiful source of ideas and personal inspiration but please don't copy my designs for contest submission or use for classes, publication or sale without express permission.