One Layer Monograms for Less Is More

by Joanne James26. June 2021 07:00

Today I'm here bright and early to share a couple of cards for the new challenge over at Less Is More where I was delighted to be asked to be Guest Designer following my recent accolade as overall winner for April. 


I would like to say I am delighted - although I did break into something of a cold sweat when the lovely Anita told me the challenge for the next fortnight is not only 'Monogram' but yes - ONE LAYER monograms!


She did give me the option to defer, but never one to shy away from a challenge I started researching - this challenge really did necessitate me getting my thinking cap on! So first things first - the definition we are using for the term 'monogram' is:

Monogram: a motif of two or more interwoven letters, typically a person's initials, used to identify a personal possession or as a logo.

A design consisting of two or more alphabetic letters combined or interlaced, commonly one's initials.

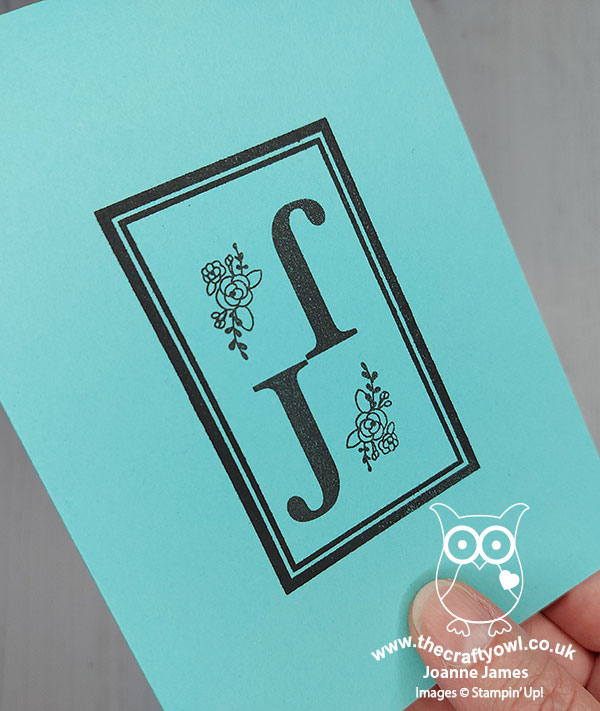
My first card uses my own initials. One of the challenges for me in creating a card to meet the brief was that it needed two or more letters. I explored various ways to combine the two Js in my name. I explored various ways of combining the letters and in the end went for a rotational pattern in a Tiffany & Co.-inspired design of black on Coastal Cabana - take a look:


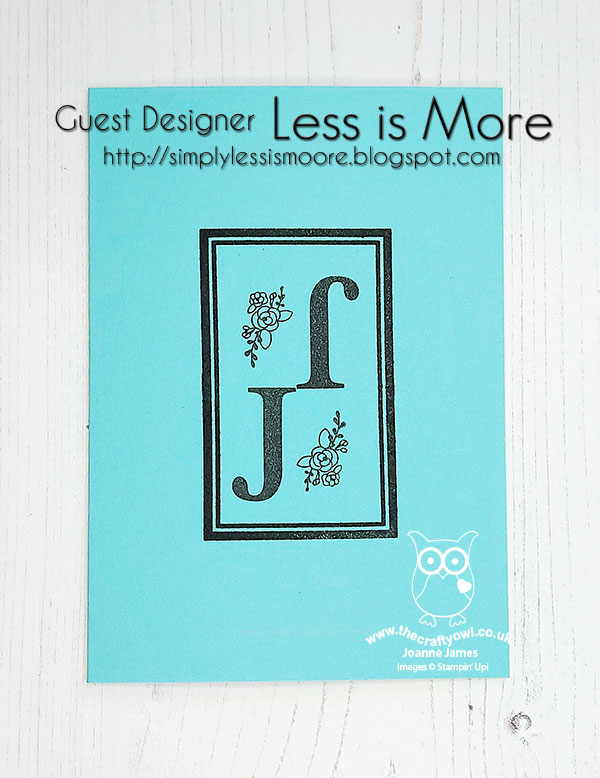
This card uses a long-retired set called 'Sophisticated Serifs' which I'm not sure I ever blogged with, but is a set I love for its clearly defined alphabet. I added some flowers and a strong black border to draw the eye to my monogram:


Once I'd started, I tried out a few other ideas too. Another way monograms are often used is to create fun patterns for wedding or anniversary cards. The thing is, both my husband and I share exactly the same initials - JLJ - so in preference to a trio of Js, which whilst quirky wasn't that interesting, I created a second card using someone else's initials to create a fun monogram - can you guess who they belong to?


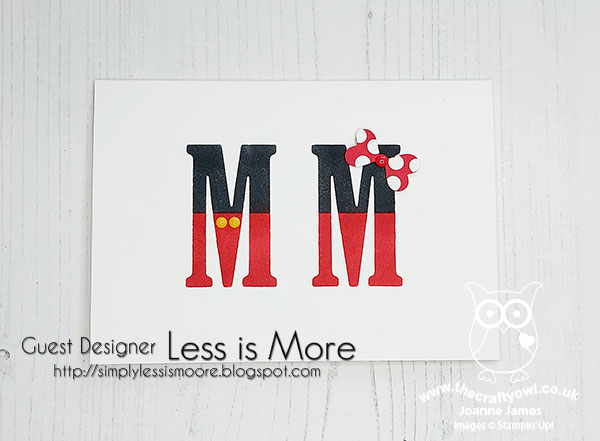
If you guessed Mickey and Minnie Mouse then you are as big a fan as I am! I created a couple of stencils using my retired Large Letter Die Framelits and sponged in the red and black base colours. I added some buttons for Mickey and a bow for Minnie - whilst this challenge is one layer, small embellishments are allowed in the LIM Rules (that's my story and I'm definitely sticking to it!) I thought this would make a fun anniversary card with an appropriate sentiment inside; I like the way that the colours and embellishments make the letters recognisable as a monogram because of how they are decorated:


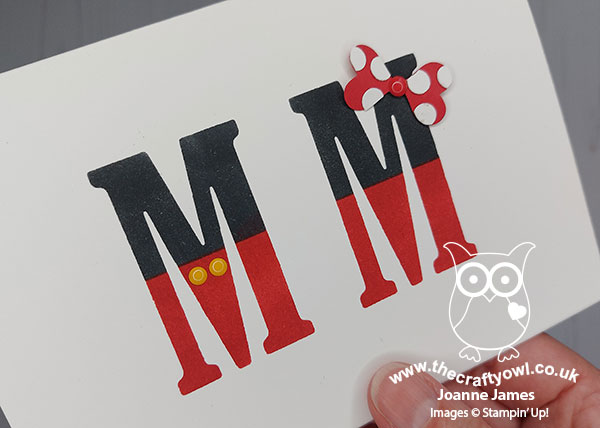
I considered adding an ampersand, but decided against it, given that MM could mean both 'Mickey Mouse' and 'Mickey and Minnie', with the former really being the true monogram although my decoration suggests the latter.

This turned out to be quite a fun creative diversion - you should definitely check out the LIM gallery to see what the Design Team have created! Whilst my cards today used items from my retired stash, I hope they provide you with some inspiration. I'm also linking up with the lovely gals over at SUO Challenges today where funnily enough they also have an 'initials' theme this week (it doesn't have to be one layer though!). If you decide to have fun with initials and are using Stampin' Up! products, you should go and pay them a visit too.

You can see all of my 'How To' summaries on my 'How To - Tips and Techniques' Pinterest board in case you've missed any. 

Enjoy your day and I'll be back tomorrow with another project. Until then, happy stampin'!


Under The Mistletoe Plaid Merry Christmas Wishes

by Joanne James19. April 2019 15:00

Hi everyone! I've been recovering from Stampin' Up!'s Onstage event and making the most of the Easter vacation with the James Juniors this week, so crafting time has been non-existent and blogging opportunities even less so! Today though the sun is shining and I am spending a glorious afternoon in the garden, so thought I would take the opportunity to share with you a card that I actually made as a second one that I made for the challenge set by my fellow Paper Players teamie the lovely LeAnne last week to use plaid or check on your card. Here's my card:


 Here's the low-down on today's card:

Christmas Plaid - Ok, so the irony of sharing a Christmas card on Good Friday isn't lost on me! However given that Stampin' Up!'s retiring lists were announced earlier this week (if you missed my post you can read all about it here) this is actually a great time to share this card as it showcases 2 products that are on that list and will be going away for good. The first of these is this fabulous plaid designer series paper that is from the 'Under the Mistletoe' pack. As is always the way, all of the designer series papers in the annual catalogue will be leaving us to make way for the new, so if you have a favourite then now is the time to stock up. If you're the type of person that 'does Christmas' all year round or likes to get ahead and work on Christmas projects during the summer months, then you should seriously consider stocking up on this paper as I can tell you that the new annual catalogue doesn't contain any festive Christmas-themed designer series paper designs, so it will be September before we have the new seasonal range on sale. You have been warned! 

Large Letters - The second retiring item on today's card are those fabulous Large Letter Framelits, which along with the co-ordinating 'Letters For You' stamp set are retiring with this catalogue. I know that the old has to make way for the new, but I will be so sad to see these go! They have been a staple in my craft collection and whilst they might leave the catalogue, they will always have a space in my die collection - they are SO useful! These will most definitely not be going into my retiring products BOGOF sale in July, so if you want a set, you need to order them now! 

A Festive Colour Combination - The paper really does do all the hard work on this card and sets the colours for each of the other elements with a can't-go-wrong festive colour combination. If this is a colour combination that appeals to you, feel free to save the image below for your future inspiration:


Here is the visual summary of the key products used on today's project for you to pin for easy reference:


You can see all of my 'How To' summaries on my 'How To - Tips and Techniques' Pinterest board in case you've missed any. 

Enjoy your day. I'm off for a James family gathering for dinner. I'll be back tomorrow with another project. Until then, happy stampin'!


Stampin' Up! Supplies Used:

Table built using Product Table Builder by The Crafty Owl - Independent Stampin' Up! Demonstrator.

Bubble Over Large Letters Party Banner Decoration

by Joanne James31. March 2018 08:00


Today it's the last day to snap up a Sale-A-Bration freebie, whether that's free stamps with your starter kit when you join my team, extra hostess rewards when you place an order of £200 or more or a free gift with a purchase of £45 or more. You only have until 10.50pm this evening though, so don't leave it too late!


I'm sharing the last of my Sale-A-Bration makes with you today, a party banner featuring the Bubble Over stamp set and Bottles & Bubbles Framelits Dies, and the FREE Bubbles & Fizz Designer Series Paper - take a look:


My banner letters are courtesy of the Letters For You stamp set and co-ordinating Large Letters framelits, on some layered circles before adding to the pennants featuring all of the designer paper designs. Here's a picture of it hanging properly at last November's Onstage event:


This is a great set for making part banners for a birthday or summer BBQ celebration (if it stops raining for long enough here in the UK to light one, of course!) and the Bubbles and Fizz designer papers add great colour and pattern with a fun party vibe.

Here is the visual summary of the key products used on today's project for you to pin for easy reference:


You can see all of my 'How To' summaries on my 'How To - Tips and Techniques' Pinterest board in case you've missed any. 

I'll be back tomorrow with this week's project for our new challenge over at The Paper Players. Until then, happy stampin'!


Stampin' Up! Supplies Used:

Table built using Product Table Builder by The Crafty Owl - Independent Stampin' Up! Demonstrator.

Painted Harvest Eclipse Thank You Card

by Joanne James6. November 2017 21:30

It's Monday and the start of another week - only 7 weeks to go until Christmas! I'm not counting down today though; Today I'm sharing a card that I made with the ladies in the second of my technique classes this month that also fits a new(ish) challenge that has appeared in blog land - the TicTacToe Challenge:


I went across the top row for my Painted Harvest thank you card - take a look:


Here's the low-down on today's card:

Large Letter Eclipse - Eclipse cards that use a word raised out of a background are everywhere right now and so on-trend, i thought it was about time I shared one with you. What a great opportunity to use those Large Letter Framelits again - these framelits really are so worth the investment! I went with a wide, thinner card than usual that is just right to fit my 'thanks'.

Painted Harvest - I created my sunflower background using a repeating pattern of bright sunflowers; my chosen colours are Crushed Curry and Peekaboo Peach and I think the latter most certainly adds a vibrancy to this card - the letters really 'pop' against those sunflowers.

A Split Sentiment - I decided to use a split sentiment to really tie my raised letters into the theme of my card: on my small cut oval I partially stamped one of the sentiments from the Painted Harvest set that says 'gather together & give thanks', omitting the 'thanks' and selectively inking the remaining portion, so that my raised letters complete the sentiment. 

Here is the visual summary of the key products used on today's project for you to pin for easy reference:


You can see all of my 'How To' summaries on my 'How To - Tips and Techniques' Pinterest board in case you've missed any. 

I hope your day was a productive one; the ladies in today's class all produced some fabulous creations! My next class in December is using the Delightful Daisy bundle - for more details check out the event on my Facebook page here and get in touch to book your place. I'll be back tomorrow with another project using the Painted Harvest stamp set. Until then, happy stampin'!


Stampin' Up! Supplies Used:

Table built using Product Table Builder by The Crafty Owl - Independent Stampin' Up! Demonstrator.

Large Letters and Numbers Brother Football Birthday Card #GDP103

by Joanne James7. September 2017 20:30

Good evening lovely readers! I was tempted to share a Christmas card today but as it's my birthday I thought a birthday card was in order. Not one to me though - instead one that I made for Ben from Rebecca for his birthday recently - another masculine card to fit with the theme over at the Global Design Project this week which also happens to use this week's Color Throwdown colour palette too:


I decided to make another slightly larger card than usual as I wanted to be able to personalise it - take a look:


Here's the lowdown on today's card:

Recipe For Success - Every time I make a card with someone in particular in mind, I try to choose something personal or meaningful to that individual; after all, that has to be the biggest benefit of crafting your own. That is no more so than when it's a card for your nearest and dearest, and Rebecca was clear this card needed some key things: the number 10, the word 'brother', some form of birthday greeting and both a football and the colour red - the colour of Ben's beloved Manchester United football team. Armed with such clear requirements, it made the job of designing this card super easy.

Numbers and Letters - I used both my large letters and numbers today. My letters were stamped using 'Letters For You' again like yesterday's card and cut out with the Large Letters Framelits. I used my numbers to create a tone-on-tone repeating background pattern of the number 10; a good way to include it without having it front and centre. I also used the banner die from the Large Numbers Framelits for my happy birthday banner.

Retro Rubber - I substituted the 'O' in 'BROTHER' with a football, courtesy of a little 'retro rubber' from the long-retired stamp set, 'Great Sport'. I'm so glad I held on to this set - I have used the football and basketball in this set sooo many times!! A true blast from the past - so one for a link up with SUO Challenges too this week as this is their theme, how appropriate!

Here is the visual summary of the key products used on today's project for you to pin for easy reference:


You can see all of my 'How To' summaries on my 'How To - Tips and Techniques' Pinterest board in case you've missed any. 

What kinds of stamps have you held on to and would never part with? Do leave me a comment below - Id love to know!

I hope you enjoyed today's post; I'll be back tomorrow with another project - definitely for Christmas and with a little more retro rubber thrown in! Until then, happy stampin'!


Stampin' Up! Supplies Used:

Table built using Product Table Builder by The Crafty Owl - Independent Stampin' Up! Demonstrator.

High Tide Birthday Card For Dad #GDP103

by Joanne James6. September 2017 20:25

Good evening lovely readers! So today was the day that saw my precious James Juniors return to school - I got lots of work done, but boy was the house quiet! So we are about to return to our school routines and something close to normal working will resume. I've been busy making lots of Christmas samples in readiness for my open house on Friday however September is also a big birthday month for us, with several family members and friends celebrating birthdays (my good self included!) So today I'm sharing a card that I made for my Dad's birthday that fits perfectly with the theme over at the Global Design Project this week:

I decided to make a slightly larger card than usual as I wanted to be able to personalise it - take a look:


I decided to use the High Tide stamp set for my card - such a great set for masculine cards and one that you can use to make quite colourful masculine cards (they don't always have to be brown :-) ) I stamped my beach scene off to the left as I wanted it to act as something of a background for my sentiment, then paired the Happy Birthday from the 'Butterfly Basics' stamp set with my stamped and diecut 'DAD' - you know how much I love these letters and co-ordinating framelits! I'm not generally one for frills, especially on a masculine card, so pretty ribbon was a no-no for me, however I did add some burlap beneath my diecut letters for a little extra touch - I think it fits nicely with the beachy theme too.

If you like the High Tide set and live local to me, you might like to know that this is the set we will be using in one of my October Monthly Technique Classes - get in touch if you would like more information.

Here is the visual summary of the key products used on today's project for you to pin for easy reference:


You can see all of my 'How To' summaries on my 'How To - Tips and Techniques' Pinterest board in case you've missed any. 

I hope you enjoyed today's quick post; I'll be back tomorrow with another project. Until then, happy stampin'!


Stampin' Up! Supplies Used:

Table built using Product Table Builder by The Crafty Owl - Independent Stampin' Up! Demonstrator.

SING Movie-Inspired Faux Illuminated Card Using Large Letters Framelits

by Joanne James24. February 2017 20:29

Yay it's Friday! Today I'm sharing a card that I made last week following my half-term visit to the movies with the James Juniors - take a look:


Here's the low-down on today's card:

Movie Inspiration - We had been to the movies to see the fun computer-animated comedy movie 'Sing' (you can read all about that here if you're interested) and with this week's Paper Players challenge in mind (use a sentiment as the focal point on your card) I decided to create something using the movie title image as my inspiration:

Image result

With a daughter who sings and often participates in public performances and examinations, I knew that this would make a great encouragement card for her - I'm sure you can see the similarities.

Love Those Letters - I know I say it every time I use them, but the Large Letters Framelits are so worth the investment - I love them! Buying them during Sale-A-Bration leaves you only £1 away from two free gifts too, what a great time to invest! Here I layered them, cutting one set in red and then tracing the inner line of the framelit with a pencil and fussy-cutting them by hand in order to leave a thin border visible. I also used my Labeler Alphabet for the 'loud' part of my sentiment - a great 'mix and match'. 

Fake Illumination - I used a liberal dose of gold metallic enamel shapes  to create my illuminated letters and heat embossed the starburst from the Kinda Eclectic stamp set to give the illusion of bright lights shining in the background along with a strip of gold glimmer for extra sparkle. The layering and lettering detail made this card less than 'clean and simple', hence the reason why I decided not to use it as my Paper Players card.

I love this card though - just shows that sometimes inspiration can strike in the strangest places. What things inspire you? Do leave me a comment below - I'd love to hear your thoughts.

Here is the visual summary of the key products used on today's project for you to pin for easy reference:


You can see all of my 'How To' summaries on my 'How To - Tips and Techniques' Pinterest board in case you've missed any. 

I'll be back tomorrow with another project. Until then, happy stampin'!


Stampin' Up! Supplies Used:

Table built using Product Table Builder by The Crafty Owl - Independent Stampin' Up! Demonstrator.

Twisted Pop Up Panel Sending Love Card

by Joanne James24. January 2017 07:00

Today I'm sharing a fancy fold card that I made for my first technique class of the year that is also perfect for a couple of challenges this week:


The ladies over at TGIF Challenges are working with a love theme and the gals over at Just Add Ink have a blog hope this week featuring Pop Up and Interactive Cards. I urge you to check it out and the wonderful entries into this week's challenge, there are some fabulous examples of interactive cards on show.

I have been wanting to have a go at the Twisted Pop Up Panel card that has been appearing everywhere over the internet in recent weeks, so having watched a few tutorials I got down to business. On the outside a fairly straightforward looking envelope-style card:


It's when you open it up that the magic happens and the pop-up is revealed:


And here it is fully opened so that you can see the fun fold out panels in all their glory:


 Here's the low-down on today's card:

Twisted Pop Up Panel Card - I looked at several different versions of this card in order to work out how to create my pop-up panel card and in true Crafty Owl fashion didn't follow any one set of instructions, rather combined a number of 'learns' to create my card. I may well shoot my own video tutorial on this later this week, so if you'd like to find out how I did it, then pop back and check it out. One things for sure, the ladies at my technique class loved it and have definitely got the bug for creating more of them now!

Sending Love in Red and White - My technique class featured the Sealed With Love product bundle - used for the 'Sealed with a kiss' button on the front of my card and that fabulous stamped and diecut heart that adorns the 'O' of the word LOVE. For me this card was a real opportunity to showcase the Sending Love Designer Series Paper Stack, with five different patterns on show. The real challenge was which five of the twelve red and white patterns in the DSP stack to choose - check them out:

My team laugh at me as they think I have an unhealthy obsession with designer series paper and to be honest, they are probably right! I'm not one of those to keep it and stroke it though - I do cut into it and use it and am always looking for ways to incorporate it into my designs. I particularly like the 6" x 6" stacks, which are incredibly good value for money.

Large Letters, Big Impact - I've said it before and I'll say it again - the Large Letter Framelits are great and well worth the investment! They are great for a sentiment with impact; I've paired mine with the 'you' from the 'Hello You Thinlits' to complete my Valentine's message. If you are considering purchasing the Large Letter Framelits, now is an even better time to pop them in your shopping basket - add a little something to them and earn two free Sale-A-Bration items or alternatively why not include them in a starter kit? 

Here is the visual summary of the key products used on today's project for you to pin for easy reference:


You can see all of my 'How To' summaries on my 'How To - Tips and Techniques' Pinterest board in case you've missed any. 

Enjoy your day and I'll be back tomorrow with another project. Until then, happy stampin'!


Stampin' Up! Supplies Used:

Table built using Product Table Builder by The Crafty Owl - Independent Stampin' Up! Demonstrator.

Halloween Night Card and Treat Box

by Joanne James26. October 2016 10:00

Today I have more Halloween fun for you, with a card and some co-ordinating Halloween treats that are again perfect for this week's TGIF Challenge where treats are most definitely the order of the day:


So I've made both a treat box and a matching card today using one of the gorgeous foil specialty sheets in my Halloween Night DSP pack. Here's my treat box, which holds a stack of chocolate coins adorned with spiders and filled with popping candy:


So much shine with all that foil! Here's a close up of my treat box:

My treat box measures 4 1/2" x 1 1/2" finished size, and is made from a piece of designer series paper measuring 7 1/2" x 6". I added a little trick or treat banner tag and a silver mini tassle tied on with black baker's twine. Instructions to make if you'd like to have a go are as follows:

  • Score paper on short side at 1 3/8", 2 6/8", 4 1/8" and 5 1/2"
  • Score paper on long side at 1/2", 1 1/2", 6" and 7"
  • Cut an aperture in one of the long central sections using your Big Shot and Project Life Cards and Labels Framelits
  • Fold on the score lines on the short side to make a long thin box, then pinch the ends and glue/staple one end, fill with chocolate then pinch and glue/staple the other end closed.
  • Add tag and twine to complete.

 Finally, here's my card featuring those large Letter Framelits again: 


Check out the cute dangling spider in the 'O' - isn't he just so fun?! I stamped him in Versamark and heat embossed him in silver then coloured him in with my black Stampin' Write marker. 

Here is the visual summary of the key products used on today's projects for you to pin for easy reference:


You can see all of my 'How To' summaries on my 'How To - Tips and Techniques' Pinterest board in case you've missed any. 

Enjoy your day and I'll be back tomorrow with a card (or two!) for this week's Connie and Mary Challenge. Until then, happy stampin'!


Stampin' Up! Supplies Used:

Table built using Product Table Builder by The Crafty Owl - Independent Stampin' Up! Demonstrator.

Warmth and Cheer Masculine Birthday Card

by Joanne James20. September 2016 19:00

Hello everyone! I am still struggling with intermittent blog and website issues, in addition to a lack of email, so please bear with me! If you have emailed me since Saturday I won't have received your message, so I would urge you to give me a call with the details so that I can deal with it for you. 

As promised I have another card for this week's challenge over at TGIF Challenges where the theme is to use the negative space left after making a die cut in a positive way:

Today I have the masculine version that I made for my Dad, who celebrates his birthday today - you can see the feminine version I made for my Mother-in-Law on yesterday's post here if you missed it. Here's today's card:


Here's the low-down on today's card:

Large Letter Top Tips - I used my Large Letter Framelits again to create the negative die cut space on my card, this time to spell out 'Dad'. I have two 'Top Tips' for you today when using your letter framelits in this way to cut out a word where there are repeated letters - two D's on today's card, for example - and where there are 'gaps':

  • In order to ensure all of the letters are aligned horizontally, I like to use a metal ruler. If you are using a magnetic platform in your Big Shot (and if not, why not?!) your ruler will 'stick' to your plate and make it really easy for you to align your framelits. On this card, I lined up the first D and A and cut them, then left the A framelit in place, whilst I moved the D to the end of the word and used my metal ruler to ensure they were level before putting through the Big Shot to cut my final letter.
  • Unlike yesterday's card, the letters in DAD have areas of negative space, which when you are reversing them as I am here, you need to retain these pieces and place them in the appropriate place in the negative letter to ensure your space is fully defined. The best way to do this is to place the letter you've cut out into the space, then stick in the smaller pieces, then remove your letter, leaving the smaller pieces behind.

Not Just for Christmas - Today's negative space showcases one of the gorgeous plaid patterns from the Warmth and Cheer DSP stack. These papers are perfect for autumn and festive projects, but also work well for general masculine cards too. I decided to go with the Delightful Dijon/Black colour combo for my card today - the pattern is bold enough to work really well in the negative space of my diecut letters.

Finishing Touches - The 'happy birthday' from 'Guy Greetings' completes my sentiment today, centred and heat embossed in gold with some fine gold thread wrapped around the bottom of the panel. No bows today as I needed this card to be post-friendly - besides, it's a guy card, so no bow required!

My Dad should have received his card in the post today, so happy birthday wishes to him (although he's unlikely to be reading this!)

Here is the visual summary of the key products used on today's project for you to pin for easy reference:


You can see all of my 'How To' summaries on my 'How To - Tips and Techniques' Pinterest board in case you've missed any.   

Back tomorrow with a Christmas card for you; until then, happy stampin'!


Stampin' Up! Supplies Used: 

Table built using Product Table Builder by The Crafty Owl - Independent Stampin' Up! Demonstrator.

Mini Catalogue

BROWSE THE CATALOGUE

The mini catalogue is now live! Read and download your copy here.

Shop Online

Access my online shop 24 x 7, 365 days of the year:

Current April hostess code:

VDKNV7BH

Shop Online

Join My Team

It's always a great time to join Stampin’ Up! New team members can get £130 worth of products for only £99 + free business supplies + free shipping + all the fun being a part of Stampin’ Up! Stampin' Up! has something for everyone: join my growing team and benefit from my support to enjoy Stampin' Up! however you choose.

If you're interested, call me for a chat to understand how I can help you realise your goals. Alternatively, if you have already decided to sign up and you just can't wait, please click here for the link to the online form where you can sign up and order your starter kit right away! 

Latest Kit!

Stampin Cut and Emboss

The Rock Legend Kit has all you need to make 8 cards with coordinating envelopes. Along with the new Panda Friends Kit, both are available from January 4th for just £14 each - get yours here!

2023-24 Annual Catalogue

BROWSE THE CATALOGUE

Click on the catalogue for a full list of current SU! supplies - if you would like to order any of the items featured, please drop me a line at [email protected] or give me a call on 07773 421446 - I'd be happy to help.

New Online Exclusives

There are new products available exclusively in the online store from 5 March - check them out here.

About Me

Hi I'm Joanne and live in Northampton and when I'm not looking after my husband and two beautiful children, am an avid crafter with a passion for all things Stampin' Up!

I must confess that I have never been a big rubber stamper - until I discovered Stampin' Up! that is. I love the fact that I can get such great results with co-ordinating stamps, inks, papers and punches - the possibilities are endless! Join me on my stamping journey as I share the things I love and be inspired to create amazing things yourself!

Follow Me

Monthly Newsletter

Box Builder

Click the button above to use Box Buster to create your custom box design using the Envelope Punch Board!

Kits Collection Now Available!

Stampin Cut and Emboss

The new Kits Collection from Stampin' Up! is now available!

Click here to see the current kits available and order yours online today.

I Design For


Stampin' Up Stuff

This is my personal blog and is not endorsed by Stampin’ Up! I hope you find it a plentiful source of ideas and personal inspiration but please don't copy my designs for contest submission or use for classes, publication or sale without express permission.