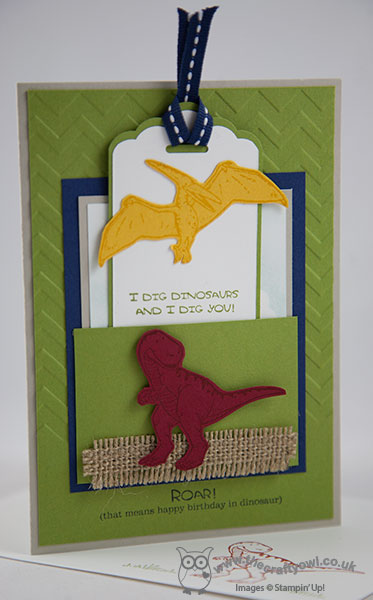
by Joanne James12. July 2014 21:19Well what a day! The highlight has definitely been Ben's birthday party with his class mates at Bugtopia, an insect and reptile centre near here. He had the most amazing time, holding everything from stick insects and tarantulas to chameleons and crickets! I will share some photos with you when I've had a chance to download them from my camera, but for today thought I would share the cards I made for Ben's two fellow 'birthday boys' with whom he shares his special day and some of the sweet treats that made it into the party bags. So first up, one of Ben's frineds is currently dinosaur mad, so I made a card using the new retired 'Dinoraur' stamp set (with a soon to be 7 year old son, I couldn't possibly part with my set, retired or otherwise!). I decided to create a fun card with a removable dinosaur bookmark made with the Scalloped tag Topper punch. Here is the card with the bookmark in its little pocket:
And here is the bookmark when removed, showing Triceratops on the bottom too:
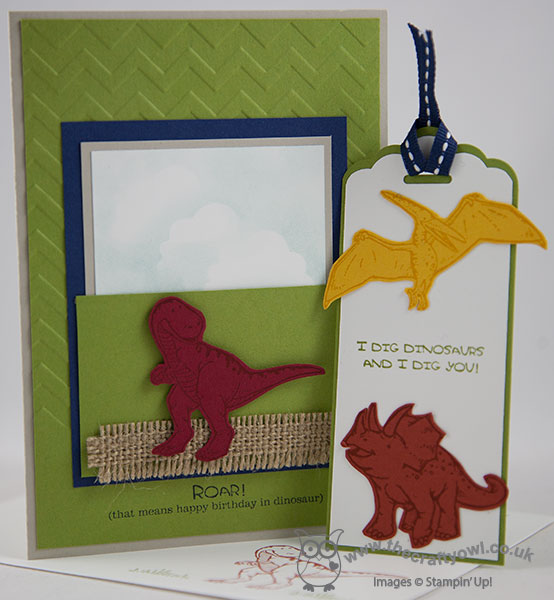
This card was such fun to make and perfect for a would-be palaeontologist. I have a bonus share for you today too: given the theme of our party, I used the Goodie Gear Simply Created Treat Kit for some suitably themed sweet treats - take a look:
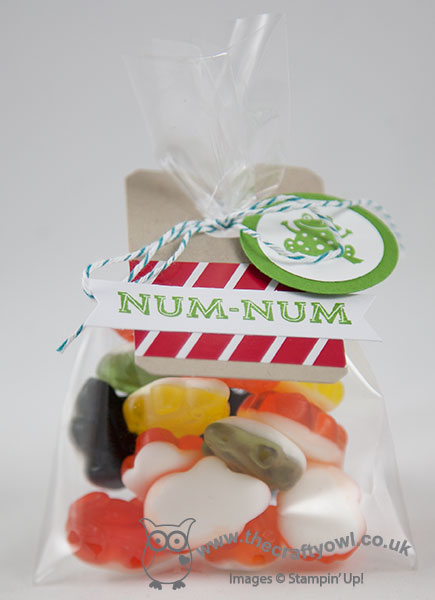
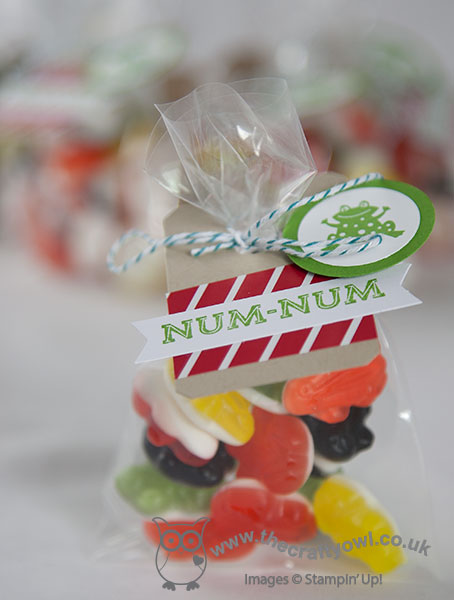
I bought a box of jelly frogs and tied them into the kit bags, decorated the labels and made a little stamped frog button (this is also from the retired 'Spring Sampler' stamp set). I thought I would share these with you as these bag kits are currently available on the Clearance Rack for just £1.79, and the Pumpkin Pie versions too - bargain or what?! Go and snap up a few to add a little 'wow' factor to your party treats! We also gave each child their very own butterfly garden to enable them to hatch their own caterpillar eggs into Painted Lady butterflies - a perfect project for the forthcoming long school summer holidays!
I'll be back tomorrow nice and early with my Paper Players post for the week; until then, happy stampin'!
Stampin' Up! Supplies Used:
11817e7b-5a4d-4100-9a43-b4ab2fe39fd2|0|.0|96d5b379-7e1d-4dac-a6ba-1e50db561b04
Tags: Big Shot, Chevron Textured Embossing Folder, Dinoroar, Goodie Gear Simply Created Kit, Scalloped Tag Topper Punch, Stampin' Up Supplies, Stampin' Up Card ideas, Stampin' Up Card, Stampin' Up, Shop online, Clearance Rack
3D Projects | Cards | Children's Parties | Stamping
by Joanne James6. June 2014 09:00Today marks the 70th anniversary of the Normandy Landings in World War Two, with the start of the invasion on the 6th June known as D-Day. There are commemorations taking place both at home and abroad today to remember those Allied personnel who lost their lives on this day and to recognise the bravery, commitment and sacrifices of those service personnel who fought during the war to free Europe from Nazi occupation.
So it seemed a fitting day to share with you a recent commission. I was asked to create some cards and gift boxes as thank you gifts for some teachers who had led a school trip to the World War Two battlefields recently. A red poppy, the traditional form of remembrance, is the star of this card:
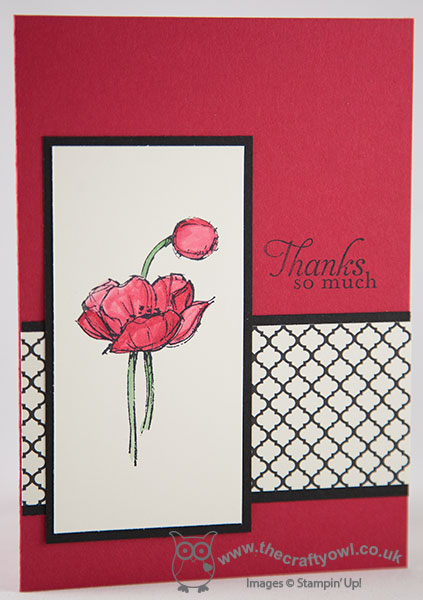
I chose a simple Real Red background and created a layered border using Modern Medley DSP. I stamped the poppy from the 'Simply Sketched' hostess set in Black stazon onto Very Vanilla, then coloured using Real Red ink and my aquapainter, with a touch of Garden Green for the stem. I added the sentiment directly to the card base, and honestly didn't feel this card needed anything else. I also made a co-ordinating gift box using one of the kraft gift boxes available in the annual catalogue:
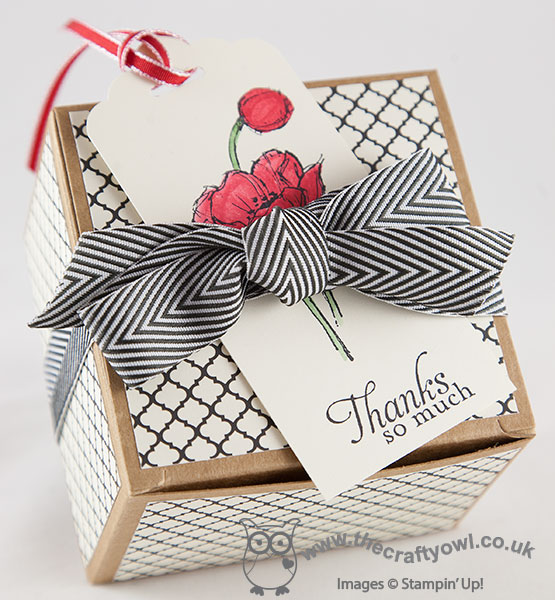
I covered in co-ordinating paper and made a tag with the same sentiment and poppy image on Very Vanilla and punched with my Scalloped Tag Topper punch, finishing with a 3/4" Chevron ribbon bow.
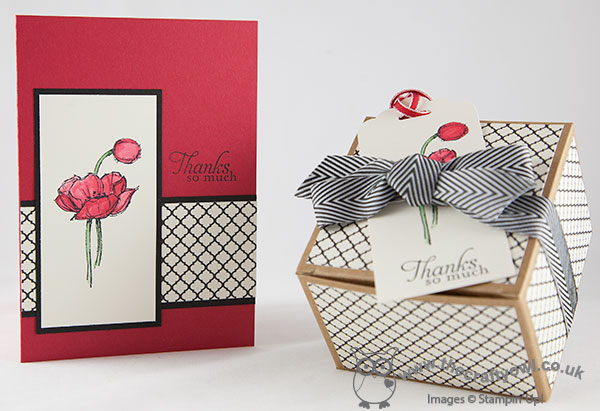
A lovely set to show appreciation and appropriate to share it on a day when we should all take time to remember the courage, bravery and sacrifice of our armed forces, of yesterday and today, who give of themselves in order that we may live relatively safe and secure lives. I for one, am thankful for that.
Back tomorrow with another project; until then, hapy stampin'!
Stampin' Up! Supplies Used:
72e562c8-d7a2-4069-b77a-e93e150acc7a|0|.0|96d5b379-7e1d-4dac-a6ba-1e50db561b04
Tags: boxes, Kraft Gift Boxes, Simply Sketched, Modern Medley, Scalloped Tag Topper Punch, Shop online, Stamp-a-ma-jig, Stampin' Up, Stampin' Up Card, Stampin' Up Card ideas, Stampin' Up Supplies
Boxes | Cards | Stamping
by Joanne James10. May 2014 20:55A quick post from me this evening as I sit with my feet up relaxing following today's all day workshop. We had a lovely time and everyone left with lots of completed projects and plenty of leftover bits and pieces to make lots more things at home. The following card, designed by Monica Gale, was one of my favourite projects:
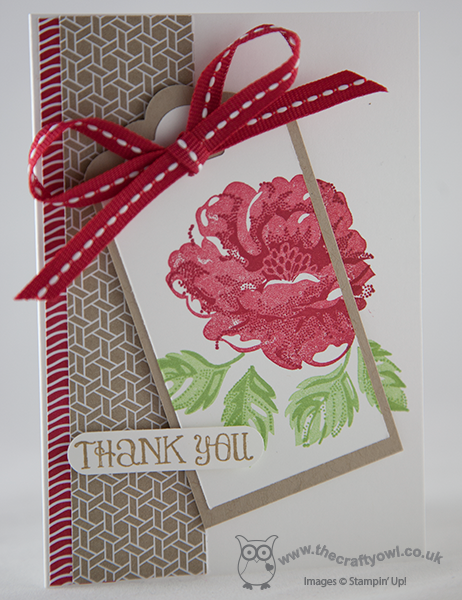
The feature of the card is a Stippled Blossoms rose that is stamped partially off the tag; this is backed with a couple of strips of Fresh Prints DSP and then finished with a red grosgrain ribbon bow and a sentiment cut with the word window punch. A simple enough card but a great way to use the Stippled Blossoms stamps and great practice for getting to grips with your stamp-a-ma-jig. I'm on a mission to make sure all my ladies can use theirs and truly reap the benefits (much to their dismay at times, I'm sure!) of this amazing little plastic sheet and its accompanying t-piece. Thanks ladies for your patience!
My next monthly card class is on Monday 2nd June and will be featuring the 'Springtime Hello' stamp set. If you live in or around Northampton and would like to come along, please do get in touch for more details - experienced and non-experienced crafters welcome.
Back tomorrow hopefully with a special blog post for you; until then, happy stampin'!
Stampin' Up! Supplies Used:
5b70a00c-4938-4cf1-86fd-79b4b2a7a072|0|.0|96d5b379-7e1d-4dac-a6ba-1e50db561b04
Tags: Classes, Lots of Thanks, Shop online, Stippled Blossoms, Scalloped Tag Topper Punch, Fresh Prints DSP Stack, Stamp-a-ma-jig, Stampin' Up, Stampin' Up Card, Stampin' Up Card ideas, Stampin' Up Supplies
Cards | Classes | Stamping
by Joanne James8. May 2014 14:54Hello everyone - my second video in a week! I'm cheating slightly, as I actually shot this video weeks ago but haven't got around to editing it until now. I made a lovely concertina fold Mother's Day card a while ago using the Scalloped Tag Topper Punch - you can see my original card here - which was based on a similar card made by Julie Kettlewell (you can see Julie's original card here). Having just gone to update my original post with the link to today's video, I realise I didn't mention her in my original post, which was very remiss of me and a complete oversight on my part, as I even mentioned her in today's video. Needless to say, I have now updated the original post!
I love this concertina fold card style - it's great if you need a card that's just a little different. I made another card based on my original one, this time adapting it to a birthday card for a friend of mine who always puts so much thought into cards for others, I thought she deserved something special for her birthday too; here's my latest scalloped tag topper punch concertina fold card:
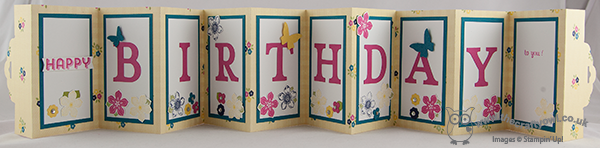
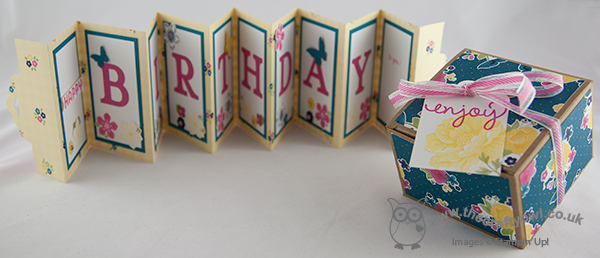
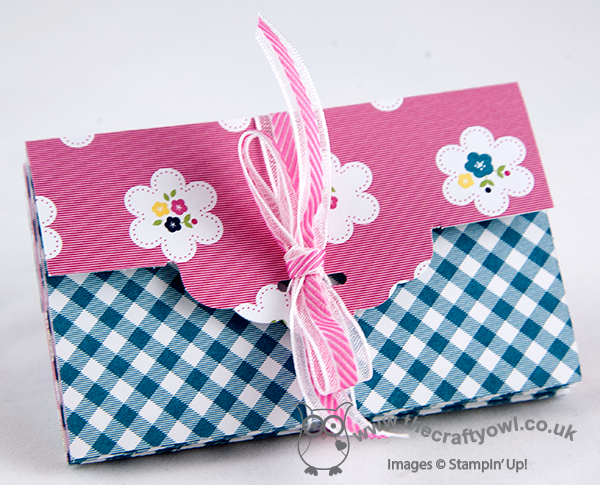
The dimensions are exactly the same as my original card - there is still enough space to stamp 'happy' on one panel, with 'birthday' spelled out on the subsequent panels leaving the last panel blank for your message (I also stamped a little 'to you!' on this panel, just to complete my message). I also decorated one of the Stampin' Up! Kraft gift boxes with some co-ordinating Gingham Garden DSP to make some pretty packaging for my accompanying gift - finished with a tag made with the Scalloped Tag Topper Punch - well, what else?! Here's a picture of both pieces together:
So, if you would like to make a Scalloped Tag Topper Concertina Fold Card - either for the forthcoming international Mother's Day or a birthday card, here's my video tutorial showing you everything you need to know:
If you would like to purchase any of the Stampin' Up! supplies featured in today's project, just contact me or click on the links in the table below to go straight to my online store.
Back tomorrow with another project; until then, happy stampin'!
Stampin' Up! Supplies Used:
83ecd8a3-a7da-4843-9788-9cf4d23e90f5|0|.0|96d5b379-7e1d-4dac-a6ba-1e50db561b04
Tags: 3D Projects, boxes, Kraft Gift Boxes, Gingham Garden, Typeset Alphabet, video tutorial, Stampin' Up, Stampin' Up Card, Stampin' Up Card ideas, Stampin' Up Supplies, Shop online, Scalloped Tag Topper Punch, Simply Celebrate, Stippled Blossoms, Petite Petals, Petite Petals Punch, Itty Bitty Punches, Fabulous Phrases, See Ya Later
3D Projects | Boxes | Cards | Stamping | Video Tutorials
by Joanne James4. April 2014 20:55Today I'm sharing another card from this week's classes - this time one of the scallop tag-closure cards that are all the rage at the moment in a lovely, deep purple. Here is my card:

The card is a standard A6 size (10.5cm x 14.9cm), but instead of being scored down the centre of the cardstock, I scored at 8.5cm and 19cm, marked the centre point and having guided the cardstock over the punch guides, I punched using the Scalloped Tag Topper Punch and trimmed away the excess on either side of the punched section. I love this punch - it really is so useful for tags, bookmarks, boxes, fancy cards and everything in between!
I also used my Aquapainter to colour this card, but instead of using watercolour paper I actually used Whisper White cardstock - I wanted to show my class attendees the differences in effect when you use different paper types. The sentiment was also stamped separately and punched out, which worked better on the narrower section. We split our sentiment away from the tulips at the start to allow for more flexibility when stamping, so this was really easy with no masking required.
That's all from me today; I'm entertaining family this weekend and off to play tooth fairy to my eldest this evening, who lost another of her baby teeth today - just need to make sure she's asleep first :-)
Back tomorrow with another card; until then, happy stampin'!
Stampin' Up! Supplies Used:
by Joanne James3. April 2014 21:03Evening everyone! I promised you a special project today and here it is! Several months ago Stampin' Up! asked me if I would create an Easter box for a magazine commission and that magazine hits the shelves of the newsagents today! The box I created for Stampin' Up! is featured in the April 2014 issue of Prima Baby and Parenting and is part of an extended feature on Easter Family Fun - great things to make and do with your family this Easter. There are cute cakes and biscuits to bake and this fabulous Easter egg box to make:
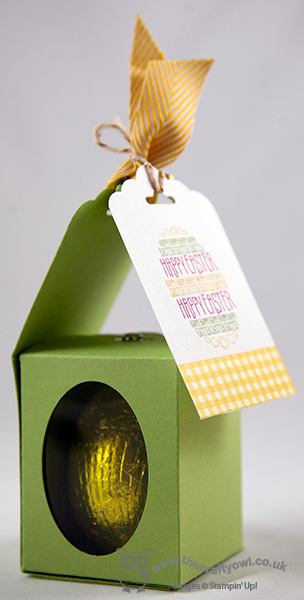
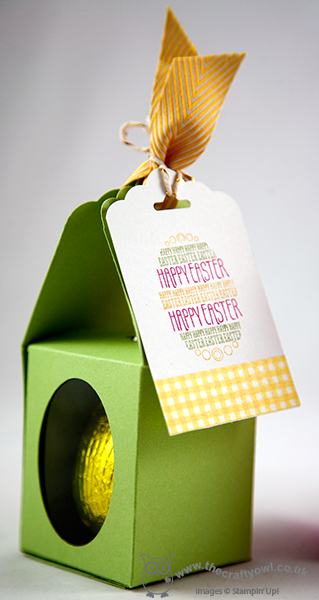
Here's another shot from a different angle showing a close up of the tag, stamped with the egg from the 'Eggstra Spectacular' stamp set:
Lastly the trio of boxes that the magazine used for the title page of the two-page spread:
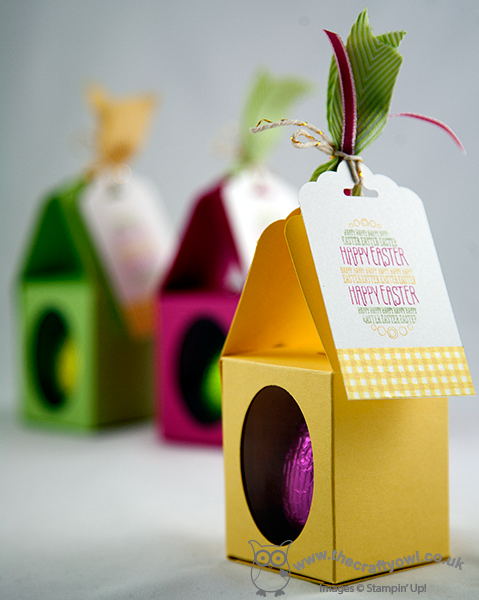
Here is my photograph of the title page in the magazine itself - the facing page contains a step-by-step 'how to' tutorial showing how to make it:
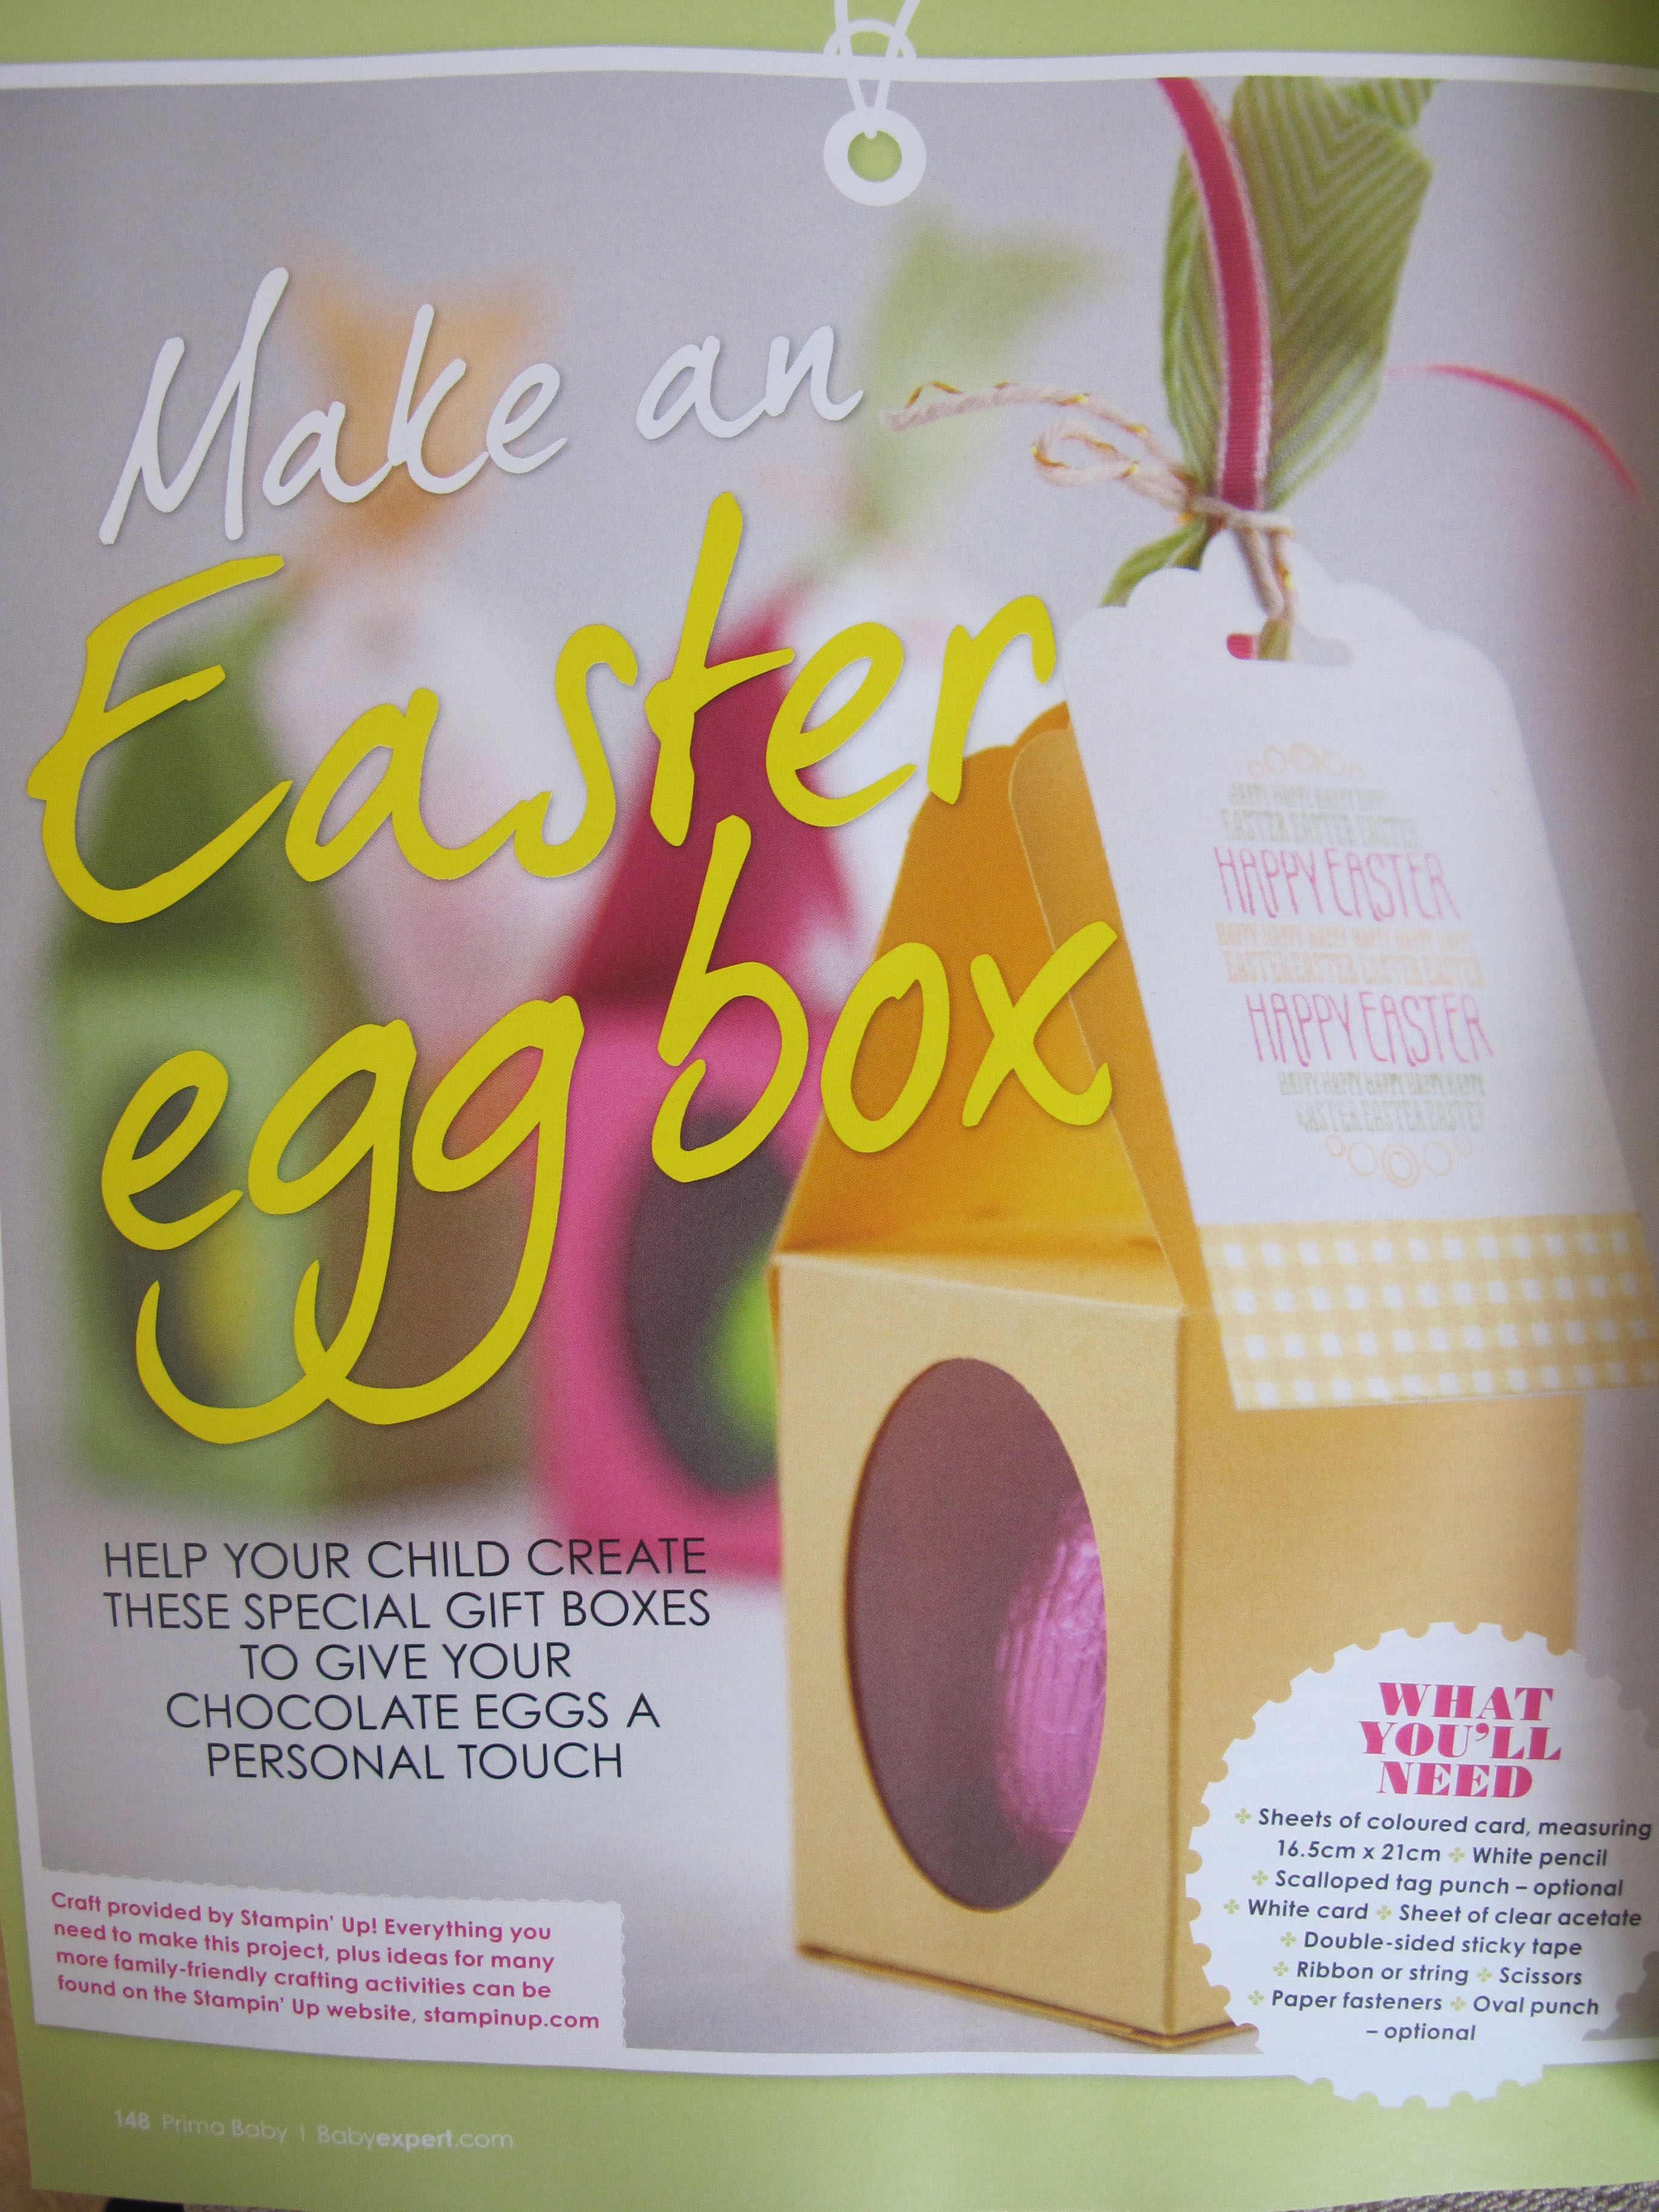
The sides of the body of the finished box measures 2" x 2 1/2" which is perfect for a small Easter egg (I used the ones you can buy in packs for Easter egg hunts) but this box could be used for anything small and attractive where you want to give a glimpse of the contents. If you would like a copy of the tutorial you can see it in this month's Prima Baby magazine - if you live in Northampton, you'd better get to the shops quick though before I buy all the copies :-) I also made a short video tutorial showing you how I made this box - click the link below to watch it:
That's all from me today; back tomorrow with another project; happy stampin'!
Stampin' Up! Supplies Used:
5a410a65-8882-46df-b9d9-50c6b2560efa|0|.0|96d5b379-7e1d-4dac-a6ba-1e50db561b04
Tags: 3D Projects, boxes, Candy Dot Brads, Easter, Eggstra Spectacular, Scalloped Tag Topper Punch, Shop online, Stampin' Up, Stampin' Up Card, Stampin' Up Card ideas, Stampin' Up Supplies, video tutorial
3D Projects | Boxes | Stamping
by Joanne James22. March 2014 21:25I've had a busy day today preparing for tomorrow's Spring Banner class - photos to follow - and working on some other projects, so just time for a quick post today. I'm sharing a thank you card designed by Monica Gale that we made at our January team training session:

This is a lovely pastel card featuring the orchid stamp from the 'Happy Watercolour' set'. It is stamped onto a scallop topped tag and coloured with Stampin' Write markers and a blender pen and layered on a few layers of Sale-A-Bration Sweet Sorbet DSP in co-ordinating colours. along with an offcut from one of the laser-cut cards from the 'Simply Fabulous Simply Sent' kit sets. Some background stamping and a banner are stamped with two of the other stamps in the 'Happy Watercolour' set and the tag is finished with some ribbon and rhinestones to complete the look.
Come back tomorrow to see the outputs from tomorrow's Spring Banner class; until then, happy stampin'!
Stampin' Up! Supplies Used:
by Joanne James19. March 2014 20:33Today I want to share with you another use for one of my new favourite punches - the scalloped tag top punch. This really is such a versatile punch that can be used in so many ways. There are lots of variations on how it can be used to make an unusual card closure - today's card is a fun, concertina style Mother's Day card, where the scalloped tag top punch is used to add detail to the closure. I saw a similar card to this on Julie Kettlewell's blog here and liked it so much I decided to create one. This is what the card looks like 'closed':
Ribbon is threaded through the punch out hole and around the card and tied in a bow to keep it shut, then when you undo the ribbon and open the card out, you see the message inside:
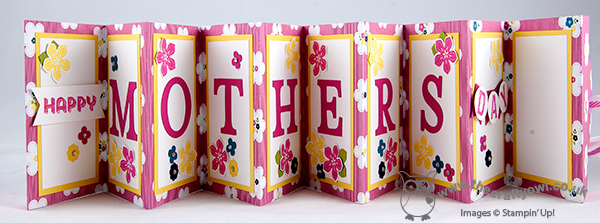
These cards are such fun to make and so easy. All you need is one sheet of 12" x 12" for the basic card. I used a sheet of the Gingham Garden DSP for my card, and layered the inside panels with Whisper White matted on Daffodil Delight. I cut the letters for 'Mothers' with my Typeset Alphabet die, but you could easily use an alphabet stamp set such as Morning Post or Notable Alphabet if you have one instead. I took the word 'Happy' from one of the 'See Ya Later' Sale-A-Bration stamp sets and the letters for 'Day' from my Sketched Alphabet individual stamps before punching out and layering on a mini banner. I then decorated with flowers stamped and punched from the Petite Petals bundle and the Itty Bitty Punches set in colours that co-ordinated with my chosen DSP. The last panel is left blank for you to write your personalised Mother's Day message.
I had intended to shoot a video tutorial on how to make one of these cards to accompany my series of Scalloped Tag Top Punch video tutorials, but time has not been on my side so I haven't managed it yet; I will look to complete one in the next week or so and when I do will update my blog with the link. Updated 8/5/14 - here is my video tutorial on how to make this card:
The best bits about this card: it's one of those projects where you don't have to deliberate over which side of your DSP to use, as you see both sides (dilemma avoided, for once) and also because of the closure, you don't need an envelope - this is a card and envelope in one! This style of card would work for lots of other occasions too - why not have a go and see what you come up with.
Back tomorrow with another project; until then, happy stampin'!
Stampin' Up! Supplies Used:
ea819749-b0b7-4e51-82ac-2f6a767b1ba6|0|.0|96d5b379-7e1d-4dac-a6ba-1e50db561b04
Tags: ABC-123 Sketch Alphabet & Numbers, Banner Punch, circle punch, See Ya Later, Shop online, Stampin' Up, Stampin' Up Card, Stampin' Up Card ideas, Stampin' Up Supplies, Typeset Alphabet, Scalloped Tag Topper Punch, Big Shot, Mother's Day, Gingham Garden
Cards | Stamping | Video Tutorials
by Joanne James19. March 2014 20:33Today I want to share with you another use for one of my new favourite punches - the scalloped tag top punch. This really is such a versatile punch that can be used in so many ways. There are lots of variations on how it can be used to make an unusual card closure - today's card is a fun, concertina style Mother's Day card, where the scalloped tag top punch is used to add detail to the closure. This is what the card looks like 'closed':
Ribbon is threaded through the punch out hole and around the card and tied in a bow to keep it shut, then when you undo the ribbon and open the card out, you see the message inside:
These cards are such fun to make and so easy. All you need is one sheet of 12" x 12" for the basic card. I used a sheet of the Gingham Garden DSP for my card, and layered the inside panels with Whisper White matted on Daffodil Delight. I cut the letters for 'Mothers' with my Typeset Alphabet die, but you could easily use an alphabet stamp set such as Morning Post or Notable Alphabet if you have one instead. I took the word 'Happy' from one of the 'See Ya Later' Sale-A-Bration stamp sets and the letters for 'Day' from my Sketched Alphabet individual stamps before punching out and layering on a mini banner. I then decorated with flowers stamped and punched from the Petite Petals bundle and the Itty Bitty Punches set in colours that co-ordinated with my chosen DSP. The last panel is left blank for you to write your personalised Mother's Day message.
I had intended to shoot a video tutorial on how to make one of these cards to accompany my series of Scalloped Tag Top Punch video tutorials, but time has not been on my side so I haven't managed it yet; I will look to complete one in the next week or so and when I do will update my blog with the link.
The best bits about this card: it's one of those projects where you don't have to deliberate over which side of your DSP to use, as you see both sides (dilemma avoided, for once) and also because of the closure, you don't need an envelope - this is a card and envelope in one! This style of card would work for lots of other occasions too - why not have a go and see what you come up with.
Back tomorrow with another project; until then, happy stampin'!
Stampin' Up! Supplies Used:
496e722e-02bc-47d9-8908-08b02d818f3c|0|.0|96d5b379-7e1d-4dac-a6ba-1e50db561b04
Tags: ABC-123 Sketch Alphabet & Numbers, Banner Punch, circle punch, See Ya Later, Shop online, Stampin' Up, Stampin' Up Card, Stampin' Up Card ideas, Stampin' Up Supplies, Typeset Alphabet, Scalloped Tag Topper Punch, Big Shot, Mother's Day, Gingham Garden
Cards | Stamping
by Joanne James24. February 2014 20:29Good evening blog readers! I managed to grab a few hours this afternoon to catch up on some crafting (a reward to myself for getting some of my admin out of the way this morning!) and I made a card using both this week's 'tall and skinny' Mojo Monday sketch and the colours over at Colour Q:
I don't often make 'tall and skinny' cards and historically was always put off by not having the correct sized envelope, but now I have my Envelope Punch Board, irregular envelope sizes don't phase me at all! As for the Colour Q challenge, well you may remember when I made this card a few weeks ago that I confessed I had two ink pads in my stash that I had owned for more than 12 months and never broke the cellophane wrapper on; one of them was Garden Green, that I used on the previous card; the other - Always Artichoke. So when I saw this colour challenge, I just had to have a go! Now Peach Parfait and Apricot Appeal are retired SU colours; I did have an old inkpad and some Peach Parfait cardstock, which I've used, but no Apricot Appeal, so I substituted with Pumpkin Pie instead. Here is my card:
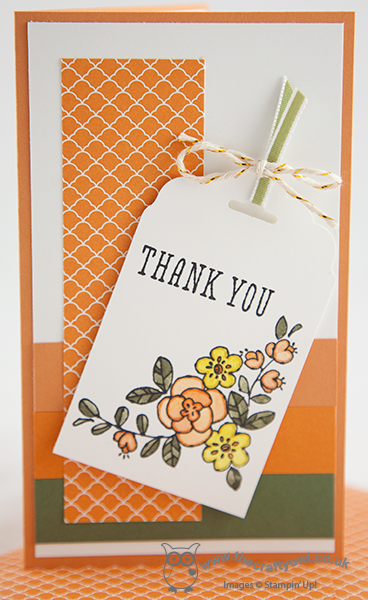
I followed the background layering of the sketch with solid colour cardstock and overlaid with a slim panel of Pumpkin Pie Brights DSP. Instead of a circle as my focal point, I decided to use a tag punched with my Scalloped Tag Topper Punch. I cut my cardstock slightly wider than the 2" groove in order that it could accommodate my corner flower stamp from the 'You're So Grateful' stamp set. I stamped the image in black Stazon and used my Aquapainter to colour in the design. When the image had dried, I went around the inside edge of the image with the co-ordinating colour marker pen to give it added definition. I have one small confession, which is that I used a small piece of Old Olive ribbon to finish off my tag as it was the closest match I had to Always Artichoke. And finally - I made a co-ordinating envelope!
Hope you like today's card; I'll be back tomorrow with a very special punch art creation, so do check back to see what I've made. Until then, happy stampin'!
Stampin' Up! Supplies Used: