by Joanne James20. February 2014 21:28Good evening everyone! Today I have a video tutorial to share with you that I prepared a couple of weeks ago that shows you how to make an extra-wide pouch using the Scalloped Tag Topper Punch. Here's the finished extra-wide pouch:
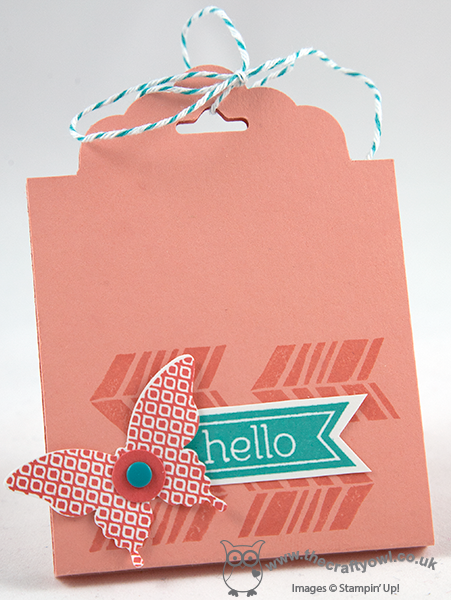
Here is a standard size treat pouch made with the Scalloped Tag Topper Punch - you can find my previous video tutorial on how to make this here:

As you can see, when compared to the standard-size punch, the extra-wide version is about 1" or 2.5cm wider and taller. The video tutorial shows you how to adapt your punch and shares my top tip for a smooth punch every time - go and take a look:
Here are the measurements I used in the video in case you didn't catch them:
Cardstock: 2 3/4" x 7 3/4" or 7cm x 19.5cm
Score at: 3 3/4" and 4" or 9.5cm and 10cm
I hope you found this video tutorial useful - this is such a versatile punch with so many uses beyond a standard tag. The treat pouches make great little wedding favours too.
Back tomorrow with another project; until then, happy stampin'!
Stampin' Up! Supplies Used:
9f056e18-8f7c-4028-927f-66d960295930|0|.0|96d5b379-7e1d-4dac-a6ba-1e50db561b04
Tags: 3D Projects, Papillon Potpourri, Perfect Pennants, Petal Parade, Scalloped Tag Topper Punch, Shop online, Stampin' Up, Stampin' Up Card, Stampin' Up Card ideas, Stampin' Up Supplies, video tutorial, Weddings
3D Projects | Stamping | Video Tutorials
by Joanne James18. February 2014 20:58Good evening blog readers! Today I'm going to share a scrapbook page with you that I made at a recent team training event and designed by the lovely Bekka Prideaux. It features a number of the Sweet Sorbet paper designs and the Petal Parade stamp set - both items that can be yours free during Sale-A-Bration with an order of £45 or more - some new Spring-Summer items and a somewhat overlooked item in the annual catalogue (more on that in a moment). So here is my scrapbook layout:
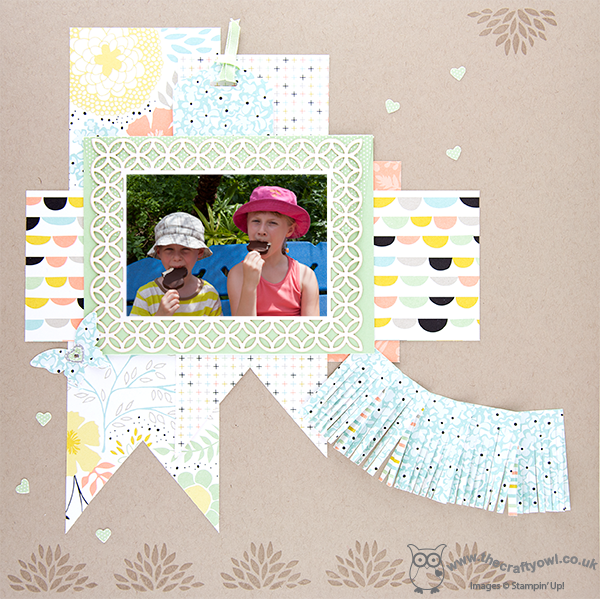
I decided to use one of my summer holiday photos of Rebecca and Ben as the centrepiece; I have so many amazing photographs from our holiday that I have yet to do something with, so this seemed a good opportunity to start. They are participating in one of my favourite activities at a Disney theme park - no not a roller coaster, but the ritual eating of a Mickey ice-cream bar (I am rather partial to these!) - and the concentration on their faces is a concerted attempt to get them eaten before they melt in the extreme heat!
The bright colours and patterns in the papers make a great background for my photo. Did you spot the 'hidden treasure' from the annual catalogue? The photograph is mounted on to one of the Simply Fabulous Simply Sent cards, with another attached to the Scallop tag Topper Punch piece behind for hidden journaling. These cards are great for quick cards but can also be used for journaling or as a photo mount. Lastly, a fringe cut using the new fringe scissors adds texture and draws the eye in to the focal point.
Back tomorrow with another project; until then, happy stampin'!
Stampin' Up! Supplies Used:
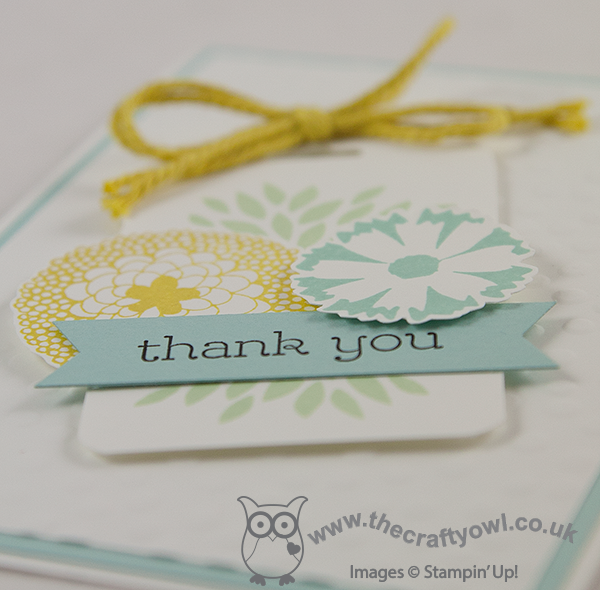
by Joanne James8. February 2014 19:56Yay - it's the weekend! We don't have any special plans this weekend, but sometimes that's a nice way to be. Homework, swimming lessons enough of a dry spell to get outside and shoot some hoops this afternoon and some time spent doing jigsaw puzzles - what could be nicer? Today I'm sharing another of the cards we made at this week's card class, featuring the items that can be yours free with a £45 spend. This card uses my favourite of the Sale-A-Bration stamp sets, Petal Parade - here is my card:
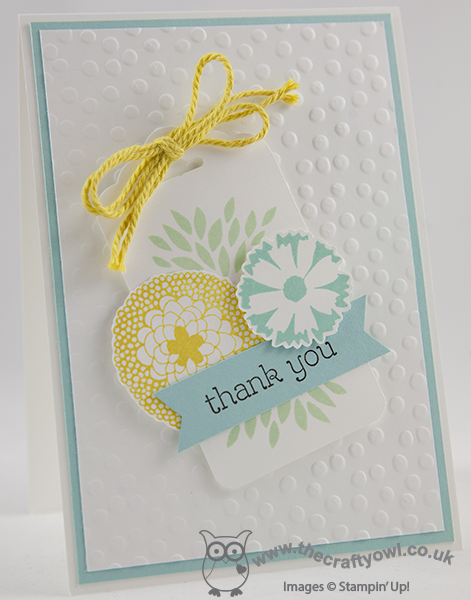
This card is a CASE of this one made by the talented Mary Brown; I loved this card when I saw it - the layering and the fussy-cut flowers really make it something special. In addition to which, it features three great Sale-A-Bration items (Petal Parade, Decorative Dots TIEF and some of the lovely baker's twine from the Sweet Sorbet accessory set) and one of my new favourites from the Spring-Summer catalogue - the Scalloped Tag Topper Punch. For my version of this card I wanted to use different colours and a pop of colour on my sentiment banner and offset my tag at a more jaunty angle. I hope you like it!
Back tomorrow with another card; until then, happy stampin'!
Stampin' Up! Supplies Used:
12b1e757-ed9a-4fad-a80d-7451139c1b34|1|4.0|96d5b379-7e1d-4dac-a6ba-1e50db561b04
Tags: Big Shot, Scalloped Tag Topper Punch, Decorative Dots Textured Impressions Embossing Folder, Happy Watercolour, Sale-a-bration 2014, Petal Parade, Sweet Sorbet, Shop online, Stampin' Up, Stampin' Up Card, Stampin' Up Card ideas, Stampin' Up Supplies, Classes
Cards | Classes | Stamping
by Joanne James3. February 2014 21:18This week is a busy week for me, with a couple of classes and lots more going on. I held my first class of the week today and we had a lot of fun making cards using all of the items that can be yours free with a £45 spend during Sale-A-Bration. I'll share some of these cards with you later in the week (I don't want to spoil things for those ladies that haven't made them yet!) but today I wanted to share a short video tutorial for the first of the projects I've made using the Scalloped Tag Topper Punch. The Scalloped Tag Topper Punch is new in the Spring-Summer seasonal catalogue and, along with its neighbour the Angled Tag Topper Punch, can be used to make easy gift tags and bookmarks in one simple step, as the top is shaped and the hole punched for you in one easy movement. It is an incredibly versatile punch and can be used to create lots more besides.
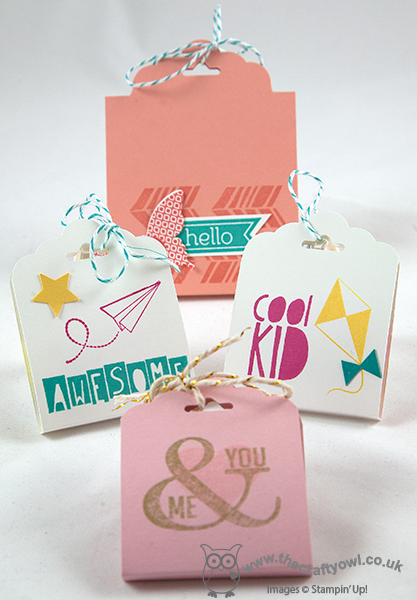
I have filmed a series of tutorials that show the versatility of these punches and the first of these shows you how to make a basic treat holder. Here are some of the ones I created:
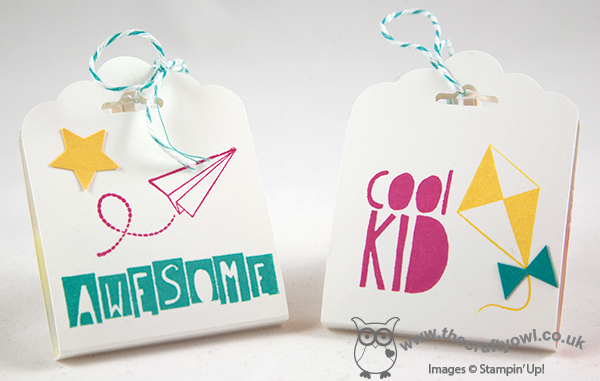
These were for my children as an after-school treat (they always complain I never greet them with sweets at the school gate, so this made a nice change!) and then I also created this more grown-up version:
I think these would make such lovely wedding favours and are so easy to make you could easily put together large quantities with minimal effort. I was inspired by these treat holders made by Mary Fish and adapted mine to suit the chocolate supplies on hand! Also, I have included both metric and imperial measurements in my tutorial, so you can create this treat holder with ease, whichever method you prefer.
So here's the first in my series of Scalloped Tag Topper Punch video tutorials - enjoy!
I hope you found my video useful; if you would like to purchase any of the items featured, please click on the links below and hop on over to my online store or give me a call if you're local to me and would like to save on postage costs. Back soon with news of some product shares that I've put together for those of you who have now had time to browse the new Spring-Summer catalogue and would like a little bit of everything! Until then, happy stampin'!
Stampin' Up! Supplies Used: