Special Reason Mainly Teal Birthday Card

by Joanne James10. March 2017 21:30

Hooray it's Friday! This week feels like a long one and has finished with what feels like a day at the wheel of my Mum Taxi! I did manage to finish a card I started yesterday for this week's challenge over at Less is More although I am too late to link up - you should totally check out the DT and gallery cards though, they are gorgeous: 


I love the idea of 'mainly teal' for this week's colour challenge and I've had an idea for this card that has been with me all week, just waiting for some time in my craft room to execute it  - take a look:


I decided to go with a simple layered flower and leaves, cut with my Stylish Stems Framelits Dies, in Bermuda Bay and Pool Party cardstock and some of the gorgeous new Sale-A-Bration Glimmer Paper in Bermuda Bay for my flower outline and border edge. To create the same effect with the leaves, I used my Pool Party Stampin' Write Marker to colour some Dazzling Diamonds white glimmer paper to mimic this. A border of retired Cherries On Top DSP and a sentiment from Butterfly Basics finishes my card. 

Here is the visual summary of the key products used on today's project for you to pin for easy reference:


You can see all of my 'How To' summaries on my 'How To - Tips and Techniques' Pinterest board in case you've missed any. 

This new Sale-A-Bration glimmer paper is gorgeous and I love the way that just a little sparkle adds to this otherwise clean and simple design.

A really quick post from me today - should be back with an earlier one tomorrow though! Until then, happy stampin'!


Stampin' Up! Supplies Used:

Table built using Product Table Builder by The Crafty Owl - Independent Stampin' Up! Demonstrator.

Picture Perfect Hummmingbird Meets Flowering Flourishes

by Joanne James4. May 2016 19:00


I have had a busy day today with early climbing wall club (for the James Juniors, not me!), a trip to Ikea for a few frames (am I the only one who goes in for 4 things and comes out with 14?!) as well as some preparation for some upcoming classes. One of those classes is using the Picture Perfect stamp set, that also features on my card today for the current Fusion challenge:

I've been busy trying lots of hummingbird colour combinations and when I saw the inspiration photo for the challenge I couldn't resist having a go at this one. Here's my card: 


An eclectic mix of elements today - here's the low-down on my card:

Picture Perfect Hummingbird - I stamped the four parts of my hummingbird in Wild Wasabi, Bermuda Bay, Crushed Curry and Basic Grey to get the realistic markings. There is so much fun to be had in trying different colour combinations with this bird and the photopolymer does make it easy to line up with a little practice.

A Flowering Flourish - I decided to add a flowering flourish to mimic the orange blossom of the inspiration photo and having seen this card here on Pinterest I thought the Flowering Flourishes stamp set offered the perfect solution. I inked mine with my Watermelon Wonder, Crushed Curry and Cucumber Crush Stampin' Write markers for added vibrancy.

Borders of Blue - I finished my card with a piece of Bermuda Bay patterned paper from the Cherry On Top DSP stack to frame my scene. 

Here is the visual summary of the key products used on today's project for you to pin for easy reference:


You can see all of my 'How To' summaries on my 'How To - Tips and Techniques' Pinterest board in case you've missed any. 

This isn't one of my class cards next week but hopefully it will get the ladies that are booked to attend in the mood for some multi-step stamping.

That's all from me today. Back tomorrow with my card for this week's new challenge over at Create With Connie and Mary; until then, happy stampin'!


Stampin' Up! Supplies Used:

Table built using Product Table Builder by The Crafty Owl - Independent Stampin' Up! Demonstrator.

Sale-A-Bration Pedal Pusher Times Two!

by Joanne James21. March 2016 11:23

Here I am with today's post that contains not one but two cards - a variation on a theme! There are only 11 more days left of this year's Sale-A-Bration with Stampin' Up! and I wanted to share with you a couple of cards I made with my most favourite of the second wave of limited-time products that you can receive free with a £45 spend - the Pedal Pusher stamp set. Both cards have been made with a couple of challenges in mind - the first for this week's colour challenge at Color Throwdown:

Having had Wisteria Wonder, a colour I don't use often, out on my desk for yesterday's Paper Players card, I couldn't fail to be inspired by the inspiration photo and decided to ink up my Pedal Pusher Sale-A-Bration stamp set for the first time:
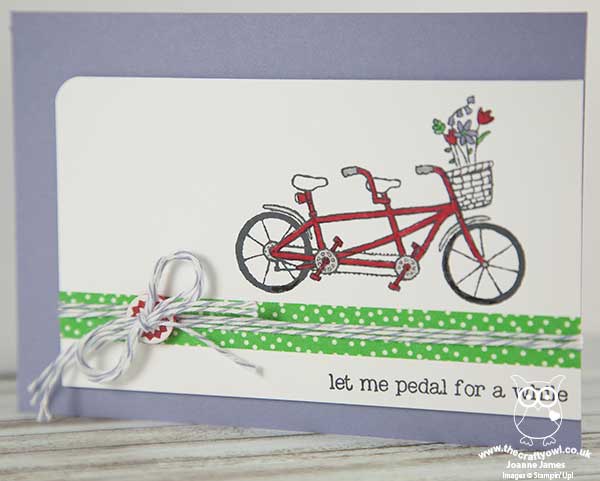
I decided to use the Wisteria Wonder for my card base, but decided my bicycle should be red - somewhat ironic, as my actual bicycle is purple, but it's more of a Rich Razzleberry colour, so not one for this card. Anyway, I digress! I added a strip of Cucumber Crush 'Cherry on Top' designer washi tape horizontally across my card, stamping my bicycle above it, coloured with my Stampin' Write Markers, and my sentiment below it. I added some retired Wisteria Wonder baker's twine and a retired button from my stash to finish this card. 

The Pedal Pusher stamp set is just great for so many reasons - here's my top 3:

It's versatile - there are so many little pieces to customise your bicycle, including three sentiments all of which play on the tandem bicycle theme.

It's photopolymer - makes aligning all the pieces easy-peasy and allows for perfect stamping every time.

It's free - with a £45 spend before 31st March.

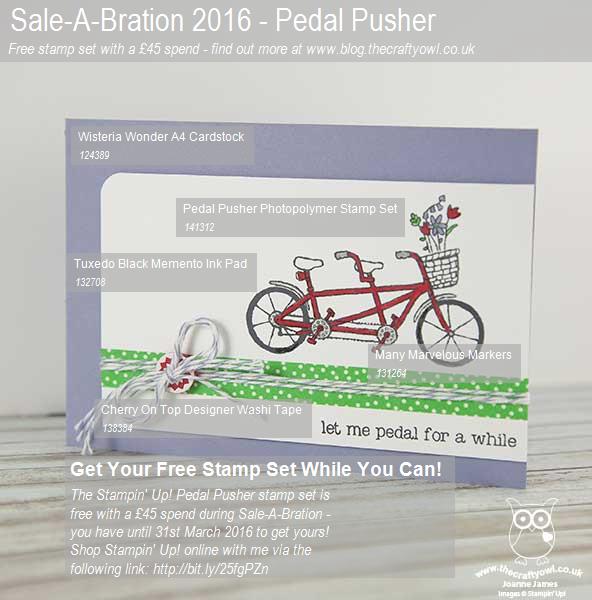
Here's the visual summary of the supplies used to make today's card for easy reference:
 

To demonstrate its versatility, for my second card I went a little more clean and simple and restricted my colour palette to white, Melon Mambo and Basic Black, adding an alternative sentiment and basket contents:
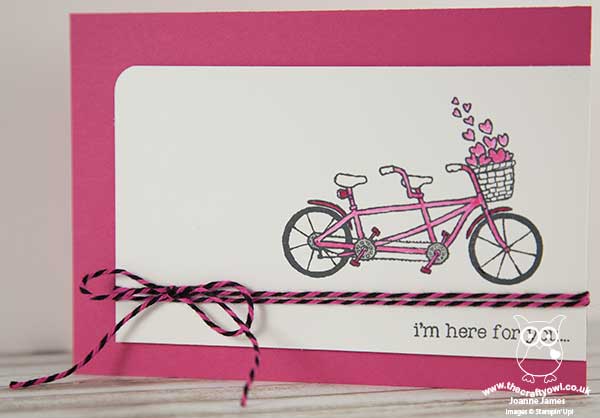
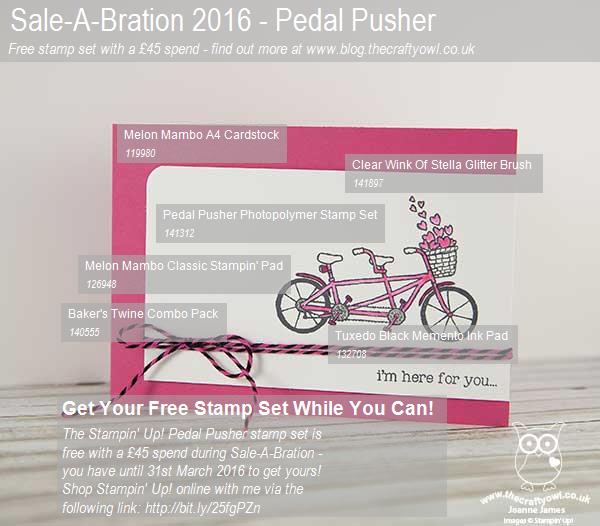
This time I coloured my bike using some Melon Mambo ink and my aquapainter and I also added a little clear Wink of Stella to my floating hearts for a nice shimmer. How cute is that?! The perfect card to let a friend know you are thinking of them. I'm linking this card up with the lovely ladies over at Less Is More this week, where the theme is 'what's outside your window'. Whilst I'm guessing a bicycle might not be the most obvious choice for some, now that Spring has sprung my bicycle will often be found outside my window - before I get on it and join my hubby and the James juniors for a long bike ride. With school holidays starting from tomorrow, I am hoping for lots of fine weather and the chance to indulge in this pleasant past time. 

Here's the visual summary of the supplies used to make the above card for easy reference:
 

That's all from me today; I'm off to squeeze in a quick trip to Ikea (if there is such a thing!) before going to watch Rebecca in her final school netball match of the season. Yesterday both James Juniors played basketball for school and were narrowly beaten into second place in their county qualifier, however Rebecca's club hockey match had a much more successful outcome, with her team earning a place at the U12 regional finals next month. Go Northampton Saints Hockey! The netball team cam third out of five in last week's inter-school netball tournament, so it would be nice for the girls to end the season with a win - here's hoping! 

Back tomorrow with another project. Until then, happy stampin'!


Stampin' Up! Supplies Used:

Card 1:

Table built using Product Table Builder by The Crafty Owl - Independent Stampin' Up! Demonstrator.

Card 2: 

Table built using Product Table Builder by The Crafty Owl - Independent Stampin' Up! Demonstrator.


New Wednesday Weekly Deals Are Here!

by Joanne James9. March 2016 02:00

It's Wednesday and you know what that means: a new collection of Wednesday Weekly Deals! These offers are valid for one week only. As always, a new collection of deals will be announced next Wednesday.

If you want to take advantage of any of the deals on offer, you can support my business by placing your order online by clicking here or using the link to my store on the right hand side of my blog page where it says 'Shop Online' or with me in person. Don't forget to add the new Hostess Code for March XDZGYVJC if your order is under £150 and be sure to make sure that you don't check the 'no contact' box if you'd like to be kept updated with the progress of you order and receive a little thank you in the post from me. 

Here's a summary of this week's one-week only Wednesday deals - click on each item to go to the online store to purchase:

Table built using Product Table Builder by The Crafty Owl - Independent Stampin' Up! Demonstrator.

Back later with today's creative project; until then, happy shopping!

Cherry on Top Birthday Balloons Card

by Joanne James20. February 2016 21:51

Hello everyone I hope you have all been enjoying your weekend so far. I managed to snatch a quick hour between chores and swimming lessons to make a quick card today for a couple of challenges:

SIP Sketch Challenge 35 800   

Before I share today's card I would like to say thank you to the team over at Stamp Ink Paper, and in particular Sandy, who chose my white wedding card as a winner in their 'love' themed challenge last week (if you missed it, you can see that card here) - it's always great to be recognised for one's creative efforts! This week the team have a sketch to play with and since I chose to feature balloons on my card it's also perfect for a link up with the Global Design Project who have these as their theme this week and The Friday Mashup, where the theme is birthdays (with the optional mashup of stencils - I'm coming back for this one!) We have so many balloon-related products currently; I chose to use an annual catalogue mainstay, the Cherry On Top Designer Series Paper Pack, as the inspiration for today's card:

I just love the bright little balloons on this paper pattern so I decided to cover my whole card front with the paper. I added a frame to my sentiment from the 'Birthday Blooms' stamp set (the swirly sentiment reminds me of the balloon strings!) which I cut with my Big Shot and Tags and Labels Framelits - these are on this week's Wednesday Weekly Deals if you want to grab them at a bargain price! For my embellishment, I chose to echo the balloons and cloud pattern of the paper and punched a cloud in Whisper White with my Tree Builder Punch and a trio of balloons with my punch from the Party Punch Pack, which I added some silver metallic thread string to, which I loosely tied together. I added in a thin banner of Cucumber Crush to complete the sketch. I just love the bright and happy colours of this card - and balloons are the perfect way to celebrate a birthday, whether young or old.

For those of you who like a visual summary, here's something new that I will be featuring in my blog posts - a labelled photograph of the key products required to make today's card: 


These images are perfect for pinning to give you a visual reference of the supplies needed to re-create this card which can be useful if you want to come back to it at a later date. I will be pinning these to my new 'How To - Tips and Techniques' Board on Pinterest too, which you can find here.

I hope you like today's card; I'll be back with another card for tomorrow's new challenge over at The Paper Players. I'm hosting this week so you won't want to miss it! Until then, happy stampin'!


Stampin' Up! Supplies Used:

Table built using Product Table Builder by The Crafty Owl - Independent Stampin' Up! Demonstrator.

Age Awareness Meets Cherry On Top Square Birthday Card

by Joanne James2. August 2015 11:00

It's Sunday and you know what that means: time for a new challenge over at The Paper Players! This week it is the turn of my fellow Brit, the lovely Jaydee, to host and she has a fun theme challenge for you:


Yes - square cards! It's always fun to create a square card for a change - when I saw this week's challenge I knew exactly where I wanted to start: the striped paper in the Cherry On Top stack was calling my name! I'm also linking up with the Friday Mashup where the challenge this week is also square cards, although obviously given my paper choice I decided not to go for the 'mashup' and use the colours over there too. Here's my card:


Now the pattern I chose actually has an off-centre point (check out your paper stack to see what I mean!) so I chose to cut my square of DSP square so that the lines all came together in the centre. I chose to use the 'happy' and 'birthday' sentiments from the 'Age Awareness' set as the focal point for my card - I like the contrasting swirls combined with the lined detail, which I infilled with my Stampin' Write markers in the colours that co-ordinated with the striped paper. To balance my sentiment in the square I also included a couple of the swirls across the top, which I joined together using a Crushed Curry Candy Dot. I simply measured my mats and layers and cut them with my trimmer, but you could always use your Square Framelits to make it easier if you prefer. A great clean and layered card and I love the way the striped paper draws your eye to the sentiment. A colourful custom envelope in Watermelon Wonder completes my card!

Before you reach for your ink and papers, check out what our amazing team has created to inspire you this week:

The Paper Players Design Team
Anne Marie Hile - on leave
 
 
Here's a quick recap of our challenge rules:
 
1.  Create a new paper project
2.  Upload your creation to your blog with a link back to us and provide a direct link to the post featuring your challenge submission.
3.  Please link your card to no more than three challenges, TOTAL.
4.  Have FUN! 

One of the reasons people avoid making a square card is that it often calls for a bespoke envelope. Don't forget about your Envelope Punch Board! Along with the gorgeous new Envelope Paper in the annual catalogue, and my Envelope Expert tool of course, there is no excuse to not make perfectly customised square envelopes (or rectangular for that matter!) every time. No fuss, no wastage, no guesswork required - if you're not already a fan, check out my free Envelope Expert tool today!

I look forward to seeing how you interpret Jaydee's fun challenge and seeing all your square creations in the gallery this week. As you read this I will be flying high somewhere above Europe, on my way back to the rather wetter climes of the UK. Don't worry - I'm doing my best to bring the sunshine back with me everyone! Enjoy the rest of your weekend, however you choose to spend it.

Back tomorrow with another project; until then, happy stampin'!


Stampin' Up! Supplies Used:

Table built using Product Table Builder by The Crafty Owl - Independent Stampin' Up! Demonstrator.

Watercolour Wings and an as Light as Air Cotton Paper Butterfly

by Joanne James16. July 2015 08:00

It's Thursday and time for a new challenge over at Create With Connie and Mary, where this week we have a colour challenge for you:


I also used this week's sketch over at Mojo Monday as the inspiration for the layout of today's card, which features my first outing of my new Watercolour Wings stamp set: 

I used a base of Crushed Curry and a mat of Basic Black, combined with two co-ordinating papers from the Cherry on Top DSP stack. I embossed a solid panel of Watermelon Wonder using the new Flutterings embossing folder and added this on the left and chose to use the negative space of the Greetings Thinlit die cut for my top layer. I added my butterfly, on which I stamped each of the layers with one of the challenge colours - photopolymer really makes easy work of this kind of triple stamping. The Watermelon Wonder looked slightly orange over the yellow, so I decided to add a small diecut butterfly, cut with the smallest of the Bold Butterfly framelits out of some of the new Cotton Paper in Crushed Curry. This paper is so soft and delicate and perfect for this kind of layering, as well as for flowers and more besides. Here's a close up of the layered butterfly:

So very pretty - I can't wait to stamp this in lots of other colourways too. I hope you like today's card and those of the other Design Team members - we look forward to seeing what you do with this colour palette this week!

Back tomorrow with another project; until then, happy stampin'!


Stampin' Up! Supplies Used:

  • Greetings Thinlits Dies
  • Big Shot
  • Cherry On Top Designer Series Paper Stack
  • Fluttering Textured Impressions Embossing Folder
  • Butterflies Thinlits Dies
  • Bold Butterfly Framelits Dies
  • Basic Black A4 Cardstock
  • Crushed Curry Classic Stampin' Pad
  • Crushed Curry A4 Cardstock
  • Watermelon Wonder Classic Stampin' Pad
  • Watermelon Wonder A4 Cardstock
  • Whisper White A4 Cardstock
  • Cherry On Top Cotton Paper Assortment


Cherry On Top Donuts Card

by Joanne James9. July 2015 08:00

It's Thursday and time for a new challenge over at Create With Connie and Mary! This week we have a great sketch challenge for you:


This was one of those sketches that the minute I saw it, I knew exactly what I was going to do with those 'flowers' - to me, they looked just like the donuts with a bit taken out that feature on both one of the Cherry on Top DSP stack patterns and the Sprinkles on Top stamp set on page 7 of the annual catalogue. I don't have the latter but am definitely in love with the former, so that's where I was headed for my card this week:

I stayed with the square shape for my card and used a base of Pool Party with mats in Whisper White and Bermuda Bay. I then used another of the patterns from the Cherry on top DSP stack as my top layer and stamped my sentiment from the 'Bravo' stamp set in Watermelon Wonder directly onto the DSP. I then used a long, slim panel of Bermuda Bay, with one corner rounded t echo the shape of the base card, then adhered four little donuts, punched out of the DSP using my 3/4" circle punch, onto the panel using dimensionals. I finished with a double loop of Whisper White baker's twine to complete my card. 

So what do think - is this card sweet to you? Do check out how the other design team members have interpreted this week's sketch as we've all taken a different approach. As for me, I'll be back tomorrow with another project to share. Until then, happy stampin'!


Stampin' Up! Supplies Used:

  • Bravo Photopolymer Stamp Set
  • Cherry On Top Designer Series Paper Stack
  • Whisper White Baker's Twine
  • Watermelon Wonder Classic Stampin' Pad
  • Bermuda Bay A4 Cardstock
  • Pool Party A4 Cardstock
  • Punch Corner Project Life
  • Whisper White A4 Cardstock
  • 3/4" Circle Punch


Tags: , , , , , , ,

Cards | Stamping

Giggle Greetings Meets Cherry on Top

by Joanne James20. June 2015 20:58

Hello lovely blog readers! Today I have a card to share that is for this week's Mojo Monday challenge. Before I share it though I wanted to give a congratulations shout out to Justin Krieger and Lori Tecler who were both recently selected to become members of the Mojo Monday Design Team. I admire both of their work and am so pleased they will be joining with the talented Julee and other DT members to provide Mojo inspiration. So here is this week's sketch:

I decided those circles would be great to try something I've had in mind ever since I saw the Cherry on Top DSP stack - take a look:

I've been wanting to pair that bowl of cherries image from the Giggle Greetings stamp set with the cheery DSP in the Cherry on Top DSP stack and this layout was a great way to try it out. I used Cucumber Crush for my base then cut a partial circle out of my Whisper White mat using my Circles Framelits and placed a piece of cherry DSP beneath it. I added the flags in Cucumber Crush and Watermelon Wonder and stamped the sentiment in two parts, one on each, having masked off the rest of the stamp:

I added another circle of patterned paper from the Cheery on Top DSP stack and then lastly added the circle with the bowl of cherries, which I stamped in Memento Black onto Whisper White and coloured with a combination of my Blendabilities for the cherries and my Stampin' Write markers and mounted on a circle of Cucumber Crush.

I love this fresh colour combo and such a fun way to combine old and new product. That's all from me today; I'm off to catch a movie! Back tomorrow with a new challenge over at the Paper Players; until then, happy stampin'!


Stampin' Up! Supplies Used:

Table built using Product Table Builder by The Crafty Owl - Independent Stampin' Up! Demonstrator.


Sprinkles of Life Layered Cherry On Top Card

by Joanne James19. June 2015 07:00

It's Friday - the end of the week already! The somewhat strange title of my blog post today is as a result of the card that I'm sharing. it's another Sprinkles of Life birthday card, this time using the sketch over at Retrosketches, which has lots of layers this week:

I decided to go for a real mix and match approach with my Cherry on Top DSP stack - this is what I came up with:


A Pool Party base and borders of Cucumber Crush are the perfect background for the birthday candles paper. For the banner and layers, I chose some of the bold patterns in the pack and kept my cupcake in solid colours with a few sprinkles to tie the cake in with the rest of my card. A paper-pieced candle, some sequin sprinkles and done! I made this card for Ben to give to Rebecca on her birthday earlier this week - she has a real love for bold patterns and colours and is not afraid to mix and match so this card is very her.

That's all from me today; I am treating myself to a rare day of pampering with a couple of friends, with whom I am visiting the spa to enjoy a day of relaxation. Back tomorrow with another project; until then, happy stampin'!


Stampin' Up! Supplies Used:

Table built using Product Table Builder by The Crafty Owl - Independent Stampin' Up! Demonstrator.


Current Promotions

Stampin Cut and Emboss

Save up to 30% off on all your favourite kits from 1 to 31 October! 

Click here to see the current kits available and order yours online today.

Join My Team

It's always a great time to join Stampin’ Up! During October you can get even more in your starter kit! New team members can get £160 worth of products for only £99 + free business supplies + free shipping + all the fun being a part of Stampin’ Up! Stampin' Up! has something for everyone: join my growing team and benefit from my support to enjoy Stampin' Up! however you choose.

If you're interested, call me for a chat to understand how I can help you realise your goals. Alternatively, if you have already decided to sign up and you just can't wait, please click here for the link to the online form where you can sign up and order your starter kit right away! 

Shop Online

Access my online shop 24 x 7, 365 days of the year:

Current October hostess code:

4XPEYCB9

Shop Online

Scrapbooking

Stampin' Up! has introduced a new range of 12x12" scrapbooking product and kit - the full range is now available to purchase online. To download a copy of the new digital Scrapbooking Catalogue click here.

Mini Catalogue

BROWSE THE CATALOGUE

'Tis The Season - the new Stampin' Up! Mini Catalogue is here! For more details and to download your copy click here

2024-25 Annual Catalogue

BROWSE THE CATALOGUE

Click on the image to download your copy of the 2024-25 annual catalogue. For a full list of current SU! supplies, go to my online store. If you would like any help or advice, please drop me a line at joanne@thecraftyowl.co.uk or give me a call on 07773 421446 - I'd be happy to help.

Latest Kits!

Stampin Cut and Emboss

The Christmas Ornaments Kit and Card Keeper Kit are the latest kits in the online store - get yours here!

New Online Exclusives

There are new products available exclusively in the online store from 5 November - check them out here.

About Me

Hi I'm Joanne and live in Northampton and when I'm not looking after my husband and two beautiful children, am an avid crafter with a passion for all things Stampin' Up!

I must confess that I have never been a big rubber stamper - until I discovered Stampin' Up! that is. I love the fact that I can get such great results with co-ordinating stamps, inks, papers and punches - the possibilities are endless! Join me on my stamping journey as I share the things I love and be inspired to create amazing things yourself!

Follow Me

Monthly Newsletter

Box Builder

Click the button above to use Box Buster to create your custom box design using the Envelope Punch Board!

Kits Collection Now Available!

Stampin Cut and Emboss

The new Kits Collection from Stampin' Up! is now available!

Click here to see the current kits available and order yours online today.

I Design For


Stampin' Up Stuff

This is my personal blog and is not endorsed by Stampin’ Up! I hope you find it a plentiful source of ideas and personal inspiration but please don't copy my designs for contest submission or use for classes, publication or sale without express permission.