by Joanne James21. April 2016 08:05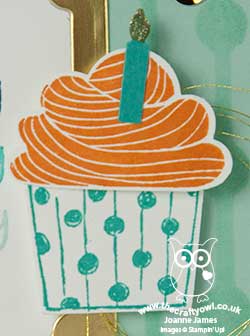
Today it's time for a new challenge over at Create With Connie and Mary and this week we have a great sketch for you:
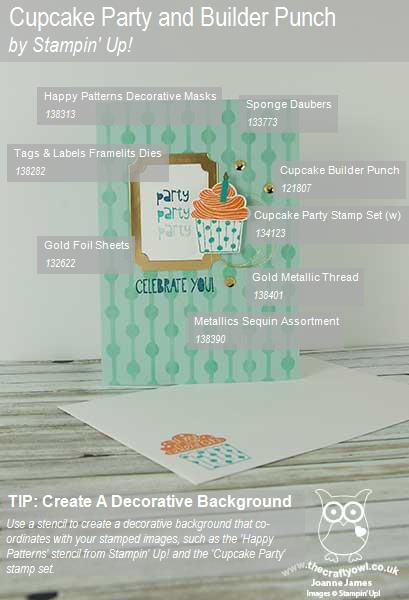
I decided to use the 'Cupcake Party' stamp set for both the greeting and embellishment on my card today, with some splashes of gold and an interesting co-ordinating background:

Cupcake Party - I haven't used this stamp set and punch in a while - and now they are both going away! I decided to use some bright orange frosting to contrast with the blues of my card - and added a Bermuda Bay candle with a gold Wink of Stella flame. If either of these items are on your wishlist, snap them up from the online store before it's too late.
A Happy Pattern - I've been intrigued for a while that one of the stencils in the Happy Patterns pack co-ordinates perfectly with the cupcake case in the cupcake Party stamp set. I sponged my background in Pool Party onto my Pool Party card base to create a co-ordinated yet subtle background.
Splashes of Gold - My card features quite a few gold elements for sparkle and shine today: a gold foil frame for my ombre sentiment (inked with Island Indigo, Bermuda Bay and Pool Party markers), gold Wink of Stella for my candle flame, some gold metallic thread and a sprinkle of gold sequins. On this card all that glitters most certainly is gold - I think it adds to the party feel!
Here is the visual summary of the key products used on today's project for you to pin for easy reference:
You can see all of my 'How To' summaries on my 'How To - Tips and Techniques' Pinterest board in case you've missed any.
Do visit the other Design Team members to see how they interpreted this week's sketch; there's lots of inspiration over on their blogs too!
Enjoy your day and I'll be back tomorrow with another project; until then, happy stampin'!
Stampin' Up! Supplies Used:
- Cupcake Party Wood-Mount Stamp Set
- Cupcake Builder Punch
- Sponge Daubers
- Happy Patterns Decorative Masks
- Tags & Labels Framelits Dies
- Tangerine Tango Classic Stampin' Pad
- Bermuda Bay Classic Stampin' Pad
- Bermuda Bay A4 Cardstock
- Pool Party Classic Stampin' Pad
- Pool Party A4 Cardstock
- Whisper White A4 Cardstock
- Metallics Sequin Assortment
- Gold Metallic Thread
- Gold Foil Sheets
- Island Indigo Classic Stampin' Pad
by Joanne James20. February 2016 21:51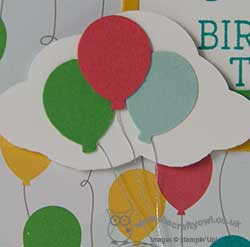
Hello everyone I hope you have all been enjoying your weekend so far. I managed to snatch a quick hour between chores and swimming lessons to make a quick card today for a couple of challenges:

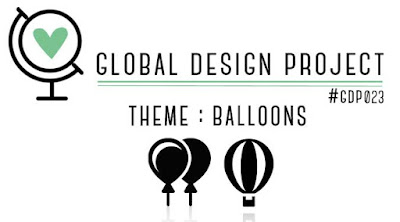

Before I share today's card I would like to say thank you to the team over at Stamp Ink Paper, and in particular Sandy, who chose my white wedding card as a winner in their 'love' themed challenge last week (if you missed it, you can see that card here) - it's always great to be recognised for one's creative efforts! This week the team have a sketch to play with and since I chose to feature balloons on my card it's also perfect for a link up with the Global Design Project who have these as their theme this week and The Friday Mashup, where the theme is birthdays (with the optional mashup of stencils - I'm coming back for this one!) We have so many balloon-related products currently; I chose to use an annual catalogue mainstay, the Cherry On Top Designer Series Paper Pack, as the inspiration for today's card:
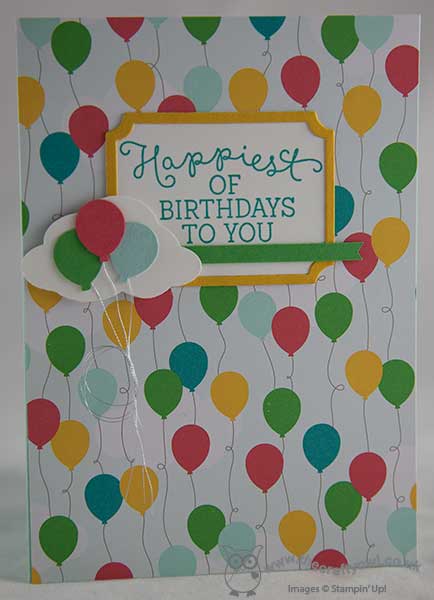
I just love the bright little balloons on this paper pattern so I decided to cover my whole card front with the paper. I added a frame to my sentiment from the 'Birthday Blooms' stamp set (the swirly sentiment reminds me of the balloon strings!) which I cut with my Big Shot and Tags and Labels Framelits - these are on this week's Wednesday Weekly Deals if you want to grab them at a bargain price! For my embellishment, I chose to echo the balloons and cloud pattern of the paper and punched a cloud in Whisper White with my Tree Builder Punch and a trio of balloons with my punch from the Party Punch Pack, which I added some silver metallic thread string to, which I loosely tied together. I added in a thin banner of Cucumber Crush to complete the sketch. I just love the bright and happy colours of this card - and balloons are the perfect way to celebrate a birthday, whether young or old.
For those of you who like a visual summary, here's something new that I will be featuring in my blog posts - a labelled photograph of the key products required to make today's card:
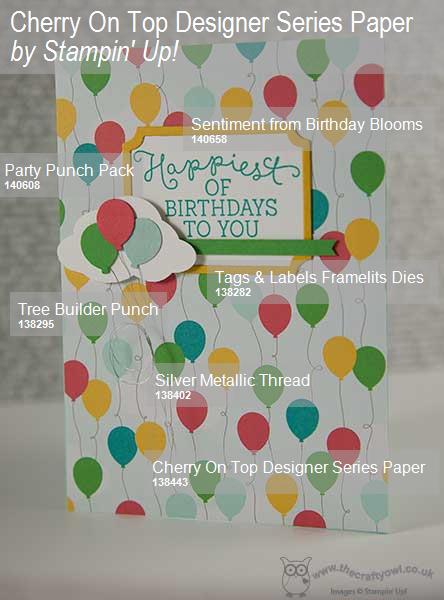
These images are perfect for pinning to give you a visual reference of the supplies needed to re-create this card which can be useful if you want to come back to it at a later date. I will be pinning these to my new 'How To - Tips and Techniques' Board on Pinterest too, which you can find here.
I hope you like today's card; I'll be back with another card for tomorrow's new challenge over at The Paper Players. I'm hosting this week so you won't want to miss it! Until then, happy stampin'!
Stampin' Up! Supplies Used:
2b00d59d-2d37-48a1-8db4-aeb10fe4799e|0|.0|96d5b379-7e1d-4dac-a6ba-1e50db561b04
Tags: Big Shot, Cherry on Top, Tags and Labels Framelits, Stampin' Up, Stampin' Up Card, Stampin' Up Card ideas, Stampin' Up Supplies, Shop online, Shop Stampin' Up online, Birthday Blooms, Party Punch Pack, Tree Builder Punch
Cards | Shop Online | Stamping
by Joanne James18. February 2016 10:00A day late as I was out all day and evening yesterday - here are this week's new Wednesday Weekly Deals! These offers are valid for one week only. As always, a new collection of deals will be announced next Wednesday.
If you want to take advantage of any of the deals on offer, you can support my business by placing your order online by clicking here or using the link to my store on the right hand side of my blog page where it says 'Shop Online' or with me in person. Don't forget to add the new Hostess Code for February UYGWGF4W if your order is under £150 and be sure to make sure that you don't check the 'no contact' box if you'd like to be kept updated with the progress of you order and receive a little thank you in the post from me.
Here's a summary of this week's one-week only Wednesday deals - click on each item to go to the online store to purchase:
Some great offers on this week - the cute Bear Hugs framelits, as used by my good self to create the little Valentine's table favours at the weekend that I shared over on my Facebook page (you can see them here if you missed them - do give my page a 'like' if you'd like to keep up to date with all the fun over there too!) Very useful Tags and Labels framelits dies, along with the Petite Petals stamp set, as voted for by one of my customers last week as 'the best stamp set EVER!' (hello Jane!) and the product that always gets my vote for the top spot: The Envelope Punch Board. When used in conjunction with my Envelope Expert and Box Buster tools, a tool that offers limitless possibilities. Always a bargain in my view even at its full price of £18, but at £13.50 it's an absolute steal!!! If you haven't got one, what on earth are you waiting for???!!!
Don't forget that for every £45 you spend you are entitled to a free Sale-A-Bration item too - and this week there are three new ones added to the range too. In case you missed it, you can find full details here.
Back later with today's creative project; until then, happy shopping!
063402aa-bafd-4b05-ab70-5c00a58f1271|0|.0|96d5b379-7e1d-4dac-a6ba-1e50db561b04
Tags: Promotions, Shop online, Shop Stampin' Up online, Stampin' Up, Stampin' Up Card, Stampin' Up Card ideas, Stampin' Up Supplies, Wednesday Weekly Deals, Box Buster, Envelope Expert, Envelope Punch Board, Bear Hugs, Petite Petals, Confetti Stars Punch, Tags and Labels Framelits
Promotions | Shop Online | Stamping
by Joanne James17. December 2015 08:05
I've had a few blog-free days this week - so much going on with the end of the school term and Christmas preparations, blogging has had to take a bit of a back seat - however today it's time for a new challenge over at Create With Connie and Mary so I'm back with it and this week we have a great colour combination for you:
My card this week is all about the reindeer - take a look:
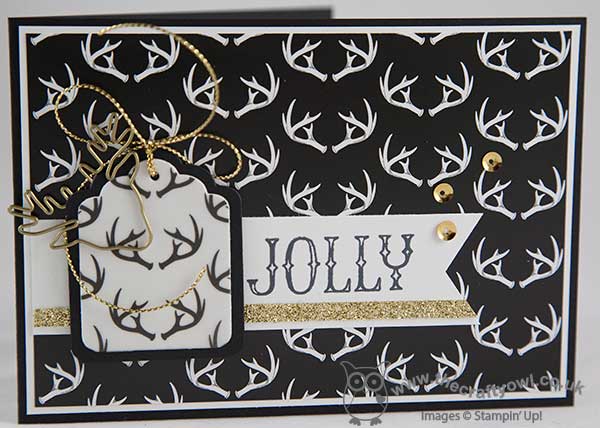
I decided to make a feature of the reindeer antler paper and vellum from the Winter Wonderland designer series paper, with a little gold glimmer paper, a few gold sequins, corded trim and one of my favourite reindeer paper clips to finish off my little layered tag. A little bit of layering but still easy enough to make for those last minute Christmas cards and a great way to use up that rather tricky heavily patterned paper.
Do visit the other Design Team members to see what they did with this week's colours; there's lots of inspiration over on their blogs too! Due to the Christmas festivities, this challenge will run for two weeks instead of one, so lots of time for to squeeze in an entry!
Enjoy your day and I'll be back tomorrow with another project; until then, happy stampin'!
Stampin' Up! Supplies Used:
- Winter Wonderland Specialty Designer Series Paper
- Winter Wonderland Designer Vellum Stack
- Gold Cording Trim
- Reindeer Paper Clips Embellishments
- Tags & Labels Framelits Dies
- Gold Glimmer Paper
- Metallics Sequin Assortment
- Basic Black A4 Cardstock
- Whisper White A4 Cardstock
- Big Shot
- Fine-Tip Glue Pen

f7cc3feb-9faf-428c-b747-9f9fdec49648|0|.0|96d5b379-7e1d-4dac-a6ba-1e50db561b04
Tags: Create With Connie And Mary, Stampin' Up, Stampin' Up Card, Stampin' Up Card ideas, Stampin' Up Supplies, Wonderland, Winter Wonderland, Tags and Labels Framelits, Reindeer paper clip, Christmas, Oh What Fun
Cards | Shop Online | Stamping
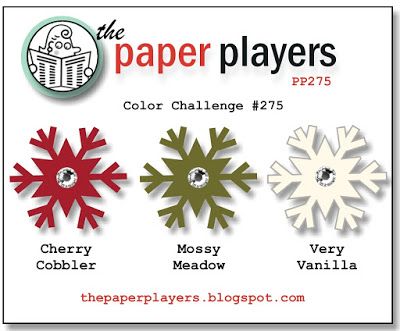
by Joanne James13. December 2015 10:00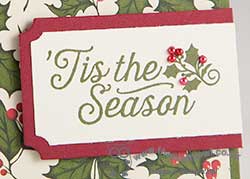
It's Sunday and time for a new challenge over at The Paper Players! This week it is the turn of my good friend LeAnne to host and she has the following colour palette to get our creative juices flowing this week:
This is a special week for us as we say goodbye to our guest designers Jodi, Amy and Lisa. We are grateful that these lovely ladies have shared their considerable talent and creativity with us for the last 6 months and we wish them well on their respective journeys. We will miss you!
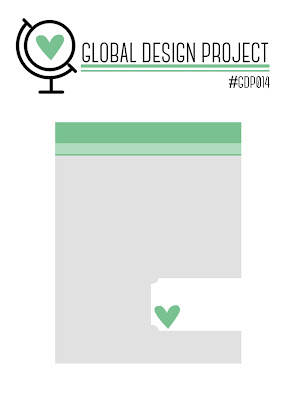
For my card this week I was inspired to use yet more of the lovely Home For Christmas paper and designed my card all around the holly. I also used the sketch over at The Global Design Project for my layout:
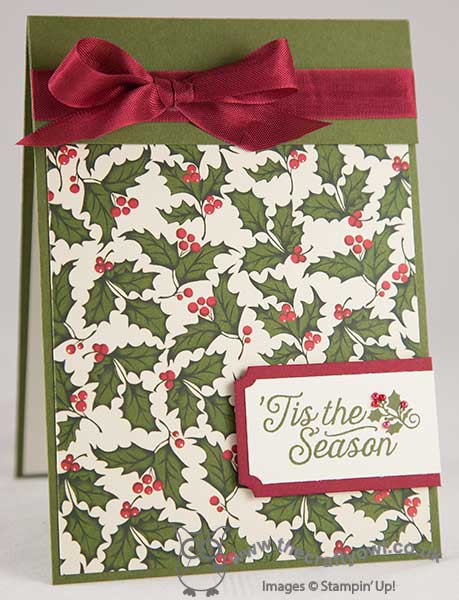
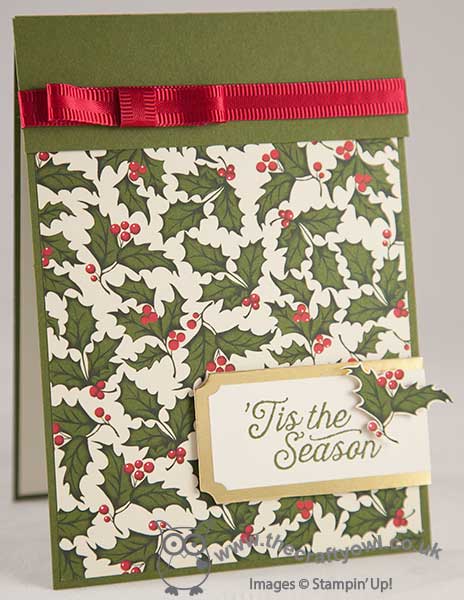
Really simple, allowing the holly patterned paper to do all the hard work on this one. The sentiment is from 'Oh What Fun' and the sentiment piece cut using the Tags and Labels Framelits. I added some Cherry Cobbler seam binding ribbon and highlighted the berries on my holly with pearls coloured with my retired Cherry Cobbler Blendabilities. I also created a second version of this card whilst I had everything out on my desk, using the same sketch but this time using the similar but slightly different colour palette over at Paper Pals Arts this week:

I used gold foil to make my sentiment banner stand out and fussy cut some holly from the dsp in place of the stamped sentiment and also added a flatter, more post-friendly bow with a scrap of ribbon I found in my stash:
Here's a close up of the label detail:
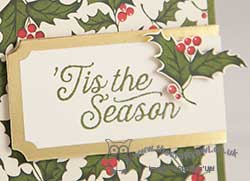
I really like how the gold gives a different effect.
Before you reach for your ink and papers, check out what our amazing team has created to inspire you this week:
The Paper Players Design Team
Here's a quick recap of our challenge rules:
1. Create a new paper project
2. Upload your creation to your blog with a link back to us and provide a direct link to the post featuring your challenge submission.
3. Please link your card to no more than three challenges, TOTAL.
4. Have FUN!
I look forward to seeing what you create with this colour combination this week. We are hoping to put our Christmas tree up today - it's time to really get our Christmas preparations underway!
Back tomorrow with another project; until then, happy stampin'!
Stampin' Up! Supplies Used:
edec6f08-c19b-470a-9656-d4fa5b29df8b|0|.0|96d5b379-7e1d-4dac-a6ba-1e50db561b04
Tags: Stampin' Up, Stampin' Up Card, Stampin' Up Card ideas, Stampin' Up Supplies, The Paper Players, Shop online, Shop Stampin' Up online, Christmas, Home For Christmas, Oh What Fun, Tags and Labels Framelits
Cards | Shop Online | Stamping
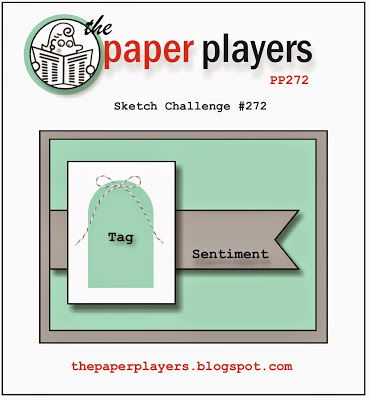
by Joanne James22. November 2015 10:00
It's Sunday and time for a new challenge over at The Paper Players! This week it is the turn of the lovely Laurie to host and she has a great sketch to get our creative juices flowing this week:
I decided to showcase some of the lovely Home For Christmas designer series paper on my card today along with one of the Cozy Christmas stamps on today's card:
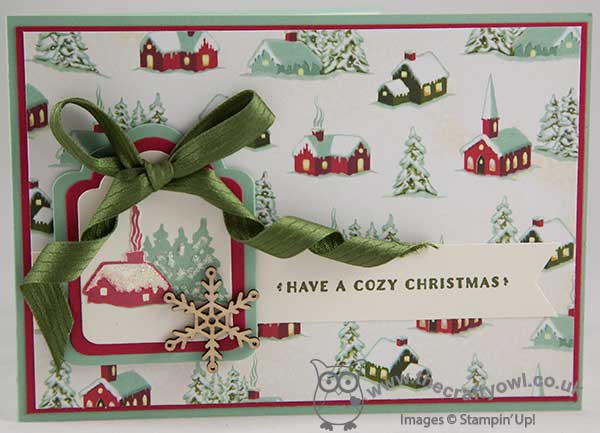
I love this winter village scene paper so I paired it with a sentiment and the little house from the 'Cozy Christmas' stamp set. I stamped the scene in Mint Macaron and then cropped out the tree on the left and paper-pieced the house, which I stamped in Real Red. I added dimension with some puffy snow on the roof and trees and a wooden snowflake embellishment. I created my layered tag using the Tags and Labels framelits and to finish added a twirly bow using some retired in-colour ribbon in Mossy Meadow. Having had a busy week of classes and most of my day yesterday taken up with school projects I struggled to get into the groove with this card, but time was against me so in the end I had to stop fiddling with it and finish up!
Before you reach for your ink and papers, check out what our amazing team has created to inspire you this week:
The Paper Players Design Team
Here's a quick recap of our challenge rules:
1. Create a new paper project
2. Upload your creation to your blog with a link back to us and provide a direct link to the post featuring your challenge submission.
3. Please link your card to no more than three challenges, TOTAL.
4. Have FUN!
I look forward to seeing what you make with Laurie's sketch this week. I'm off for a morning of sport and then both James Juniors are taking part in a basketball tournament this afternoon. Another busy Sunday!
Back tomorrow with another project; until then, happy stampin'!
Stampin' Up! Supplies Used:
27f7666a-d167-4369-bd64-cc4e5be8a87e|1|5.0|96d5b379-7e1d-4dac-a6ba-1e50db561b04
Tags: Stampin' Up, Stampin' Up Card, Stampin' Up Card ideas, Stampin' Up Supplies, The Paper Players, Shop online, Shop Stampin' Up online, Cozy Christmas, Home For Christmas, Christmas, Big Shot, Tags and Labels Framelits
Cards | Shop Online | Stamping