by Joanne James21. May 2017 09:00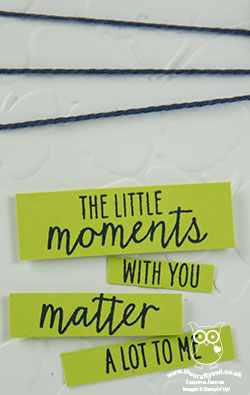
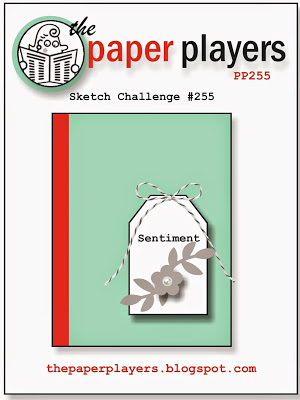
It's Sunday and time for this week's new challenge over at The Paper Players! It's the turn of our amazing and fearless leader Nance to host this week and she has a clean and simple challenge for us to work with:
I took the opportunity to use this week's Paper Craft Crew Sketch for my card today as I haven't played along over there for a while:

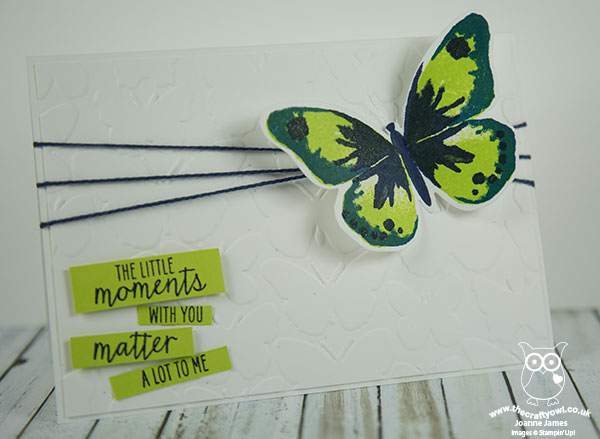
This simple layout was perfect for a clean and simple card with a feature butterfly - take a look:
Here's the low-down on today's card:
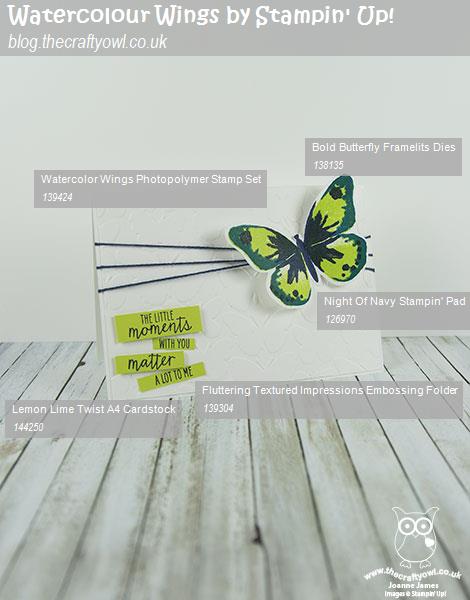
Watercolour Wings - I decided to use the larger of the Watercolour Wings butterflies to create the focal point on my card today. I used the same set for my sentiment, that I chopped up by hand. This is a great set for a clean and simple card - I really should use it more often!
Fluttering White Space - I wanted to keep my 'white space' white and uncluttered, however decided to add interest by embossing my background with my Fluttering Embossing Folder.
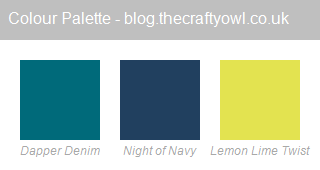
Loving Lemon-Lime Twist - I decided to feature one of the new in-colours on my card today: Lemon-Lime Twist. I paired it with Dapper Denim and Night of Navy for my butterfly, along with a little Night of Navy baker's twine and Navy on Lime for my sentiment - I so love these two colours together! This green is so zingy and fresh - it is a definite new favourite of mine! Here's my colour combination in case you would like to try it on a future project:
Here is the visual summary of the key products used on today's project for you to pin for easy reference:
You can see all of my Product and 'How To' summaries on my 'How To - Tips and Techniques' Pinterest board in case you've missed any.
Before you reach for your ink and papers, check out what our amazing team has created to inspire you this week:
The Paper Players Design Team
Here's a quick recap of our challenge rules:
1. Create a new paper project
2. Upload your creation to your blog with a link back to us and provide a direct link to the post featuring your challenge submission.
3. Please link your card to no more than four challenges, TOTAL.
4. Have FUN!
I look forward to seeing your clean and simple creations in the gallery this week. Enjoy the rest of your weekend as it will be over all too quickly; I'll be back tomorrow with another project; until then, happy stampin'!
Stampin' Up! Supplies Used:
dda01d66-ed2f-4013-a8c7-a9479cf15952|0|.0|96d5b379-7e1d-4dac-a6ba-1e50db561b04
Tags: Shop Stampin' Up! Online, Stamping Shop Stampin' Up online, Shop online, Stampin' Up, Stampin' Up Card ideas, Stampin' Up Supplies, Stampin' Up Card, The Paper Players, Watercolour Wings, Fluttering Texture Impressions Embossing Folder, Bold Butterfly Framelits
Cards | Shop Online | Shop Stampin' Up! Online | Stamping
by Joanne James7. April 2016 08:05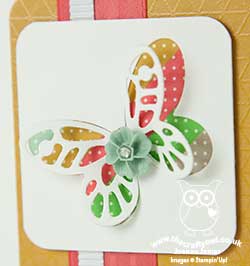
Today it's time for a new challenge over at Create With Connie and Mary and this week we have a great sketch for you:
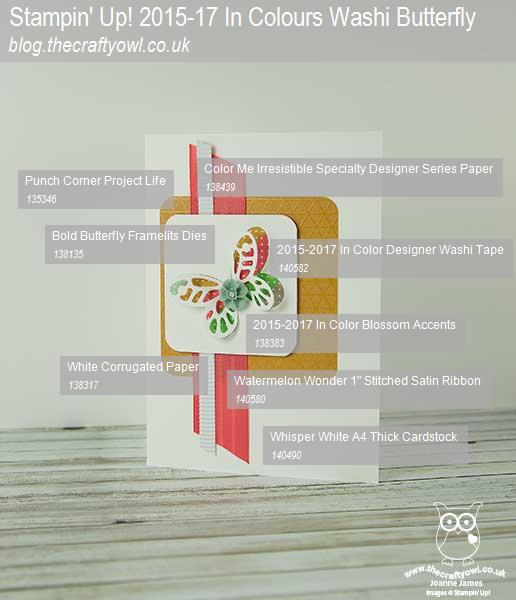
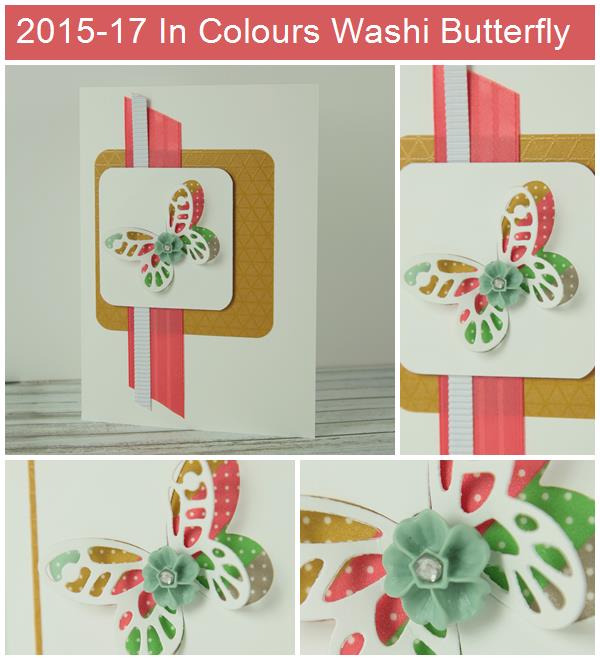
So after everything I said about Delightful Dijon on my CCMC card last week, this week I've gone and used it again - out of choice! My card this week is all about our current in-colours, the 2015-17 In Colours to be exact:

I decided to create a washi tape striped inset background for my white butterfly, using the In Colour Designer Washi Tape that is an exclusive hostess gift which you can purchase with Stampin' Rewards when you host a Stampin' Up! party. I then chose the remaining elements of my card from there: a strip of white corrugated card for texture, a strip of watermelon wonder wide 1" stitched satin ribbon and for the back panel a piece of Colour Me Irresistible Specialty Designer Series Paper - I went with the Delightful Dijon because this is the only uncut piece in my pack! I finished my butterfly with a Mint Macaron In-Colour Blossom Accent, finished with a rhinestone. I haven't added a sentiment to my card today as I wanted to add it to my stash of 'all purpose' cards, so will probably add one as I'm ready to send it.
Here is the visual summary of the key products used on today's project for you to pin for easy reference:
You can see all of my 'How To' summaries on my 'How To - Tips and Techniques' Pinterest board in case you've missed any.
Do visit the other Design Team members to see how they interpreted this week's sketch; there's lots of inspiration over on their blogs too!
Enjoy your day and I'll be back tomorrow with another project; until then, happy stampin'!
Stampin' Up! Supplies Used:
- Bold Butterfly Framelits Dies
- 2015-2017 In Color Designer Washi Tape
- Watermelon Wonder 1" Stitched Satin Ribbon
- Color Me Irresistible Specialty Designer Series Paper
- 2015-2017 In Color Blossom Accents
- Kraft And White Corrugated Paper
- Punch Corner Project Life
- Rhinestone Basic Jewels
- Whisper White A4 Thick Cardstock
by Joanne James26. July 2015 11:00It's Sunday and you know what that means: time for a new challenge over at The Paper Players! This week it is the tun of the super-talented Sandy to host and she has my favourite kind of a challenge for you - yes, it's a sketch:
This is a great sketch and gave me the opportunity to use some of my very favourite items from the annual catalogue: another Expressions Natural Element sentiment, some Pretty Petals DSP and a butterfly cut with the Bold Butterfly Framelits - take a look at my card today:
I used a cardbase of Very Vanilla for my card today, with a border strip of Typeset DSP to compliment the diagonal lines of the Pretty Petals paper that I used to cover the rest of my cardfront. I decided to use Basic Black for my tag, punched with the Ornate Tag Topper Punch, to give a strong contrast to the vanilla elsewhere and I created a layered butterfly that echoes the design of those in the paper pattern, with a solid vanilla base then two of the Bold Butterfly thinlit butterflies - one in Calypso Coral adhered directly to the base butterfly, and one in Pacific Point that I adhered in the middle only so that the layer beneath could be seen. I did reverse the positioning of the butterfly and sentiment on my tag to the sketch - I thought the sentiment was too heavy to put above the butterfly as I didn't want to overshadow it - what do you think, smart move or should I have stuck to the sketch more literally? A few Old Olive candy dots, some satin Very Vanilla ribbon and some black and white baker's twine finish my card. No stamping on this one - not on the outside, anyway! I'm also linking up with the ladies over at Just Add Ink this week where the theme is 'Butterflies'.
Before you reach for your ink and papers, check out what our amazing team has created to inspire you this week:
The Paper Players Design Team
Here's a quick recap of our challenge rules:
1. Create a new paper project
2. Upload your creation to your blog with a link back to us and provide a direct link to the post featuring your challenge submission.
3. Please link your card to no more than three challenges, TOTAL.
4. Have FUN!
The tag on this week's sketch is a real fun detail; I look forward to seeing how you interpret it and the rest of Sandy's sketch in the gallery this week. Time for me to return to my sunbed to top up my tan - enjoy the rest of your weekend, however you choose to spend it.
Back tomorrow with another project; until then, happy stampin'!
Stampin' Up! Supplies Used:
b92e8e70-3d4a-462d-abdd-c563b3044a1e|0|.0|96d5b379-7e1d-4dac-a6ba-1e50db561b04
Tags: Big Shot, Bold Butterfly Framelits, Butterfly Thinlits Dies, Expressions Natural Elements, Ornate Tag Topper Punch, Pretty Petals, Shop online, Shop Stampin' Up online, Stampin' Up, Stampin' Up Card, Stampin' Up Card ideas, Stampin' Up Supplies, The Paper Players, Typeset, Candy Dots
Cards | Stamping
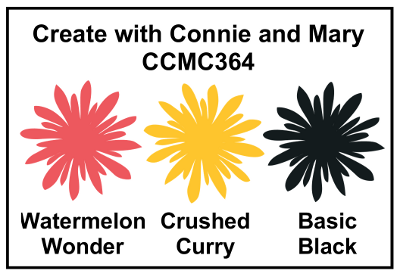
by Joanne James16. July 2015 08:00It's Thursday and time for a new challenge over at Create With Connie and Mary, where this week we have a colour challenge for you:
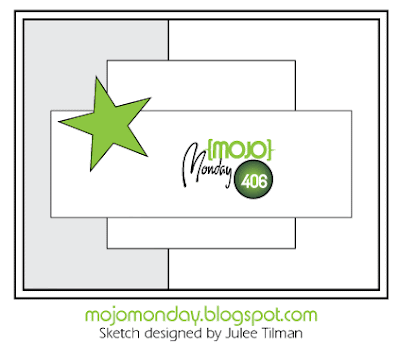
I also used this week's sketch over at Mojo Monday as the inspiration for the layout of today's card, which features my first outing of my new Watercolour Wings stamp set:
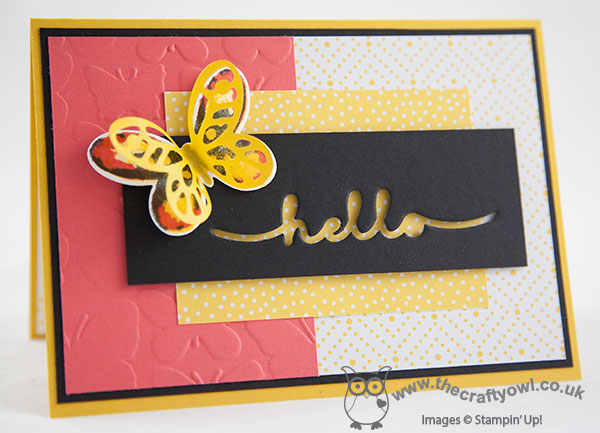
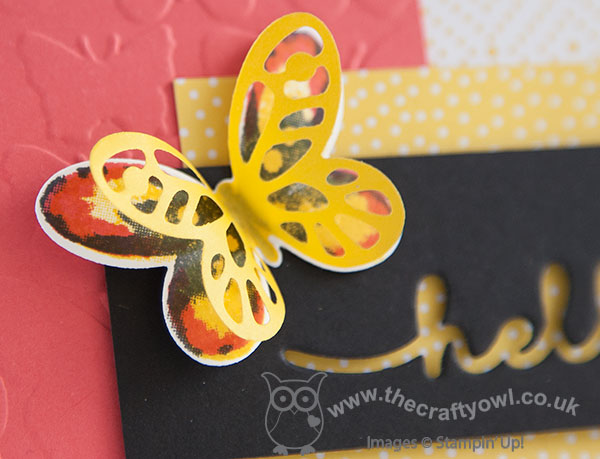
I used a base of Crushed Curry and a mat of Basic Black, combined with two co-ordinating papers from the Cherry on Top DSP stack. I embossed a solid panel of Watermelon Wonder using the new Flutterings embossing folder and added this on the left and chose to use the negative space of the Greetings Thinlit die cut for my top layer. I added my butterfly, on which I stamped each of the layers with one of the challenge colours - photopolymer really makes easy work of this kind of triple stamping. The Watermelon Wonder looked slightly orange over the yellow, so I decided to add a small diecut butterfly, cut with the smallest of the Bold Butterfly framelits out of some of the new Cotton Paper in Crushed Curry. This paper is so soft and delicate and perfect for this kind of layering, as well as for flowers and more besides. Here's a close up of the layered butterfly:
So very pretty - I can't wait to stamp this in lots of other colourways too. I hope you like today's card and those of the other Design Team members - we look forward to seeing what you do with this colour palette this week!
Back tomorrow with another project; until then, happy stampin'!
Stampin' Up! Supplies Used:
- Greetings Thinlits Dies
- Big Shot
- Cherry On Top Designer Series Paper Stack
- Fluttering Textured Impressions Embossing Folder
- Butterflies Thinlits Dies
- Bold Butterfly Framelits Dies
- Basic Black A4 Cardstock
- Crushed Curry Classic Stampin' Pad
- Crushed Curry A4 Cardstock
- Watermelon Wonder Classic Stampin' Pad
- Watermelon Wonder A4 Cardstock
- Whisper White A4 Cardstock
- Cherry On Top Cotton Paper Assortment
a80ecd95-9c1d-4f62-9609-335c81ec3d93|0|.0|96d5b379-7e1d-4dac-a6ba-1e50db561b04
Tags: Watercolour Wings, Bold Butterfly Framelits, Big Shot, Greetings Thinlits, Cotton Paper, Create With Connie And Mary, Cherry on Top, Shop online, Shop Stampin' Up online, Stampin' Up, Stampin' Up Card, Stampin' Up Card ideas, Stampin' Up SuppliesCircles Framelits, Stampin' Up Supplies
Cards | Stamping
by Joanne James29. June 2015 09:49Happy Monday everyone! Well, we didn't manage to barbeque yesterday as it was the worst weather day of the week here in the UK, but no matter - this week is supposed to be a scorcher, despite the fact that it's the start of Wimbledon Tennis Fortnight (a sure recipe for rain!) so I'm sure there will be lots of opportunity. My week is shaping up to be a busy one - with only three weeks until the end of the school term, there is something on pretty much every other day between now and the end of term so forgive me if my blogging becomes brief! Anyway, a good start to the week as I've two cards to share today! This first is my card for this week's challenge over at Colour Q:

Don't you just love those flip flops?! The colours along with the butterflies prompted me to create a fun 'cutting edge' card that I am also linking up with the current challenge over at SUO Challenges where they are asking us to create a card that features a cut edge that is something other than a straight line. This is what I came up with:
I used Soft Sky for my card base, then diecut four butterflies in Night of Navy using the smallest butterfly in the new Bold Butterfly framelits and adhered them to the edge of my card, carefully cutting around them by hand to remove the edge of the card base and expose the back panel. I then cut another two butterflies each in Daffodil Delight and Marina Mist and paper-pieced the small pieces into the navy butterflies. I stamped the sentiment from Watercolour Wonder onto the front of my card in Night of Navy and stamped the spotty strip repeatedly along the back inside edge of the card in Soft Sky for some added detail behind the butterflies, although you can't see this in the above photo as it's not flat and only visible when closed (I need to take another picture which I will add to this post later - these type of cards are so tricky to photograph!). This card looks so pretty in real life - the fussy cut edge really lifts this card and makes it something special.
My second card today is using this week's sketch over at Freshly Made Sketches where the lovely Jen Mitchell has a great sketch that would work so well for so many layouts:
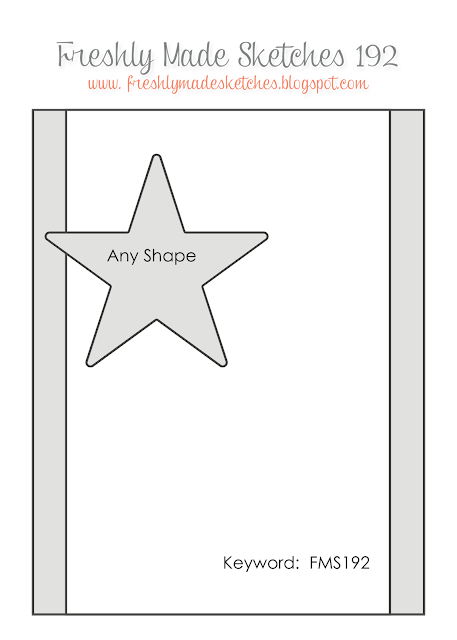
I flipped the sketch through 180 degrees (it's allowed!) to create a rather topical card that was inspired by a cupcake of all things that appeared in my Facebook feed over the weekend, commemorating the decision by the US Supreme Court over the weekend to legalise same sex marriage across all US states:
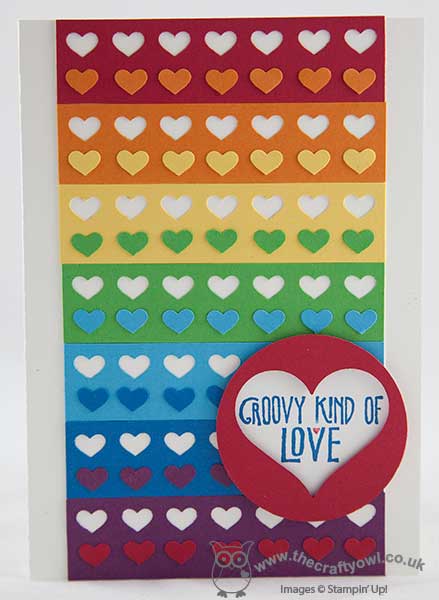
I used a rainbow of strips of cardstock, punching each with my Hearts Border punch before adhering to my base of extra-thick Whisper White cardstock (love this for card bases!) I then took the punched out hearts and adhered these individually in a row beneath the negative punched space on the strip above. My focal point is a couple of 2" circles, the first in Whisper White and stamped with one of the sentiments in the 'Groovy Love' stamp set, inked up with Pacific Point and Real Red Stampin' Write markers. The second circle was punched from Real Red cardstock, with a heart punched out of the centre using the Sweetheart punch so that the sentiment could show through the negative space and popped up over the first on Dimensionals for added depth. Very 'gay pride' with the hearts and rainbows, don't you agree? I am also entering this card into a demonstrator-only challenge that Stampin' Up! are currently running with the tagline #punchitup where we have to use a combination of two of four specific punches and as you can see, I went with hearts!
That's my creative post for today; I will be back tomorrow with another project and may be back in the meantime with other news, depending on how far I get through today's 'to do' list so do pop back later! Until then, happy stampin'!
Stampin' Up! Supplies Used:
Card One:
Card Two:
cf37e0b6-0757-4f9a-aa8f-aef99f5fa071|0|.0|96d5b379-7e1d-4dac-a6ba-1e50db561b04
Tags: Bold Butterfly Framelits, Watercolour Wonder, Big Shot, Hearts Border Punch, Stampin' Up, Stampin' Up Card, Stampin' Up Card ideas, Stampin' Up Supplies, Sweetheart Punch, circle punch, Punch Art, Groovy Love
Cards | Punch Art | Stamping