Age Awareness Meets Cherry On Top Square Birthday Card

by Joanne James2. August 2015 11:00

It's Sunday and you know what that means: time for a new challenge over at The Paper Players! This week it is the turn of my fellow Brit, the lovely Jaydee, to host and she has a fun theme challenge for you:
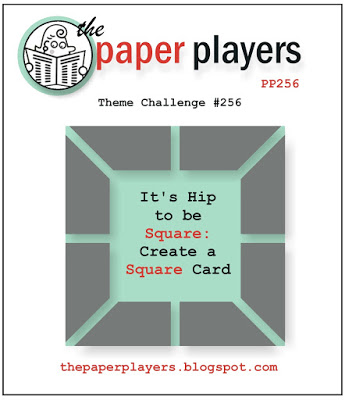
    

Yes - square cards! It's always fun to create a square card for a change - when I saw this week's challenge I knew exactly where I wanted to start: the striped paper in the Cherry On Top stack was calling my name! I'm also linking up with the Friday Mashup where the challenge this week is also square cards, although obviously given my paper choice I decided not to go for the 'mashup' and use the colours over there too. Here's my card:
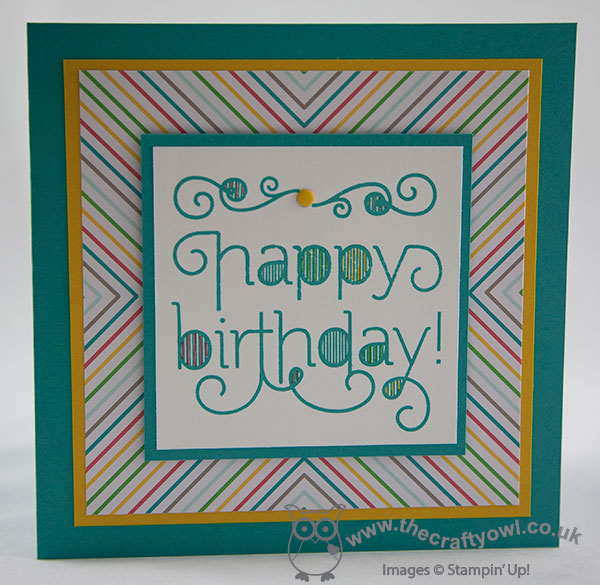
 

Now the pattern I chose actually has an off-centre point (check out your paper stack to see what I mean!) so I chose to cut my square of DSP square so that the lines all came together in the centre. I chose to use the 'happy' and 'birthday' sentiments from the 'Age Awareness' set as the focal point for my card - I like the contrasting swirls combined with the lined detail, which I infilled with my Stampin' Write markers in the colours that co-ordinated with the striped paper. To balance my sentiment in the square I also included a couple of the swirls across the top, which I joined together using a Crushed Curry Candy Dot. I simply measured my mats and layers and cut them with my trimmer, but you could always use your Square Framelits to make it easier if you prefer. A great clean and layered card and I love the way the striped paper draws your eye to the sentiment. A colourful custom envelope in Watermelon Wonder completes my card!

Before you reach for your ink and papers, check out what our amazing team has created to inspire you this week:

The Paper Players Design Team
Anne Marie Hile - on leave
 
 
Here's a quick recap of our challenge rules:
 
1.  Create a new paper project
2.  Upload your creation to your blog with a link back to us and provide a direct link to the post featuring your challenge submission.
3.  Please link your card to no more than three challenges, TOTAL.
4.  Have FUN! 

One of the reasons people avoid making a square card is that it often calls for a bespoke envelope. Don't forget about your Envelope Punch Board! Along with the gorgeous new Envelope Paper in the annual catalogue, and my Envelope Expert tool of course, there is no excuse to not make perfectly customised square envelopes (or rectangular for that matter!) every time. No fuss, no wastage, no guesswork required - if you're not already a fan, check out my free Envelope Expert tool today!

I look forward to seeing how you interpret Jaydee's fun challenge and seeing all your square creations in the gallery this week. As you read this I will be flying high somewhere above Europe, on my way back to the rather wetter climes of the UK. Don't worry - I'm doing my best to bring the sunshine back with me everyone! Enjoy the rest of your weekend, however you choose to spend it.

Back tomorrow with another project; until then, happy stampin'!


Stampin' Up! Supplies Used:

Table built using Product Table Builder by The Crafty Owl - Independent Stampin' Up! Demonstrator.

You've Got This Meets Pretty Petals

by Joanne James28. July 2015 08:00

Good morning everyone! Today I have another of the cards from my July technique lass featuring the stamp set 'You've Got This': 

I was inspired by this card of Patsy Waggoner's and wanted to create a similar card showing how the focal flower could also be used as a background stamp to create an alternative effect. Of course I had to pair mine with my most favourite Pretty Petals DSP with that cute Pacific Point flower, which I then used in the candy dots of the same colour to bring focus to the sentiment banner - a cinch to create with my Triple Banner punch. Pacific Point and Old Olive seem an unlikely colour combo, yet the Pretty Petals DSP shows how they work so perfectly together, especially when teamed with Very Vanilla as the neutral.

This card was another success with the ladies at my technique class; combined with the third card (this one - the card that started it all!) which was the most complicated of the three, we managed to make three cards to be proud of.

Back tomorrow with a new set of Wednesday Weekly Deals - don't forget you still have one more day to take advantage of my Weekly Deals Giveaway this week - to remind yourself of the offer, please click here! Until tomorrow, happy stampin'!


Stampin' Up! Supplies Used:

Table built using Product Table Builder by The Crafty Owl - Independent Stampin' Up! Demonstrator.


Pretty Petals Butterfly Tag Card

by Joanne James26. July 2015 11:00

It's Sunday and you know what that means: time for a new challenge over at The Paper Players! This week it is the tun of the super-talented Sandy to host and she has my favourite kind of a challenge for you - yes, it's a sketch:

This is a great sketch and gave me the opportunity to use some of my very favourite items from the annual catalogue: another Expressions Natural Element sentiment, some Pretty Petals DSP and a butterfly cut with the Bold Butterfly Framelits - take a look at my card today:

I used a cardbase of Very Vanilla for my card today, with a border strip of Typeset DSP to compliment the diagonal lines of the Pretty Petals paper that I used to cover the rest of my cardfront. I decided to use Basic Black for my tag, punched with the Ornate Tag Topper Punch, to give a strong contrast to the vanilla elsewhere and I created a layered butterfly that echoes the design of those in the paper pattern, with a solid vanilla base then two of the Bold Butterfly thinlit butterflies - one in Calypso Coral adhered directly to the base butterfly, and one in Pacific Point that I adhered in the middle only so that the layer beneath could be seen. I did reverse the positioning of the butterfly and sentiment on my tag to the sketch - I thought the sentiment was too heavy to put above the butterfly as I didn't want to overshadow it - what do you think, smart move or should I have stuck to the sketch more literally? A few Old Olive candy dots, some satin Very Vanilla ribbon and some black and white baker's twine finish my card. No stamping on this one - not on the outside, anyway! I'm also linking up with the ladies over at Just Add Ink this week where the theme is 'Butterflies'.

Before you reach for your ink and papers, check out what our amazing team has created to inspire you this week:

The Paper Players Design Team
Anne Marie Hile - on leave
 
 
Here's a quick recap of our challenge rules:
 
1.  Create a new paper project
2.  Upload your creation to your blog with a link back to us and provide a direct link to the post featuring your challenge submission.
3.  Please link your card to no more than three challenges, TOTAL.
4.  Have FUN! 

The tag on this week's sketch is a real fun detail; I look forward to seeing how you interpret it and the rest of Sandy's sketch in the gallery this week. Time for me to return to my sunbed to top up my tan - enjoy the rest of your weekend, however you choose to spend it.

Back tomorrow with another project; until then, happy stampin'!


Stampin' Up! Supplies Used:

Table built using Product Table Builder by The Crafty Owl - Independent Stampin' Up! Demonstrator.

I'm Always There For You In Red, White and Blue

by Joanne James6. July 2015 13:19

Happy Monday everyone! I have had my first of this week's technique card classes this month and spent a pleasant morning catching up with my ladies, who all left very pleased with their cards. I will share these cards in due course once all my classes are complete (I don't want to spoil the surprise for the next group of ladies!). Meanwhile, today I have a card made with this week's sketch over at Freshly Made Sketches:

I'm also linking this card up with the ladies over at Less Is More this week, where the challenge is to use red, white and blue on your card, which I most certainly have - take a look: 

I decided to pair my bright Real Red with the softer tones on Sky Blue for today's card and added some detail to my main panel using some retired 'Back To Black' DSP although the new Everyday Chic paper would work just as well. I coloured both pieces with my retired Soft Sky Blendabilities pens. My sentiment is from the new 'Friendly Wishes' stamp set and I finished my caard with a few pops of Real Red: some cotton ribbon, an Itty Bitty Accents punched flower (or two!) and a retired button from my storecupboard, tied with some white baker's twine.

I really love the way the combination of bright red with the pale blue, and I think the set off the black and white of the DSP and sentiment beautifully. 

That's all from me today; a basket of ironing awaits, although hopefully I'll catch another match at Wimbledon on the TV as I go, so much less of a hardship than usual! Back tomorrow with another card and a new product share! until then, happy stampin'!


Stampin' Up! Supplies Used:

Table built using Product Table Builder by The Crafty Owl - Independent Stampin' Up! Demonstrator.


Hats Off To You Masculine Birthday Card

by Joanne James24. February 2015 08:45

I'm here today to share my card for this week's challenge over at Create With Connie and Mary where they have a rather interesting sketch to play along with this week:


I've been playing with my new 'Guy Greetings' stamp set this week, in preparation for my next stamp-a-stack class which is featuring masculine cards and I decided that this sketch would work perfectly with a trio of hats - take a look at my card to see what I mean:

I went for a monochromatic look for my card with a Very Vanilla base and a piece of striped Typeset paper, set beneath another layer of Very Vanilla cut at an angle. I masked the hat stamp and inked three of the six hats and stamped them above a piece of black cardstock cut at an angle, then stamped my greeting on the Vanilla base panel. I finished my black strip with a trio of Very Vanilla candy dots. Clean and simple and I like it! 

Back tomorrow with another project; until then, happy stampin'!


Stampin' Up! Supplies Used:

Table built using Product Table Builder by The Crafty Owl - Independent Stampin' Up! Demonstrator.


Tags: , , , , , , , ,

Cards | Stamping

Amazing Birthday Card for Colour Me...! Card Challenge

by Joanne James26. November 2014 10:00

Today's card is for this week's Colour Me...! card challenge where we have are working with a playful palette of pinks and purples with a spot of Coastal Cabana:

I took the opportunity to ink up my Amazing Birthday stamp set for the first time. This was one of the sets I received free at Stampin' Up! Convention in Brussels this year and it was really tough not to buy it before I went, as I think it's a really versatile stamp that will get lots of use. Here's today's card:


I used Elegant Eggplant for my card base, then mounted a panel of Perfect Plum that I had dry embossed with the large polka dot embossing folder. I tied some thick Coastal Cabana baker's twine around the embossed panel before adhering to my card base. I stamped the main image in Elegant Eggplant on Whisper White, but also stamped it separately in Rose Red and Costal Cabana and fussy cut a couple of panels and overlaid them onto my main panel to add a pop of colour. To finish, I added a couple of rhinestones to my main panel which I first coloured wit my Coastal Cabana Blendabilities and a trio of Rose Red candy dots to the embossed panel. 

This card could be made in lots of different colourways and would make a great 'storecupboard standby' that works for both male and female. As someone who is a big fan of purple though, this colour combination really works for me. I might have to go and make a few more! 

Feel free to leave a comment on today's card, before hopping over to check out the amazing cards by the rest of the Colour Me...! team:

And our talented guest designer for November - Anita Bowden
 
We look forward to seeing your playful creations - what do these colours inspire you to create? 
 
Back tomorrow with another project; until then, happy stampin'!
 
 
Stampin' Up! Supplies Used:
Table built using Product Table Builder by The Crafty Owl - Independent Stampin' Up! Demonstrator.
 

Clean And Simple Christmas Cheer Card

by Joanne James24. November 2014 09:25

Happy Monday everyone! Hope you all had lovely weekends; mine was busy as always, with a Stampin' Up! party on Friday night, followed by the usual weekend of sport and a morning stood out in the driving rain watching my first rugby match yesterday (hockey is definitely a cleaner game!) Other highlights of my weekend included reaching the bottom of my ironing basket (to be celebrated!) and the addition of a new pet to the James household - Olivia the goldfish has joined Goldie, who was feeling lonely following the recent departure of Fishy.

So, onto today's card! Today I have a clean and simple card for this week's challenge over at Freshly Made Sketches, where Cindy has another great sketch for us:

I took inspiration from another of the designs in the Nordic Noel DSP pack and paired it with the sentiment stamp from Cheerful Christmas for my card today:

I used Soft Sky as my base and a piece of the Nordic Noel DSP featuring the acorns and pine sprigs for the left panel of my card. I stamped my feature sentiment in Garden Green on Whisper White and matted this onto a piece of Garden Green cardstock, rounding the corners on the right-hand side of both pieces. I used some Soft Sky and Calypso Coral Candy Dots to add a little colour to the main panel. Lastly, I added a strip of Garden Green and finished with a double loop of Baked Brown Sugar baker's twine. I love this thick twine - it's great for packaging but also works as a substitute for ribbon and ties a lovely bow. 

I love the fresh look of this card; the Garden Green is definitely a festive colour, but pairing it with Soft Sky, Baked Brown Sugar and Calypso Coral and Whisper White adds a real crispness to it I think. That's all from me - I'm off to get ready for today's class featuring the Many Merry Stars kit; click here to order yours if you haven't already, before they're all gone. 

Back tomorrow with another project and news of a fantastic one-week only demonstrator sign up offer - come back and check it out, you are not going to want to miss it! Until then, happy stampin'!


Stampin' Up! Supplies Used:

Table built using Product Table Builder by The Crafty Owl - Independent Stampin' Up! Demonstrator.


Nordic Noel Christmas Card

by Joanne James9. November 2014 07:00

It's Sunday and time for a new challenge over at The Paper Players and this week Sandy has a fantastic colour challenge for us:


Aren't these colours so reminiscent of winter? I also used this week's sketch over at The Paper Craft Crew for the layout for today's card:

I used Cherry Cobbler for my card base and matted this with a piece of Very Vanilla cardstock. I created my own DSP for my background panel by stamping Mossy Meadow ink on Mossy Meadow cardstock and stamping a selection of the baubles from the Nordic Noel set. The focal image of my card is the main stamp in this set, which I coloured with my Mossy Meadow and Cherry Cobbler markers to achieve the two-colour pattern. A Stylish Stripes embossed panel added a little background texture and I finished with the gorgeous in-colour Mossy Meadow satin ribbon and an antique brad, along with a sentiment from Good Greetings. Lastly, there is a 'cheat' element to my card today - did you spot it? For all of you wondering where I managed to get my Mossy Meadow candy dots from, since they aren't in the catalogue, I'll let you into a secret - they're actually Always Artichoke! I'm hoping Sandy will forgive me, but as they aren't next to anything that is Mossy Meadow you cant see the subtle difference in colour so they do the job as far as my card is concerned. I won't tell if you don't ;-).

I hope you like today's card; do pop by The Paper Players gallery to see what the rest of the team have come up with - there are some great cards as always. There's even one by LeAnne that uses the exact same sketch layout as me, yet it looks completely different, so check it out for double inspiration!

Back tomorrow with another project; until then, happy stampin'!


Stampin' Up! Supplies Used:

Table built using Product Table Builder by The Crafty Owl - Independent Stampin' Up! Demonstrator.


Nutty or Nice Nutcracker Christmas Card

by Joanne James7. November 2014 07:00

Yay it's Friday - always a good day! Today I'm sharing my card for this week's Less is More challenge, where the theme is non-traditional colours on a Christmas card (specifically no red or green). I decided to go with another Nutcracker card - he is so perfect for non-traditional colour schemes, and this time with a very simple layout; here's my card:

I used a base of Soft Sky and layered a couple of mats of Rich Razzleberry and Soft Sky, then stamped my Nutcracker image directly onto the Soft Sky layer and did some basic paper piecing on the jacket and hat to add the Rich Razzleberry elements and the Soft Sky crown. His face was stamped on Blushing Bride and again paper pieced together. I coloured the eyebrows and hair using my Smoky Slate Stampin' Up! Blendabilities markers, and stamped the moustache in Memento Black onto Smoky Slate cardstock and popped it up on dimensionals. Some Rich Razzleberry candy dots on his crown and Soft Sky ones on his jacket complete the look.

There you have it - another non-traditional nutcracker card. Back tomorrow with another project; until then, happy stampin'!


Stampin' Up! Supplies Used:

Table built using Product Table Builder by The Crafty Owl - Independent Stampin' Up! Demonstrator.


Tags: , , , , , , , , ,

Cards | Stamping

Nordic Noel Joy To You Christmas Card

by Joanne James6. November 2014 09:36

Good morning everyone! I'm back with another Christmas card today - well, it truly is the season for it now! Today's card uses the sketch over at CAS(E) This Sketch which was the perfect layout for me to showcase some lovely Nordic Noel DSP and incorporate a layered die cut. Here's this week's sketch:

And this is my card: 

A simple layering of Garden Green on Soft Sky, followed by the Nordic Noel DSP. This paper has such a busy pattern I find it only really works on cards like this where there isn't anything to clutter it; I cut my 'Joy' die cut in Real Red, then stacked it on a couple of identical die cuts in Garden Green to give it real dimension (I used adhesive transfer sheets to hold the layers together, which made for very easy layering). I decided to mount it onto a rectangular piece of Garden Green cardstock, because the die cut didn't stand out enough against the patterned paper without, then I added the 'to you' from the Endless Wishes stamp set in Garden Green on Calypso Coral beneath it - the only stamping on today's card! Lastly, I added a sprinkling of candy dots in something of a nod to the sketch, albeit that I restricted use of them to the solid colour panels.

Hope you like today's card - if you like this layout you should check out the other cards on the CAS(E) This Sketch page - there are some great examples there.

Right, I'm off to get some work done - back tomorrow with another Christmas card; until then, happy stampin'!


Stampin' Up! Supplies Used:

Table built using Product Table Builder by The Crafty Owl - Independent Stampin' Up! Demonstrator.


Tags: , , , , , , , , ,

Cards | Stamping

Current Promotions

Stampin Cut and Emboss

Save up to 30% off on all your favourite kits from 1 to 31 October! 

Click here to see the current kits available and order yours online today.

Join My Team

It's always a great time to join Stampin’ Up! During October you can get even more in your starter kit! New team members can get £160 worth of products for only £99 + free business supplies + free shipping + all the fun being a part of Stampin’ Up! Stampin' Up! has something for everyone: join my growing team and benefit from my support to enjoy Stampin' Up! however you choose.

If you're interested, call me for a chat to understand how I can help you realise your goals. Alternatively, if you have already decided to sign up and you just can't wait, please click here for the link to the online form where you can sign up and order your starter kit right away! 

Shop Online

Access my online shop 24 x 7, 365 days of the year:

Current October hostess code:

4XPEYCB9

Shop Online

Scrapbooking

Stampin' Up! has introduced a new range of 12x12" scrapbooking product and kit - the full range is now available to purchase online. To download a copy of the new digital Scrapbooking Catalogue click here.

Mini Catalogue

BROWSE THE CATALOGUE

'Tis The Season - the new Stampin' Up! Mini Catalogue is here! For more details and to download your copy click here

2024-25 Annual Catalogue

BROWSE THE CATALOGUE

Click on the image to download your copy of the 2024-25 annual catalogue. For a full list of current SU! supplies, go to my online store. If you would like any help or advice, please drop me a line at joanne@thecraftyowl.co.uk or give me a call on 07773 421446 - I'd be happy to help.

Latest Kits!

Stampin Cut and Emboss

The Christmas Ornaments Kit and Card Keeper Kit are the latest kits in the online store - get yours here!

New Online Exclusives

There are new products available exclusively in the online store from 5 November - check them out here.

About Me

Hi I'm Joanne and live in Northampton and when I'm not looking after my husband and two beautiful children, am an avid crafter with a passion for all things Stampin' Up!

I must confess that I have never been a big rubber stamper - until I discovered Stampin' Up! that is. I love the fact that I can get such great results with co-ordinating stamps, inks, papers and punches - the possibilities are endless! Join me on my stamping journey as I share the things I love and be inspired to create amazing things yourself!

Follow Me

Monthly Newsletter

Box Builder

Click the button above to use Box Buster to create your custom box design using the Envelope Punch Board!

Kits Collection Now Available!

Stampin Cut and Emboss

The new Kits Collection from Stampin' Up! is now available!

Click here to see the current kits available and order yours online today.

I Design For


Stampin' Up Stuff

This is my personal blog and is not endorsed by Stampin’ Up! I hope you find it a plentiful source of ideas and personal inspiration but please don't copy my designs for contest submission or use for classes, publication or sale without express permission.