A Petal Garden Note For You #GDP139

by Joanne James23. May 2018 07:30

Today I'm sharing a card that uses the sketch over at As You See It that I also created with the Global Design Project theme this week in mind:


I was intrigued by the sketch at AYSI and thought I'd go one step further than the lovely LeAnne's card and not only use up some of my retiring DSP, but use it to create a kind of relief pattern that added interest to my main image - take a look:


Here's the low-down on today's card:

Petal Garden - I had some sheets of Petal Garden DSP left over and most of them had a single stem image like the one on my card. I thought this sketch would be an alternative way to add interest to the basic paper pattern by adding dimensional panels in the same design. I really like the finished effect - although it did challenge my mathematical skills to ensure that all of the pieces were the correct size and correctly spaced, whilst the image remained aligned. For a card with very little stamping, the mosaic element was rather time-consuming - a good thing that I like jigsaws!

A Note For You - This card is all about the paper, so a small sentiment was the order of the day. I chose the simple 'For You' from the Graceful Garden stamp set, masking each word so that they would sit one on top of the other and fit into my 3/4" punched circle. I added a little of the new velvet ribbon beneath it.

When Is A Scalloped Circle Not A Scalloped Circle? - My sentiment needed a border so that it didn't get lost on my card, but I didn't have anything small enough to fit. Then I remembered a trick I have used on a previous card - I used the outer framelit of the wreath in the Santa's Sleigh Thinlits, circled below:


A clever trick! It's always worth checking your framelits to see if they can be used for purposes other than those intended :-)

I needed a 'just because' card and this one fits the bill nicely; it's always good to have a few of this type of card on hand. 

Here is the visual summary of the key products used on today's project for you to pin for easy reference:


You can see all of my 'How To' summaries on my 'How To - Tips and Techniques' Pinterest board in case you've missed any. 

Enjoy your day; I'm off to watch the cricket this afternoon so hoping that the sun continues to shine and it's a little less windy than last week! I'll be back tomorrow with another project. Until then, happy stampin'!


Stampin' Up! Supplies Used:

Table built using Product Table Builder by The Crafty Owl - Independent Stampin' Up! Demonstrator.

Let's Get Away Project Life Bicycle Card

by Joanne James1. May 2016 09:00

It's Sunday and time for a new challenge over at The Paper Players! It's the turn of our fearless leader Nance to host our challenge this week and she has a fun theme challenge for you to play along with:
   PPA-298-Apr28

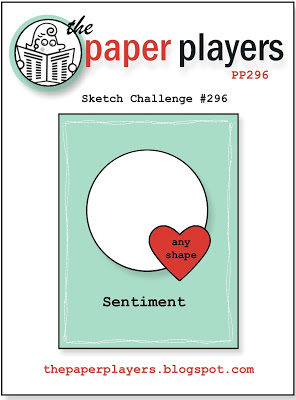
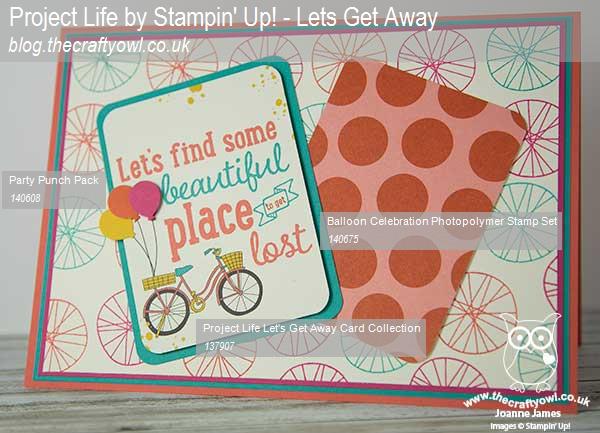
For my card this week I decided to do something a little different and make a card featuring a couple of my Project Life cards. As a family we do a lot of cycling and it often features in my memory keeping, so it was a tough decision to actually part with this one and use it on a card! When I saw Ginger's sketch layout over at Pals Paper Arts this week it was perfect for showcasing an alternative use for my Project Life cards so I 'bit the bullet' and this is what I came up with:
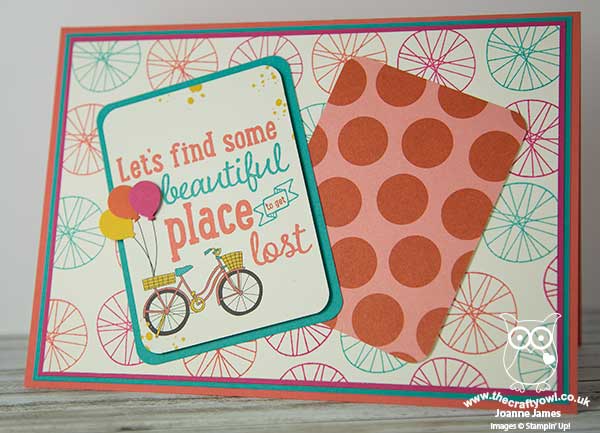
 

My card is A5, so slightly larger than usual, in order to accommodate my pair of Project Life cards, yet it really was quite straightforward to put together as the Project Life cards do so much of the creative work. That said, there are a few things worth highlighting:

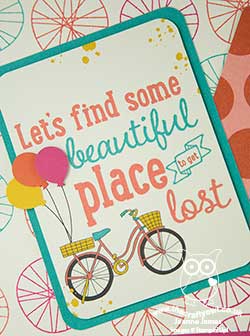
Let's Get Away - The Project Life cards featured on today's card are from the 'Let's Get Away' box set. This set is perfect for documenting your travels, near and far and contains lots of transport, including cars, aeroplanes and bicycles. What's more, this set is retiring so now is the perfect time to pick it up at a bargain price. The card I chose is perfect for today's challenge, with illustration and sentiment all in one. Here's a closer look at it in all its glory:
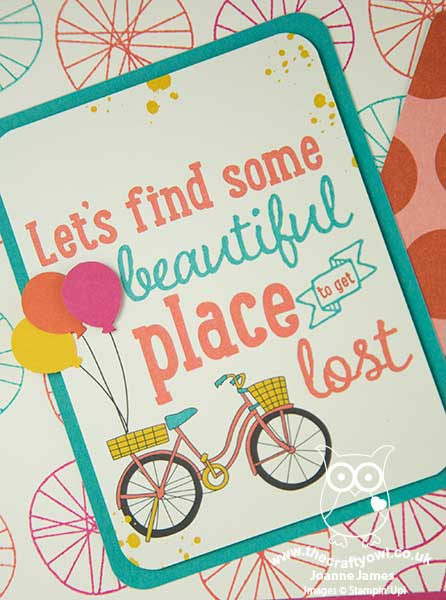
I mounted it onto a mat of Bermuda Bay for added definition and rounded the corners using my Project Life corner rounder punch. The second large polka dot card is one of the filler cards from the same set.

Bicycle Wheel Background - The stamp that I've used for my background is from the 'Balloon Celebration' set in the seasonal catalogue. I'm not exactly sure what this stamp is intended to be, but to me has always felt like a bicycle wheel - although I've no idea what that has to do with balloons! The open design works well to create interest in the background and incorporate my base and mat colours, which ties it in with my feature cards. 

Balloon Trio - As an added detail, I punched out a trio of coloured balloons using the mini balloon punch in the Party Punch Pack (you are so going to snap this up before it retires at the end of this month!) and adhered them over the top of the original ones that decorated the Project Life card, popping the pink one on a dimensional. They are slightly larger than the printed ones, so create a nice overhang and cover completely the printed balloons without any further work being required.

Here is the visual summary of the key products used on today's project for you to pin for easy reference:
 

You can see all of my 'How To' summaries on my 'How To - Tips and Techniques' Pinterest board in case you've missed any. 

Before you reach for your ink and papers, check out what our amazing team has created to inspire you this week:

The Paper Players Design Team
 
 
Here's a quick recap of our challenge rules:
 
1.  Create a new paper project
2.  Upload your creation to your blog with a link back to us and provide a direct link to the post featuring your challenge submission.
3.  Please link your card to no more than four challenges, TOTAL.
4.  Have FUN! 


I look forward to seeing what you make of our theme this week. We are off to basketball this morning but no hockey today as the season has officially ended. If the weather forecast is correct and we are in for an afternoon of rain, we will be snuggling up on the sofa for a family movie afternoon watching the classic 'The Wizard of Oz'. Rebecca has an audition for a role in a school production of this musical this week, so is keen to 'gen up' on all aspects. Her practising of 'Somewhere Over the Rainbow' is coming along nicely - Judy Garland, eat your heart out!

Back tomorrow with another project; until then, happy stampin'!


Stampin' Up! Supplies Used:

Table built using Product Table Builder by The Crafty Owl - Independent Stampin' Up! Demonstrator.

Happy Haunting Halloween Card

by Joanne James17. October 2015 22:22

Just time today to squeeze in a blog post using this week's sketch over at Mojo Monday; the talented Julee Tilman comes up with some of the best sketches and I love to play along here whenever I can. Here is this week's sketch:


The minute I saw this week's sketch I knew what I wanted to do with it and fortunately I managed to find some time this afternoon to bring my design to fruition. Here's my card:

I just knew I wanted to use one of my spider web doilies for the circular element, so my Halloween theme and everything else just came from there. A Tangelo Twist base and a piece of the large gingham-print Happy Hauntings DSP served as the background, with a panel of the fun ghostly pattern from the same set as my feature piece. I overlayed this with the spider web doily and a 'Boo' from the Cheer All Year set stamped in Tangelo Twist on Very Vanilla for my centre. I stamped my main sentiment in black on a piece of Tangelo Twist - also from Cheer All Year, although I masked it and stamped the 'happy' above the 'haunting' rather than alongside it. I was looking at my finished card and felt like it was missing a little something, so I fussy cut a spider from black glimmer paper and placed him on the spider's web (I did cut him freehand, so don't look too closely at his less-than-straight legs!). I'm also playing along with the team over at Fusion this week since my chosen theme fits with their photo inspiration a treat (right down to the lone spider!) 

I hope you like today's card; back tomorrow with this week's card for our new challenge over at The Paper Players. until then, happy stampin'!


Stampin' Up! Supplies Used:

Table built using Product Table Builder by The Crafty Owl - Independent Stampin' Up! Demonstrator.


Cherry On Top Donuts Card

by Joanne James9. July 2015 08:00

It's Thursday and time for a new challenge over at Create With Connie and Mary! This week we have a great sketch challenge for you:


This was one of those sketches that the minute I saw it, I knew exactly what I was going to do with those 'flowers' - to me, they looked just like the donuts with a bit taken out that feature on both one of the Cherry on Top DSP stack patterns and the Sprinkles on Top stamp set on page 7 of the annual catalogue. I don't have the latter but am definitely in love with the former, so that's where I was headed for my card this week:

I stayed with the square shape for my card and used a base of Pool Party with mats in Whisper White and Bermuda Bay. I then used another of the patterns from the Cherry on top DSP stack as my top layer and stamped my sentiment from the 'Bravo' stamp set in Watermelon Wonder directly onto the DSP. I then used a long, slim panel of Bermuda Bay, with one corner rounded t echo the shape of the base card, then adhered four little donuts, punched out of the DSP using my 3/4" circle punch, onto the panel using dimensionals. I finished with a double loop of Whisper White baker's twine to complete my card. 

So what do think - is this card sweet to you? Do check out how the other design team members have interpreted this week's sketch as we've all taken a different approach. As for me, I'll be back tomorrow with another project to share. Until then, happy stampin'!


Stampin' Up! Supplies Used:

  • Bravo Photopolymer Stamp Set
  • Cherry On Top Designer Series Paper Stack
  • Whisper White Baker's Twine
  • Watermelon Wonder Classic Stampin' Pad
  • Bermuda Bay A4 Cardstock
  • Pool Party A4 Cardstock
  • Punch Corner Project Life
  • Whisper White A4 Cardstock
  • 3/4" Circle Punch


Tags: , , , , , , ,

Cards | Stamping

Hip Hip Hooray For The Paper Players

by Joanne James31. May 2015 10:00

It's Sunday and time for a new challenge over at The Paper Players. You totally rocked Anne-Marie's sketch last week; this week it's the turn of the lovely Laurie, who has a tic-tac-toe challenge to stretch our creative brains:


I normally struggle with these, yet I seem to be on a real creative roll this week as I had a ton of different ideas and combinations for today's grid. I settled on combining my card with this week's sketch over at Pals Paper Arts and challenging myself to use something that I have lots of but sometimes use for little more than decorating an envelope: washi tape. I decided the sketch was perfect for showcasing some of the new Bohemian washi tape that I received with my pre-order goodies - here's my card:

I used a base of Delightful Dijon and a mat of Island Indigo, then cut a piece of Very Vanilla to the shape of the zig zag on the sketch. Starting at the zig zag end, I then covered my whole piece in strips of washi tape, creating an open herringbone effect and alternating between each of the three designs. Once I had covered the entire piece of cardstock, I adhered it to the card base using dimensionals. For my sentiment panel, I cut a rectangle of Very Vanilla and rounded the corners using my Project Life corner rounder and stamped it with the 'Hip Hip Hooray' greeting from the 'Bravo' stamp set in Island Indigo. I added a scattering of Bermuda Bay sequins to finish before popping this up on dimensionals too. I'm sure you've worked it out, but just in case I was following the top line of the tic tac toe board: washi tape, any shade of blue and sequins. I really quite like this card - it seemed almost a shame to cover my lovely pattern with the sentiment panel!

Before you reach for your inks and stamps, check out what our amazing team has created to inspire you this week:

The Paper Players Design Team
 
Here's a quick recap of our challenge rules:
 
1.  Create a new paper project
2.  Upload your creation to your blog with a link back to us and provide a direct link to the post featuring your challenge submission.
3.  Please link your card to no more than three challenges, TOTAL.
4.  Have FUN! 

I look forward to seeing how many different combinations of the grid we see in the gallery this week. I'm off to prepare lunch as we have some friends visiting today and then I have to get two of the other three members of the James household ready for trips away this week - a busy, yet fun day ahead!

Back tomorrow with another project; until then, happy stampin'!


Stampin' Up! Supplies Used:

A4 Delightful Dijon -available 2nd June

Bohemian washi tape - available 2nd June

Table built using Product Table Builder by The Crafty Owl - Independent Stampin' Up! Demonstrator.


2013-15 In Colour Hey There Buds Card for The Paper Players

by Joanne James12. April 2015 10:00

It's Sunday and time for a new challenge over at The Paper Players and this week we have a colour challenge for you and I am the hostess! Stampin' Up!'s 2013-15 In Colours will soon retire on the 2nd June, to make way for five new In-Colours in the new annual catalogue. Whilst we still have them though, I thought this week we would showcase three of my personal favourites:


I'd like to take this opportunity to give a big shout-out to the fabulous Nance Leedy, who makes all of our challenge badges and does so much to ensure our weekly challenges run smoothly - Nance, you rock! - didn't she do a great job on my challenge badge this week? I used the sketch layout over at The Challenge for the layout of my card this week, and decided to go floral with my chosen colours - here's my card:

I have had the 'Hey There Buds' stamp set for edges and been dying to ink it up, so decided that today was the day! I used Coastal Cabana for my card base, then created a split mat panel of Strawberry Slush and Coastal Cabana, which I embossed with the large polka dot embossing folder. I matted my central panel of Whisper White on Coastal Cabana too (having rounded the corners of both pieces with my Project Life corner rounder), then on my piece of white I stamped the whole image in Pistachio Pudding, with the exception of the sentiment which I inked up separately with my Coastal Cabana Stampin' Write marker. I then stamped the whole image again on scrap cardstock in Strawberry Slush and fussy cut each of the blooms and stuck these onto the focal panel. I also stamped the central section of the open flower on a scrap of white in Coastal Cabana, and fussy cut around the spiky white section before adhering to the main image. I then added a blob of Crystal Effects to the blue flower centre for some extra dimension. I added a piece of Coastal Cabana ribbon (from the Sale-A-Bration Best Year Ever accessory set) and a white button tied with some split Strawberry Slush thick baker's twine to finish, before popping this panel onto the base using dimensionals.

So a little fussy cutting required, but it enabled me to get a more solid image than selectively colouring the image using markers and I think it was worth it. So before you reach for your paper and inks, check out what our amazing team has created to inspire you this week:

The Paper Players Design Team
 
Here's a quick recap of our challenge rules:
 
1.  Create a new paper project
2.  Upload your creation to your blog with a link back to us and provide a direct link to the post featuring your challenge submission.
3.  Please link your card to no more than three challenges, TOTAL.
4.  Have FUN! 

I hope you like today's project - I'm so looking forward to see what you create with my chosen colour palette - I look forward to seeing your cards and projects in our gallery this week.

I'm off on an all day team training day today, which promises to be fun. I then have two days of classes to look forward to. The James juniors are back to school on Tuesday after the Easter holiday and whilst I will be sorry to see them go, it should at least mean that normal blogging will resume shortly thereafter. This week the call of the warmer weather here in the UK was simply too much and we spent our week outdoors; with the exception of making the samples for next week's classes, my ink pads have remained firmly shut!

Back tomorrow with another project; until then, happy stampin'!


Stampin' Up! Supplies Used:

Table built using Product Table Builder by The Crafty Owl - Independent Stampin' Up! Demonstrator.


Clean And Simple Christmas Cheer Card

by Joanne James24. November 2014 09:25

Happy Monday everyone! Hope you all had lovely weekends; mine was busy as always, with a Stampin' Up! party on Friday night, followed by the usual weekend of sport and a morning stood out in the driving rain watching my first rugby match yesterday (hockey is definitely a cleaner game!) Other highlights of my weekend included reaching the bottom of my ironing basket (to be celebrated!) and the addition of a new pet to the James household - Olivia the goldfish has joined Goldie, who was feeling lonely following the recent departure of Fishy.

So, onto today's card! Today I have a clean and simple card for this week's challenge over at Freshly Made Sketches, where Cindy has another great sketch for us:

I took inspiration from another of the designs in the Nordic Noel DSP pack and paired it with the sentiment stamp from Cheerful Christmas for my card today:

I used Soft Sky as my base and a piece of the Nordic Noel DSP featuring the acorns and pine sprigs for the left panel of my card. I stamped my feature sentiment in Garden Green on Whisper White and matted this onto a piece of Garden Green cardstock, rounding the corners on the right-hand side of both pieces. I used some Soft Sky and Calypso Coral Candy Dots to add a little colour to the main panel. Lastly, I added a strip of Garden Green and finished with a double loop of Baked Brown Sugar baker's twine. I love this thick twine - it's great for packaging but also works as a substitute for ribbon and ties a lovely bow. 

I love the fresh look of this card; the Garden Green is definitely a festive colour, but pairing it with Soft Sky, Baked Brown Sugar and Calypso Coral and Whisper White adds a real crispness to it I think. That's all from me - I'm off to get ready for today's class featuring the Many Merry Stars kit; click here to order yours if you haven't already, before they're all gone. 

Back tomorrow with another project and news of a fantastic one-week only demonstrator sign up offer - come back and check it out, you are not going to want to miss it! Until then, happy stampin'!


Stampin' Up! Supplies Used:

Table built using Product Table Builder by The Crafty Owl - Independent Stampin' Up! Demonstrator.


You're How Old - Really??! Birthday Card

by Joanne James21. September 2014 07:00

It's Sunday so I'm here with my card for this week's challenge over at The Paper Players, where Jaydee has the following clean and simple challenge for us:


I also used the above sketch from Freshly Made Sketches again for my card this week and this week's card is a lot more 'clean' than last weeks - here is my card:

My card is really simple, with a piece of the numbered Typeset paper mounted on Basic Black as the central panel of my card, with a couple of strips of Flashback DSP behind to add some colour and the focal point word bubble 'You're How Old?' stamped in Real Red. I finished my card with the sentiment 'happy birthday Grandpa' (stamped with my vintage 'For My Family' stamp set - a keeper!) and a punched star.

Yesterday was my Dad's 70th birthday and I made this card for him from the children - they think 70 is positively ancient, so the word bubble was entirely appropriate! - however it occurred to me as I typed up my post that not only could you change out the sentiment to just say 'happy birthday' or include the role of any family member (dad, brother, uncle, etc.) this might also work as a fun tongue-in-cheek card with the sentiment as is. So beware any male that feels he's 'over the hill', because one of these cards could be heading your way Grandpa!

Do check out the other design team cards this week; as always, there is some great inspiration and I look forward to seeing your challenge entries in the gallery. Right, I'm off to prepare for Sunday lunch and hopefully enjoy a restful family day before the onset of a new week. Enjoy your weekends everyone!

Back tomorrow with another project; until then, happy stampin'!


Stampin' Up! Supplies Used:

Table built using Product Table Builder by The Crafty Owl - Independent Stampin' Up! Demonstrator.


So Many Smiles ... Begin With You Brownie Camera Shaker Card

by Joanne James26. August 2014 15:30

As I'm writing my post today there is finally a break in the rain - hurrah! I hope that everyone here in the UK had a lovely Bank Holiday weekend, despite the dreadful weather across most of the country yesterday. I am now home, having spent a long weekend away in Somerset with my extended family, celebrating my Mother-in-law's forthcoming 70th birthday. We were fortunate to have had wonderful weather and spent a great weekend on the beach, fossil hunting, playing rounders and generally having a relaxing time.

Today I'm sharing a card I made a while ago as one of the samples for the UK Regional Training Day where I was asked to do a 'wow' technique presentation using the Traveler stamp set. This card is one of the ones that was actually inspired by the set, rather than featuring it directly, although the old fashioned brownie camera that inspired my card does feature on the inside. I decided to try my hand at a shaker card and created it to look like an old fashioned camera - here's the front of my card:

I used Soft Suede, Baked Brown Sugar and Brushed Gold cardstock and a variety of circle punches and both circle and deco label framelits to construct my shaker, and filled the window with gold sequins and some confetti squares cut using my fringe scissors from baked Brown Sugar cardstock and Champagne glimmer paper. I used the Petite Pairs sentiment set and heat embossed the first half of my sentiment in gold on the inside of my shaker frame. This was then continued on the inside of the card:

I also finished with the camera stamp. So what do you think - does my punch art camera shaker card bear any resemblance to the real thing? I thought this would make a fun masculine shaker card - proving even grown ups can be fun!

Back tomorrow with my Design Team card for this week's Colour Me...! challenge - and I have a fun 'sneak peek' Christmas card to share with you!

Until then, happy stampin'!


Stampin' Up! Supplies Used:

Table built using Product Table Builder by The Crafty Owl - Independent Stampin' Up! Demonstrator.


Colour Me...! Spotlight on Swallowtail

by Joanne James9. July 2014 08:00

Happy Wednesday everyone! Double delights today: new weekly Wednesday Deals - I'll be back with the details on those later  -and more importantly for me my second Colour Me...! Card Challenge Design Team post! This week we are using the striking colour combination of Elegant Eggplant and Soft Sky:

This is an unusual colour combination for me, but I had a clear idea of how I was going to use these contrasting colours - here's the card I came up with this week: 

I decided to use Elegant Eggplant for my base card and then stamped the large Swallowtail stamp in Elegant Eggplant onto Soft Sky cardstock. I then took a rectangular piece of Elegant Eggplant cardstock and punched a circular hole out of the centre and rounded alternating corners with my Project Life corner rounder. I then strategically placed this over my butterfly to include its head and adhered it to my card using dimensionals, having first coloured the portion of the butterfly visible through the circular hole using Elegant Eggplant ink and a blender pen. The top layer is used to create a 'spotlight' onto the butterfly and almost magnify its detail. I finished with a small birthday sentiment from Petite Pairs as I didn't want anything that would overshadow my butterfly, and stamped the inside of the card and the envelope too with the smaller swallowtail from the coordinating Papillion Potpourri stamp set.

I hope you like today's card - please do pop along to the 'Colour Me...!' challenge page this week to check out the work from the other talented designers that I'm working with and to upload your own creations.

Back tomorrow with another project; until then, happy stampin'!


Stampin' Up! Supplies Used:

Table built using Product Table Builder by The Crafty Owl - Independent Stampin' Up! Demonstrator.


Tags: , , , , , , , ,

Cards | Stamping

Mini Catalogue

BROWSE THE CATALOGUE

The mini catalogue is now live! Read and download your copy here.

Shop Online

Access my online shop 24 x 7, 365 days of the year:

Current March hostess code:

S9F2XJJW

Shop Online

Join My Team

It's always a great time to join Stampin’ Up! New team members can get £130 worth of products for only £99 + free business supplies + free shipping + all the fun being a part of Stampin’ Up! Stampin' Up! has something for everyone: join my growing team and benefit from my support to enjoy Stampin' Up! however you choose.

If you're interested, call me for a chat to understand how I can help you realise your goals. Alternatively, if you have already decided to sign up and you just can't wait, please click here for the link to the online form where you can sign up and order your starter kit right away! 

Latest Kit!

Stampin Cut and Emboss

The Rock Legend Kit has all you need to make 8 cards with coordinating envelopes. Along with the new Panda Friends Kit, both are available from January 4th for just £14 each - get yours here!

2023-24 Annual Catalogue

BROWSE THE CATALOGUE

Click on the catalogue for a full list of current SU! supplies - if you would like to order any of the items featured, please drop me a line at [email protected] or give me a call on 07773 421446 - I'd be happy to help.

New Online Exclusives

There will be new products available exclusively in the online store from 5 March - check them out here.

About Me

Hi I'm Joanne and live in Northampton and when I'm not looking after my husband and two beautiful children, am an avid crafter with a passion for all things Stampin' Up!

I must confess that I have never been a big rubber stamper - until I discovered Stampin' Up! that is. I love the fact that I can get such great results with co-ordinating stamps, inks, papers and punches - the possibilities are endless! Join me on my stamping journey as I share the things I love and be inspired to create amazing things yourself!

Follow Me

Monthly Newsletter

Box Builder

Click the button above to use Box Buster to create your custom box design using the Envelope Punch Board!

Kits Collection Now Available!

Stampin Cut and Emboss

The new Kits Collection from Stampin' Up! is now available!

Click here to see the current kits available and order yours online today.

I Design For


Stampin' Up Stuff

This is my personal blog and is not endorsed by Stampin’ Up! I hope you find it a plentiful source of ideas and personal inspiration but please don't copy my designs for contest submission or use for classes, publication or sale without express permission.