Cupcake Party Punch Subtles Birthday Card

by Joanne James26. May 2016 08:05

Today it's time for a new challenge over at Create With Connie and Mary and this week we have a colour combination for you:


When I saw today's colours, I thought Easter, ice-cream and cupcakes in that order! I went with the latter as I had a card in mind that I had wanted to try out for a little while - here it is:


I CASE'd the idea for today's card from this fabulous masculine card from the talented Bruno Bertucci. I fell in love with Bruno's fabulous masculine birthday card and when I saw this week's colours, I knew I was going to have to re-create an altogether more feminine take on Bruno's card, whilst preserving the clean and graphic layout. A change of colours and punch and there you have it - thank you Bruno for the inspiration! Here's the low-down on today's card:

Farewell Mini Muffin - The trio of punches that comprise the Party Punch Pack in the Spring-Summer seasonal catalogue are not carrying over into the new annual catalogue - boo hoo! Along with the candle and balloon, this adorable mini muffin (or cupcake if you prefer!) will be retiring, so snap up a set now. I promise you that I will not be selling on mine, so don't expect to see them in a retiring items sale any time soon. you have been warned :-)

Sunburst Sayings - My sentiment is from the Sunburst Sayings stamp set - slim and perfectly in keeping with this graphic card. I anchored mine with a pink candy dot too by way of embellishment.

Party With Cake - Another great birthday set with some fun sentiments that I used for the inside of my card, which you can see in my thumbnail above. I love the typewriter-style font that accompanies the main sentiment too.

Here is the visual summary of the key products used on today's project for you to pin for easy reference:


You can see all of my 'How To' summaries on my 'How To - Tips and Techniques' Pinterest board in case you've missed any. 

Do visit the other Design Team members to see what they did with this week's colours; there's lots of inspiration over on their blogs too!

Enjoy your day and I'll be back tomorrow with another project; until then, happy stampin'!


Stampin' Up! Supplies Used: 

  • Party Punch Pack
  • Party With Cake Wood-Mount Stamp Set
  • Sunburst Sayings Clear-Mount Stamp Set
  • So Saffron A4 Cardstock
  • Blushing Bride A4 Cardstock
  • Mint Macaron A4 Cardstock
  • Mint Macaron Classic Stampin' Pad
  • Whisper White A4 Thick Cardstock

Let's Get Away Project Life Bicycle Card

by Joanne James1. May 2016 09:00

It's Sunday and time for a new challenge over at The Paper Players! It's the turn of our fearless leader Nance to host our challenge this week and she has a fun theme challenge for you to play along with:
   PPA-298-Apr28

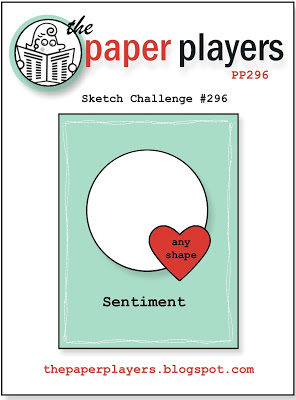
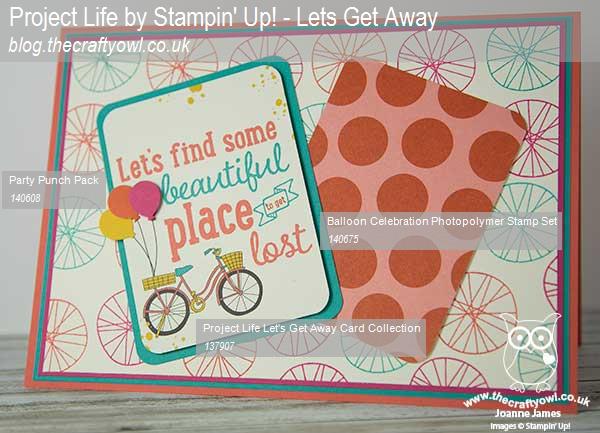
For my card this week I decided to do something a little different and make a card featuring a couple of my Project Life cards. As a family we do a lot of cycling and it often features in my memory keeping, so it was a tough decision to actually part with this one and use it on a card! When I saw Ginger's sketch layout over at Pals Paper Arts this week it was perfect for showcasing an alternative use for my Project Life cards so I 'bit the bullet' and this is what I came up with:
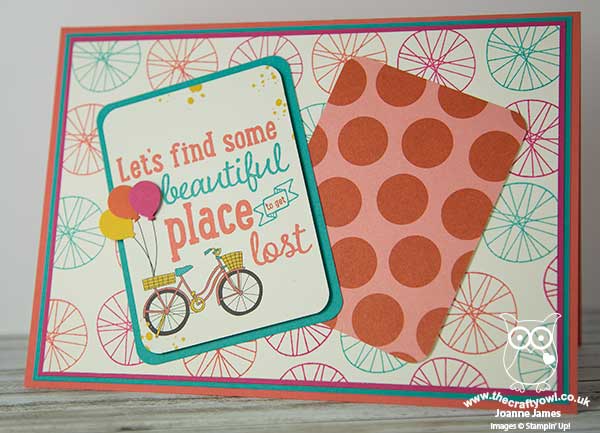
 

My card is A5, so slightly larger than usual, in order to accommodate my pair of Project Life cards, yet it really was quite straightforward to put together as the Project Life cards do so much of the creative work. That said, there are a few things worth highlighting:

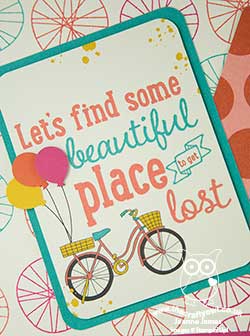
Let's Get Away - The Project Life cards featured on today's card are from the 'Let's Get Away' box set. This set is perfect for documenting your travels, near and far and contains lots of transport, including cars, aeroplanes and bicycles. What's more, this set is retiring so now is the perfect time to pick it up at a bargain price. The card I chose is perfect for today's challenge, with illustration and sentiment all in one. Here's a closer look at it in all its glory:
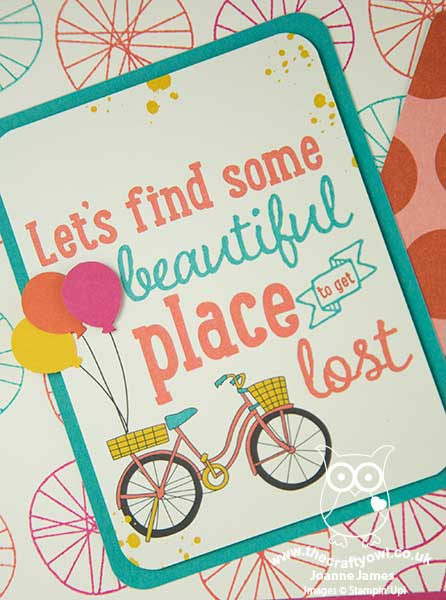
I mounted it onto a mat of Bermuda Bay for added definition and rounded the corners using my Project Life corner rounder punch. The second large polka dot card is one of the filler cards from the same set.

Bicycle Wheel Background - The stamp that I've used for my background is from the 'Balloon Celebration' set in the seasonal catalogue. I'm not exactly sure what this stamp is intended to be, but to me has always felt like a bicycle wheel - although I've no idea what that has to do with balloons! The open design works well to create interest in the background and incorporate my base and mat colours, which ties it in with my feature cards. 

Balloon Trio - As an added detail, I punched out a trio of coloured balloons using the mini balloon punch in the Party Punch Pack (you are so going to snap this up before it retires at the end of this month!) and adhered them over the top of the original ones that decorated the Project Life card, popping the pink one on a dimensional. They are slightly larger than the printed ones, so create a nice overhang and cover completely the printed balloons without any further work being required.

Here is the visual summary of the key products used on today's project for you to pin for easy reference:
 

You can see all of my 'How To' summaries on my 'How To - Tips and Techniques' Pinterest board in case you've missed any. 

Before you reach for your ink and papers, check out what our amazing team has created to inspire you this week:

The Paper Players Design Team
 
 
Here's a quick recap of our challenge rules:
 
1.  Create a new paper project
2.  Upload your creation to your blog with a link back to us and provide a direct link to the post featuring your challenge submission.
3.  Please link your card to no more than four challenges, TOTAL.
4.  Have FUN! 


I look forward to seeing what you make of our theme this week. We are off to basketball this morning but no hockey today as the season has officially ended. If the weather forecast is correct and we are in for an afternoon of rain, we will be snuggling up on the sofa for a family movie afternoon watching the classic 'The Wizard of Oz'. Rebecca has an audition for a role in a school production of this musical this week, so is keen to 'gen up' on all aspects. Her practising of 'Somewhere Over the Rainbow' is coming along nicely - Judy Garland, eat your heart out!

Back tomorrow with another project; until then, happy stampin'!


Stampin' Up! Supplies Used:

Table built using Product Table Builder by The Crafty Owl - Independent Stampin' Up! Demonstrator.

Coffee and Card - Party Pop-Up Card

by Joanne James12. April 2016 10:00

I've had a busy day today with both my first Technique Class of the month and my monthly Project Life Memory Keeping Class. Today's card though is all about tomorrow; it's the card that we will be making at my Drop-in Coffee and Card morning at Bell of Northampton. This week we will be making a pop up card using the Party Pop-Up Thinlits - take a look:

I've featured a card front similar to this one on my blog previously (you can read the detail here) - for this one though the fun happens on the inside:

I used one of the fun Party Pop-Up Thinlits for a surprise inside greeting, cut out of Whisper White and coloured with my Stampin' Write markers to co-ordinate with the front of my card. Added gold Wink of Stella for the candle flames, of course!

Here is the visual summary of the key products used on today's project for you to pin for easy reference:


You can see all of my 'How To' summaries on my 'How To - Tips and Techniques' Pinterest board in case you've missed any.  

I would love you to join me at Bell's tomorrow between 10-12 (you can find a reminder of the full details here) - hope to see you there!

I will be back tomorrow with one of the cards from today's technique class featuring the Rose Wonder bundle and the new, final set of Weekly Deals; until then, happy stampin'!


Stampin' Up! Supplies Used:

Table built using Product Table Builder by The Crafty Owl - Independent Stampin' Up! Demonstrator.

Cherry on Top Birthday Balloons Card

by Joanne James20. February 2016 21:51

Hello everyone I hope you have all been enjoying your weekend so far. I managed to snatch a quick hour between chores and swimming lessons to make a quick card today for a couple of challenges:

SIP Sketch Challenge 35 800   

Before I share today's card I would like to say thank you to the team over at Stamp Ink Paper, and in particular Sandy, who chose my white wedding card as a winner in their 'love' themed challenge last week (if you missed it, you can see that card here) - it's always great to be recognised for one's creative efforts! This week the team have a sketch to play with and since I chose to feature balloons on my card it's also perfect for a link up with the Global Design Project who have these as their theme this week and The Friday Mashup, where the theme is birthdays (with the optional mashup of stencils - I'm coming back for this one!) We have so many balloon-related products currently; I chose to use an annual catalogue mainstay, the Cherry On Top Designer Series Paper Pack, as the inspiration for today's card:

I just love the bright little balloons on this paper pattern so I decided to cover my whole card front with the paper. I added a frame to my sentiment from the 'Birthday Blooms' stamp set (the swirly sentiment reminds me of the balloon strings!) which I cut with my Big Shot and Tags and Labels Framelits - these are on this week's Wednesday Weekly Deals if you want to grab them at a bargain price! For my embellishment, I chose to echo the balloons and cloud pattern of the paper and punched a cloud in Whisper White with my Tree Builder Punch and a trio of balloons with my punch from the Party Punch Pack, which I added some silver metallic thread string to, which I loosely tied together. I added in a thin banner of Cucumber Crush to complete the sketch. I just love the bright and happy colours of this card - and balloons are the perfect way to celebrate a birthday, whether young or old.

For those of you who like a visual summary, here's something new that I will be featuring in my blog posts - a labelled photograph of the key products required to make today's card: 


These images are perfect for pinning to give you a visual reference of the supplies needed to re-create this card which can be useful if you want to come back to it at a later date. I will be pinning these to my new 'How To - Tips and Techniques' Board on Pinterest too, which you can find here.

I hope you like today's card; I'll be back with another card for tomorrow's new challenge over at The Paper Players. I'm hosting this week so you won't want to miss it! Until then, happy stampin'!


Stampin' Up! Supplies Used:

Table built using Product Table Builder by The Crafty Owl - Independent Stampin' Up! Demonstrator.

Make A Wish Birthday Card

by Joanne James30. December 2015 21:31

Good evening lovely readers! I hope you've all had a pleasant day. I went for my second visit of the week to the pantomime, this time the turn of The Snow Queen, which was excellent. I love pantomime - for me it is one of those traditions that make my Christmas. As for crafting - I'm back today with another 'sneak peek' for you, this time using the current sketch over at Mojo Monday as the basis for my birthday card:

Today's card features not one, but FIVE new products from the forthcoming Stampin' Up! Spring-Summer catalogue. Here's my card - can you spot them all?


So how did you do? Check out the fun party-themed designer series paper from the 'It's My Party' Designer Series Paper Stack, along with the stamps, both from a new set called 'Party Wishes' (I coloured them with my Stampin' Write markers to get the detail). Then there's the fabby two-tone baker's twine that I also shared on yesterday's card and check out the trio of enamel dots on my birthday cake - these come in a pack with Mint Macaron coloured dots too! Finally, did you spot the fifth item? This is a slightly sneaky one - the candle on the cake was punched with one of a trio of punches in the 'Party Punch Pack' (it also includes a balloon and a mini cupcake!) If you are wondering where the striped paper across the bottom panel came from - this is actually a piece of black and white striped paper from the Neutrals paper stack where I coloured in the white stripes with my Melon Mambo Stampin' Write marker to create my custom paper to co-ordinate in with the rest of my colour scheme.

So much party fun in one card! I just love the bold colour combinations of the 'It's My Party' Suite - they offer so many different creative possibilities!

Back tomorrow with a new challenge over at Create With Connie and Mary where it's out with the old and in with the new! Until then, happy stampin'!


Stampin' Up! Supplies Used:

The following items will be available on 5th January:

140552 It's My Party Designer Series Paper Stack

140961 Party Wishes Stamp Set

140608 Party Punch Pack

140555 Baker's Twine Combo Pack

140554 It's My Party Enamel Dots

Table built using Product Table Builder by The Crafty Owl - Independent Stampin' Up! Demonstrator.


Scrapbooking

Stampin' Up! has introduced a new range of 12x12" scrapbooking product and kit - the full range is now available to purchase online. To download a copy of the new digital Scrapbooking Catalogue click here.

Mini Catalogue

BROWSE THE CATALOGUE

'Tis The Season - the new Stampin' Up! Mini Catalogue is here! For more details and to download your copy click here

Shop Online

Access my online shop 24 x 7, 365 days of the year:

Current September hostess code:

JQEHTZGK

Shop Online

2024-25 Annual Catalogue

BROWSE THE CATALOGUE

Click on the image to download your copy of the 2024-25 annual catalogue. For a full list of current SU! supplies, go to my online store. If you would like any help or advice, please drop me a line at joanne@thecraftyowl.co.uk or give me a call on 07773 421446 - I'd be happy to help.

Join My Team

It's always a great time to join Stampin’ Up! New team members can get £130 worth of products for only £99 + free business supplies + free shipping + all the fun being a part of Stampin’ Up! Stampin' Up! has something for everyone: join my growing team and benefit from my support to enjoy Stampin' Up! however you choose.

If you're interested, call me for a chat to understand how I can help you realise your goals. Alternatively, if you have already decided to sign up and you just can't wait, please click here for the link to the online form where you can sign up and order your starter kit right away! 

Latest Kits!

Stampin Cut and Emboss

The Christmas Ornaments Kit and Card Keeper Kit are the latest kits that will be arriving in the online store later this month - get yours here!

New Online Exclusives

There are new products available exclusively in the online store from 3 July - check them out here.

About Me

Hi I'm Joanne and live in Northampton and when I'm not looking after my husband and two beautiful children, am an avid crafter with a passion for all things Stampin' Up!

I must confess that I have never been a big rubber stamper - until I discovered Stampin' Up! that is. I love the fact that I can get such great results with co-ordinating stamps, inks, papers and punches - the possibilities are endless! Join me on my stamping journey as I share the things I love and be inspired to create amazing things yourself!

Follow Me

Monthly Newsletter

Box Builder

Click the button above to use Box Buster to create your custom box design using the Envelope Punch Board!

Kits Collection Now Available!

Stampin Cut and Emboss

The new Kits Collection from Stampin' Up! is now available!

Click here to see the current kits available and order yours online today.

I Design For


Stampin' Up Stuff

This is my personal blog and is not endorsed by Stampin’ Up! I hope you find it a plentiful source of ideas and personal inspiration but please don't copy my designs for contest submission or use for classes, publication or sale without express permission.