Hand Delivered Eclipse Birthday Wishes For A Discerning Teenager

by Joanne James22. May 2018 07:30

Today I'm sharing a card for the current challenge over at Just Add Ink where they are asking us to embrace the eclipse technique. I also used the sketch over at Fusion for my layout and it is perfect for the numbers and letters challenge over at Stamps Ink Paper too:


Firstly, a shout out to the lovely team over at Just Add Ink for choosing this card as the winner for challenge 407 - what an honour and I'm thrilled you liked my delicately different take on the Love What You Do stamp set. I was unable to play along with last week's colour challenge, but was keen to have another go at the eclipse technique this week with a birthday card for a discerning teenager - take a look:


Here's the low-down on today's card:

A Sneak Peak At Hand Delivered - I decided to give you a 'sneak peak' of a new stamp set today that is actually one of the exclusive hostess sets from the new Stampin' Up! annual catalogue. A fun set that has a selection of items being carried by a young lady, everything from balloons to cakes to message boards, with a variety of different skirt designs and sentiments that offer a ton of creative combinations for lots of different occasions. Best of all, it's photopolymer too, so aligning the pieces is super easy - bonus!

I think this will be one of my favourite hostess sets in the catalogue - I have so many cards in the pipeline for this one, you are definitely going to want to host a party so that you can get your hands on it too. It's worth pointing out I did make a slight modification to my stamped image on this card, in that in order to fully accommodate my numbers within the bouquet of balloons, I added a couple of extra balloons to left and right - this really wasn't tricky though, I simply masked the original image and then stamped again slightly offset on each side (the uppermost green and orange balloons on my card).  

Last Chance For Large Numbers - The eclipse technique is where a word or some element of design is 'hidden' within the broader design and built up in layers so that it stands out in relief and is therefore visible as part of the overall card. I made an eclipse card previously using my Large Letters Framelits - you can see that card here - so today decided to go with the Large Numbers Framelits as I needed a card for a friend of my daughter who becomes a teenager this week. Such a milestone birthday is worthy of a number, so I decided to 'hide' mine in the collection of balloons being carried to the birthday girl, stepped up on three layers of Berry Burst cardstock.

Oh how I will miss these numbers! I can't quite believe they are retiring and they will most definitely be a 'keeper' in my collection. Incredibly, they are still available but be warned - you only have until the end of the month to add them to your crafting arsenal if you would like them; one things for sure, they are a purchase you won't regret and will get loads of use from them. 

Picture Perfect Palette - I used the colours in the Picture Perfect DSP stack that featured in my vertical border as the palette for my card and simply coloured my image with my Stampin' Write Markers, adding a liberal dose of clear Wink of Stella to my balloons. Here is the colour swatch if you would like to save it for your future project inspiration:


Lastly, I finished the inside of my card with this sentiment from the Cake Soiree stamp set:


So what do you think? I'd love to hear your thoughts by leaving a comment below. Also, be sure to check out the Just Add Ink designers and gallery for lots more inspiration with the eclipse technique.

Here is the visual summary of the key products used on today's project for you to pin for easy reference:


You can see all of my 'How To' summaries on my 'How To - Tips and Techniques' Pinterest board in case you've missed any. 

Enjoy your day and I'll be back tomorrow with another project. Until then, happy stampin'!


Stampin' Up! Supplies Used:

Table built using Product Table Builder by The Crafty Owl - Independent Stampin' Up! Demonstrator.

Paper Aeroplanes - You've Got Mail

by Joanne James1. August 2016 08:00

Happy Monday everyone! Week 2 of the long school summer holiday! I managed to get some quality craft time over the weekend, so have a few things to share with you this week. The first is a card for this week's CASology challenge:

This week's cue card is 'journey'. I've been having fun playing along with this challenge when I can as it's a great opportunity both to hone my CAS card style and have fun, as there are often numerous ways the cue card can be interpreted. The design team are also awesome with amazing cards each week - you should definitely check them out! So with 'journey' it didn't take me long to get to thinking about transport, but I still managed to make a slightly quirky interpretation; take a look:


Here's the low-down on today's card:

Is it a star? No it's a plane! - I decided to go with a simple notecard and paper aeroplane for my card today. It reminded me of my schooldays, when I spent far too much time sending notes across the classroom to my class mates via this mode of transport. But I digress! My paper aeroplane today comes from the 'Shooting star' stamp set and is easily cut out with the co-ordinating Sliding Star Framelit Dies. I added a dotted trail using a retired stamp from the 'Cool Kid' set, but you could just as easily hand draw this in with your Basic Black Stampin' Write marker.

Airmail Border - I decided that I would use an airmail-type border around the edge of my notecard base to tie in with the postal theme, but on hunting for a suitable stamp that would give me the alternating red, white and blue stripes I was looking for and failing to come up with anything suitable, I decided instead to use my retired striped stencil and sponge in the alternating colours to create my border. It worked a treat! Here's a picture showing you how I did it:


Just A Note - Despite the simplicity of my notecard, I managed to use three stamp sets! My third set is 'Picture Perfect' and this is where I found my simple sentiment to finish my card. I stamped it in Pacific Point and finished with a Real Red enamel shape heart to complete my visual triangle.

Here is the visual summary of the key products used on today's project for you to pin for easy reference:


You can see all of my 'How To' summaries on my 'How To - Tips and Techniques' Pinterest board in case you've missed any. 

A fun notecard that would be useful for any little notes that you want to send. I might actually use this card to send a note to one of my blog friends who lives across the pond - it seems a fitting card for that kind of journey!

That's all from me today; I have a child-free day today as I am attending a business function; the James Juniors are looking forward to spending the day with Granny and Ollie dog, as he is on vacation with her whist my brother-in-law and his family are holidaying abroad. I'll be back tomorrow with another project and news of the new Thoughtful Branches set that will be available to order; until then, happy stampin'!


Stampin' Up! Supplies Used:

Table built using Product Table Builder by The Crafty Owl - Independent Stampin' Up! Demonstrator.

Hot Pink Picture Perfect Hummingbird Card

by Joanne James10. May 2016 22:00

Good evening everyone! I hope your week has started well. I've had my first technique class of the month yesterday along with both a rounders and cricket match (observing not participating, and both wins!), and a second technique class and this month's Project Life Memory Keeping class today so it's been a busy couple of days. Just time to pop in this evening and share the first of the cards from this month's technique class, featuring the Hummingbird in the 'Picture Perfect' stamp set. I used this week's sketch over at As You See It for my layout:

AYSIChallenge134   SIP One Element Wonder 47 800

I'm also linking up with Stamp Ink Paper again this week, as their challenge is to feature one main element on your project and make it really stand out. The hummingbird is the most tricky stamp in the set to align, but when you get it right is so worth it in terms of the result. Here is my finished card:

Here's the low-down on today's card:

Picture Perfect Hummingbird - 'Picture Perfect' is a multi-step image stamp set, with each of the stamps having two, three or four layers. The hummingbird comes in four pieces; for my bird I stamped my first layer in Bermuda Bay, I stamped the second stamp in Melon Mambo, the third layer in Pacific Point and the fourth and final one in Night of Navy. Whilst it sounds complicated, this set is made from photopolymer which makes lining up the images really straightforward. I find it helpful to use the eye to align the images and use a piercing mat or similar foam pad as a base for your stamping for an even image. I do prefer to stamp my bird in the order that the stamps are numbered and if all else fails, a stamp-a-ma-jig will help you to align the images perfectly.  It is definitely a stamp where positioning improves with practice and I must say my ladies today stamped with amazing results, each producing four perfectly stamped hummingbirds on the first attempt!

Partial Die Cutting using Circle Framelits - I stamped my bird onto a piece of Whisper White and having fussy cut his wing tip by hand, I then cut a partial circle up to the diagonal before adhering behind so that it aligned with my cut away circle on my card base. Circle Framelits are invaluable for this kind of partial diecutting, as you simply roll through the Big Shot to the desired point without cutting the whole way through. I've used this technique with this stamp before here; it adds an interesting detail to an otherwise clean and simple card.

Pop of Pink - Melon Mambo is one of my favourite pinks in the Stampin' Up! colour collections and whilst there is only the smallest amount featured on the throat of my bird, I picked up this colour in both my card base and satin knotted ribbon to give a real pop of colour to my otherwise blue card.

Here's today's visual summary of the key things needed to make today's card for easy reference:


You can see all of my 'How To' summaries on my 'How To - Tips and Techniques' Pinterest board in case you've missed any. 

That's all from me today; I have another busy day tomorrow, with my Coffee and Card Drop In Session at Bell of Northampton in Kingsthorpe and I'll also be at the in-store Spring Open Evening at Bells too. you can find full details on the latter here

Hopefully I'll squeeze in time for a quick blog post with another of my Picture Perfect class cards. Until then, happy stampin'!


Stampin' Up! Supplies Used:

Table built using Product Table Builder by The Crafty Owl - Independent Stampin' Up! Demonstrator.

Picture Perfect Hummmingbird Meets Flowering Flourishes

by Joanne James4. May 2016 19:00


I have had a busy day today with early climbing wall club (for the James Juniors, not me!), a trip to Ikea for a few frames (am I the only one who goes in for 4 things and comes out with 14?!) as well as some preparation for some upcoming classes. One of those classes is using the Picture Perfect stamp set, that also features on my card today for the current Fusion challenge:

I've been busy trying lots of hummingbird colour combinations and when I saw the inspiration photo for the challenge I couldn't resist having a go at this one. Here's my card: 


An eclectic mix of elements today - here's the low-down on my card:

Picture Perfect Hummingbird - I stamped the four parts of my hummingbird in Wild Wasabi, Bermuda Bay, Crushed Curry and Basic Grey to get the realistic markings. There is so much fun to be had in trying different colour combinations with this bird and the photopolymer does make it easy to line up with a little practice.

A Flowering Flourish - I decided to add a flowering flourish to mimic the orange blossom of the inspiration photo and having seen this card here on Pinterest I thought the Flowering Flourishes stamp set offered the perfect solution. I inked mine with my Watermelon Wonder, Crushed Curry and Cucumber Crush Stampin' Write markers for added vibrancy.

Borders of Blue - I finished my card with a piece of Bermuda Bay patterned paper from the Cherry On Top DSP stack to frame my scene. 

Here is the visual summary of the key products used on today's project for you to pin for easy reference:


You can see all of my 'How To' summaries on my 'How To - Tips and Techniques' Pinterest board in case you've missed any. 

This isn't one of my class cards next week but hopefully it will get the ladies that are booked to attend in the mood for some multi-step stamping.

That's all from me today. Back tomorrow with my card for this week's new challenge over at Create With Connie and Mary; until then, happy stampin'!


Stampin' Up! Supplies Used:

Table built using Product Table Builder by The Crafty Owl - Independent Stampin' Up! Demonstrator.

Picture Perfect High Tide Starfish Card

by Joanne James2. April 2016 19:00

I've had a busy day today hence my late post - more time crafting and less time blogging, I'm afraid! Anyway, I just thought I would write a quick post to share a 'something old, something new' card that I made today using this week's Mojo Monday sketch:

My 'something new' is the 'Picture Perfect' stamp set that I had out on my desk preparing for May's technique class when we will be using that set. For today's card I paired it with some retired DSP from my hoard:

The details for today's card are as follows:

Something Old - This retired High Tide Designer Series Paper has lots of nautical and sealife patterns and I remembered this one featuring a coral starfish. The panels on this sketch lend themselves to co-ordinating DSP and I knew this card would give me the perfect opportunity to use up some of my old papers.

Something New - The starfish is the only image in the 'Picture Perfect' stamp set I've yet to use, so that was naturally my image of choice today. I stamped my starfish first in Blushing Bride, then overlaid the second image in Calypso Coral to tie it in with the coral starfish on my chosen DSP. I then cropped my image using my Circles Framelits.

Something Blue - Whilst I didn't borrow anything to make today's card, in keeping with the saying there is most definitely 'something blue': I used Pacific Point cardstock to give me a bright and solid base for my background to bring together my sentiment and patterned papers and ensure my card remained cohesive. 

Here is the visual summary of the key products used on this project for you to pin for easy reference:


Back tomorrow with another project; until then, happy stampin'!


Stampin' Up! Supplies Used:

Table built using Product Table Builder by The Crafty Owl - Independent Stampin' Up! Demonstrator.

Picture Perfect Wonderful Rose Card

by Joanne James26. March 2016 20:07

I've had a great crafty day today and have got lots of cards made, the first of which I made for a few challenges:

      SIP 40 Tic-Tac-Toe Lisa 800

I haven't played along with The Challenge for a while and I just love those flowers in the inspiration picture and the dominance of pink, with the splashes of gold against white. I decided to use this week's CAS(E) This Sketch layout to create my feminine card, which also bears some elements in common with one of the catalogue samples for this set:

Today's card is definitely a 'less is more' card - there are three key elements that define it:

Picture Perfect Pink Rose - I had originally had in my mind that I would use the Rose Wonder framelits and create a paper-pieced rose, but at the last minute I switched and decided on a softer look with the three-step stamped rose from the Picture Perfect set. I used Pink Pirouette for my base stamp and followed with layers 2 and 3 stamped in Rose Red (I stamped off layer 2 before stamping on my card). Super easy to stamp in photopolymer and this gave me the delicate, softer look I was aiming for. 

White on White - I layered white on white twice on this card; the mat and base and my piece of diecut from the Striped Scallop Thinlits. My card remains clean and uncluttered, but with enough texture to create interest across the horizontal banner. I also added some white and clear sequins to my finished card.

All That Glistens Is Indeed Gold - There are three gold elements to my card: my sentiment, stamped in Versamark and heat embossed in gold, the twist of gold metallic thread behind the rose and the third which is actually quite tricky to see but a fine mist of gold Wink of Stella, which I flicked across the front of my card. This adds a beautiful lustre and subtle sparkle to my card in real life.

It just so happens that my card ticks the middle horizontal row of the tic-tac-toe board over at Stamps, Ink, Paper this week (gold, sequins, congrats) so I'm linking up there too. This is my second outing with the Picture Perfect stamp set; I will be using it for my Technique Class in May so expect to see more of it between now and then. If you would like more information on this class or any others, you can check out my complete class schedule here or contact me for more information.

Here is today's visual summary of the key supplies used on today's card for you to save for easy reference:


That's all from me today; I'll be back tomorrow with my card for this week's new challenge over at The Paper Players. until then, happy stampin'!


Stampin' Up! Supplies Used:

Table built using Product Table Builder by The Crafty Owl - Independent Stampin' Up! Demonstrator.


Picture Perfect Hummingbird Card

by Joanne James13. March 2016 09:00

It's Sunday and time for a new challenge over at The Paper Players! It's the turn of our esteemed leader the amazing Nance to host our challenge this week and she has a fun colour scheme for you to play along with:
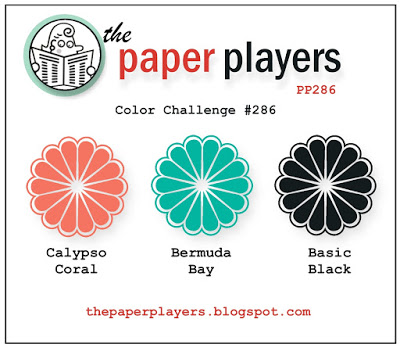
 

For my card this week I was inspired to use my Picture perfect stamp set for the first time; I've seen so many brightly coloured hummingbirds with this set, I thought these colours would be perfect to create one of my very own. Take a look:
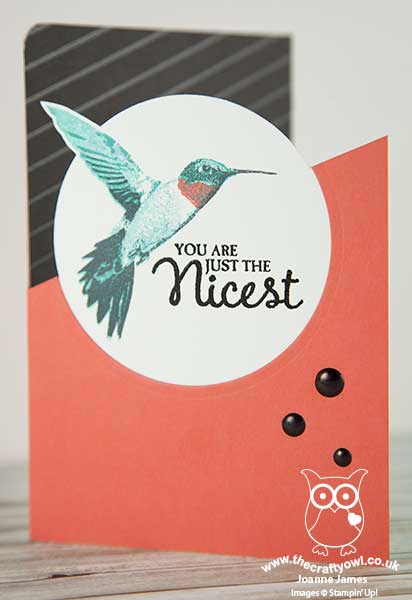
 

Here are the key features of today's card:

Picture Perfect Hummingbird - 'Picture Perfect' is a multi-step image stamp set, with each of the stamps having two, three or four layers. The hummingbird comes in four pieces, so in order to get four layers with only three colours, I stamped my first and third layers in Bermuda Bay, having stamped off the first one so that it was lighter in colour. I stamped the second stamp in Calypso Coral and the fourth and final one in Memento Black. Whilst it sounds complicated, this set is made from photopolymer which makes lining up the images really straightforward. 

Partial Die Cutting using Circle Framelits - I decided upon a rather unusual layout for my card today, using a base of Calypso Coral with the top part of the front cut away on the diagonal. I stamped my bird onto a piece of Whisper White and having fussy cut his wing tip by hand, I then cut a partial circle up to the diagonal before adhering behind so that it aligned with my cut away circle on my card base. Circle Framelits are invaluable for this kind of partial diecutting, as you simply roll through the Bid Shot to the desired point without cutting the whole way through.

Color Me Irresistible Specialty Designer Series Paper - I used this black pre-embossed paper last week on this card and decided it was just the thing to add a block of colour to the background of my card today too. The subtle stripes align perfectly to the diagonal line of my card and add interest without detracting from the bird.

Lastly, I stamped my sentiment in Versamark and heat embossed it in black and added a trio of White Perfect Accents, coloured black using a Sharpie, for a little extra shine. I spent ages trying to work out what to do with these colours, but once I'd decided on using this stamp set, it all came together seamlessly. Love it when that happens!

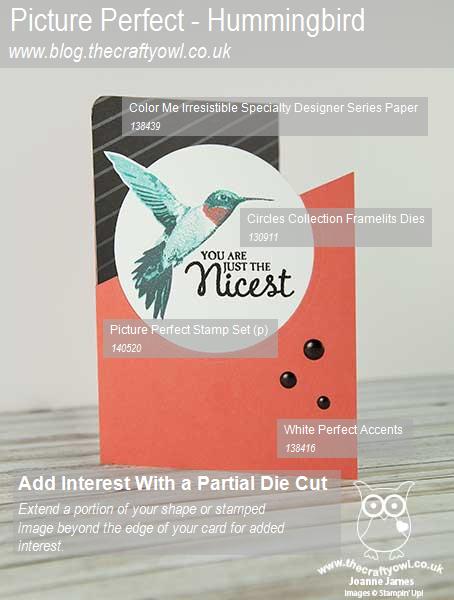
Here's today's visual summary of the key things needed to make today's card for easy reference:
 

Remember you can also find all of my 'Tip and Techniques' summaries on my Pinterest page here.

Before you reach for your ink and papers, check out what our amazing team has created to inspire you this week:

The Paper Players Design Team
 
 
Here's a quick recap of our challenge rules:
 
1.  Create a new paper project
2.  Upload your creation to your blog with a link back to us and provide a direct link to the post featuring your challenge submission.
3.  Please link your card to no more than four challenges, TOTAL.
4.  Have FUN! 


I look forward to seeing what you create with our colour palette this week. We are off to basketball today and hockey today, Rebecca has a birthday party to attend to and I have lots of preparation for this week's classes to be getting on with, so it's going to be a busy one!

Back tomorrow with another project; until then, happy stampin'!


Stampin' Up! Supplies Used: 

Table built using Product Table Builder by The Crafty Owl - Independent Stampin' Up! Demonstrator.

Scrapbooking

Stampin' Up! has introduced a new range of 12x12" scrapbooking product and kit - the full range is now available to purchase online. To download a copy of the new digital Scrapbooking Catalogue click here.

Mini Catalogue

BROWSE THE CATALOGUE

'Tis The Season - the new Stampin' Up! Mini Catalogue is here! For more details and to download your copy click here

Shop Online

Access my online shop 24 x 7, 365 days of the year:

Current September hostess code:

JQEHTZGK

Shop Online

2024-25 Annual Catalogue

BROWSE THE CATALOGUE

Click on the image to download your copy of the 2024-25 annual catalogue. For a full list of current SU! supplies, go to my online store. If you would like any help or advice, please drop me a line at joanne@thecraftyowl.co.uk or give me a call on 07773 421446 - I'd be happy to help.

Join My Team

It's always a great time to join Stampin’ Up! New team members can get £130 worth of products for only £99 + free business supplies + free shipping + all the fun being a part of Stampin’ Up! Stampin' Up! has something for everyone: join my growing team and benefit from my support to enjoy Stampin' Up! however you choose.

If you're interested, call me for a chat to understand how I can help you realise your goals. Alternatively, if you have already decided to sign up and you just can't wait, please click here for the link to the online form where you can sign up and order your starter kit right away! 

Latest Kits!

Stampin Cut and Emboss

The Christmas Ornaments Kit and Card Keeper Kit are the latest kits that will be arriving in the online store later this month - get yours here!

New Online Exclusives

There are new products available exclusively in the online store from 3 July - check them out here.

About Me

Hi I'm Joanne and live in Northampton and when I'm not looking after my husband and two beautiful children, am an avid crafter with a passion for all things Stampin' Up!

I must confess that I have never been a big rubber stamper - until I discovered Stampin' Up! that is. I love the fact that I can get such great results with co-ordinating stamps, inks, papers and punches - the possibilities are endless! Join me on my stamping journey as I share the things I love and be inspired to create amazing things yourself!

Follow Me

Monthly Newsletter

Box Builder

Click the button above to use Box Buster to create your custom box design using the Envelope Punch Board!

Kits Collection Now Available!

Stampin Cut and Emboss

The new Kits Collection from Stampin' Up! is now available!

Click here to see the current kits available and order yours online today.

I Design For


Stampin' Up Stuff

This is my personal blog and is not endorsed by Stampin’ Up! I hope you find it a plentiful source of ideas and personal inspiration but please don't copy my designs for contest submission or use for classes, publication or sale without express permission.