Pinkfresh Studio Slimline Birthday Card

by Joanne James5. July 2023 16:00

Today I'm sharing a card I made using the current sketch over at Sunday Stamps which is a slimline and using a pastel colour palette for the challenge over at Just Us Girls this week:


I'm not usually big on pastels, but I do LOVE the new  Lemon Lolly and Bubble Bath colours, and when I received a crafty gift in the post from a crafty friend I was inspired to create something pretty in pink take a look:


Here's the low-down on today's card:

One of my dear friends, Elizabeth Stewart of Paper Sweetness fame, sent me a whole collection of fabulous washi diecuts after I was wowed by a card she made using some, so I couldn't wait to create something with them! Since she is the hostess over at Just Us Girls this week it seemed only fair I showed that I was putting her sweet gift to good use! I paired them with existing bits and pieces from my stash, including a decorative panel cut from the (retired) Slim Card Dies in white layered over a base of Bubble Bath and my favourite shape of the Nested Essential Dies, to which I added a diecut 'celebrate' in gold foil from the Wanted To Say DIes and a gold heat-embossed 'you' from an old set:


An extra sprinkle of gold festive pearls completed my card. I love the pretty pastels in the washi tape and the way the elements 'frame' my label and extend along the slimline. Pretty in pink, for sure!

Here is the visual summary of the key products used on today's project for you to pin for easy reference:


You can see all of my 'How To' summaries on my 'How To - Tips and Techniques' Pinterest board in case you've missed any. 

Enjoy your evening and I'll be back tomorrow with another project. Until then, happy stampin'!


Stampin' Up! Supplies Used:

Table built using Product Table Builder by The Crafty Owl - Independent Stampin' Up! Demonstrator.

Oh So Eclectic Washi Tape Card

by Joanne James8. July 2017 21:30

Today I've a quick post as I'm playing catch-up to share a quick card that I made using this week's sketch over at The Global Design Project:

I considered all those lines and came up with this card using the new Basics (Pack 3) washi tape:


Super simple, I inset my stripes and used my top mat to frame them, then added a layered flower and sentiment using the Oh So Eclectic stamp set and co-ordinating Eclectic Layers Thinlits Dies. Washi tape is so useful for easy cards and I love that the new ones come in shades of colour across one area of the colour spectrum and are of differing widths. 

I've been making lots of samples using this set in readiness for my technique class that features it next week so have lots more where this came from, including another one using the same sketch that I'll share tomorrow after my Paper Players post.

Here is the visual summary of the key products used on today's project for you to pin for easy reference:


You can see all of my 'How To' summaries on my 'How To - Tips and Techniques' Pinterest board in case you've missed any. 

I'll be back tomorrow with my card for this week's new challenge over at The Paper Players and another project. Until then, happy stampin'!


Stampin' Up! Supplies Used:

Table built using Product Table Builder by The Crafty Owl - Independent Stampin' Up! Demonstrator.

Christmas Tree Warmth and Cheer Washi Tape Card

by Joanne James5. December 2016 19:27

Happy Monday everyone! I've had a busy start to my week with deliveries and appointments but did manage to catch up with a couple of friends for a festive afternoon tea, which was lovely. I have a quick card to share with you today  - this one is from one of last month's classes where we were using the Santa's Sleigh bundle. This was our warm up card and features the traditional colours that the Paper Craft Crew are challenging us to use this week:

Visit the Paper Craft Crew and play along with Color Challenge 221. www.papercraftcrew.com

I got out the washi tape and set to work - here's my card:


Here's the low-down on today's card:

O Christmas Tree -  The tree framelit in the Santa's Sleigh Thinlits set makes for an elegant Christmas tree, and does double duty when the negative space is used creatively too. On this card the focal point is the absence of the actual tree, as opposed to the tree itself. 

Warmth and Cheer Washi - Here the tree is decorated with Warmth and Cheer washi tape, simple strips of colour onto the Crumb Cake card base. Perfect within the Garden Green top layer, to add to the feeling of foliage.

And A Star - I finished my card with a stamped sentiment, tied twine bow and a metallic gold star.

A great simple card, easy for mass production - and don't we all need those at this time of year!

Here is the visual summary of the key products used on today's project for you to pin for easy reference:


You can see all of my 'How To' summaries on my 'How To - Tips and Techniques' Pinterest board in case you've missed any. 

That's all from me; I'll be back soon with another project; until then, happy stampin'!


Stampin' Up! Supplies Used:

Table built using Product Table Builder by The Crafty Owl - Independent Stampin' Up! Demonstrator.

Grateful Bunch Paper Pierced Card

by Joanne James25. April 2016 21:05


Another Monday, another week! I had the second of this month's technique classes this morning and thought today I would share one of my class cards with you. Today's class featured the Grateful Bunch stamp set and co-ordinating Blossom Bunch Punch and looked at the technique of paper-piercing.


This card was inspired by a similar one that was featured in our recent demonstrator magazine, Stampin' Success, a really useful resource for Stampin' Up! demonstrators. The key features of my card today are as follows:

Paper Piercing - The pointelist style of the leaves in the 'Grateful Bunch' stamp set really compliment the paper-piecing on this card. I used my Updated Essentials paper piercing templates to pierce both a border on my Crumb Cake base layer and also the word 'you' onto my Calypso Coral banner. I then finished my sentiment with a partial stamp of one of the sentiments in the stamp set (omitting the 'you').

Ways With Washi - Washi tape can be used in oh so many ways! Here I added a strip of Everyday Chic Designer Washi Tape to the edge of my white layer for added visual interest. 

Black Perfect Accents - I stamped my trio of flowers in Memento Black ink on Whisper White cardstock, coloured them in with my Calypso Coral marker and finished them with a trio of Perfect Accents, coloured black with my Sharpie for the perfect shiny centre.

I just love the clean, modern feel of these stamps and the co-ordinating punch makes cutting out these flowers a cinch. Even better, this is one of the great value bundles in the current seasonal catalogue - a saving of 15% if you buy both items together. The good news is that both of these products is carrying over to the new annual catalogue - the bad news is that they will not be available as a bundle, so buy now to take advantage of this saving. The ladies in my class today love this card, although found their first foray into paper piercing more challenging than they had first thought. 

Here is the visual summary of the key products used on today's project for you to pin for easy reference:


You can see all of my 'How To' summaries on my 'How To - Tips and Techniques' Pinterest board in case you've missed any. 

Back tomorrow with another project; until then, happy stampin'!


Stampin' Up! Supplies Used: 

Table built using Product Table Builder by The Crafty Owl - Independent Stampin' Up! Demonstrator.

Washi Feather Be Brave Card

by Joanne James4. April 2016 07:00

Another Monday, another week - welcome lovely readers! I enjoyed a lovely day yesterday, with a family lunch, a long cycle ride, more planting of seedlings for the garden and yet more Easter chocolate (we are slowly getting through it!) Today's card is for this week's challenge over at Casology where the cue word is 'washi':

I was thrilled to have my weather cards last week chosen as Honourable Mentions (you can see those cards here and here) and couldn't resist playing along again this week as I try to hone my 'clean and simple' design skills. I'm also entering today's card into this week's challenge over at Simply Less Is More where this week's challenge is to use 'white space that isn't white'. Let me show you my card and then I'll explain a little more what that means:

The key features of today's project are as follows:

Washi Feather - I have lots of washi tape (I don't hoard it quite as badly as designer series paper, but close!) and rarely use it; I consulted with my 'Things to do with Washi Tape' Pinterest board where I have saved lots of ideas and thought it was about time I tried something a little different, so settled on creating the feather you see on today's card. I used some retired tape as I liked the subtle pattern on this one, but you could use any current tape for a similar effect. It's really easy to do: you just tape both sides of a piece of baker's twine or strand of jute ribbon as I did here, then use your paper snips to shape your feather. 

White Space That Isn't White - The creation of 'white space', that is an area of your card with no image, layer, pattern or embellishment, is one of the things that designers often find tricky with this kind of card. 'White space' doesn't refer to the colour of the base layer, although often a white base is used - rather it refers to leaving an large proportion of the card blank. I chose to use Pool Party as my colour of choice today and with the exception of my feather, trio of white Perfect Accents, sentiment and thin border frame, there is nothing else on my card front, meeting the 'white space' clean and simple brief.

Make A Statement - My clean and simple card needed a clean yet bold sentiment. My feather started me thinking about Red Indians (don't ask!) and Indian braves. I remembered this sentiment in the 'Enjoy The Little Things' stamp set; whilst designed to go with the kit of the same name, it stands alone and works well with my lone feather. I stamped it in Versamark and heat embossed in white I think this would be a great card to send to someone battling an illness or difficult circumstance, where a little encouragement is needed.

Here's the visual summary of the key supplies used to make this card for you to save for future reference:


You can see all of my 'How To' summaries on my 'How To - Tips and Techniques' Pinterest board in case you've missed any. 

This is the second full week of the Easter holidays for the James juniors. I'm not sure what our week will have in store, but you can be sure it will include more fun activities that don't include school work!

Enjoy your day and I'll be back tomorrow with another project; until then, happy stampin'!

Stampin' Up! Supplies Used:

Table built using Product Table Builder by The Crafty Owl - Independent Stampin' Up! Demonstrator.

Last Orders for Sale-A-Bration and New Stampin' Up! Wednesday Weekly Deals Are Here!

by Joanne James30. March 2016 09:00

It's Wednesday and you know what that means: not only a new collection of Wednesday Weekly Deals - today it's only 2 days until the end of Sale-A-Bration!

If you missed it or need a reminder, you can get the full low-down on Sale-A-Bration here; I've had lots of lovely ladies join my team during Sale-A-Bration and I've always room for more, so if you're undecided about whether or not Stampin' Up! is for you, give me a call - this is the best time to give it a try. 

It's also your last opportunity to benefit from extra Stampin' Rewards for orders over £200 and a free gift with every £45 spend; I will be placing my final order tomorrow at 6pm, so if you live local to me and would like to save postage, then call me or email me with the details. That is also when I will be ordering anything from this week's Weekly Deals.

If you want to take advantage of Sale-A-Bration or any of the weekly deals on offer, you can support my business by placing your order online by clicking here or using the link to my store on the right hand side of my blog page where it says 'Shop Online' or with me in person. Don't forget to add the new Hostess Code for April UD3KDWM4 if your order is under £150 and be sure to make sure that you don't check the 'no contact' box if you'd like to be kept updated with the progress of you order and receive a little thank you in the post from me. 

Here's a summary of this week's one-week only Wednesday deals - click on each item to go to the online store to purchase:

Table built using Product Table Builder by The Crafty Owl - Independent Stampin' Up! Demonstrator.


You can see today's creative project here; until tomorrow, happy shopping!

Sale-A-Bration Pedal Pusher Times Two!

by Joanne James21. March 2016 11:23

Here I am with today's post that contains not one but two cards - a variation on a theme! There are only 11 more days left of this year's Sale-A-Bration with Stampin' Up! and I wanted to share with you a couple of cards I made with my most favourite of the second wave of limited-time products that you can receive free with a £45 spend - the Pedal Pusher stamp set. Both cards have been made with a couple of challenges in mind - the first for this week's colour challenge at Color Throwdown:

Having had Wisteria Wonder, a colour I don't use often, out on my desk for yesterday's Paper Players card, I couldn't fail to be inspired by the inspiration photo and decided to ink up my Pedal Pusher Sale-A-Bration stamp set for the first time:
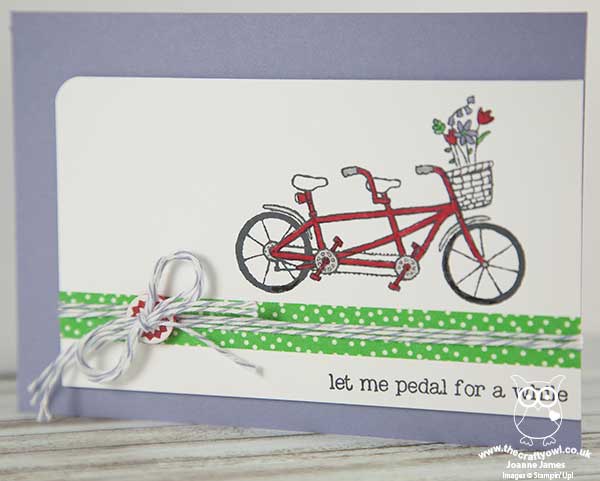
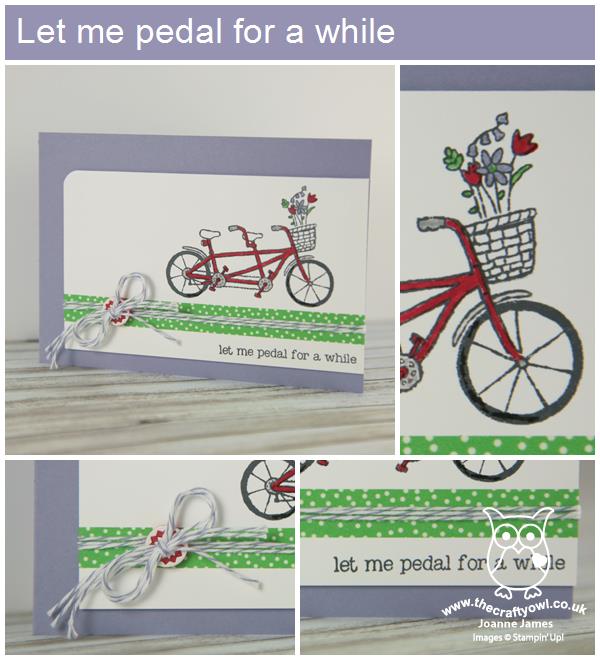
I decided to use the Wisteria Wonder for my card base, but decided my bicycle should be red - somewhat ironic, as my actual bicycle is purple, but it's more of a Rich Razzleberry colour, so not one for this card. Anyway, I digress! I added a strip of Cucumber Crush 'Cherry on Top' designer washi tape horizontally across my card, stamping my bicycle above it, coloured with my Stampin' Write Markers, and my sentiment below it. I added some retired Wisteria Wonder baker's twine and a retired button from my stash to finish this card. 

The Pedal Pusher stamp set is just great for so many reasons - here's my top 3:

It's versatile - there are so many little pieces to customise your bicycle, including three sentiments all of which play on the tandem bicycle theme.

It's photopolymer - makes aligning all the pieces easy-peasy and allows for perfect stamping every time.

It's free - with a £45 spend before 31st March.

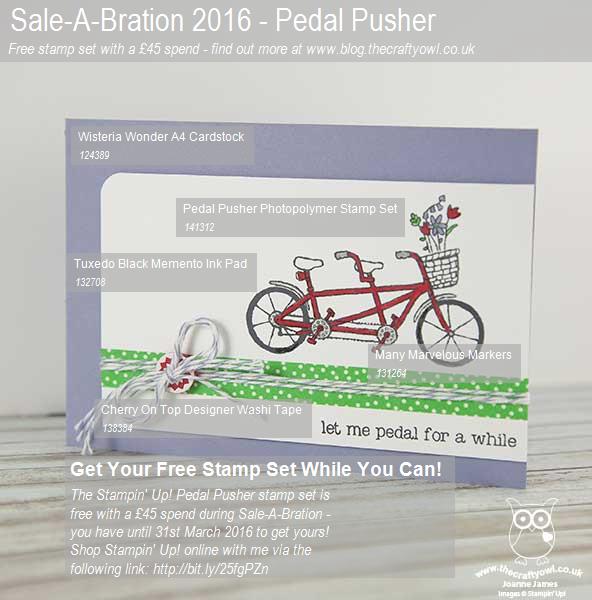
Here's the visual summary of the supplies used to make today's card for easy reference:
 

To demonstrate its versatility, for my second card I went a little more clean and simple and restricted my colour palette to white, Melon Mambo and Basic Black, adding an alternative sentiment and basket contents:
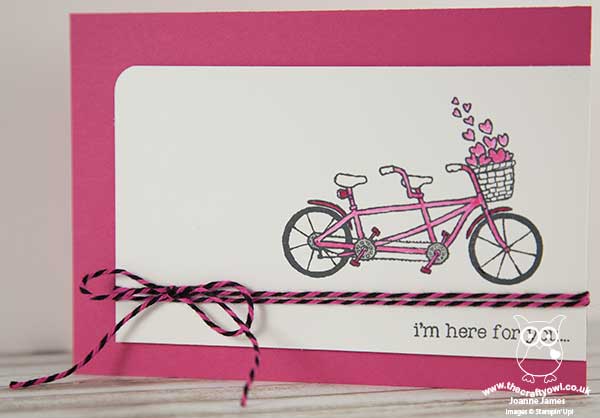
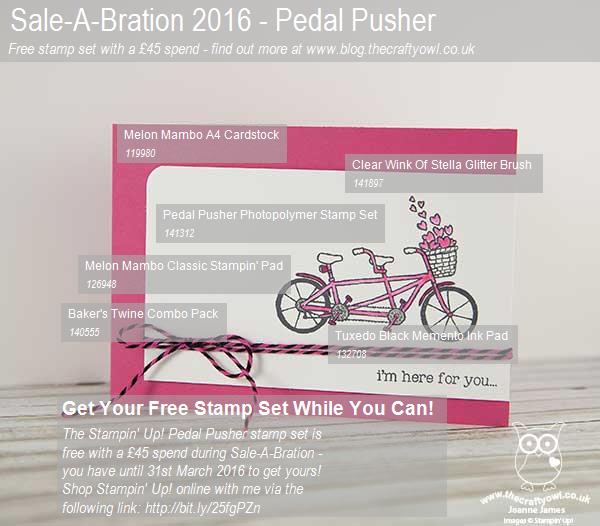
This time I coloured my bike using some Melon Mambo ink and my aquapainter and I also added a little clear Wink of Stella to my floating hearts for a nice shimmer. How cute is that?! The perfect card to let a friend know you are thinking of them. I'm linking this card up with the lovely ladies over at Less Is More this week, where the theme is 'what's outside your window'. Whilst I'm guessing a bicycle might not be the most obvious choice for some, now that Spring has sprung my bicycle will often be found outside my window - before I get on it and join my hubby and the James juniors for a long bike ride. With school holidays starting from tomorrow, I am hoping for lots of fine weather and the chance to indulge in this pleasant past time. 

Here's the visual summary of the supplies used to make the above card for easy reference:
 

That's all from me today; I'm off to squeeze in a quick trip to Ikea (if there is such a thing!) before going to watch Rebecca in her final school netball match of the season. Yesterday both James Juniors played basketball for school and were narrowly beaten into second place in their county qualifier, however Rebecca's club hockey match had a much more successful outcome, with her team earning a place at the U12 regional finals next month. Go Northampton Saints Hockey! The netball team cam third out of five in last week's inter-school netball tournament, so it would be nice for the girls to end the season with a win - here's hoping! 

Back tomorrow with another project. Until then, happy stampin'!


Stampin' Up! Supplies Used:

Card 1:

Table built using Product Table Builder by The Crafty Owl - Independent Stampin' Up! Demonstrator.

Card 2: 

Table built using Product Table Builder by The Crafty Owl - Independent Stampin' Up! Demonstrator.


Thanks Very Very Very Much Teacher Card

by Joanne James10. March 2016 08:05

Today it's time for a new challenge over at Create With Connie and Mary and this week we have a great sketch for you:


My card today started with the sentiment on the sketch, which immediately reminded me of the thank you sentiment in the 'Fabulous Four' stamp set. I decided to get an early start on my end of school year thank you cards - a long way off yet, but I will need lots of them this year so no time like the present! Here's my card:


The three key elements of today's card are as follows:

Fabulous Four stamp set - this is a stamp set with four large sentiments, three of which are two-line sentiments like the one on today's card. They are big, bold and fun and perfect if you want to make the sentiment the focal point of your card.

Owl Builder Punch - I haven't made an owl with my Owl Builder Punch for a while so I decided to take the flower element of the sketch and make it a scholarly owl, complete with spectacles, mortar board and shiny apple courtesy of a little Crystal Effects. I coloured him to co-ordinate with my chosen designer series paper - isn't he so cute?!

Schoolhouse Designer Series Paper - I used two of the papers from the Schoolhouse pack for my card today: the alphabet fitted in perfectly with my school theme and the stripes added some additional colour for the bottom portion of the card. I also added a piece of co-ordinating Tangelo Twist In-Colour Washi Tape beneath the sentiment as per the sketch; a small touch, but it does nicely emphasise the positioning of the owl.

Here's today's visual summary for easy reference:


Do visit the other Design Team members to see how they interpreted this week's sketch; there's lots of inspiration over on their blogs too!

Enjoy your day and I'll be back tomorrow with another project; until then, happy stampin'!


Stampin' Up! Supplies Used:

  • Fabulous Four Clear-Mount Stamp Set
  • Owl Builder Punch
  • Schoolhouse Designer Series Paper
  • 2014-2016 In Color Designer Washi Tape
  • Garden Green Classic Stampin' Pad
  • Whisper White A4 Cardstock
  • Basic Gray A4 Cardstock
  • Daffodil Delight A4 Cardstock
  • Garden Green A4 Cardstock
  • Basic Black A4 Cardstock
  • Crystal Effects
  • Real Red A4 Cardstock
  • Tree Builder Punch
  • 1/8" Silver Mini Brads
  • Whisper White Baker's Twine


Peaceful Holly Sprig Clean and Simple Christmas Card

by Joanne James3. December 2015 08:05

Today it's time for a new challenge over at Create With Connie and Mary and this week we have a great colour combination for you:


I have another CAS card for you today - I'm still making lots of cards to send out so unfussy and quick to mass-produce is something of the order of the day. For this card I decided to go with the holly sprig from the Peaceful Wreath set:


I used a base of Cherry Cobbler and added a strip of In-Colour Mossy Meadow washi tape and a sliver of silver foil cardstock along the edge of my offset Whisper White top layer for  a little extra interest. On my front panel I stamped the holly sprig in Mossy Meadow and then used my aquapainter to roughly watercolour the leaves in the same colour and then added some Cherry Cobbler for my berries. I stamped the second part of my sentiment from the same set in Cherry Cobbler and decided to add a Christmas Greetings diecut silver glimmer 'peace' for a quick touch of festive sparkle to really draw the eye and ground my design. The washi tape I used is included in this week's Wednesday Deals, so now would be a good time to snap some up for the bargain price of £5.44!

Do visit the other Design Team members to see what they did with this week's colours; there's lots of inspiration over on their blogs too! I'm also linking up today's card with the lovely ladies over at Less Is More as I haven't played there for a few weeks and this week's theme is 'fruit' - and fortunately for me this includes holly berries and mistletoe too!

Enjoy your day and I'll be back tomorrow with another project; until then, happy stampin'!


Stampin' Up! Supplies Used:

  • 2014-2016 In Color Designer Washi Tape
  • Peaceful Wreath Photopolymer Stamp Set
  • Cherry Cobbler Classic Stampin' Pad
  • Cherry Cobbler A4 Cardstock
  • Mossy Meadow Classic Stampin' Pad
  • Whisper White A4 Cardstock
  • Aqua Painters
  • Christmas Greetings Thinlits Dies
  • Silver Glimmer Paper
  • Silver Foil Sheets


New Wednesday Weekly Deals Are Here!

by Joanne James2. December 2015 09:00

It's Wednesday and you know what that means: a new collection of Wednesday Weekly Deals! These offers are valid for one week only. As always, a new collection of deals will be announced next Wednesday.

If you want to take advantage of any of the deals on offer, you can support my business by placing your order online by clicking here or using the link to my store on the right hand side of my blog page where it says 'Shop Online' or with me in person. Don't forget to add the new Hostess Code for December 99Y3W6CF if your order is under £150 and be sure to make sure that you don't check the 'no contact' box if you'd like to be kept updated with the progress of you order and receive a little thank you in the post from me. 

Here's a summary of this week's one-week only Wednesday deals - click on each item to go to the online store to purchase:

Table built using Product Table Builder by The Crafty Owl - Independent Stampin' Up! Demonstrator.

I will be placing an order this evening, so if you live in or around Northampton and would like to save on postage, please get in touch and I will add your items on. I'll also be using this washi tape on my card tomorrow so pop back if you'd like to see how I use it.

Back later with today's creative project; until then, happy shopping!

Scrapbooking

Stampin' Up! has introduced a new range of 12x12" scrapbooking product and kit - the full range is now available to purchase online. To download a copy of the new digital Scrapbooking Catalogue click here.

Mini Catalogue

BROWSE THE CATALOGUE

'Tis The Season - the new Stampin' Up! Mini Catalogue is here! For more details and to download your copy click here

Shop Online

Access my online shop 24 x 7, 365 days of the year:

Current September hostess code:

JQEHTZGK

Shop Online

2024-25 Annual Catalogue

BROWSE THE CATALOGUE

Click on the image to download your copy of the 2024-25 annual catalogue. For a full list of current SU! supplies, go to my online store. If you would like any help or advice, please drop me a line at joanne@thecraftyowl.co.uk or give me a call on 07773 421446 - I'd be happy to help.

Join My Team

It's always a great time to join Stampin’ Up! New team members can get £130 worth of products for only £99 + free business supplies + free shipping + all the fun being a part of Stampin’ Up! Stampin' Up! has something for everyone: join my growing team and benefit from my support to enjoy Stampin' Up! however you choose.

If you're interested, call me for a chat to understand how I can help you realise your goals. Alternatively, if you have already decided to sign up and you just can't wait, please click here for the link to the online form where you can sign up and order your starter kit right away! 

Latest Kits!

Stampin Cut and Emboss

The Christmas Ornaments Kit and Card Keeper Kit are the latest kits that will be arriving in the online store later this month - get yours here!

New Online Exclusives

There are new products available exclusively in the online store from 3 July - check them out here.

About Me

Hi I'm Joanne and live in Northampton and when I'm not looking after my husband and two beautiful children, am an avid crafter with a passion for all things Stampin' Up!

I must confess that I have never been a big rubber stamper - until I discovered Stampin' Up! that is. I love the fact that I can get such great results with co-ordinating stamps, inks, papers and punches - the possibilities are endless! Join me on my stamping journey as I share the things I love and be inspired to create amazing things yourself!

Follow Me

Monthly Newsletter

Box Builder

Click the button above to use Box Buster to create your custom box design using the Envelope Punch Board!

Kits Collection Now Available!

Stampin Cut and Emboss

The new Kits Collection from Stampin' Up! is now available!

Click here to see the current kits available and order yours online today.

I Design For


Stampin' Up Stuff

This is my personal blog and is not endorsed by Stampin’ Up! I hope you find it a plentiful source of ideas and personal inspiration but please don't copy my designs for contest submission or use for classes, publication or sale without express permission.