Sweet Ice Cream - Oh I Do Like To Be Beside The Seaside!

by Joanne James4. September 2014 22:14

Apologies for my late post today lovely blog readers - I have had a very busy 'making' day trying desperately to get ahead of myself for once, but as a result I'm late posting; I guess I just cant do it all!! So I'll keep today's post short and sweet - literally! - and share today's card that I made for this week's challenge over at Less Is More where there is a song theme again, using this week's colour scheme over at Pal Paper Arts:

The song theme over at Less is More is 'Oh I do like to be beside the seaside'. I almost didn't make a card this week (I wasn't sure you wanted to see another Sea Street crab or lobster card!) when I was musing about what the seaside means to me and I found myself thinking about ice cream; I mean, a cornet is an intrinsic part of any trip to the seaside, right? When I was at the seaside in Minehead a couple of weeks ago, I had the most delicious forest fruits ice cream in an Italian waffle cone, so with this in mind I thought I would use the above colours to create my ice cream. So, here is my card:

I had some Stampin' Up! notelets out on my desk for another project and decided to use one as the base for my card, as they are more sturdy than Whisper White so perfect for a CAS card like this. I simply added a strip of Hello honey striped DSP from the Moonlight DSP paper stack and made a punch art ice cream cone, first scoring a piece of Crumb Cake with my Simply Scored Scoring Tool and cutting out by hand. For the ice cream itself, I stamped the cream swirl from the Cupcake party stamp set in Versamark, once on Hello Honey and once on Blackberry Bliss, then heat embossed with white embossing powder and punched out with my Cupcake Builder Punch. I also punched out a little Blackberry Bliss cherry using the punch, and covered it in crystal effects to add shine and dimension - this looks so cool in real life! I finished my card with the 'Sweet!' sentiment from the 'Bravo' stamp set, which somehow seemed appropriate for something so delicious!

Hope you like today's card; back tomorrow with another project. until then, happy stampin'!


Stampin' Up! Supplies Used:

Table built using Product Table Builder by The Crafty Owl - Independent Stampin' Up! Demonstrator.


So Many Smiles ... Begin With You Brownie Camera Shaker Card

by Joanne James26. August 2014 15:30

As I'm writing my post today there is finally a break in the rain - hurrah! I hope that everyone here in the UK had a lovely Bank Holiday weekend, despite the dreadful weather across most of the country yesterday. I am now home, having spent a long weekend away in Somerset with my extended family, celebrating my Mother-in-law's forthcoming 70th birthday. We were fortunate to have had wonderful weather and spent a great weekend on the beach, fossil hunting, playing rounders and generally having a relaxing time.

Today I'm sharing a card I made a while ago as one of the samples for the UK Regional Training Day where I was asked to do a 'wow' technique presentation using the Traveler stamp set. This card is one of the ones that was actually inspired by the set, rather than featuring it directly, although the old fashioned brownie camera that inspired my card does feature on the inside. I decided to try my hand at a shaker card and created it to look like an old fashioned camera - here's the front of my card:

I used Soft Suede, Baked Brown Sugar and Brushed Gold cardstock and a variety of circle punches and both circle and deco label framelits to construct my shaker, and filled the window with gold sequins and some confetti squares cut using my fringe scissors from baked Brown Sugar cardstock and Champagne glimmer paper. I used the Petite Pairs sentiment set and heat embossed the first half of my sentiment in gold on the inside of my shaker frame. This was then continued on the inside of the card:

I also finished with the camera stamp. So what do you think - does my punch art camera shaker card bear any resemblance to the real thing? I thought this would make a fun masculine shaker card - proving even grown ups can be fun!

Back tomorrow with my Design Team card for this week's Colour Me...! challenge - and I have a fun 'sneak peek' Christmas card to share with you!

Until then, happy stampin'!


Stampin' Up! Supplies Used:

Table built using Product Table Builder by The Crafty Owl - Independent Stampin' Up! Demonstrator.


Minecraft Creeper Pop-Up Birthday Card

by Joanne James17. August 2014 08:00

Today I'm sharing my Design team card for this week's challenge over at The Paper Players. This week LeAnne is hosting and she has a clean and simple challenge to create a child's birthday card this week:
Those of you who follow LeAnne's blog, Wee Inklings, regularly will know that today young Miss Cassidy is celebrating her fourth birthday - hooray! having seen the other Design Team members cards this week, I can vouch for the fact that mine looks quite different to everyone else's! My cards today are not made with four year old girls in mind (nowhere near enough pink for that!) however as the mother of two young children, I make lots of children's cards. Whilst they are sometimes stamped, I am often asked to make something that reflects the current favourite game/toy/theme of the moment. Those of you who follow my blog will know I am partial to Lego and have created some great Lego punch art in the past (see my most recent one here), although this can be time-consuming and not all that clean and simple. Today though I am sharing two of my tried and tested punch art cards for young boys.

First I am sharing another of Ben's birthday cards from last week; this time, the one I made for him from his big sister. Now as is true for most young boys of his age, Minecraft is a game that provides hours of endless entertainment for him. I've made a few creeper cards that I haven't shared previously (creepers are the monsters that come out at night and take your life, so I'm told) - they really are so easy to make! - but I thought I'd share this one, as after a browse on Pinterest I saw this card and decided I wanted to make a creeper card with a difference. Here's the outside of my card:
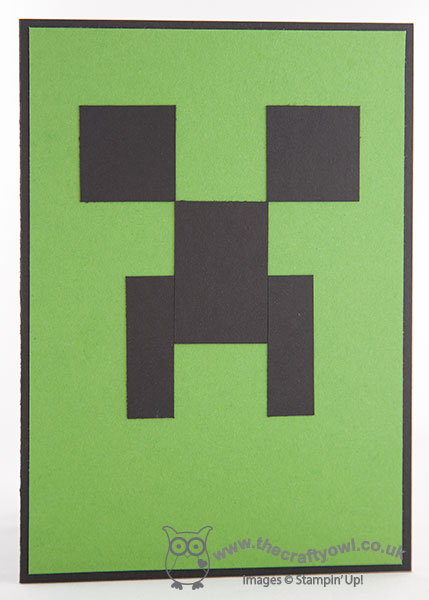
 

A simple creeper face made from 1" punched squares, along with 2 pieces of 1" x 1 1/2", one cut in half lengthways, on a background of now retired Gumball Green (I think this is the best creeper colour, but you could substitute with Garden Green if you don't have any), then when you open the card, he really comes to life:
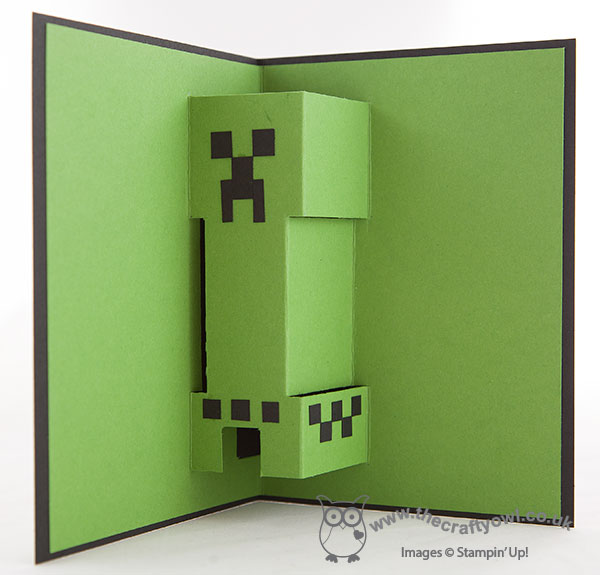
 

A simple pop-up - how fun is that?! This must be a record in terms of supplies, given that you can make one of these cards with some basic cardstock and not much else; it's also another 'no stamping' card - that's two in a week! Now I have to admit, as cards go it's not really my cup of tea, but then I'm not the target audience. The verdict? Rebecca thought it was awesome and Ben loved it, so if it ticks the box of the now seven year old, it's good enough for me!

I also wanted to share another clean and simple birthday card that I have made so many of, I can't quite believed I've never blogged before! All children seem to love shaped cards, and this cute Angry Bird is so easy to create using a few punches and a base made using the Circle Thinlits and the Big Shot:
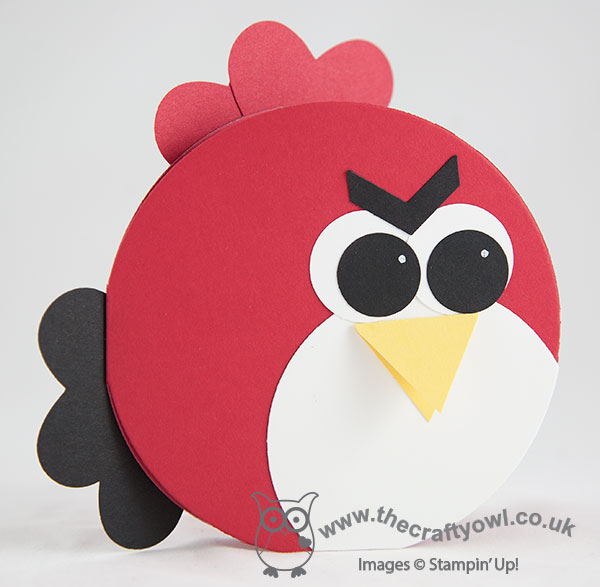
 

A custom envelope from some co-ordinating Brights DSP made using the Envelope Punch Board and you are good to go. Two cards that are really clean and simple, quick and easy. Do pop over to The Paper Players to see what the other designers have come up with - I promise they will be quite different to mine!

It's Sunday and I'm off to town today to collect some frames for a private home décor class I'm teaching tomorrow along with a visit to the shoe shop for new trainers and school shoes for the children in readiness for the new school year. Still two more weeks to go, yet I'm sure it will fly by.

Back tomorrow with another project; until then, happy stampin!


Stampin' Up! Supplies Used:

Table built using Product Table Builder by The Crafty Owl - Independent Stampin' Up! Demonstrator.


Simply Created Thank You Collage Card

by Joanne James10. August 2014 08:00

Yay - it's Sunday and time for a new challenge over at The Paper Players! Today Nance has an interesting colour challenge for us:


Today I have an unusual card to share with you, in more ways than one! When I saw Nance's colour palette, I immediately thought of the Simply Created Banner Kit that I used for the decorations for Rebecca's recent birthday party; I knew I had a few offcuts and leftover pieces of DSP from the kit and that Calypso Coral, Blushing Bride and Basic Grey were 3 of the feature colours of the add-on kit, so using this week's sketch over at Create with Connie and Mary as my starting point (perfect for using up scraps!) I set to work. Here is my finished card:

Using Calypso Coral as my base, I layered a number of strips of DSP in varying widths/lengths across the front of my card, alternating between the Calypso Coral/Blushing Bride chevron pattern and the Basic Grey/Smoky Slate chevron pattern. I then embossed a strip of Blushing Bride cardstock with the Arrows Embossing Folder and cut one end to a point. I layered some Calypso Coral chevrons that I had cut out with one of the framelits from the Circle Thinlit card, then created a tag, again using a pre-printed leftover tag from the kit. I added some black chevron ribbon (a little bit of a liberty as far as the colour scheme is concerned, but the closest match I could get from my stash!) and tied it with some retired Calypso Coral baker's twine in a double bow. I finished my tag with a die cut 'thank' in Hello Honey, part of the 'thankful' framelit from the now retired Expressions Thinlits set (still available on the European Clearance Rack if you fancy snapping up a bargain!) and the YOU cut out of Basic Grey with my Big Shot and the new Perfect Print Alphabet Bigz die. lastly, I added an Essentials Hardware Clip to my tag before adhering it to my card with dimensionals.

I love the idea of collage cards but find them really difficult to create, so am quite pleased with the way this arrow-filled card turned out. Also, on completion I realised that I hadn't done any stamping at all on this card - how unusual is that??! For more inspiration from the Design Team and to see the fabulous cards they've made using this colour palette, pop on over to The Paper Players blog to see what they've created and to link up your own card.

Back tomorrow with a fun birthday card; until then, happy stampin'!


Stampin' Up! Supplies Used:

Table built using Product Table Builder by The Crafty Owl - Independent Stampin' Up! Demonstrator.


Bravo! Sea Street Congratulations Card

by Joanne James4. July 2014 21:54

Today's card is my entry for this week's Summer Collection challenge over at Create with Connie and Mary where they have the following colour challenge:

I love this colour combo and couldn't pass up the opportunity to make something with it. All of these colours can be found in the new Sea Street designer series paper, so I decided this would be my starting point. Here's my card:

I've been wanting to make a life-buoy on a card with this paper that would enable me to use the new thick baker's twine too and this card provided the perfect opportunity. Using a Real Red base, I then used a mat of Whisper White and a further mat for the top layer in Night of Navy. I created my life buoy by cutting two rings using my circle framelits, one in red and one in white, then cutting the white one into quarters and overlaying two of the sections onto the red one. I wound Coastal Cabana baker's twine around this and adhered it to my card using dimensionals, having first stamped my sentiment onto a circle of Whisper White and adhered that directly to the card base. I then finished the front of my card with two strips of Sea Street DSP showing multi-coloured sailor's flags and stamped the co-ordinating stamp onto the inside card panel.

As my regular blog readers will know, both James juniors are keen swimmers and whilst only Rebecca currently races competitively, Ben is improving all the time as he grows older and stronger and is gaining on her all the time. He often undertakes distance swimming badges and skills-based certifications, so I made this card with him in mind - I think it will make a lovely congratulations card for my little swimmer the next time he achieves a milestone and I like that the card has a masculine feel that would suit both young and old alike.

I'll be back tomorrow with another project and I will be posting early as I will be watching the last swimming gala of the season tomorrow evening. Wish me luck - with the warmer weather we've been having the swimming baths will be roasting, so it will be all I can do to stop myself diving into the water too! Until then, happy stampin'!


Stampin' Up! Supplies Used:

Table built using Product Table Builder by The Crafty Owl - Independent Stampin' Up! Demonstrator.


Tags: , , , , , , , ,

Cards | Punch Art | Stamping

A New Home Card!

by Joanne James22. May 2014 15:30

I had a hugely productive creative day yesterday (I love days like that!) and decided to have another go at a card with the sketch layout from CAS(E) This Sketch (although I'm too late to link up to this challenge with this sketch). I am linking up with Addicted to CAS though as I have another 'over the edge' birdie and today's card features the zingy colour palette over at Color Throwdown:


So using the color throwdown photo for inspiration, I decided to create a 'new home' card. There is only one set is the annual catalogue that features a new home welcome - the hostess set 'Sweetly Framed' - so I decided to create something using some punch art with an idea that I've had swimming around in my head for a while. Here's my card:

I used Pear Pizzazz for my base, and popped my Soft Sky panel up on dimensionals and created a little bird house by punching a 1" square out and topping with a Tangerine Tango triangle cut from half a square for the roof. I punched a Tangerine Tango bird using the bird punch and highlighted the bird's wing by using a scrap of Retro Fresh DSP, adhering with rolled glue dots to give some height. I added some punched co-ordinating coloured hearts punched with my owl punch. Lastly, what to use as a sentiment? I eventually decided on 'Yippee-Skippee!' from the stamp set of the same name, stamped in Versamark and heat embossed in clear powder - not quite 'Welcome to your new home', but it's exactly how I felt when I bought a new house, both times, so it seemed more than appropriate! Another very clean and simple card, created with just a few punches and a sentiment.

Back tomorrow with another project; until then, happy stampin'!


Stampin' Up! Supplies Used:

Table built using Product Table Builder by The Crafty Owl - Independent Stampin' Up! Demonstrator.


Tags: , , , , , , , ,

Cards | Punch Art | Stamping

Smile - It's Your Birthday!

by Joanne James23. March 2014 22:57

Good morning blog readers! It's Monday and the start of another busy week. Today I'm sharing my card for this week's Pals Paper Art challenge. I was thrilled to be a Top 3 winner over at PPA last week with my flowerpot card (if you missed it, you can see it here). This week the Pals have a great sketch by the talented Margaret Moody:

I was initially tempted to use a feature piece of DSP for panel 2, however I had some punched butterflies left over from preparing my weekend Spring banner class and decided instead to use them to create my card. Here it is:

I used a Soft Sky base, then layered a Whisper White panel on Daffodil Delight and carefully aligned my punched butterflies. I finished by stamping the 'Smile' sentiment in Versamark and heat embossing with clear embossing powder onto a panel of So Saffron, which I raised on dimensionals. A simple layout that worked for me and saved my excess butterflies from the scrap box; who else hoards bits and pieces then never goes back to use them on a card, instead punching the shape from a fresh piece of cardstock? Go on, admit it - we've all done it ;-). I loved the mix of brights and subtles on this card and the feeling of spring that it conjures up. 

I'm off to do some work before meeting some friends I haven't seen in a while for lunch. Back tomorrow with another project; until then, happy stampin'!

Stampin' Up! Supplies Used:

Table built using Product Table Builder by The Crafty Owl - Independent Stampin' Up! Demonstrator.


Tags: , , , , , , ,

Cards | Punch Art | Stamping

Welsh Daffodils for Easter!

by Joanne James1. March 2014 20:16

Today I've had the kind of day where I feel like a true working mother - my 'to do' list is reaching epic proportions and I seem to be rushing from one thing to the next and am welcome for the break that sitting down to write my blog today has given me: and breathe ...!

Well being Welsh, there's only one thing I could share with you today: March 1st is St David's Day, the day that celebrates the patron saint of Wales, so it had to be a card featuring the national flower - daffodils. The first time I saw the Petite Petals punch I knew it would make great daffodil petals - it was the perfect shape. I've seen a few examples in blogland - the first one of which I think was by Jackie Topa - but today I'm going to share my version with you. So for working mothers everywhere and Welsh people at home and abroad, Here's today's card:


I stamped the petals in Daffodil Delight onto the same colour cardstock using the spotted flower stamp just to give some pattern, and made the trumpets by using a flower shape from the Itty Bitty Punches which I formed by scrunching around the rounded end of my paper piercing tool. here's a close up of the flowers so that you can see what I mean:

I cut some stems and leaves using the edges of my large oval punch and my paper snips, and mounted these onto a piece of Whisper White cardstock that I background stamped with the large colourwash stamp from the Happy Watercolour set to add some interest. I edged this piece with yellow for definition and mounted my decorated piece onto a Gumball Green card base. I decided to make my card into an Easter card and stamped my sentiment in Whisper White kraft ink and set it within a horizontal line that I drew in with my chalk marker.

I used this week's sketch layout at CAS(E) this Sketch for my card this week and was delighted to see that the challenge over at Less is More this week is to use yellow and green on your card - perfect!

Back tomorrow with another project; until then, happy stampin'!


Stampin' Up! Supplies Used:

Table built using Product Table Builder by The Crafty Owl - Independent Stampin' Up! Demonstrator.


Everything is ... Awesome! Lego Movie Punch Art

by Joanne James25. February 2014 10:11

Today I have something special to share with you! As my regular readers know, I  live in a house of Lego! Well, not literally, but Lego is a big part of our family life - we have a massive brick collection and I have a 6 year old whose ambition it is to be a master builder someday. Either that, or a brain surgeon so that he can earn enough money to fund his ever-expanding Lego collection! Last week was half-term here which neatly coincided with the release of the first ever Lego Movie - a set built entirely from Lego that tells the story of the 'ordinary' builder Emmet who is mistaken for the chosen Master Builder and whose destiny is to prevent the world of Lego being glued together by the evil Mr Business. Of course the first of our half-term excursions was to the cinema to watch the new movie and Ben at least was not disappointed - he sat 'glued' to the screen throughout.

I decided to create another Lego punch art card to celebrate the release of the new movie and add to my collection (you can see some of my previous Lego punch art here). Here is my card:

Whilst Emmet is possibly the most ordinary of the characters, my card had to incorporate him as he is central to the movie. I used this week's layout over at The Paper Craft Crew PCCCS081 for my card and split Emmet's catchphrase in the movie, 'Eveything is awesome' across both the banner and the word bubble. I printed the 'Everything is' on my computer and matched up the colour to print it in Pacific Point, then stamped the 'awesome' by partially inking one of the stamps in the 'Yippee Skippee' stamp set. I used lots of different punches to create my minifigure and drew on some of the detail by hand with either my Stampin' Write black marker or my white gel pen and used a piece of pacific Point Brights DSP to add colour to the background without overwhelming the focal point.

I love creating this kind of card, although they really do take an age to make - a real labour of love. It was all worthwhile though when Ben took one look at the finished card and declared it "Awesome!" and promptly burst into Emmet's 'Everything is Awesome!' song from the movie.

Back tomorrow with something a little more traditional; until then, happy stampin'!


Stampin' Up! Supplies Used:

Table built using Product Table Builder by The Crafty Owl - Independent Stampin' Up! Demonstrator.


Tags: , , , , , , ,

Cards | Punch Art | Stamping

Horse Punch Art SUO #90

by Joanne James17. February 2014 21:26

Today I've had the most fun day. I was privileged to be invited to run a Crafty Owl birthday party for a 10 year old and her classmates, which was great fun. We made some wall art and they had a fun time punching shapes and using the Big Shot to create their masterpieces. When I run a craft party, I always create a punch art kit for the party bags so that the children can continue the crafty fun at home. For today's party, the birthday girl loves horses so I knew that a pony needed to feature on my card. I had a quick surf on Pinterest for some general inspiration then set to work creating my card. This is what I came up with:

I used a variety of punches to create my card (see full list below) and some Core d'inations cardstock embossed with the woodgrain embossing folder to give texture to my stable door. I've always loved grey horses so made my card with a grey pony, but since my eight year-old informed me that this made it look like a donkey, the kits I made for the party girls all had brown horses to remove any doubt!

The girls loved their kits and I'm sure they will have had as much fun completing them as they did at the party itself. I'm linking today's card up with the challenge over at SUO Challenges where the theme this week is 'Punch Art', so this card fits perfectly.

I ended my day with a trip to the cinema to see the new Lego Movie; it was a great children's movie for half term and fulfilled one of Ben's main aims for the week, so all in all a good day was had by all.

Back tomorrow with another project; until then, happy stampin'!


Stampin' Up! Supplies Used:

Table built using Product Table Builder by The Crafty Owl - Independent Stampin' Up! Demonstrator.

New Online Exclusives

There are new products available exclusively in the online store from 5 November - check them out here.

Latest Kits!

Stampin Cut and Emboss

The Layered Landscapes Kit and Nature's Paintings Kit are the latest kits in the online store - get yours here!

Shop Online

Access my online shop 24 x 7, 365 days of the year:

Current November hostess code:

9NKXDTTR

Shop Online

Mini Catalogue

BROWSE THE CATALOGUE

'Tis The Season - the new Stampin' Up! Mini Catalogue is here! For more details and to download your copy click here

Scrapbooking

Stampin' Up! has introduced a new range of 12x12" scrapbooking product and kit - the full range is now available to purchase online. To download a copy of the new digital Scrapbooking Catalogue click here.

2024-25 Annual Catalogue

BROWSE THE CATALOGUE

Click on the image to download your copy of the 2024-25 annual catalogue. For a full list of current SU! supplies, go to my online store. If you would like any help or advice, please drop me a line at joanne@thecraftyowl.co.uk or give me a call on 07773 421446 - I'd be happy to help.

Join My Team

It's always a great time to join Stampin’ Up! New team members can get £130 worth of products for only £99 + free business supplies + free shipping + all the fun being a part of Stampin’ Up! Stampin' Up! has something for everyone: join my growing team and benefit from my support to enjoy Stampin' Up! however you choose.

If you're interested, call me for a chat to understand how I can help you realise your goals. Alternatively, if you have already decided to sign up and you just can't wait, please click here for the link to the online form where you can sign up and order your starter kit right away! 

About Me

Hi I'm Joanne and live in Northampton and when I'm not looking after my husband and two beautiful children, am an avid crafter with a passion for all things Stampin' Up!

I must confess that I have never been a big rubber stamper - until I discovered Stampin' Up! that is. I love the fact that I can get such great results with co-ordinating stamps, inks, papers and punches - the possibilities are endless! Join me on my stamping journey as I share the things I love and be inspired to create amazing things yourself!

Follow Me

Monthly Newsletter

Box Builder

Click the button above to use Box Buster to create your custom box design using the Envelope Punch Board!

Kits Collection Now Available!

Stampin Cut and Emboss

The new Kits Collection from Stampin' Up! is now available!

Click here to see the current kits available and order yours online today.

I Design For


Stampin' Up Stuff

This is my personal blog and is not endorsed by Stampin’ Up! I hope you find it a plentiful source of ideas and personal inspiration but please don't copy my designs for contest submission or use for classes, publication or sale without express permission.