A Vase Full of Flowers For This Week's Colour Me...! Card Challenge

by Joanne James24. September 2014 10:00

It's Wednesday and time for a new challenge over at the Colour Me...! Card Challenge. This week we have a playful colour palette for you to work with - I also chose to use this week's Retrosketches layout for my card:


I love the bright colours of this week's colour palette, so decided to create a nice cheery card to really make the most of them - here's my card:

I used Bermuda Bay as the base colour for my card and decided to make a 4" square card for a change. I layered a sheet of Real Red polka dot paper from the Brights paper stack and a piece of Confetti Celebration DSP that features a fun Bermuda Bay design. I stamped the flower vase from Pictogram Punches, having inked it with my Stampin' Write markers to enable me to add the chevron detail on the vase and the flower stems in a different colour to the vase itself, then stamped and punched three flowers, finishing each with a rhinestone in the centre that had been coloured with my Blendabilities marker and adhered the flowers separately using glue dots. After stamping my sentiment from Petite Pairs, this left-handed section was adhered to the front of the card using dimensionals, to allow space for my selection of co-ordinating buttons to sit above and below it as per the sketch design.

I even remembered to take a  photo of the stamping on the inside of my card today:

That's my Colour Me...! card for this week - why not visit the other Colour Me...! designers and check out their takes on this week's colour combination:

And our talented guest designer for September - Holly Endress
 
We look forward to seeing your subtle creations. Right, i'm off to get some work done before this afternoon's hockey match (observer, not participant!)

Back tomorrow with another project; until then, happy stampin'!


Stampin' Up! Supplies Used:

Table built using Product Table Builder by The Crafty Owl - Independent Stampin' Up! Demonstrator.


So Many Smiles ... Begin With You Brownie Camera Shaker Card

by Joanne James26. August 2014 15:30

As I'm writing my post today there is finally a break in the rain - hurrah! I hope that everyone here in the UK had a lovely Bank Holiday weekend, despite the dreadful weather across most of the country yesterday. I am now home, having spent a long weekend away in Somerset with my extended family, celebrating my Mother-in-law's forthcoming 70th birthday. We were fortunate to have had wonderful weather and spent a great weekend on the beach, fossil hunting, playing rounders and generally having a relaxing time.

Today I'm sharing a card I made a while ago as one of the samples for the UK Regional Training Day where I was asked to do a 'wow' technique presentation using the Traveler stamp set. This card is one of the ones that was actually inspired by the set, rather than featuring it directly, although the old fashioned brownie camera that inspired my card does feature on the inside. I decided to try my hand at a shaker card and created it to look like an old fashioned camera - here's the front of my card:

I used Soft Suede, Baked Brown Sugar and Brushed Gold cardstock and a variety of circle punches and both circle and deco label framelits to construct my shaker, and filled the window with gold sequins and some confetti squares cut using my fringe scissors from baked Brown Sugar cardstock and Champagne glimmer paper. I used the Petite Pairs sentiment set and heat embossed the first half of my sentiment in gold on the inside of my shaker frame. This was then continued on the inside of the card:

I also finished with the camera stamp. So what do you think - does my punch art camera shaker card bear any resemblance to the real thing? I thought this would make a fun masculine shaker card - proving even grown ups can be fun!

Back tomorrow with my Design Team card for this week's Colour Me...! challenge - and I have a fun 'sneak peek' Christmas card to share with you!

Until then, happy stampin'!


Stampin' Up! Supplies Used:

Table built using Product Table Builder by The Crafty Owl - Independent Stampin' Up! Demonstrator.


Colour Me...! Spotlight on Swallowtail

by Joanne James9. July 2014 08:00

Happy Wednesday everyone! Double delights today: new weekly Wednesday Deals - I'll be back with the details on those later  -and more importantly for me my second Colour Me...! Card Challenge Design Team post! This week we are using the striking colour combination of Elegant Eggplant and Soft Sky:

This is an unusual colour combination for me, but I had a clear idea of how I was going to use these contrasting colours - here's the card I came up with this week: 

I decided to use Elegant Eggplant for my base card and then stamped the large Swallowtail stamp in Elegant Eggplant onto Soft Sky cardstock. I then took a rectangular piece of Elegant Eggplant cardstock and punched a circular hole out of the centre and rounded alternating corners with my Project Life corner rounder. I then strategically placed this over my butterfly to include its head and adhered it to my card using dimensionals, having first coloured the portion of the butterfly visible through the circular hole using Elegant Eggplant ink and a blender pen. The top layer is used to create a 'spotlight' onto the butterfly and almost magnify its detail. I finished with a small birthday sentiment from Petite Pairs as I didn't want anything that would overshadow my butterfly, and stamped the inside of the card and the envelope too with the smaller swallowtail from the coordinating Papillion Potpourri stamp set.

I hope you like today's card - please do pop along to the 'Colour Me...!' challenge page this week to check out the work from the other talented designers that I'm working with and to upload your own creations.

Back tomorrow with another project; until then, happy stampin'!


Stampin' Up! Supplies Used:

Table built using Product Table Builder by The Crafty Owl - Independent Stampin' Up! Demonstrator.


Tags: , , , , , , , ,

Cards | Stamping

Best of Christmas Nativity - Paper Craft Crew #67

by Joanne James18. November 2013 20:08

Today I'm sharing my entry for this week's Paper Craft Crew sketch challenge. Here is this week's challenge sketch:

I decided to use the nativity stamp from the Stapin' Up! 'Best of Christmas' stamp set. I haven't used this stamp before and think it's rather cute, however a few of my customers have avoided using this stamp as they see it as a children's stamp so I wanted to create a card using this stamp that had a more grown-up feel to it. This is what I came up with:

I used a Night of Navy card base, then stamped the image in gold metallic ink on Whisper White and matted it on squares of both navy and brushed gold. I highlighted the stars and heart with some gold glitter just to add a little extra sparkle, but otherwise left the image as stamped. Here's a close up of the stamped image so you can see the shimmer:

The layer beneath the image that runs across the card was made from a strip of navy cardstock embossed with the Print Poetry Embossing Folder with I then swiped the gold metallic ink pad across the surface to add some shine and pick up the detail of the embossed script. This was border was also matted with brushed gold cardstock and finally the sentiment was stamped in gold to finish.  I used the narrow label from the Circle Card Thinlits set for the label piece and finished with three Night of Navy candy dots to tone in with the rest of my card.

Whilst this stamp will always look a child's drawing, I think this card shows that with the right colour combination and layout the boundaries can be stretched a little. Why don't you pop over to the Paper Craft Crew's challenge page and have a look at the design team inspiration there and see what the other challenge entrants have come up with.

Back tomorrow with a project and another video tutorial using the Envelope Punch Board; until then, happy stampin'!


Stampin' Up! Supplies Used:


Overweight Santa?!

by Joanne James13. November 2013 21:37

A quick post from me today, to share a card I made earlier in the week. The sketch over at Freshly Made Sketches last week really appealed to me, however whilst I had a few rather obvious ideas as to how I could use it (an ornament, a snowflake) I wanted something really unusual. So here is the sketch:


So here's what I did with the sketch:


I figured it really looked like it could be part of a santa suit, but for a santa who's eaten one too many mince pies, as his belt doesn't quite do up around his middle! The sparkly glimmer paper buckle adds some lovely 'bling' and a simple white embossed 'Merry Christmas' sentiment for the finishing touch.

I was too late to link this card up to the challenge, but I'm really happy with my final output.

Come back tomorrow for another project; until then, happy stampin'!


Stampin' Up Supplies Used:


Tags: , , , , , , ,

Cards | Punch Art

Merry Mini Card and Custom Envelope using the NEW Envelope Punch Board

by Joanne James4. November 2013 21:26

Today's post features one of the cards that I'm making in my classes this week: it's a 3" x 4" notelet card, with co-ordinating DSP bespoke envelope made with the new Envelope Punch Board. This really is a great piece of kit and can be used for so much besides envelopes, but before we get ahead of ourselves I thought I would shoot a short video to show you just how easy it is to make a simple envelope to fit a card that isn't a 'standard' size.

So here is the card I made:

The card itself is very simple, with some festive washi tape and a small punched square, that has been embossed with the Stylish stripes TIEF and had a little Christmas tree punched out using one of the Merry Minis punch trio. Then a tiny button and twine bow to finish and a simple sentiment and done. The great thing is that with the new envelope punch board a co-ordinating envelope really can be created in minutes - just watch the video below to see how easy it is:


Isn't that great? The ladies at my class today couldn't believe just how easy it was to create a perfect envelope. It was a good job this was our last card of the class, otherwise I think they would have spent the whole afternoon making envelopes and not cards! The envelope board can be used for so much more though; watch out for more videos showing you how to get the most out of this great new tool.

I'm also linking today's card up with the colour challenge over at Create with Connie and Mary, where this week's challenge is to make a card using my featured colours: 

If you would like to be inspired, pop over to their blog and see how other designers have used this colour combination in a variety of different ways. Back tomorrow with another project; until then, happy stampin'!


Stampin' Up! Supplies Used:


Mosaic Bauble Thinlit Card and Punch Tip Video

by Joanne James26. October 2013 22:16

We have had a lovely day today; we've stayed indoors out of the howling winds and had some family over for Sunday lunch. It's been lovely to spend time with my brother- and sister-in-law, nephew and niece, as we don't do it nearly often enough with the busy lives we all lead.

As promised, I have another Thinlit card for you today, this time with a Mosaic Madness bauble design - take a look:

I created a simple 'layered' bauble using a circle punch and the mosaic punch, then layering by raising the outer circle on dimensionals and creating a ribbon hanger. Here's a close-up of my bauble:

For a greeting on this card, I used a pair of sentiments from the 'Petite Pairs' stamp set, stamping one half on a layered label on the front of the card and the other half on the reverse of the flipped circle:

Lastly, are you wondering what punches I used for my raised sentiment label on the front of my card? Here's a closer look:

No, it's not a new label punch or two, I actually used my Mosaic Punch to create them! I'm all for making your tools work harder for you and this punch is great for creating labels as well as straight forward mosaic shapes. I shot a short video to show you how to make these labels; I actually made it a while ago, but didn't make a card to go with it, so haven't shared it until now. This also explains why the stamped pieces I used in the video are not the actual ones you see on today's card. If you're feeling confused, just watch the video - it will all make sense! Here's the link:

Just to recap on the measurements in the video: I recommend the narrow label is a maximum of 1.5cm in width, and the wider label 3.0cm in width. Either label can be of any length. I hope you found the video tutorial useful.

Lastly, don't forget, you have only until 11pm tomorrow night to order any of the 25 stamp sets that are 25% off - for details on the stamps on offer, click here.

Back tomorrow with another project; until then, happy stampin'!


Stampin' Up! Supplies Used:

Summer Silhouettes Telford Swap

by Joanne James26. August 2013 22:24

Today I have another of the swaps I received at our training event in Telford a little while ago to share with you. This card was made by Jenny Moors and we laughed as we swapped as I had used the same stamp set but taken a completely different creative approach (you can see my Telford swap card here). Here is Jenny's card:

I love the bright colours of this card and there is tons of detail here, right down to the paper pierced edge. It's also a great example of a very well made slider card - here's the inside of the card extended so that you can see what I mean:

If you would like to re-create this card, Jenny has provided a step-by-step tutorial on her blog here. Back with the last of my favourite three swaps I received at Telford next time; until then, happy stampin'!


Stampin' Up Supplies:

Stamps: Summer Silhouettes, Petite Pairs

Cardstock: Tangerine Tango, Rich Razzleberry, Whisper White

Ink/Stampin' Write Markers: Tangerine Tango, Rich Razzleberry, Wild Wasabi

Tools: Paper Piercing Essentials Pack

Finishing Touches: Whisper White Stitched Grosgrain Ribbon, Basics Rhinestones

Tags: , , , , ,

Cards | Stamping | Swaps

Really Good Greetings - 25% off this month!

by Joanne James3. July 2013 15:08

Just a quick interim post from me today to bring to your attention yet another great Stampin' Up! offer this month. As if the launch of the new annual catalogue wasn't enough, Stampin' Up! are offering a selection of greeting stamp sets at 25% off when purchased before the 31st July.

The sets on offer are:

Sale Price

Catalogue Price

Description

Item

21,71 €/£15.71

28,95 €/£20.95

Sassy Salutations Wood-Mount Stamp Set

132070

17,21 €/£12.71

22,95 €/£16.95

Sassy Salutations Clear-Mount Stamp Set

126707

17,96 €/£13.46

23,95 €/£17.95

Sweet Essentials Wood-Mount Stamp Set

132085

14,21 €/£10.46

18,95 €/£13.95

Sweet Essentials Clear-Mount Stamp Set

126457

26,21 €/£19.46

34,95 €/£25.95

Petite Pairs Wood-Mount Stamp Set

128706

20,96 €/£15.71

27,95 €/£20.95

Petite Pairs Clear-Mount Stamp Set

122497

These are three very popular stamp sets each of which offer a variety of greetings that are useful for a wide range of cards and projects. Here's a picture of each of the sets:

If you would like to see samples of projects I've made using these sets, then simply do a search on the name of the stamp set in the box on the right and you will find lots of examples. If you would like to purchase any of these sets this month, then do drop me a line or give me a call and I can arrange that for you.

Back shortly with today's creative post!

Tags: , , , , ,

Promotions | Stamping

Scallop Envelope Gift Card Holder Card

by Joanne James24. June 2013 20:11

It's Monday, the start of a new working week and so I thought it would be a great opportunity to remind all you dedicated crafters out there that there are only another 7 days left to order from the retiring stamp and accessories lists before these items are gone for good. Lots of items have gone already but you still have until July 1st to pick up a bargain or two.

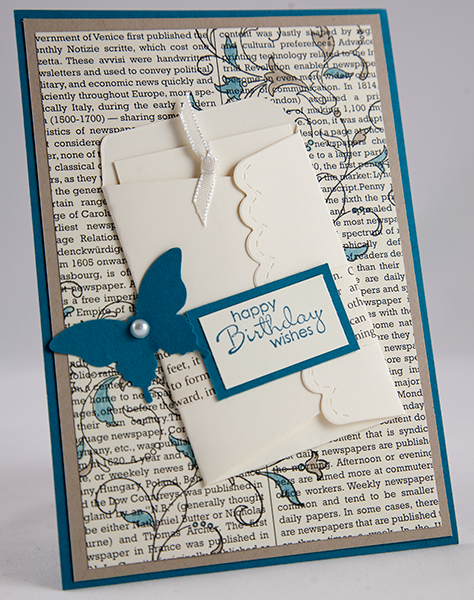
With this in mind, I'm back on the retiring products theme today and I'm actually sharing a card that isn't mine but one that I received in a swap at the UK regional training day in Telford last month and which features three retiring products. It's always nice to see what others have created and I received a few swaps that I really loved in their own right and would like to share with you. The first of these is this card by Kerry Newton:

I don't believe Kerry has a blog (she didn't leave details on her swap and I can't find her on an internet search), but if anyone reading this knows different do let me know as I will then update this post with a link to it.

There are so many things I like about this card: the colours (vanilla, crumb cake and indigo), the background stamping and blended colouring on the First Edition DSP, the feature gift card holder made using the Scallop Envelope Die and the little sentiment band and butterfly that just bring the whole design together. I think the card has quite a unique design, but one that is very effective.

Did you spot the retiring products? Yes, it's the Scallop Envelope Bigz Die, the First Edition printed designer series paper and the Very Vanilla Taffeta Ribbon. If you don't own these and would like to recreate this card, you have one week left to place your order before they're gone for good! Back tomorrow with another project; until then, happy stampin'!


Stampin' Up Supplies:

Stamps: Creative Elements, Petite Pairs

Cardstock: Island Indigo, Crumb Cake, Very Vanilla, First Edition DSP

Ink/Stampin' Write Markers: Basic Black, Island Indigo, Crumb Cake

Tools: Elegant Butterfly Punch, Scallop Envelope Bigz Die, Big Shot, Blender Pen

Finishing Touches: Basics Pearls, 1/8" Very Vanilla Taffeta Ribbon

Mini Catalogue

BROWSE THE CATALOGUE

The mini catalogue is now live! Read and download your copy here.

Shop Online

Access my online shop 24 x 7, 365 days of the year:

Current March hostess code:

S9F2XJJW

Shop Online

Join My Team

It's always a great time to join Stampin’ Up! New team members can get £130 worth of products for only £99 + free business supplies + free shipping + all the fun being a part of Stampin’ Up! Stampin' Up! has something for everyone: join my growing team and benefit from my support to enjoy Stampin' Up! however you choose.

If you're interested, call me for a chat to understand how I can help you realise your goals. Alternatively, if you have already decided to sign up and you just can't wait, please click here for the link to the online form where you can sign up and order your starter kit right away! 

Latest Kit!

Stampin Cut and Emboss

The Rock Legend Kit has all you need to make 8 cards with coordinating envelopes. Along with the new Panda Friends Kit, both are available from January 4th for just £14 each - get yours here!

2023-24 Annual Catalogue

BROWSE THE CATALOGUE

Click on the catalogue for a full list of current SU! supplies - if you would like to order any of the items featured, please drop me a line at [email protected] or give me a call on 07773 421446 - I'd be happy to help.

New Online Exclusives

There will be new products available exclusively in the online store from 5 March - check them out here.

About Me

Hi I'm Joanne and live in Northampton and when I'm not looking after my husband and two beautiful children, am an avid crafter with a passion for all things Stampin' Up!

I must confess that I have never been a big rubber stamper - until I discovered Stampin' Up! that is. I love the fact that I can get such great results with co-ordinating stamps, inks, papers and punches - the possibilities are endless! Join me on my stamping journey as I share the things I love and be inspired to create amazing things yourself!

Follow Me

Monthly Newsletter

Box Builder

Click the button above to use Box Buster to create your custom box design using the Envelope Punch Board!

Kits Collection Now Available!

Stampin Cut and Emboss

The new Kits Collection from Stampin' Up! is now available!

Click here to see the current kits available and order yours online today.

I Design For


Stampin' Up Stuff

This is my personal blog and is not endorsed by Stampin’ Up! I hope you find it a plentiful source of ideas and personal inspiration but please don't copy my designs for contest submission or use for classes, publication or sale without express permission.