World of Dreams Meets All Abloom

by Joanne James10. May 2015 10:00

It's Sunday - my favourite day of the week and time for a new challenge over at The Paper Players. I loved the variety of the transportation-themed cards in the gallery last week. This week, the lovely LeAnne has an interesting colour challenge for you to play along with: 


I'm also playing along with the TGIF Challenge this week as I've used their sketch as the inspiration for my layout this week. So I deliberately used the word 'interesting' for LeAnne's choice of colours this week - this colour combo had me stumped for a good long while! Then I remembered the piece of Lost Lagoon and Pistachio Pudding patterned DSP in the All Abloom paper stack; I think it's the only piece I've never used (and I've been through a few packs!) as I prefer the pattern on the reverse,so I decided to challenge myself to see if I could make it work on today's card. Here is my finished card:

I used Sahara Sand for my base and a mat of Lost Lagoon, then went all out and covered the entire card front with my DSP. This is such a busy pattern, I knew I would have to be careful what else I used on my card to avoid it looking too busy. For my focal point, I chose to stamp one of the silhouette flower stamps in Pistachio Pudding on a circle in the same colour - the paper pattern reminded me of this set - and stamp the sentiment over the top in Lost Lagoon. I mounted this on a slightly larger circle of Lost Lagoon and then a piece of Sahara Sand cut with my Big Shot and a Deco Label framelit. I mounted this on a banner of Sahara Sand that I added a little lace trim to in the same colour - something for a little texture and interest, but not wanting to clash with the strong pattern. Lastly, I added a piece of Lost Lagoon ribbon that I ruched across the front of the card. 

This isn't my usual type of card, but I quite like it. The Sahara Sand does a great job of toning down the pattern and also meant I didn't use any Whisper White cardstock at all, which is quite unusual, not even for my sentiment panel. The thing that pleases me most though - I actually managed to use the sheet of patterned paper effectively!

Before you reach for your paper and inks, check out what our amazing team has created to inspire you this week:

The Paper Players Design Team
 
Here's a quick recap of our challenge rules:
 
1.  Create a new paper project
2.  Upload your creation to your blog with a link back to us and provide a direct link to the post featuring your challenge submission.
3.  Please link your card to no more than three challenges, TOTAL.
4.  Have FUN! 

I look forward to seeing how you interpret this week's colour palette. I'm off to finish the preparation for my technique classes this week and enjoy the rest of the weekend.

Back tomorrow with another project; until then, happy stampin'!


Stampin' Up! Supplies Used:

Table built using Product Table Builder by The Crafty Owl - Independent Stampin' Up! Demonstrator.


Hey I Remembered Your Birthday!

by Joanne James9. April 2015 08:05

It's Thursday and time for another challenge over at Create With Connie and Mary, where this week we have a great colour combination for you:

This colour combination appears in the Birthday Bash DSP and I couldn't resist using a piece of it on a fun-fold card for a humorous birthday greeting:

I used Night of Navy for my card base and created a fun-fold card using my Deco Labels framelits. I used Calypso Coral for my mats. I used a piece of the party hat paper for the front section beneath my main sentiment, a lovely curly script from the 'Age Awareness' stampset. I backed my sentiment panel with a circle cut with my circle framelits and popped this up on dimensionals, so that I could attach my Calypso Coral pompom trim and gold sequins to the front with a mini gold peg to add to the party feel. I continued the stamping inside my card, which today I remembered to photograph:

This card is for a good friend whose birthday I not only forgot last year, but worse still bumped into on the day and not even that triggered my extremely poor memory into remembering! Luckily the friend was gracious enough to forgive me, although he has ribbed me mercilessly about it ever since. Needless to say, his birthday isn't until next month but the card is ready and I will be making an extra effort this time around!

The Design Team has some amazing projects to share with you this week, with lots of great inspiration so do pop by their blogs and take a look. So grab your paper and inks and we look forward to seeing you in the gallery this week!

I'll be back tomorrow with another project hopefully; I have my monthly stamp-a-stack class in the morning and the Easter holidays mean I am getting a little less creative time than usual, but I'll do my best. until then, happy stampin'!


Stampin' Up! Supplies Used:

  • Age Awareness Photopolymer Stamp Set
  • Birthday Bash Specialty Designer Series Paper
  • Calypso Coral Pompom Trim `
  • Gold Sequin Trim
  • Mini Metallic Clothespins
  • Deco Labels Collection Framelits Dies
  • Circles Collection Framelits Dies
  • Big Shot Die-Cut Machine
  • Whisper White A4 Card Stock
  • Night Of Navy Classic Stampin' Pad
  • Night Of Navy A4 Card Stock
  • Calypso Coral A4 Card Stock
  • Crushed Curry Classic Stampin' Pad


Mosaic Birthday Card

by Joanne James24. March 2015 21:33

I have a quick card to share with you today that I made using the birthday stamp from the 'Oh My Goodies' stamp set:

I used last week's Pals Paper Arts sketch for my layout and took the opportunity to use up some retired Quatrefancy Specialty DSP and my Mosaic embossing folder to echo the pattern on the stamped panel. I cut out the stamped panel and a background layer using the Deco Label framelits, which co-ordinate perfectly with this stamp set. I also stamped the sentiment again in Pumpkin Pie and cut it out and adhered it across the centre, placing a same colour circle behind to add definition.

This is a great birthday card that would work for a male or female and will make a useful addition to my birthday card stash.

Back tomorrow with this week's Wednesday Weekly Deals and another project. Until then, happy stampin'!


Stampin' Up! Supplies Used:

Table built using Product Table Builder by The Crafty Owl - Independent Stampin' Up! Demonstrator.


So Many Smiles ... Begin With You Brownie Camera Shaker Card

by Joanne James26. August 2014 15:30

As I'm writing my post today there is finally a break in the rain - hurrah! I hope that everyone here in the UK had a lovely Bank Holiday weekend, despite the dreadful weather across most of the country yesterday. I am now home, having spent a long weekend away in Somerset with my extended family, celebrating my Mother-in-law's forthcoming 70th birthday. We were fortunate to have had wonderful weather and spent a great weekend on the beach, fossil hunting, playing rounders and generally having a relaxing time.

Today I'm sharing a card I made a while ago as one of the samples for the UK Regional Training Day where I was asked to do a 'wow' technique presentation using the Traveler stamp set. This card is one of the ones that was actually inspired by the set, rather than featuring it directly, although the old fashioned brownie camera that inspired my card does feature on the inside. I decided to try my hand at a shaker card and created it to look like an old fashioned camera - here's the front of my card:

I used Soft Suede, Baked Brown Sugar and Brushed Gold cardstock and a variety of circle punches and both circle and deco label framelits to construct my shaker, and filled the window with gold sequins and some confetti squares cut using my fringe scissors from baked Brown Sugar cardstock and Champagne glimmer paper. I used the Petite Pairs sentiment set and heat embossed the first half of my sentiment in gold on the inside of my shaker frame. This was then continued on the inside of the card:

I also finished with the camera stamp. So what do you think - does my punch art camera shaker card bear any resemblance to the real thing? I thought this would make a fun masculine shaker card - proving even grown ups can be fun!

Back tomorrow with my Design Team card for this week's Colour Me...! challenge - and I have a fun 'sneak peek' Christmas card to share with you!

Until then, happy stampin'!


Stampin' Up! Supplies Used:

Table built using Product Table Builder by The Crafty Owl - Independent Stampin' Up! Demonstrator.


New Big Shot Bundle Promotion - The Best Reason Ever To Own One!

by Joanne James1. August 2014 11:51

Good morning lovely blog readers - so much to be excited about today: it's Friday (always cause for celebration!), I placed my pre-order for Autumn-Winter seasonal catalogue products in the early hours of this morning (woohoo!) and today Stampin' Up! has announced a fantastic Big Shot bundle offer available for the month of August only!!
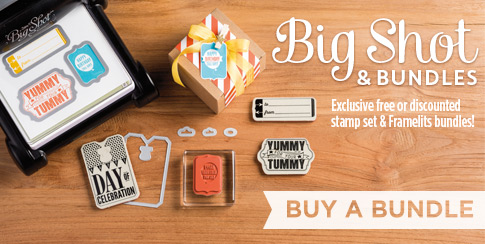
That's right - from 1st-31st August inclusive, if you purchase a Big Shot, you can receive one of five exclusive stamp set and framelit bundles ABSOLUTELY FREE - that's up to £55 worth of free products!! With the new seasonal catalogue just around the corner, which includes lots of Big Shot accessories, there's never been a better time to get your hands on one.

If you already own a Big Shot, don't worry there's a great offer for you too - you can purchase any of the exclusive bundles at a discount of 15% off. So now for the detail - these are the amazing one-time only bundles on offer:

BundleStamp SetFramelitsDiscounted Price
Sumthin' Sumthin'Word Bubbles£28.50
Sumthin' Sumthin'Word Bubbles£26.95
Oh My GoodiesDeco Labels£36.25
Oh My GoodiesDeco Labels£31.25
Day Of CelebrationChalk Talk£37.25
Day of CelebrationChalk Talk£31.95
Daydream MedallionsFloral Collection£47.50
Daydream MedallionsFloral Collection£41.50
Bright and BeautifulStar£44.95
Bright and BeautifulStar£37.25
Table built using Product Table Builder by The Crafty Owl - Independent Stampin' Up! Demonstrator.

You will even notice that one of the stamp sets in the above bundles - Bright & Beautiful - is a 'sneak peek' set that will be appearing in the new Autumn-Winter Seasonal Catalogue due to go live on 28th August.

The Big Shot is an amazing multi-tasking tool that has so many uses: it can be used to dry emboss, cut cardstock using framelits, edgelits or Sizzlits and allows you to cut a range of additional materials - wood, metal, fabric - using our extensive range of dies. If you don't own a Big Shot and need convincing, you might find this short video from Stampin' Up! a useful introduction:

For everyone that purchases a Big Shot from me, I will follow up with a one-to-one session that ensures you understand exactly how your Big Shot works with the various accessories in order that you can get the most from your purchase. This is one tool you will wonder how you ever managed without!

There is no limit to the number of Big Shots or stamp/framelit bundles that you can purchase from the above list during the month of August; the only restriction is where a Big Shot is purchased using Hostess Credits or using a 50% item discount - for these purchases the above offer does not apply.

So what are you waiting for? If you have any additional questions, do give me a call - otherwise, get ready to make the most of this amazing offer!

Back tomorrow with a creative post; until then, happy shopping!

Another Sale-A-Bration Sneak Peek - You're Lovely

by Joanne James25. January 2014 20:28

Hurray it's the weekend! Don't we all feel a little like that sometimes? We have a weekend of normality in the James household and that's fine by me - I even managed to squeeze in a few hours in my craft room this afternoon, so I'm certainly not complaining! Today I have another Sale-A-Bration sneak-peek for you - this time a stamp from a set called 'Hello Lovely'. I used this week's sketch over at Mojo Monday for the layout for my card - here is the sketch:

And here is the card I created:

I took the colours for my card from the Afternoon Picnic DSP, although I used Smokey Slate as opposed to Basic Grey as I didn't want the grey to overshadow the other colours. The main stamp is shaped and sized perfectly to fit the Deco labels framelits. I cut out my stamped image using the framelits but mounted on two circles in Crushed Curry and Pear Pizzazz to emphasize the central circle shape that is the focal point of the sketch.

Wondering where I got the embossing folder that I used to emboss the grey section beneath the main banner? It's actually the Stylish Stripes TIEF, that I ran through the Big Shot then turned my piece of cardstock through 90 degrees and embossed it again to give me a criss-cross pattern, echoing the background detail of the DSP and the lattice on the stamp itself.

I'll be sharing more cards using this stamp set in coming weeks; meanwhile, only four more days until Sale-A-Bration goes live and you too will be able to get this and many other exciting sets free when you spend £45.

Back tomorrow with another card; until then, happy stampin'!


Stampin' Up! Supplies Used:

 
Table built using Stampin' Up! Product Table Builder from The Crafty Owl.

Non-Christmas Card Alternatives Trio

by Joanne James18. December 2013 22:07

Well, what can I say - a seven day absence from my blog - unheard of!! I know this is a busy time of year and I've certainly no shortage of lovely things to share with you, but my real issue has been keeping up, both with the photography (lots of makes are leaving the house before being photographed!) and blog writing itself. The James juniors have finished school for the Christmas holidays already, and in addition to all of the usual pre-Christmas preparations, I have been having so much fun with them I've had little time for anything else this past week.

No festive project to share today - instead the alternative trio of cards made following the same layout used in my December Christmas card class (you can see the Christmas versions here) but with distinctly non-Christmas card designs. So here they are:

This one uses some of the Print Poetry paper stack that is currently available to buy on the clearance rack, whilst stocks last. The second one:

This one has quite a retro feel, with the colour scheme inspired by the retired Sycamore Street SAB paper - my customers love this paper, so are still looking for ideas and ways to use it. Lastly, the third card featuring a bow made with the Gift Bow Bigz Die:

This card actually uses a couple of the things we used to make the Christmas card version - the Seasons of Style paper stack paper and the 'Wishing You' stamp set and proves that these things can be used for non-Christmas as well as Christmas cards if you use alternative colours.

I liked the way all three of these cards turned out and the fact that they gave me a few cards to add to my stash ready for the year ahead. This really is a quick post from me, but before I go I thought I'd share one festive picture of the masterpiece created by my super-creative children today - our very first gingerbread house, from scratch! We made the house yesterday and they built and decorated it today. I'm pleased to say it's all their own work - I for one, think it's rather impressive:

Complete with gingerbread boy and girl and Christmas tree in the garden and following a considerable 'snowfall', of course! Tomorrow I have a day of present wrapping in store, so with Christmas music and tape in hand will be a woman on a mission!

I will hopefully not leave it so long before my next post; until next time, happy stampin'!


Stampin' Up! Supplies Used: 

Table built using Stampin' Up! Product Table Builder from The Crafty Owl.

Season of Style Christmas Card Trio

by Joanne James6. December 2013 22:23

Another busy day today so a late post - I'm still putting the final touches to a couple of video tutorials that I've prepared to go with my next couple of posts, so meanwhile I'm going to share with you three of the Christmas cards that we made at this month's card class. Each one features the Season of Style paper and a variety of different stamps. So here is the first one: 

This card uses the 'Love and Joy' single stamp on a set of layered pieces cut with the Deco Labels framelits. This was our second card:

This card uses the 'Warmth and Wonder' hostess set and is a CASE of a card I fell in love with by Mary Fish, who created a similar card using the Winter Frost colour scheme; you can see her original card here. Here is the third card that we made:

This uses a similar layout to one of the cards featured in the seasonal catalogue that showcases the 'Wishing You' stamp set, but I incorporated a small bow made with the Gift Bow Bigz Die for added impact. The last card was the Midnight Muse circle thinlit card I made a while ago featuring a bauble and two ways to make labels using the mosaic punch; the ladies in my class loved this card when they first saw it and were keen to have a go at it themselves. If you missed this card and would like to see it, you can find it here.

I also made alternative non-Christmas cards that followed each of the above design layouts, as I had a customer who didn't want to make Christmas cards (far too organised!); I'll share these cards with you next week.

I hope you liked the above cards, especially the last one - I love my Gift Bow Die and I have some great projects to share with you over the next few days using this useful product. Until next time, happy stampin'!

Stampin' Up! Supplies Used:

Table built using Stampin' Up! Product Table Builder from The Crafty Owl.


Mini Catalogue

BROWSE THE CATALOGUE

The mini catalogue is now live! Read and download your copy here.

Shop Online

Access my online shop 24 x 7, 365 days of the year:

Current March hostess code:

S9F2XJJW

Shop Online

Join My Team

It's always a great time to join Stampin’ Up! New team members can get £130 worth of products for only £99 + free business supplies + free shipping + all the fun being a part of Stampin’ Up! Stampin' Up! has something for everyone: join my growing team and benefit from my support to enjoy Stampin' Up! however you choose.

If you're interested, call me for a chat to understand how I can help you realise your goals. Alternatively, if you have already decided to sign up and you just can't wait, please click here for the link to the online form where you can sign up and order your starter kit right away! 

Latest Kit!

Stampin Cut and Emboss

The Rock Legend Kit has all you need to make 8 cards with coordinating envelopes. Along with the new Panda Friends Kit, both are available from January 4th for just £14 each - get yours here!

2023-24 Annual Catalogue

BROWSE THE CATALOGUE

Click on the catalogue for a full list of current SU! supplies - if you would like to order any of the items featured, please drop me a line at [email protected] or give me a call on 07773 421446 - I'd be happy to help.

New Online Exclusives

There will be new products available exclusively in the online store from 5 March - check them out here.

About Me

Hi I'm Joanne and live in Northampton and when I'm not looking after my husband and two beautiful children, am an avid crafter with a passion for all things Stampin' Up!

I must confess that I have never been a big rubber stamper - until I discovered Stampin' Up! that is. I love the fact that I can get such great results with co-ordinating stamps, inks, papers and punches - the possibilities are endless! Join me on my stamping journey as I share the things I love and be inspired to create amazing things yourself!

Follow Me

Monthly Newsletter

Box Builder

Click the button above to use Box Buster to create your custom box design using the Envelope Punch Board!

Kits Collection Now Available!

Stampin Cut and Emboss

The new Kits Collection from Stampin' Up! is now available!

Click here to see the current kits available and order yours online today.

I Design For


Stampin' Up Stuff

This is my personal blog and is not endorsed by Stampin’ Up! I hope you find it a plentiful source of ideas and personal inspiration but please don't copy my designs for contest submission or use for classes, publication or sale without express permission.