Party Emoji Teenager Birthday Card

by Joanne James21. April 2021 07:00

Today I'm sharing a card for a couple of challenges:


Whilst I loved Laurel's floral bouquets in the Inspired By photo this week, it was the theme of World Laughter Day over at Festive Friday that really got me going - and my idea was just perfect for the Inspired By sketch so I still got to play there too! Today's card is all about punch art - take a look:


Here's the low-down on today's card:

So today's card uses a ton of retired products I'm afraid: 2 1/2", 1", 3/4" and 1/2" Circle Punches, Classic Label Punch, along with the retired stamp sets '@SoSocial' and '#Hello', but when you need to create an emoji, punches are the absolute go-to and just because they've retired, these craft-room staples will never leave my collection! I decided to go with 'emoji, yellow, red, lips' from the Festive Friday inspo list and to recreate a 'party emoji' for a birthday card for a certain James Junior from his big sister - his birthday is not until August, but there's nothing like being prepared!! A quick Google gave me a layout and colour scheme to work from and so I set to work. In addition to my trusty circle punches, I've discovered the new Ice Cream Cone Builder Punch is also super useful for this type of card; I used the cone section for my emoji's party hat and the ice-cream scoop formed the basis of my lips (I punched a scoop then fashioned the lips from two of the three small 'bubble' shapes along the bottom edge):


A sprinkling of retired enamel candy dots for confetti (I wanted to go with sequins but didn't have the requisite bright colours) and my on-trend sentiments complete my card. What do you think? Would you recognise my punch art party emoji? Thanks to the Festive Friday team for a great source of inspiration this week - I'm not sure I would even have attempted this card without this challenge, yet I really quite like it and am sure it will tick the box with my social media-savvy son - who knows, he might even put it on Instagram for me!

Here is the visual summary of the key products used on today's project for you to pin for easy reference:


You can see all of my 'How To' summaries on my 'How To - Tips and Techniques' Pinterest board in case you've missed any. 

Whilst I am fairly knowledgeable as far as basic emojis are concerned, I had my children in stitches recently as I was musing over the dinner table at why the local NHS Sexual Health Clinic advertising that I'd passed earlier that day used an aubergine - of all the vegetables that could be used, I didn't think this was the one that would have broadest appeal to the youth of today, and besides I was struggling to see the link to healthy eating. Once my children had stopped laughing, they pointed out that the aubergine had nothing to do with healthy eating and was really depicting another meaning that is often associated with that emoji; apparently the same applies to cherries, tomatoes and more! I am now fully clued-up and if you are wondering what I'm talking about too, a quick Google search of 'aubergine emoji' will fill you in! Meal times are never dull in the James household, that's for sure!

Enjoy your day and I'll be back tomorrow with another project. Until then, happy stampin'!


Stampin' Up! Supplies Used:

Table built using Product Table Builder by The Crafty Owl - Independent Stampin' Up! Demonstrator.

Bermuda Bay Oh So Ombre Valentine Darling Donkey CCS 406

by Joanne James9. February 2021 13:00

It's Tuesday and time for a new challenge over at CAS Colours & Sketches. This week's challenge is a sketch challenge and Julie has asked that we use the following layout:


Feel free to flip or rotate the sketch when making your card. For my card today I chose to use two of my favourite Sale-A-Bration free gifts - take a look:


Here's the low-down on today's card:

Darling Donkey - Yes, the sweet donkey is here, this time bearing gifts, or more specifically the gift of love with a single red rose - how romantic! Is there anything cuter than a donkey at Valentine's, I wonder?! With only another 5 days to go until the day itself, I thought I would take the opportunity to make another card for one of my loved ones. I'm also linking up with the ladies over at Just Us Girls again as 'Valentine' is their word of the week.

Oh So Ombre - I backed my oval with a panel of patterned Oh So Ombre paper - another Sale-A-Bration freebie that I can't get enough of! My card today is uncluttered and clean, although the reduction in white space does leave me sailing close to the wind as far as our challenge CAS rules are concerned. So if you are reading this and considering playing along, you have been warned! 

Still Time To Sale-A-Brate - If either of the above products are on your wish list, you still have another 3 weeks to go before the current Sale-A-Braiton promotion ends. That is a month earlier than usual though, so bear this in mind and be sure to place your order in good time. Links to the online store are included below or get in touch if you would like me to place your order for you.

Here is the visual summary of the key products used on today's project for you to pin for easy reference:


You can see all of my 'How To' summaries on my 'How To - Tips and Techniques' Pinterest board in case you've missed any. 

Enjoy your day; I'm hoping to complete the second room on my current house decorating quest, so that I can spend the rest of the week getting up straight and having a good tidy up. Why is it that the minute I start decorating anywhere, the rest of the house seems to descend into disorganised chaos?! Does that happen in your house too? I'll be back tomorrow with another project. Until then, happy stampin'!


Stampin' Up! Supplies Used:

Table built using Product Table Builder by The Crafty Owl - Independent Stampin' Up! Demonstrator.

Sparkle and Shine Punch Art Umbrella

by Joanne James28. March 2016 12:15

I've been having fun playing along with the CASology challenges for the last couple of weeks, so today I have a couple of clean and simple cards for this week's challenge where the theme is weather:

   JAI #304...Inspiration

My first card was a fair weather sunshine card which you can see here. My second card is altogether at the other end of the weather spectrum and was born out my attempts to make a punch art umbrella for this week's challenge over at Just Add Ink where they have the most gorgeous inspiration photo:

Whilst I abandoned the card I had planned in my head for something infinitely more 'clean and simple', I am really pleased with my little punch art umbrella. Read on to find out how I did it:

Punch Art Umbrella - I actually used a combination of two circle punches, the 1 3'4" circle punch which I used to create a semi circle, then I took my 3/4" circle punch and punched it three times along the straight edge to create my umbrella shape. As if that wasn't neat enough, I then found the perfect umbrella handle - the candy cane framelit from the Snow Friends Framelits Dies! The dimensions are just right to complete my punch art creation. These framelits are still available as a carry-over item from the Winter seasonal catalogue if you would like to purchase them, along with the co-ordinating 'Snow Place' stamp set.

Pitter-Patter Raindrops - My raindrop background is from the 'Sparkle and Shine' stamp set. This set has some lovely patterns that work for small backgrounds or repeated patterns and the raindrops were just perfect for today's card. My sentiment is also from this set.

Neutrals That Pop - I deliberately keep my colour palette neutral with just one colour, Real Red, to maintain the CAS feel of my design. I also popped my umbrella canopy up on a couple of dimensionals to help it stand out. You can save my colour palette here:


Here's the visual summary of the key supplies used to make this card and my punch art umbrella tip for you to save for future reference:


This is the weather forecast here in the UK for the rest of this week, but I will be making the most of any fine weather and getting out and about. We also have a stash of craft kits to keep us busy when we aren't so lucky - and all of those chocolate eggs from yesterday to eat too! I have a date with my ironing basket this afternoon and then we are having an extended James family get-together this evening, which is always fun.

I will be back with another card tomorrow for the challenge over at Just Add Ink that this time focuses on the colours of those lovely umbrellas; until then, happy stampin'!


Stampin' Up! Supplies Used:

Table built using Product Table Builder by The Crafty Owl - Independent Stampin' Up! Demonstrator.

Chip And Mrs Potts Cups and Kettle Framelits Card

by Joanne James28. January 2016 08:05

Today it's time for a new challenge over at Create With Connie and Mary and this week we have a great sketch for you:


Now as my regular readers know I love a good sketch but it wasn't actually the sketch that inspired my card today; I was working on a couple of projects at the same time and had my Cups and Kettle Framelits Dies still out on my desk from my Paper Players card (if you missed it you can see that card here) and the minute I set eyes on that little cup (or it might even be a milk jug, I'm not sure) I just knew it would be perfect to make Chip, the little cup from Disney's movie 'The Beauty and The Beast' - you know the little guy I mean?

Image result for mrs potts and chip (Copyright Disney)

Paired with a customised teapot for Mrs Potts, Chip's Mum, this sketch gave me the perfect layout to showcase my fun characters - here's my finished card:

Now I know I'm biased since I made the card, but aren't that pair just the cutest?! So how did I make them? Here are the key component parts you need:

  • Basic teapot and cup cut from Shimmery White cardstock (I reversed my cup for the above card as I wanted the characters to be looking at each other)
  • Cupbase and teapot base made from the base of the other cup framelit cut from Wisteria Wonder
  • Cut an extra teapot and cup in Daffodil Delight and trim off the handles and some strips to edge the bases
  • Cut three of the looped framelit pieces, one each in Daffodil Delight, Tempting Turquoise and Pink Pirouette. Detach and use one whole yellow loop to line the cup. Snip the blue and pink ones in half across the middle and glue them in alternating colours to the Wisteria Wonder base.
  • Cut a teapot lid out of Wisteria Wonder and add a Pink Pirouette candy dot to the lid top. 
  • Cut two pieces of the wave shapes, one each from Daffodil Delight and Wisteria Wonder. Paper-piece them together and adhere to the teapot edge to create the frill.
  • Punch some eyes using the circle from the owl builder punch, adding eyelids and eye lashes to Mrs Potts and cut the eyebrows and mouths freehand with paper snips. 
  • Lastly, don't forget to snip to add Chip's chip!

I stamped a faint heart on the background, added a strip of 'Have a Cuppa' designer series paper and a heart boarder, along with my sentiment, to complete my card. Punch art-type cards like this are sometimes time-consuming to create, but so worth it I think for a special card!

Do visit the other Design Team members to see how they interpreted this week's sketch; there's lots of inspiration over on their blogs too!

Enjoy your day and I'll be back tomorrow with another project; until then, happy stampin'!


Stampin' Up! Supplies Used: 

Table built using Product Table Builder by The Crafty Owl - Independent Stampin' Up! Demonstrator.

Punch Art Guitar Cards

by Joanne James10. October 2015 09:00

I have a couple of fun punch art cards to share with you today (to make up for no post yesterday)! I was all ready to link up with the ladies at SUO Challenges but it would appear that our clocks are not coinciding this week - never mind! Check them out if you're a punch art fan as that's their theme this week. Both of these were made for my lovely husband, who celebrated his birthday this week. You will notice there is something of a common theme to my cards - here's the first one:


My husband has recently taken up learning to play the guitar; I think living in a household with three pianists and a singer, he was feeling somewhat left out! So I decided for my card to go with a simple black and white combo, using my circle framelits for the holes and my word window punch and decorative label punches for the fretboard and strings. The strings themselves are made using the new silver corded trim - perfect for my six-string - and I added an actual re guitar pick 'borrowed' from my husband's collection to add a pop of red to my card.

My second card was made from my children and includes both a punched star and a rather clever guitar made with ... the owl punch! Take a look:

I used some retired music print paper for my background and the same 'Rock Star' greeting from the 'Be The Star' stamp set, this time stamped in Pacific Point on Very Vanilla then punched out with my star punch. I also added the word 'DAD' cut with my little Letter Thinlits for further personalisation. A silver glimmer star then formed the background to highlight my punch art guitar: an owl punch body (minus the feet!) in Pacific Point, a small punched circle and a piece of Smoky Slate wound in thin silver thread for the strings with a couple of the owl hearts attached to the end for the keys that tighten the strings. Not a bad replica of the blue electric guitar he is practising on - thank heavens for headphones that plug in to his amplifier, so we are not all having to witness his Eric Clapton impressions until he is more polished!!

Back later with some exciting news for you, so watch this space; meanwhile, happy stampin'!


Stampin' Up! Supplies Used:

to follow.

2015 Seasonal Catalogue paper and Accessory Shares Are Now Open!

by Joanne James31. August 2015 20:00


New Season Paper and Accessory Shares are here!

The new Stampin' Up! Seasonal Autumn/Winter Catalogue goes live tomorrow so it's time to announce my new Product Shares!

You know that feeling - you want it all, but your budget just doesn't stretch that far? Well shares are the perfect answer! You get a little bit of everything, without having to purchase a full pack. A share can also act as a 'try before you buy' - you get to see papers, ribbons, buttons and accessories 'up close and personal' before deciding which ones you like the most and would like to purchase as a full pack.

Shares work really easily: you decide which shares and how many you would like to take part in. You place your order by clicking on the button below, which takes you to my Paypal page to enable payment. Once the closing date for the first round of shares is reached, I collate the orders, place an order with Stampin' Up! for the product, then once I receive it, I package the papers and embellishments and send them out to you. Simple!

I have been running paper, ribbon and accessory shares with my local customers for a while and starting with the new seasonal Autumn-Winter Holiday catalogue I am going to be offering them to all my online customers too. Your paper, ribbon and embellishments will come beautifully packaged like this:
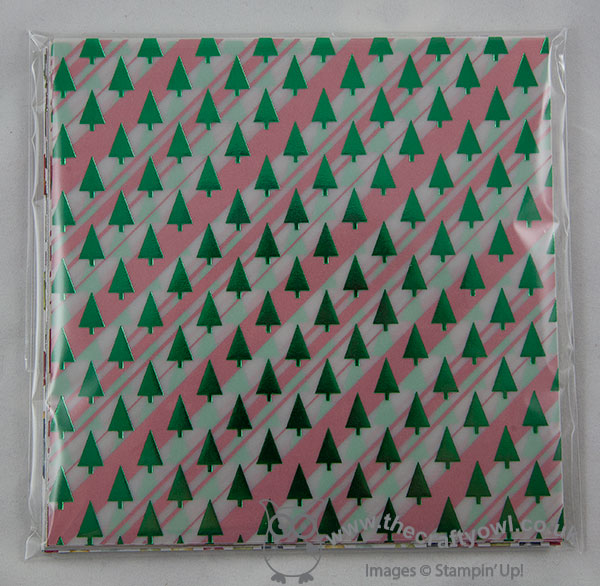


Here are my swatchbooks with a glimpse of all of the patterns included in the various shares:
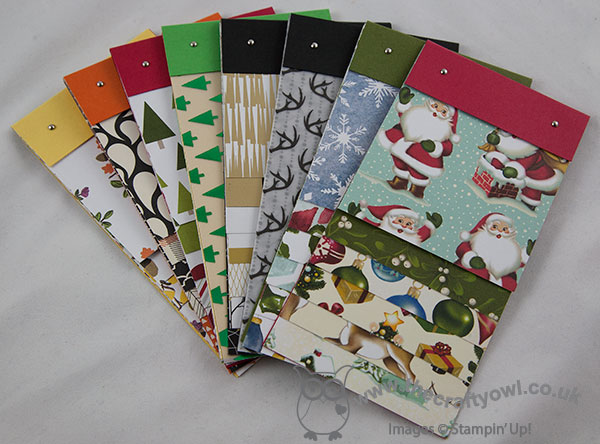
So much to choose from! Here are the details of the various shares on offer:


New Christmas Designer Series Paper Share - all sheets measure 6" x 6" - £12 plus £3.90 P&P:

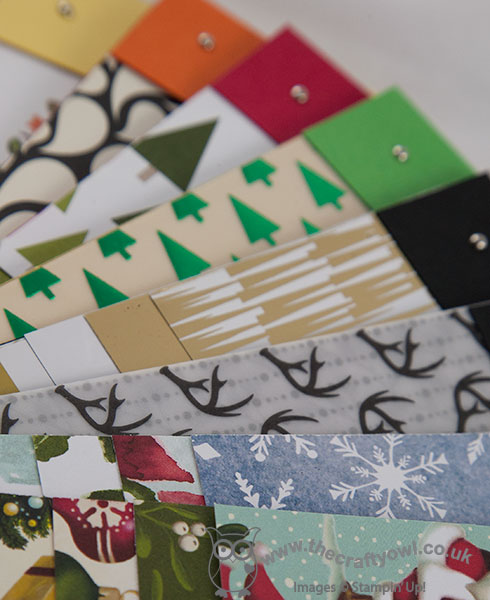
  • Home for Christmas – 6 (one of each double-sided design)
  • Winter Wonderland Specialty – 12 (two of each of 5 double-sided designs and one each of 2 single-sided designs)
  • Winter Wonderland Designer Vellum Stack – 12
  • Red Foil Sheets – 1
  • Silver Foil Sheets - 1
  • Gold Foil Sheets - 1
  • Real Red Envelope Paper – 4
  • Merry Moments Designer Series Paper Stack – 8 (4 of each design)
  • Season of Cheer – 6
  • Holiday Fancy Foil Designer Vellum – 6 (2 of each design)

In all you'll receive 57 6"x6" sheets of festive Designer Series Paper!
 

New Christmas Ribbon and Embellishment Share – £13 plus £3.90 P&P:

You will receive:

  • Real Red Pompom Trim – approximately 50cm
  • Home for Christmas Enamel Dots – 18 Dots (3 of each color and size)
  • Very Vanilla 1-1/4” Subtle Stripes Satin Ribbon – approximately 1 metre
  • Home for Christmas Designer Buttons – 6 (2 of each design)
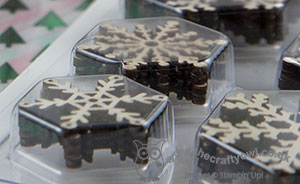
  • Snowflake Elements – 6 (2 of each design)
  • Winter Wonderland Embellishments – 4
  • Cording Trim - approximately 5.5m each of gold and silver
  • Iced Rhinestone Embellishments – 6 (3 of each size)
  • Reindeer Paper Clips – 3
  • Gold & White 3/8” Glitter Ribbon – approximately 1.1m of each color
  • 1/8” Striped Ribbon – approximately 1 metre of each color

With the Christmas Ribbon and Embellishment share you will receive approximately 16.7 metres of ribbon/trim and 43 new embellishments - everything you need to decorate your Christmas cards, tags and packaging!

Autumn Share - £3.60 plus £3.15 P&P:

  • Into the Woods Designer Series Paper – 6
  • Into the Woods 3/8” Cotton Ribbon – approximately 1 metre
  • Into the Woods Elements – 6 (2 of each design)

Halloween Share - £3.40 plus £3.15 P&P:

  • Happy Haunting Designer Series Paper – 6
  • Black Glimmer Paper – 2
  • Spider Web Doilies - 6


There are a number of bundles for further savings:

£22.50 Double Christmas Bundle for both the Christmas Designer Series Paper and Christmas Ribbon and Embellishment share - plus £3.90 postage and packaging

£6.50 Double Season Bundle for both Autumn and Halloween shares - plus £3.90 postage and packaging

Want It All? £32 - and you'll get shares of all the new Designer Series Papers, Designer Series Paper Stacks, ribbons and embellishments, and that includes postage & packaging! 

If you would like double or more shares of any particular thing, then that's fine too. I will cut your paper shares into 6" x 12" sheets where possible to give you more crafting flexibility (for the DSP stacks you will simply get double the number of sheets since they are already pre-cut to 6" x 6").

All postage & packaging quoted is for UK only - if you would like a cost for shipping to Europe, then please email me for a separate quotation.

The deadline to sign up to the first round of shares is Monday 14th September at 8pm GMT

If you live local to me and would like to save on postage and packaging costs, please email me with your requirements and I will happily place your order, to be collected on delivery. If you have any questions, just email me at joanne@thecraftyowl.co.uk or give me a call!
Bold Butterfly Framelit Shaped Edge Card and Rainbow Hearts Card Celebrating Gay Pride

by Joanne James29. June 2015 09:49

Happy Monday everyone! Well, we didn't manage to barbeque yesterday as it was the worst weather day of the week here in the UK, but no matter - this week is supposed to be a scorcher, despite the fact that it's the start of Wimbledon Tennis Fortnight (a sure recipe for rain!) so I'm sure there will be lots of opportunity. My week is shaping up to be a busy one - with only three weeks until the end of the school term, there is something on pretty much every other day between now and the end of term so forgive me if my blogging becomes brief! Anyway, a good start to the week as I've two cards to share today! This first is my card for this week's challenge over at Colour Q:

Don't you just love those flip flops?! The colours along with the butterflies prompted me to create a fun 'cutting edge' card that I am also linking up with the current challenge over at SUO Challenges where they are asking us to create a card that features a cut edge that is something other than a straight line. This is what I came up with:

I used Soft Sky for my card base, then diecut four butterflies in Night of Navy using the smallest butterfly in the new Bold Butterfly framelits and adhered them to the edge of my card, carefully cutting around them by hand to remove the edge of the card base and expose the back panel. I then cut another two butterflies each in Daffodil Delight and Marina Mist and paper-pieced the small pieces into the navy butterflies. I stamped the sentiment from Watercolour Wonder onto the front of my card in Night of Navy and stamped the spotty strip repeatedly along the back inside edge of the card in Soft Sky for some added detail behind the butterflies, although you can't see this in the above photo as it's not flat and only visible when closed (I need to take another picture which I will add to this post later - these type of cards are so tricky to photograph!). This card looks so pretty in real life - the fussy cut edge really lifts this card and makes it something special.

My second card today is using this week's sketch over at Freshly Made Sketches where the lovely Jen Mitchell has a great sketch that would work so well for so many layouts:

I flipped the sketch through 180 degrees (it's allowed!) to create a rather topical card that was inspired by a cupcake of all things that appeared in my Facebook feed over the weekend, commemorating the decision by the US Supreme Court over the weekend to legalise same sex marriage across all US states:


I used a rainbow of strips of cardstock, punching each with my Hearts Border punch before adhering to my base of extra-thick Whisper White cardstock (love this for card bases!) I then took the punched out hearts and adhered these individually in a row beneath the negative punched space on the strip above. My focal point is a couple of 2" circles, the first in Whisper White and stamped with one of the sentiments in the 'Groovy Love' stamp set, inked up with Pacific Point and Real Red Stampin' Write markers. The second circle was punched from Real Red cardstock, with a heart punched out of the centre using the Sweetheart punch so that the sentiment could show through the negative space and popped up over the first on Dimensionals for added depth. Very 'gay pride' with the hearts and rainbows, don't you agree? I am also entering this card into a demonstrator-only challenge that Stampin' Up! are currently running with the tagline #punchitup where we have to use a combination of two of four specific punches and as you can see, I went with hearts!

That's my creative post for today; I will be back tomorrow with another project and may be back in the meantime with other news, depending on how far I get through today's 'to do' list so do pop back later! Until then, happy stampin'!


Stampin' Up! Supplies Used:

Card One:

Table built using Product Table Builder by The Crafty Owl - Independent Stampin' Up! Demonstrator.
 
 
Card Two:
 
Table built using Product Table Builder by The Crafty Owl - Independent Stampin' Up! Demonstrator.


Up, Up and Away New Home Card

by Joanne James18. May 2015 11:03

I am starting this week with a quick post to share a card that I made with my ladies at one of my recent Stamp-A-Stack classes which was all about punch art and fits perfectly not only for the colours but also the inspiration photo over at The Color Throwdown this week:

I had been wanting to make an 'Up!' style card for a while and had seen lots of versions on Pinterest - here's my take with the card I made with my ladies:

Quite simple, but it needed to be as everyone was making a few each - Stamp-A-Stack is all about creating lots of cards in a - relatively! - short time.

The base is a piece of Soft Sky, onto which I adhered a few Whisper White clouds and stamped a few straight lines using the balloon string from the 'Celebrate Today' stamp set. We then stamped the house from the now retired Sale-A-Bration set in Memento Black onto Crumb Cake and punched it out with the retiring 'What's Up?' arrow punch and popped it on a dimensional at the base of the strings. The cluster of balloons is a carefully layered group of balloons made with the small oval punch and a foot from the Owl Builder punch. The sentiment is taken from the also retired winter seasonal set 'Holiday Home'. These bright primary colours are perfect for this card and so remind me of the scene where the house takes off in the Disney movie 'Up!'; I'm a big Disney fan and this movie holds special memories as it was the movie I watched with my daughter the first time we visited the cinema.

That's not quite all from me today - I have a second post which is my-fill in post from Saturday when I was at the Stampin' Up! UK Regional training event in Telford, so scroll back to read that one if you want to hear about the fun I had! 

Back tomorrow with another project; until then, happy stampin'!


Stampin' Up! Supplies Used:

Table built using Product Table Builder by The Crafty Owl - Independent Stampin' Up! Demonstrator.


Hooray For Today What's My Type Goldfish Card

by Joanne James7. May 2015 08:05

It's Thursday and time for a new challenge over at Create With Connie and Mary and this week we have a fun colour challenge for you:

I spent a little while bemusing how I was going to use these colours together this week, but once I'd decided my card came together in record time. I decided to go with some super simple punch art this week - take a look:

I love the big, bold shapes in the 'What's Your Type' stamp set; not only are they great for creating patterns but they can also be used to create fun objects too. For today's card, I stamped the wavy lines from 'Work of Art' in Bermuda Bay - stamped three times, bottom to top without re-inking to give my water an ombre effect - and stamped my sentiment from the 'Geometrical' stamp set in Versamark and heat embossed it in gold. I then used my 2" Circle punch to cut two circles out of Tangelo Twist cardstock. One of them I cut in half and overlapped by a quarter to create the fish body. The second one I cut in half then stamped the semi-circle lined stamp from 'What's Your Type' stamp set in Versamark and heat embossed this in gold too and glued this to the body piece. I added a single gold sequin to my fish for his eye, then adhered this to my card with a dimensional for some lift. A few Bermuda bay sequins for air bubbles finished off my card. I think this would be a fun birthday card for a toddler - I know my children would have loved it in years gone by!

Do check out what the other CCMC designers have in store for you today - there's a great variety of inspiration to get you going with this colour palette - and we look forward to seeing your entries in the gallery this week!

I'll be back tomorrow with another project; until then, happy stampin'!


Stampin' Up! Supplies Used:

  • What's Your Type? Photopolymer Stamp Set
  • Work Of Art Clear-Mount Stamp Set
  • Geometrical
  • 2" Circle Punch
  • Embossing Buddy
  • Versamark Pad
  • Gold Stampin' Emboss Powder
  • Heat Tool - Uk Plug
  • Whisper White A4 Card Stock
  • Gold Sequin Trim
  • Bermuda Bay Sequin Trim
  • Tangelo Twist A4 Cardstock
  • Bermuda Bay Classic Stampin' Pad
  • Card Stock A4 Bermuda Bay


Tags: , , , , , , , ,

Cards | Punch Art | Stamping

Lucky Four Leaf Clover Card

by Joanne James27. March 2015 14:34

A quick card from me to share another four leaf clover card, this time for the 'green' challenge over at Addicted to CAS:

Here's my card:


I actually made this card a couple of weeks ago and realised as I was sifting through my photos today that I had forgotten to blog and upload it, so here it is! A simple white background, with a couple of rows of three-leaf clovers, made by punching out some shapes out of Garden Green cardstock using the flower punch in the Itty Bitty Accents Punch Pack and cutting away one of the four petals. For my lucky four leaf clover, I stamped my flower image in green on green and punched it out, leaving all four petals intact and adding a stem and a rhinestone for added sparkle. My 'lucky' is stamped in Garden Green and is one of those ever-useful stamps in the Project Life 'Remember This' stamp set - yes, Project Life is for all your crafting, not just for memory-keeping!

That's all from me today; I've been busy catching up on paperwork and emails all day and I'm itching to get some 'real' crafting done! Back tomorrow with another project; until then, happy stampin'!


Stampin' Up! Supplies Used:

Table built using Product Table Builder by The Crafty Owl - Independent Stampin' Up! Demonstrator.


New Online Exclusives

There are new products available exclusively in the online store from 5 November - check them out here.

Latest Kits!

Stampin Cut and Emboss

The Layered Landscapes Kit and Nature's Paintings Kit are the latest kits in the online store - get yours here!

Shop Online

Access my online shop 24 x 7, 365 days of the year:

Current November hostess code:

9NKXDTTR

Shop Online

Mini Catalogue

BROWSE THE CATALOGUE

'Tis The Season - the new Stampin' Up! Mini Catalogue is here! For more details and to download your copy click here

Scrapbooking

Stampin' Up! has introduced a new range of 12x12" scrapbooking product and kit - the full range is now available to purchase online. To download a copy of the new digital Scrapbooking Catalogue click here.

2024-25 Annual Catalogue

BROWSE THE CATALOGUE

Click on the image to download your copy of the 2024-25 annual catalogue. For a full list of current SU! supplies, go to my online store. If you would like any help or advice, please drop me a line at joanne@thecraftyowl.co.uk or give me a call on 07773 421446 - I'd be happy to help.

Join My Team

It's always a great time to join Stampin’ Up! New team members can get £130 worth of products for only £99 + free business supplies + free shipping + all the fun being a part of Stampin’ Up! Stampin' Up! has something for everyone: join my growing team and benefit from my support to enjoy Stampin' Up! however you choose.

If you're interested, call me for a chat to understand how I can help you realise your goals. Alternatively, if you have already decided to sign up and you just can't wait, please click here for the link to the online form where you can sign up and order your starter kit right away! 

About Me

Hi I'm Joanne and live in Northampton and when I'm not looking after my husband and two beautiful children, am an avid crafter with a passion for all things Stampin' Up!

I must confess that I have never been a big rubber stamper - until I discovered Stampin' Up! that is. I love the fact that I can get such great results with co-ordinating stamps, inks, papers and punches - the possibilities are endless! Join me on my stamping journey as I share the things I love and be inspired to create amazing things yourself!

Follow Me

Monthly Newsletter

Box Builder

Click the button above to use Box Buster to create your custom box design using the Envelope Punch Board!

Kits Collection Now Available!

Stampin Cut and Emboss

The new Kits Collection from Stampin' Up! is now available!

Click here to see the current kits available and order yours online today.

I Design For


Stampin' Up Stuff

This is my personal blog and is not endorsed by Stampin’ Up! I hope you find it a plentiful source of ideas and personal inspiration but please don't copy my designs for contest submission or use for classes, publication or sale without express permission.