by Joanne James13. June 2014 22:51Good evening everyone! Apologies for my lack of post yesterday; Rebecca was selecte to compete in an inter-school athletics competition yesterday that unexpectedly took me out of the house for most of the day and then I had a get-together with my lovely team yesterday evening, so I really wasn't at home all day. Today I have been super busy with my preparations for Rebecca's birthday weekend and along with baking and decorating a two tier cake today and finishing off the decorations, this is truly the first time I've sat down all day!
So today I have the last of the cards we made at this month's card class using the Springtime Hello stamp set:
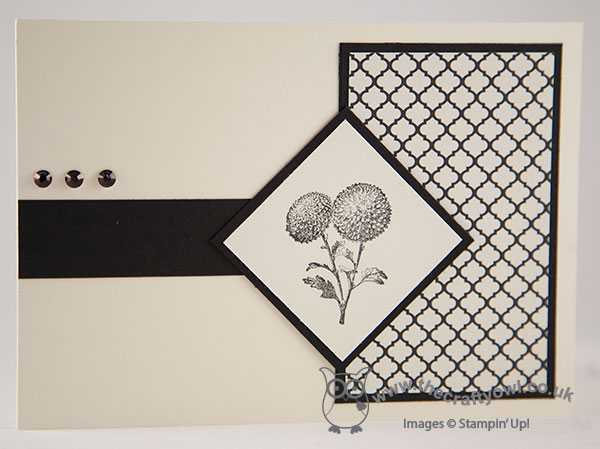
I had a request for a black and white card using the set and this is what I came up with. This is quite different to the other cards we made (you can see the full set below) and the monochrome colour scheme and clean and simple lines of the card make it look quite sharp and modern. Just a simple piece of Modern Medley DSP matted on Basic Black, and then the flower image stamped in black, mounted and positioned at an angle to the DSP, and a central strip to draw your eye to the image, with 3 rhinestones coloured black with a Sharpie marker to add a little accent. I left my card sentiment-free as this is the sort of card you can use for any occasion.
That's all from me; I need to get some sleep before the onslaught of a group of 8 and 9 year olds tomorrow ready to craft and party in style! Back tomorrow with another card; until then, happy stampin'!

Stampin' Up! Supplies Used:
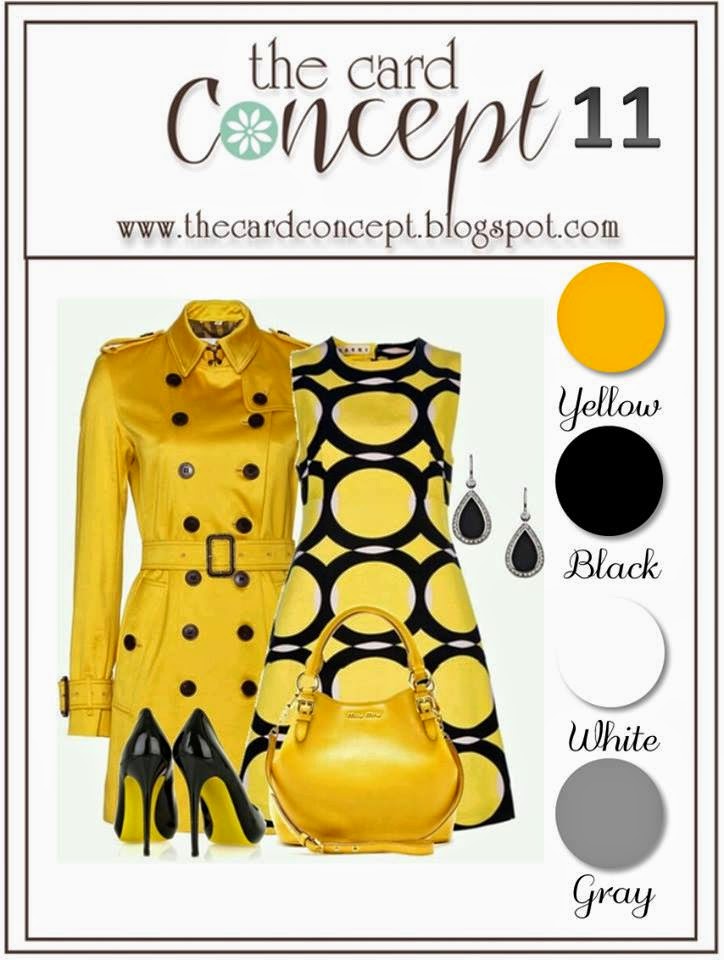
by Joanne James7. June 2014 20:55Today I'm sharing the original card I designed for this week's challenge over at The Card Concept, which I also adapted for my Springtime Hello card class this week. Here is this week's challenge colour palette:
This card is quite different to my previous entry (you can see that card here); much more 'Classy and Elegant' this time around I think - here's my card:
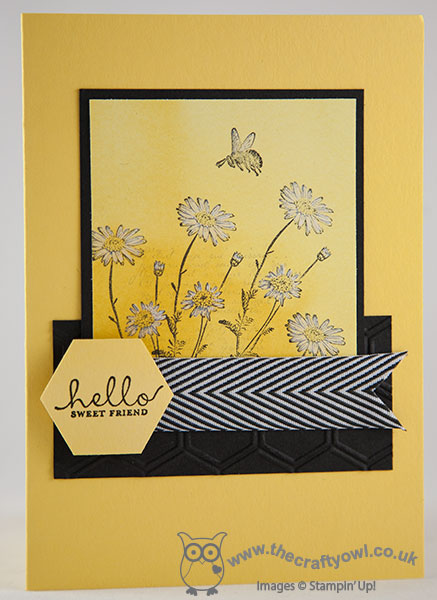
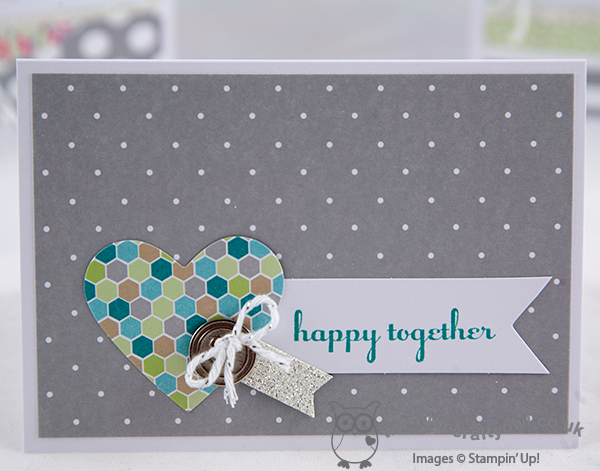
I used Daffodil Delight for my card base and layered up from there. I dry embossed a piece of Basic Black cardstock with the Honeycomb embossing folder, then layered my main stamped panel onto this. I repeat-stamped the daisy stamp from the 'Springtime Hello' onto a piece of Watercolour Wonder DSP so that the panel would have a lovely washed background, and also stamped the text stamp from the retired 'French Foliage' set in Smoky Slate behind this, having stamped off twice first to give a very faint image. You could substitute this stamp with one from the 'Background Borders' set, which is currently reduced and still available on the retired list. I then stamped the bee and using my aquapainter, I washed white kraft ink over the bee's wings and the daisy flower petals to give a subtle hint of natural colour, whilst allowing the yellow of the DSP to show through. I finished with a piece of Basic Black 3/4" Chevron ribbon and heat embossed my sentiment fro the Six Sided Sampler set in black embossing powder onto a punched hexagon and popped it onto a dimensional.
I hope you like today's card; back tomorrow with another project. Until then, happy stampin'!
Stampin' Up! Supplies Used:
78975a09-b85c-4eee-828c-ac9a94da521d|0|.0|96d5b379-7e1d-4dac-a6ba-1e50db561b04
Tags: Shop online, Springtime Hello, Six-Sided Sampler, Hexagon Punch, Watercolour Wonder, Hexagon Embossing Folder, Aquapainter, Big Shot, Stampin' Up, Stampin' Up Card, Stampin' Up Card ideas, Stampin' Up Supplies, Honeycomb Embossing Folder
Cards | Classes | Stamping
by Joanne James2. June 2014 22:28Good evening! A really quick post from me today, as I've been out and about all day today: my regular monthly card class with a super bunch of ladies, piano lessons after school and some admin this evening and now I'm ready for my bed! I just wanted to quickly share one of the cards we made in our class today, featuring the Springtime Hello stamp set:
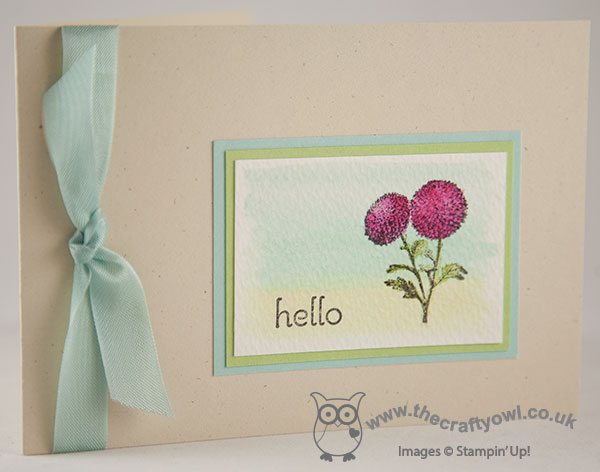
We watercoloured a background using our aquapainters and blended Soft Sky, Pool Party and Pear Pizzazz inks, then overstamped this with one of the flowers in the set and added Melon Mambo and more Pear Pizzazz to the stamped image. We also added the 'Hello' sentiment from the 'A Dozen Thoughts' stamp set. This panel was then mounted onto two mats of co-ordinating cardstock and adhered to a Naturals Ivory card base. The card was then finished with a knot-tied piece of Pool party seam binding ribbon.
A simple card with a lovely pop of colour with the pink flower.
Right my bed is calling, but I will be back tomorrow with another project; until then, happy stampin'!
Stampin' Up! Supplies Used:
by Joanne James19. May 2014 19:19I haven't had any time for crafting today, so I'm going to share with you a simple pop up card designed by Monica Gale that I made at our quarterly training session last month and that I made with my ladies at our recent Fresh Prints All Day Craft Event - here is the outside of the card:
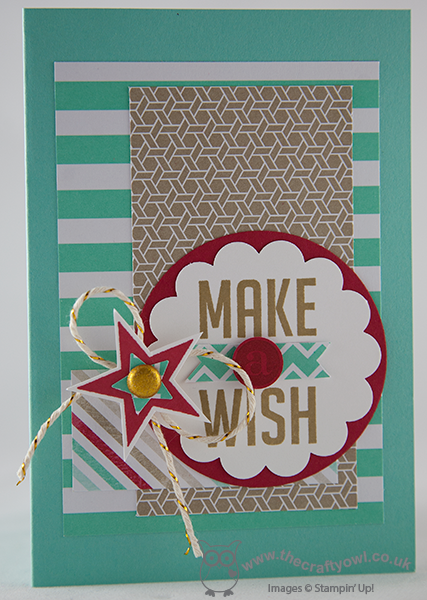
I added a few layers of Fresh Prints papers onto a Coastal Cabana card base, then stamped the 'Make a Wish' stamp from the Perfect Pennants set in Crumb Cake and punched out with a 2 3/8" Scalloped Circle punch layered onto a 2 1/2" circle out of Real Red cardstock, The banner was cut from a scrap of DSP and the 'a' stamped on red card and punched out and popped on a dimensional for added dimension. To decorate, I stamped a star from 'Simply Stars' in Real Red on Whisper White cardstock, added a DSP star using the Merry Minis star punch and secured with a gold glimmer brad with a twist of gold threaded baker's twine behind for a little added sparkle.
Inside the card there is a really simple little pop up made by cutting two short horizontal slits in the liner, which is made out of a notelet:
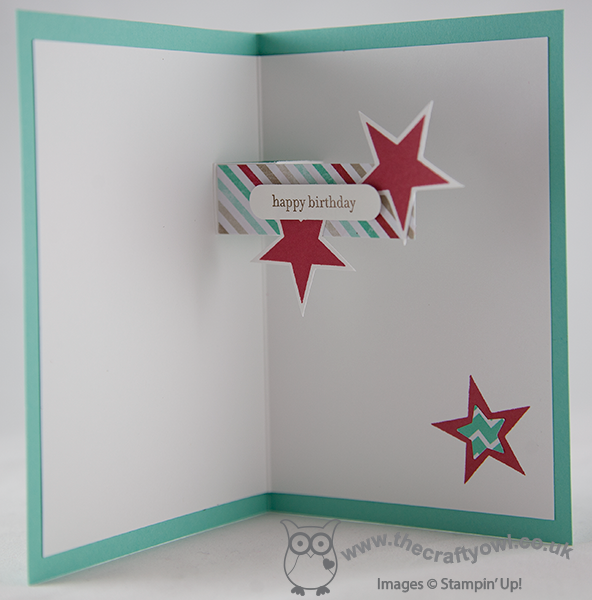
A few more stars and a simple birthday greeting and it's done - a fun little pop card suitable for either gender. I'm hoping to get into my craft room tomorrow and catch up on my crafting, although there is a big basket of ironing competing for my attention, so might need to get that out of the way first!
Either way, back tomorrow with another project; until then, happy stampin'!
Stampin' Up! Supplies Used:
by Joanne James10. May 2014 20:55A quick post from me this evening as I sit with my feet up relaxing following today's all day workshop. We had a lovely time and everyone left with lots of completed projects and plenty of leftover bits and pieces to make lots more things at home. The following card, designed by Monica Gale, was one of my favourite projects:
The feature of the card is a Stippled Blossoms rose that is stamped partially off the tag; this is backed with a couple of strips of Fresh Prints DSP and then finished with a red grosgrain ribbon bow and a sentiment cut with the word window punch. A simple enough card but a great way to use the Stippled Blossoms stamps and great practice for getting to grips with your stamp-a-ma-jig. I'm on a mission to make sure all my ladies can use theirs and truly reap the benefits (much to their dismay at times, I'm sure!) of this amazing little plastic sheet and its accompanying t-piece. Thanks ladies for your patience!
My next monthly card class is on Monday 2nd June and will be featuring the 'Springtime Hello' stamp set. If you live in or around Northampton and would like to come along, please do get in touch for more details - experienced and non-experienced crafters welcome.
Back tomorrow hopefully with a special blog post for you; until then, happy stampin'!
Stampin' Up! Supplies Used:
5b70a00c-4938-4cf1-86fd-79b4b2a7a072|0|.0|96d5b379-7e1d-4dac-a6ba-1e50db561b04
Tags: Classes, Lots of Thanks, Shop online, Stippled Blossoms, Scalloped Tag Topper Punch, Fresh Prints DSP Stack, Stamp-a-ma-jig, Stampin' Up, Stampin' Up Card, Stampin' Up Card ideas, Stampin' Up Supplies
Cards | Classes | Stamping
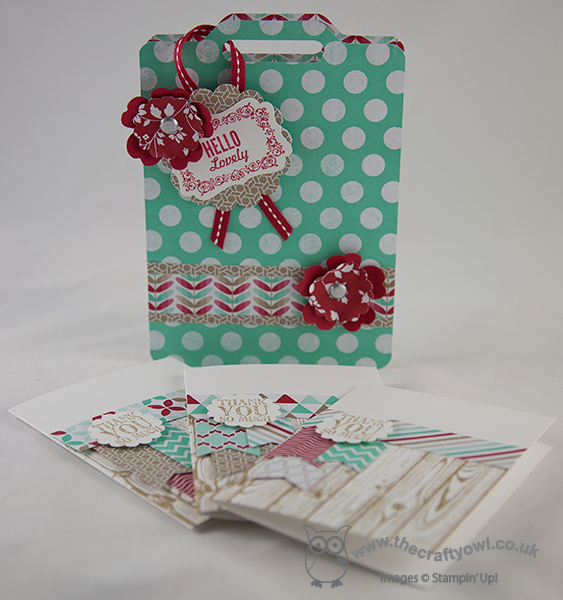
by Joanne James9. May 2014 20:39Good evening lovely blog readers! I've had a busy day today with lots of household chores and last minute preparations for an all day class that I'm running tomorrow with some of my favourite crafting ladies. Today I thought I would share with you one of the projects that we are making at our class tomorrow - a cute little tote made using the Envelope Punch Board:
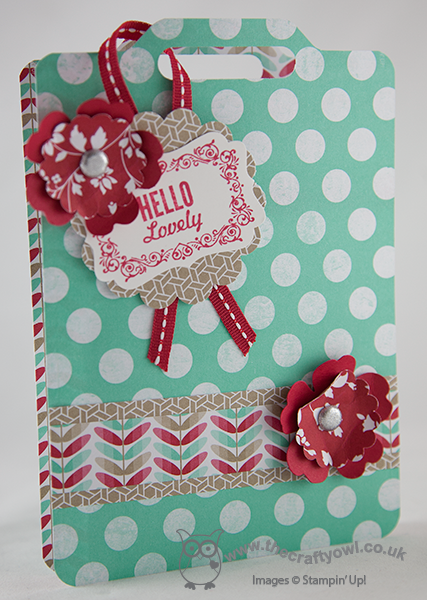
This project was designed by Monica Gale and is one that I made at our last team quarterly training day. It's made using the papers from the Fresh Prints DSP stack and decorated with a tag stamped from the 'Hello Lovely' stamp set. I just love the colours and patterns in this paper stack and as a card maker these papers offer such great value for money at just £6.25 for 48 sheets. We are also making a set of thank you notelets to go inside - this would make such a nice little gift for someone. I'm looking forward to making this and lots of other projects with my ladies tomorrow; if you live in or around Northampton and would be interested in attending any of my cardmaking or project classes, you can find my current class schedule here or just contact me for more information.
That's all from me; back tomorrow with another project. until then, happy stampin'!
Stampin' Up! Supplies Used:
a6422178-75d4-44d0-af72-a6fe6fdec35d|0|.0|96d5b379-7e1d-4dac-a6ba-1e50db561b04
Tags: 3D Projects, Classes, Decorative Label Punch, Envelope Punch Board, Fresh Prints DSP Stack, Hello Lovely, Lots of Thanks, scallop circle punch, Shop online, Stampin' Up, Stampin' Up Card, Stampin' Up Card ideas, Stampin' Up Supplies, Pansy punch, Word Window Punch, Hardwood
3D Projects | Cards | Classes | Envelope Punch Board | Stamping
by Joanne James1. April 2014 15:31Hello everyone! I can't quite believe it but James Juniors have broken up from school for their Easter holidays today - aargh! Where did that term go? Anyway, on the upside that will mean a few weeks of fun with hopefully not too much holiday homework. Today I've another quick post as I'm out hosting a crafty Stampin' Up! party this evening, so I'm blogging early (for me!) and thought I would share one of this week's class cards. In this month's classes my ladies are learning watercolouring techniques using Aquapainters and we are using the 'Blessed Easter' stamp set. All this month's cards are quite simple in design, as the aim is to spend the majority of the class time focusing on watercolouring and practising the technique rather than doing lots of stamping, cutting and sticking. Here is the first of this week's cards:
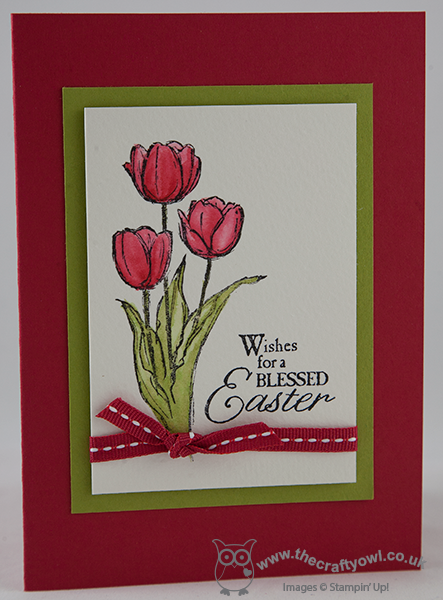
A Real Red card base and Pear Pizzazz panel, with the tulips and sentiment stamped onto watercolour paper using Jet Black Stazon and then coloured using the corresponding coloured inks and our Aquapainters. I think all the ladies in yesterday's class were pleasantly surprised at how easy it was to get a great result and the nice thing is even though everyone had the same tools, the cards all looked really different, depending on the individual shading and detail on the tulips. To finish we embellished with a piece of Real Red grosgrain ribbon.
That's all from me - I'm off to pack my bags for later. Back with more tulips later in the week; until then, happy stampin'!
Stampin' Up! Supplies Used:
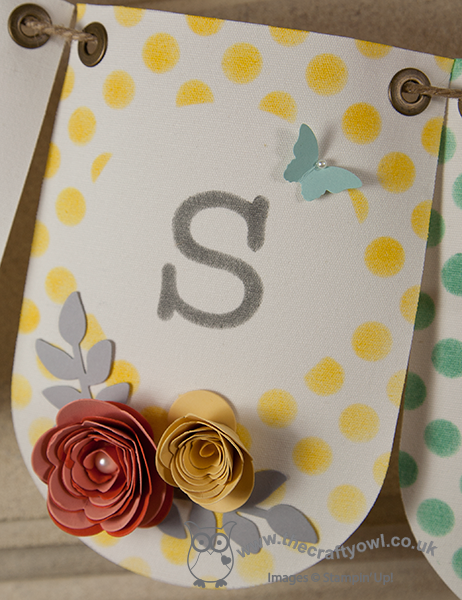
by Joanne James23. March 2014 18:16This morning I held one of my weekend project classes. They generally last longer than my monthly card classes and are a great opportunity to do something different and a little more involved. Following a successful class last December to make festive Christmas banners (you can read more about that and see our wonderful creations here), at the request of a few of the ladies who attended I decided to hold one to make a Spring/Easter banner with the other half of our banner kits. I chose a colour scheme that would compliment that of the Burlaps and Blooms wreaths that several of us made at my last weekend project class - you can see my finished wreath here. So here is my completed banner:
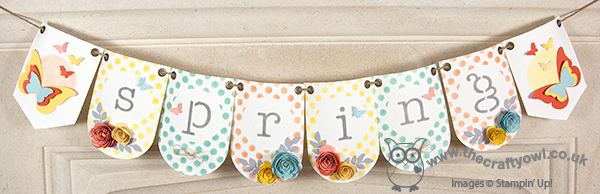
I chose to feature the word 'Spring' on my banner, as I am intending to leave it up to decorate for a while, but some of the ladies in my class made one that featured the word 'Easter'. We stencilled our backgrounds and letters using the now retired Build a Banner stencil kit in Daffodil Delight, Tangerine Tango and Pool Party with lettering in Smoky Slate.
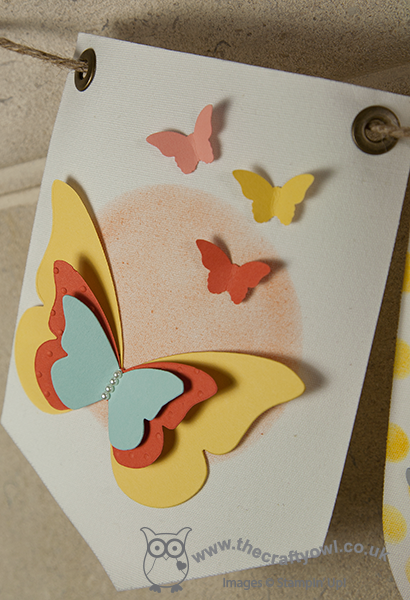
The banner is decorated with flowers made with the Spiral Flower Originals Die and punched and die-cut butterflies. Here are some close ups of the individual banner pieces - this is the first piece, with a layered butterfly with a lightly embossed layer and some tiny ones punched out with the Itty Bitty Butterfly punch:
Here's a close-up of one of the letters, along with a couple of the spiral flowers; a single yellow flower and a two-tone blue flower, finished with some Smoky Slate leaves cut out with the Secret Garden framelits:
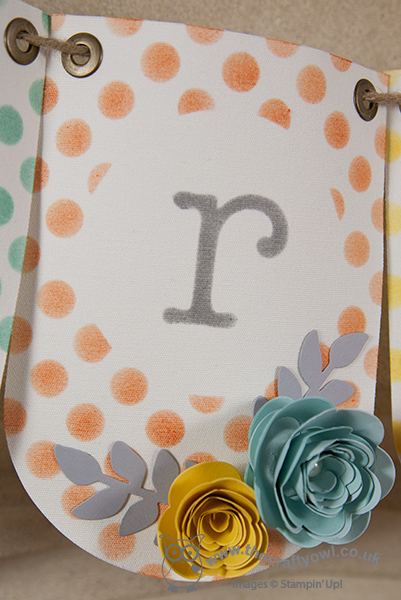
This one has a So Saffron single flower and a two-tone one in Tangerine Tango and Crisp Cantaloupe, finished with an extra-large pearl, along with a bitty blue butterfly:
My banner simply served as inspiration and as is often the way with this kind of class, everyone makes theirs slightly differently and adds their own unique touch. If you hop on over to my Facebook page, you will be able to see the finished banner that Julie, one of the lovely ladies who attended the class made - different to mine, yet equally gorgeous!
If you live in Northampton and would like to join any of my card or project classes, check out my schedule of forthcoming classes here or contact me for more information.
Back tomorrow with a card to share; until then, happy stampin'!
Stampin' Up! Supplies Used:
18734ef9-f47f-4512-85c9-0769a33a3f56|1|3.0|96d5b379-7e1d-4dac-a6ba-1e50db561b04
Tags: 3D Projects, Big Shot, Bitty Butterfly Punch, Butterflies, Classes, Decorative Dots Textured Impressions Embossing Folder, Easter, Home Décor, Secret Garden Framelits, Shop online, Spiral Flower Originals Die, Stampin' Up, Stampin' Up Card, Stampin' Up Card ideas, Stampin' Up Supplies, Stencilling, Beautiful Butterflies Bigz Die
3D Projects | Classes | Stamping
by Joanne James12. March 2014 10:11I'm hoping for a super-efficient day today: the dinner is already prepared and in the slow cooker, I've managed a few admin tasks and I'm getting my blog post in nice and early before I crack on with more creating and ticking a few more things off my ever-growing 'to do' list - I love days like this! Today I'm sharing two versions of essentially the same card - you'll see why shortly!
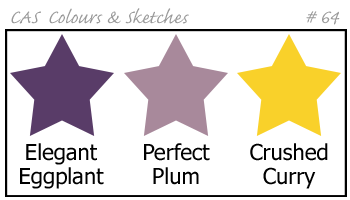
I loved the colours over at CAS Colours and Sketches this week and had a specific card in mind that I thought would also work for the challenge over at Less is More, where the challenge is One Layer cards featuring Spring flowers. So here are the CAS colours this week:
These colours reminded my of iris, a spring flower that we are starting to see in bloom now; I decided to use the orchid stamp from the Happy Watercolour set for my card (an iris is a type of orchid, right?!) because I needed to be able to create something abstract without any green and the stamps in this set are perfect for this. So here is my one layer card:
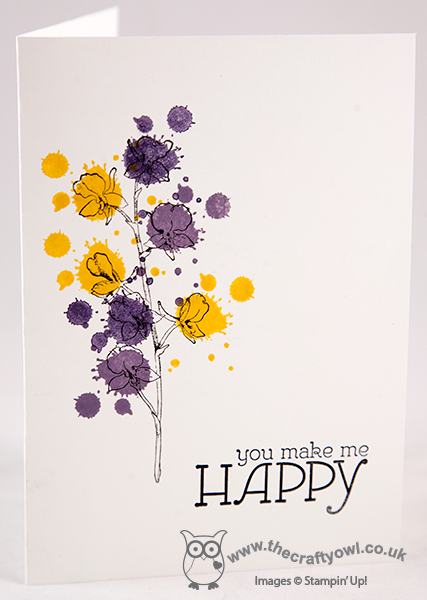
Instead of using one of the watercolour pieces to colour the flowers, I decided the bold colours needed something different so used one of the Gorgeous Grunge 'splodge' stamps instead; I saw something similar at a recent training event by Laura Mackie and decided this stamp would work nicely with the bold colour scheme. The splodges look random, but are perfectly placed: with the aid of my Stamp-a-ma-jig, it was easy to get the correct placement that I wanted. I then finished off with the 'happy' sentiment from the Happy Watercolour set - I love the font on this stamp. Having made this one layer card, I then decided to 'step it up' a little - here is my second card:
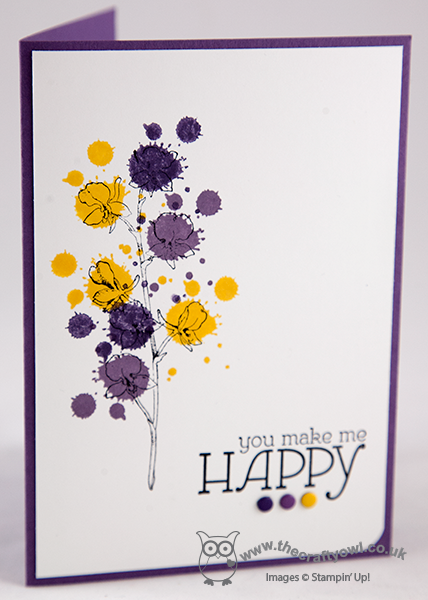
This time I layered on a base of Perfect Plum and finished the sentiment with some co-ordinating Candy Dots, rounding one corner of the white layer with my Envelope Punch Board. Some subtle additions, but they give the card quite a different look I think. I like both of these cards - which one do you prefer?
The 'Happy Watercolour' stamp set will feature in my classes on 28th and 30th April - if you live in Northampton and would like to join me to make some beautiful cards using this set, please get in touch for more information and to book your place. You can find my full class schedule here.
Right, I'm off to get inky! Back tomorrow with another project; until then, happy stampin'!
Stampin' Up! Supplies Used:
2dc518d3-fd24-4030-9b4f-d714327c5af4|0|.0|96d5b379-7e1d-4dac-a6ba-1e50db561b04
Tags: Candy Dots, Envelope Punch Board, Happy Watercolour, one layer cards, Gorgeous Grunge, Shop online, Stamp-a-ma-jig, Stampin' Up, Stampin' Up Card, Stampin' Up Card ideas, Stampin' Up Supplies
Cards | Classes | Stamping
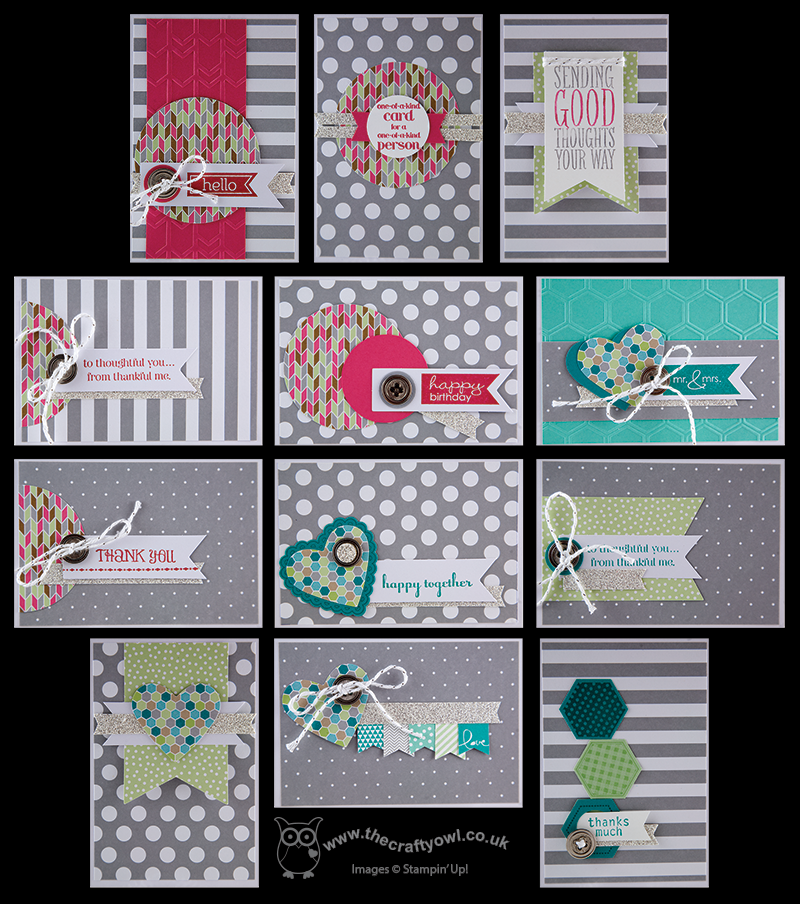
by Joanne James2. March 2014 20:59Today I'm sharing some of the cards I made using the Happenings Simply Created Card Kit that features in the Spring-Summer catalogue. The kit contains everything you need to make 15 cards, including envelopes and costs just £13.50 - that equates to 90p per card, which is great value for a hand-finished card. It doesn't include inks or stamps - you can use the 'Says it All' set suggested in the catalogue, or you can use whatever sentiment sets you already own. I used a selection of stamps on my cards, and added in a few additional items on a few of them too. So here's my first card, which is made up following the basic design that is included with the kit:
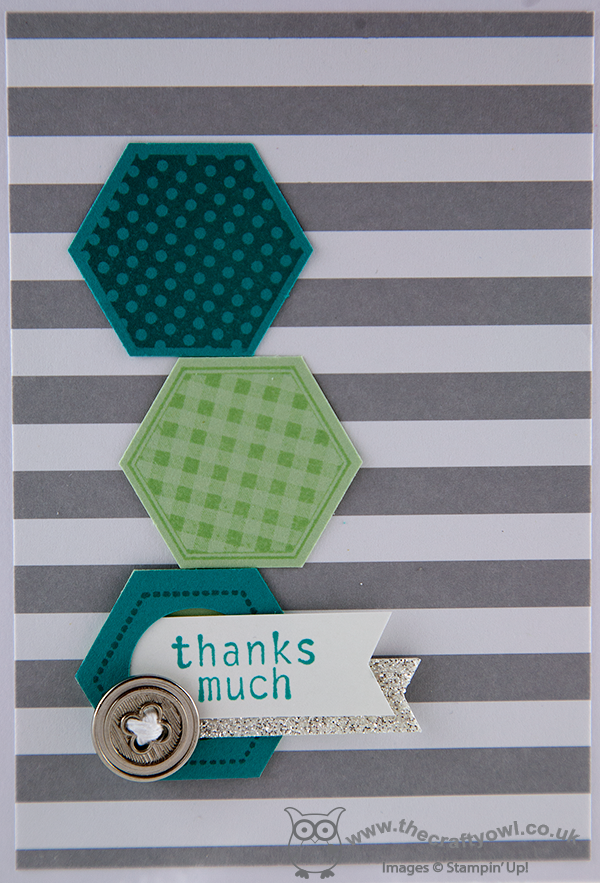
I then added in some co-ordinating accessories just to change things up a little on some of my cards - I created some embossed sections using the new Arrows embossing folder and the Hexagon embossing folder:
I also used some punches to create shapes that mirrored the patterns of the die-cut accents to add some interest:
These kits would be great for a beginner or someone who hasn't stamped before, as a gift for someone or even just when time is short and you want to create a whole bunch of cards in one go, but that can be varied such that each is unique. If you would like to buy the Happenings Simply Created Kit or any of the other items I've used on my cards, just click on the links in the table below to go straight to my online store or give me a call if you're local to me and I can place the order for you. We are using these kits in my classes this week and I can't wait to see what my ladies will come up with. I managed to decorate all of cards and still have some embellishments left over to decorate a gift box to hold some of the cards I made - come back tomorrow to see a video tutorial showing how I made it using a new tool that I'm sure you will find useful!
Until then, happy stampin'!
Stampin' Up! Supplies Used:
55c42721-365a-4b1a-9ef6-8b270ecab48e|0|.0|96d5b379-7e1d-4dac-a6ba-1e50db561b04
Tags: Arrows TIEF, circle punch, Classes, Hexagon Embossing Folder, Hexagon Punch, Shop online, Stampin' Up, Stampin' Up Card, Stampin' Up Card ideas, Stampin' Up Supplies, Happenings Simply Created Card Kit, Honeycomb Embossing Folder
Cards | Classes | Stamping