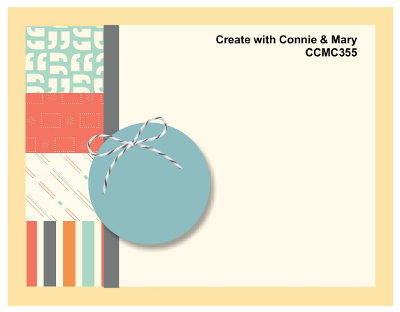
by Joanne James14. May 2015 08:05It's Thursday and time for a new challenge over at Create With Connie And Mary and this week we have a sketch challenge for you - my favourite!
This is a great card for using up scraps of DSP so I set to work with my Birthday Bash Speciality DSP and Birthday Bash Stamp set to create today's card:
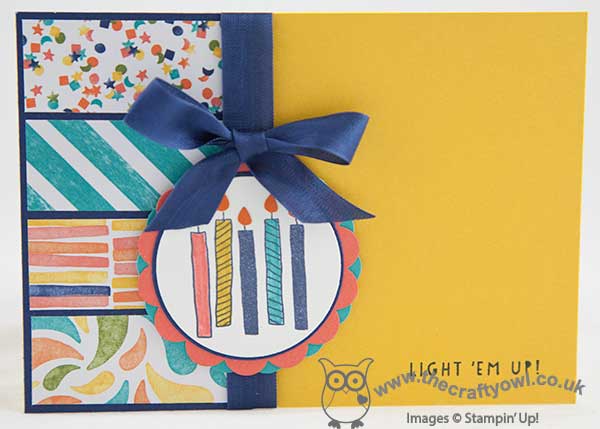
I let the DSP drive the colour scheme for my card so used a Crushed Curry base with a panel of Night Of Navy down the left hand side, which I then overlaid with four co-ordinating rectangles of patterned paper. I then added a piece of Night of Navy seam binding ribbon to cover the join and for my focal point stamped the candles from the 'light 'em up' stamp in the Birthday Bash set in navy on Whisper White, having masked off the words first. I coloured this with my Calypso Coral, Bermuda Bay and Crushed Curry Stampin' Write markers and layered this circle onto another of Night of Navy and two scalloped circles, one each in Bermuda Bay and Calypso Coral. I also punched the candle flames out of Tangerine Tango using my owl builder punch - a small touch, but looks so much better than navy ones! To finish, I stamped the sentiment, this time masking off the candles, in navy in the right hand corner.
I made this card with the ladies in my Stamp-A-Stack class last week and they loved it, so I hope you like it too. Don't forget if 'Birthday Bash' is on your wishlist, it will be retiring on 2nd June so don't leave it too late to place your order.
That's all from me today - I look forward to seeing your takes on this week's sketch in the gallery.
Back tomorrow with another project; until then, happy stampin'!
Stampin' Up! Supplies Used:
- Birthday Bash Specialty Designer Series Paper
- Balloon Bash Photopolymer Stamp Set
- Night Of Navy Classic Stampin' Pad
- Night Of Navy A4 Card Stock
- Card Stock A4 Crushed Curry
- Calypso Coral A4 Card Stock
- Card Stock A4 Bermuda Bay
- Card Stock A4 Tangerine Tango
- Night Of Navy 1/2" Seam Binding Ribbon
- Whisper White A4 Card Stock
- 2-3/8 Inch Scallop Circle Punch
- 2" Circle Punch
- Big Shot Die-Cut Machine
- Circles Collection Framelits Dies
- Big Shot Magnetic Platform
- Owl Builder Punch
by Joanne James6. May 2015 09:37Good morning everyone - today I have something a little different for you! I ran a very successful class a little while ago to make a beautiful home decor Spring flower wreath. I am demonstrating how to make this wreath at a Spring Open Evening at Bell Of Northampton this evening so thought this was a good opportunity to share it with you too:
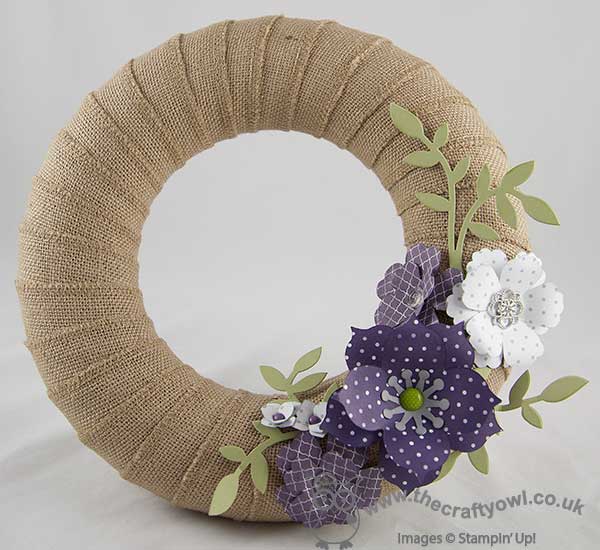
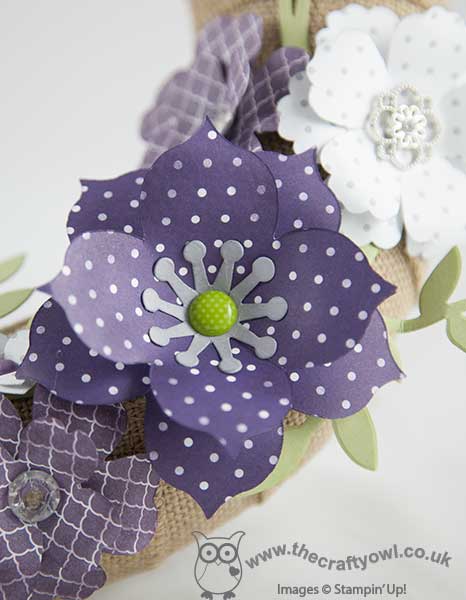
We started with a polystyrene wreath base and covered it with a roll of burlap, then decorated it with a selection of flowers made with a variety of dies and punches. The largest flower, leaves and the bases for the medium flowers were made using the Big Shot and Flower Frenzy Bigz L Die; the remaining flowers were made using a combination of the retiring Blossom punch, the Pansy punch and the Petite Petals punch. The Blossom punch and Flower Frenzy Bigz die are now out of stock, as is the patterend paper that I used, but you could make something similar with other punches and dies. We used a variety of buttons, brads and embellishments to decorate our flowers: I used Vintage Faceted Buttons, Something Borrowed Embellishments and some retired brads from my stash to decorate mine. I chose Elegant Eggplant, Smoky Slate and Pear Pizzazz as my colourway but each of the ladies tailored their colour choices and embellishments to their personal preferences. Here's a closeup of my flowers - I think they are gorgeous:
I created an album with pictures of their finished wreaths on my Facebook page here - you really should go and check them out as there are some amazing pieces and they all look so very different in the various colourways. If you haven't already, perhaps you could give me a 'like' whilst you're there - I'm only 10 away from my next milestone!
If you live in or around Northampton and would like to see me demonstrate how to make these flowers, do pop along to Bell's between 6-9pm this evening:
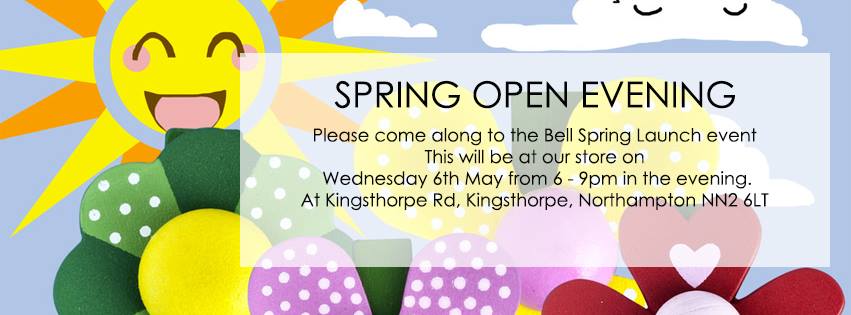
I hope you like today's project - it's one of my favourites! Back tomorrow with a card for this week's new challenge over at Create With Connie and Mary. Until then, happy stampin'!Full details via the link above and on my Facebook Page. There are lots of other demonstrations taking place - there will be someone fabulous chefs in residence cooking up delicious treats, a little pampering as well as other in-store delights that will all make for a pleasant browsing experience.
Stampin' Up! Supplies Used:
4946a4b9-930f-4216-b7d6-268e638019dd|0|.0|96d5b379-7e1d-4dac-a6ba-1e50db561b04
Tags: 3D Projects, Wreaths, Blossom Punch, Pansy punch, Petite Petals Punch, Big Shot, Flower Frenzy Bigz Die, Shop online, Stampin' Up! Demonstration, Stampin' Up, Stampin' Up Supplies, Something Borrowed
3D Projects | Classes | Promotions | Stampin' Up! Events
by Joanne James9. March 2015 10:44Happy Monday everyone! This is the start of the busiest week for me - classes, parties and a number of family commitments - so I'll do my best to keep up with my blogging schedule. Today I'm sharing one of the cards that I'm making with my ladies in my technique class this week - an oval shaped card, using an interesting vellum technique. Here's my card:
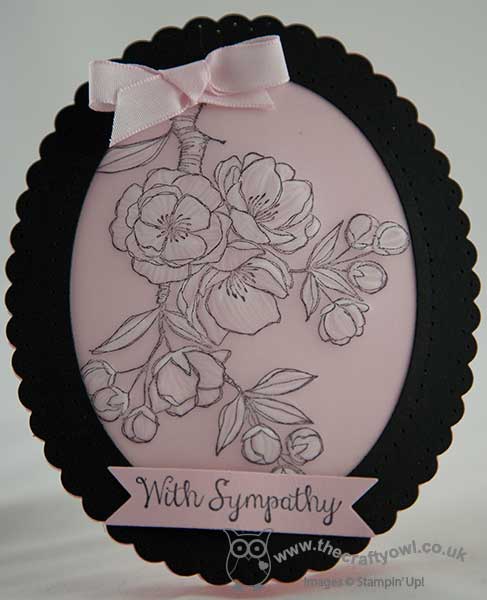
I saw this neat technique where you stamp your image on vellum then rub the back of the image with a round ended stylus to 'colour' it in a video tutorial by Deb Valder here. I used Pink Pirouette for my background, then layered the vellum before adding my black border, cut with the largest shaped oval framelit which I paper-pierced around the edge. I needed a sympathy card for my box, so used a sentiment from the 'Bloom With Hope' set, which I cut out with the Banners framelits, and a little bow to soften the card front. I really like the effect of the vellum - it looks slightly 'raised' following the rubbing and adds a feeling of texture to the card.
I'm looking forward to making this card with my ladies this afternoon and then this evening I'm off to craft with a group of Brownies and then Girl Guides - I'll share these projects later in the week.
Back tomorrow with another project; until then, happy stampin'!
Stampin' Up! Supplies Used:
by Joanne James14. February 2015 09:00I hope you all received lots of Valentine's cards today - I certainly sent plenty! Today I'm sharing a card that I made using the Butterfly Basics stamp set to share with the ladies that attended my technique class earlier this week. In addition to the cards that I design for us to make in the class, I produce a selection of alternative samples to provide further ideas and ways in which they can use the stamp set and practise the techniques that we have covered. There are times when one of these cards produces so many 'oohs' and 'aahs' that it makes me wonder if I should have included the card as the class card - this is one of those cards!! The ladies made me promise I would blog it share with all of you, so here it is:
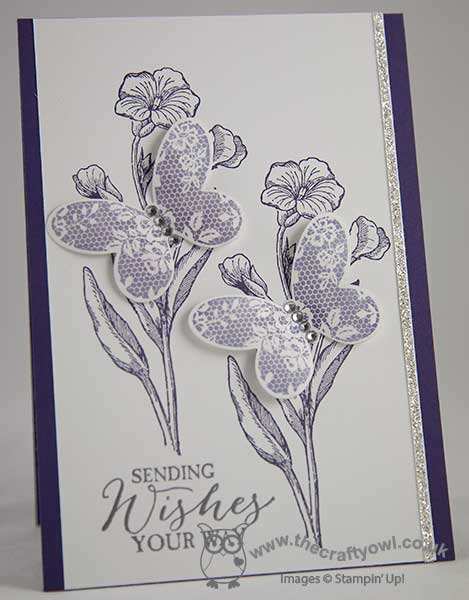
A monochromatic purple card on a base of Elegant Eggplant, featuring the lovely outlined bloom in the stamp set along with the lacy butterfly. There are lots of touches of sparkle on this card which in real life really add a touch of luxury: the thin strip of silver glimmer paper, the silver heat-embossed sentiment, the sparkling rhinetones and the vanilla smooch spritz sprayed onto the Wisteria Wonder butterflies that adds a subtle pearlescent finish.
I hope you like today's card; back tomorrow with this week's card for our new challenge over at The Paper Players - and it's my first one!
Until then, happy stampin'!
Stampin' Up! Supplies Used:
by Joanne James21. January 2015 09:00Today's card is for this week's sketch over at CAS(E) This Sketch, where Chrissy has this rather intriguing sketch for us to work with this week:
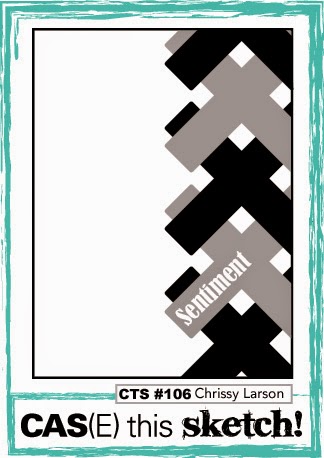
Whilst musing the best way to create a pattern with diagonals that had a readable sentiment and used a design that was different from the designers' inspiration (some lovely plaid patterns there), I remembered this lovely card by Heather Klump that I saw on Pinterest the other week and I decided to combine both inspirations to come up with my card today. Here it is:
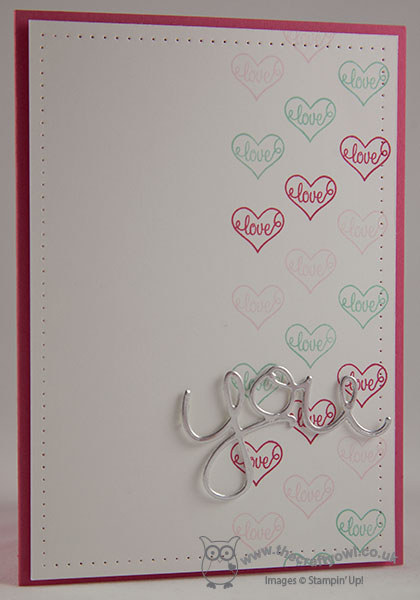
Using my stamp-a-ma-jig, I carefully stamped rows of love hearts from the 'You Brighten My Day' Sale-A-Bration set in Strawberry Slush, Pink Pirouette and Pool Party, aligning them to re-create the diagonal pattern of the sketch. I used a silver foil 'you' cut with my Big Shot and my 'Hello You' thinlits, popped up on rolled glue dots, for the final piece of my sentiment.
I love this card - another pink and pretty affair this week! Looking forward to my first Project Life class of the year this morning and catching up with some of my lovely ladies who I haven't seen since before Christmas. Back with you tomorrow with another project; until then, happy stampin'!
Stampin' Up! Supplies Used:
by Joanne James14. January 2015 12:01I haven't managed to blog the last couple of days as there's just been too much going on. Whilst I was intending to blog later today, I thought I would just share with you a card that I made with the ladies in my Technique Card Class this week, as it features two if the punches that are available on Wednesday Weekly Deals this week. My card was heavily inspired by this one by Inge Groot that a saw a couple of weeks ago. Here is my altered version, in the colourway that we made in our class:
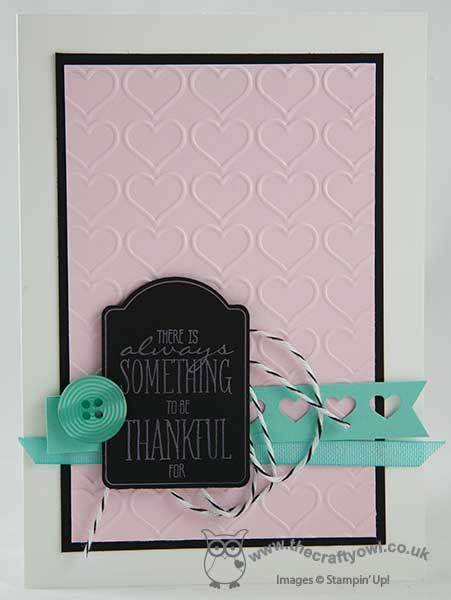
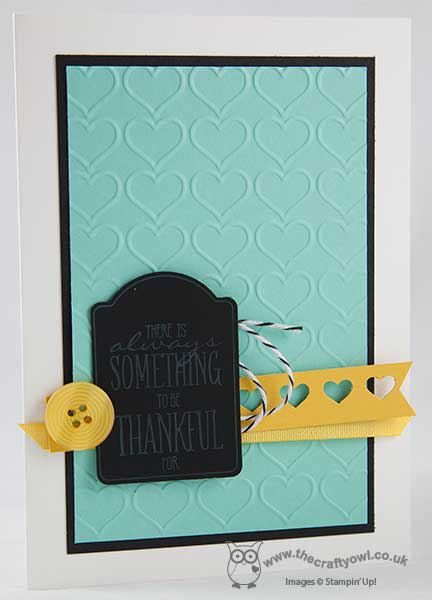
The technique class featured the new Chalkboard paper and all the different ways in which you can use the lovely new chalk inks that are now available in the Spring-Summer catalogue. These inks have a fabulous soft chalk effect on the new Chalkboard paper; here we used it to stamp the tag from the 'You Brighten My Day' stamp set, yours free with a £45 spend during Sale-A-Bration, and behind this added some black and white baker's twine, some of the Best Year Ever ribbon and buttons (another Sale-A-Bration freebie) and a strip of cardstock punched with the Hearts Border Punch. All of this was mounted on a feature mat in Pink Pirouette that we embossed with the new Happy Heart embossing folder. I also made two more cards to the same design, but in two alternative colourways. This one is Aquamarine chalk in on Coastal Cabana, with Crushed Curry accessories:
Lastly, Yellow Citrus chalk ink and So Saffron, with Calypso Coral accessories:
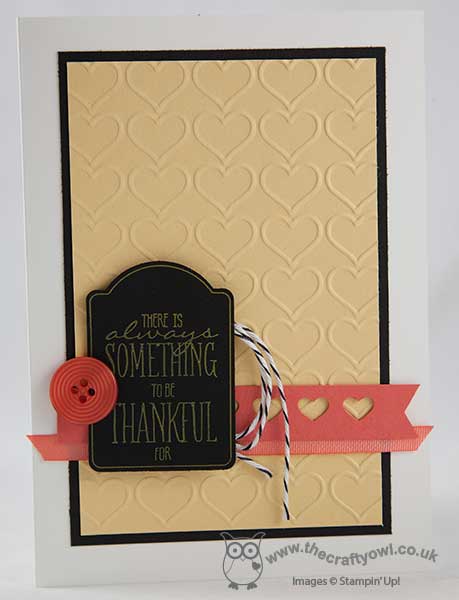
I like that these cards are quite subtle, despite the bright appearance of the chalk ink in the pad itself - it's quite deceiving. Both the Note Tag punch and the Hearts Border Punch are on offer this week as part of the Wednesday Weekly Deals, as is the What's Up punch that also co-ordinates with the house stamp in the 'You Brighten My Day' stamp set. If this stamp set appeals to you and you would like to be able to create today's card, the following product bundle costs £47.87, includes both punches and would enable you to acquire the key supplies and get the stamp set for free:
All you need to add is the cardstock in the colours of your choice, a button and some ribbon from your stash. For everyone that buys this bundle from my online store this week and uses the hostess code 44JKUBHY, I will send you a separate little thank you gift from me in the post.
Back soon with another creative post; until then, happy stampin'!
f25fa6a7-e439-425d-8d13-eff4a3eb93cc|0|.0|96d5b379-7e1d-4dac-a6ba-1e50db561b04
Tags: You Brighten My Day, Stampin' Up Supplies, Stampin' Up Card ideas, Stampin' Up, Stampin' Up Card, Shop online, Promotions, Sale-A-Bration 2015, Happy Heart TIEF, Note Tag Punch, Hearts Border Punch, Wednesday Weekly Deals, Chalk ink, Chalkboard, Big Shot
Cards | Classes | Promotions | Stamping
by Joanne James14. November 2014 21:36Today I thought I would share with you the Christmas star wreath I made at my class yesterday. I used the All is Calm Speciality Designer Series Paper for my version, which looks like this:
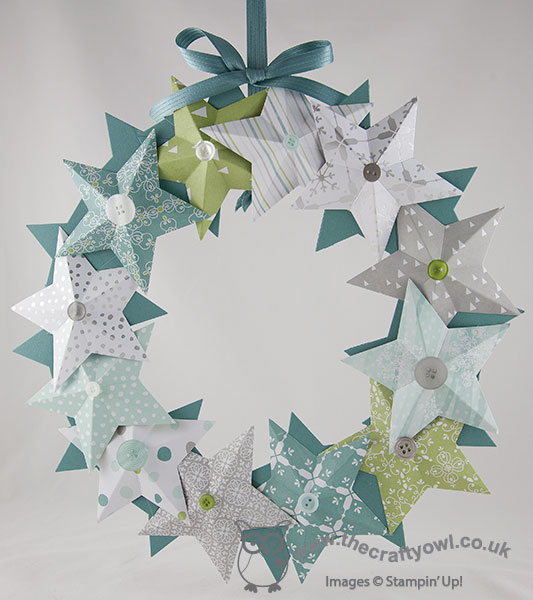
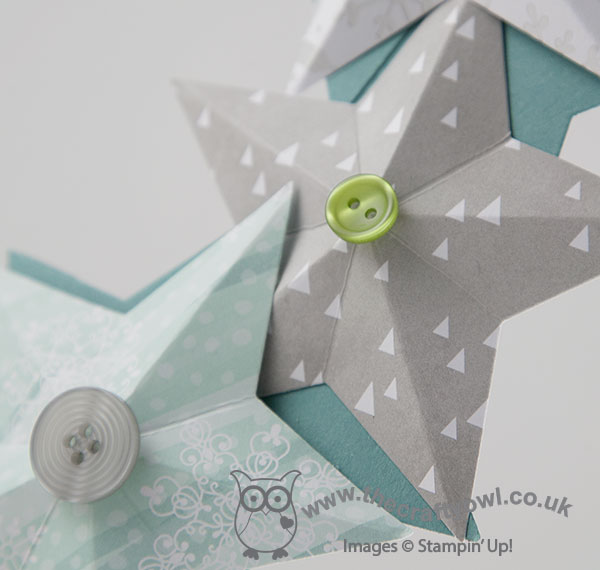
I layered a circle of Lost Lagoon flat stars, cut out with my Stars framelits, onto my wreath base, then cut 12 stars out of the All Is Calm Speciality DSP for the 3D stars. Each of these stars was scored from the point to the opposite side then pinched together to create the dimension and once glued to the wreath base, finished with a selction of Brights, Neutrals, Subtles and silver buttons:
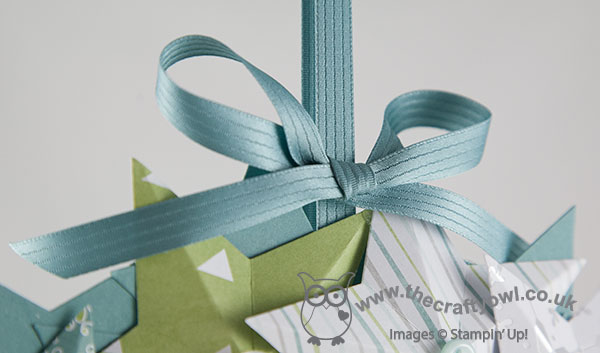
To finish, a length of the luxurious In-Colour Lost Lagoon satin ribbon to create a bow and hanging loop:
You can see another example of this wreath made with the Under The Tree Speciality DSP over on my Facebook page - it looks lovely in the kraft and more traditional, red, greens and browns, so do check it out. I have another of these classes next week where the ladies will be making them using other papers of their choice.
I hope you like today's project; this is going to be my indoor wreath as it matches my dining room colours perfectly; I have another two wreaths to share with you in coming weeks, so if home decor is your thing, keep an eye out for the other versions!
Back tomorrow with another project; until then, happy stampin'!
Stampin' Up! Supplies Used:
5659ab48-c840-43d3-b738-3ab09bab83d3|0|.0|96d5b379-7e1d-4dac-a6ba-1e50db561b04
Tags: 3D Projects, All Is Calm, Big Shot, Christmas, Shop online, Stampin' Up, Stampin' Up Card ideas, Stampin' Up Supplies, Star Framelits, Wreaths, In Colours
3D Projects | Classes
by Joanne James2. October 2014 21:02A quick post from me today with one of the cards we made at my card class earlier this week. This month's class featured the Festival of Trees stamp set and co-ordinating punch - without further ado, here's today's card:
I started with a base of Crumb Cake with a mat of Cherry Cobbler, then an additional mat of Crumb Cake which was embossed with the Decorative Dots embossing folder and lightly sponged with white kraft ink to look like snow. I added two Whisper White snow drifts, edged with Dazzling Diamonds, and then stamped and punched three trees in Garden Green on Whisper White and interspersed them between the snow drifts. The tree at the front is also over-stamped with the bauble stamp in Cherry Cobbler and a few pearls coloured with Cherry Cobbler Blendabilities added to give extra dimension. A sentiment added inside and out, and finished!
All of the cards in this month's class were quite different as I was aiming to show my ladies just how versatile this stamp set and punch can be. If you live local to me in Northampton and would like to join me for a future class, do get in touch - newcomes, whether experienced or novice papercrafters, are always welcome!
That's all from me today; back tomorrow with another project. Until then, happy stampin'!
Stampin' Up! Supplies Used:
by Joanne James10. July 2014 22:01Another busy day for me today - for those who follow me on Facebook, you will have seen photographs of a class I ran a few weeks ago with a super bunch of ladies making 3D wall art using folded hearts so that they would each have a unique gift for their little girls. Well it just so happens that the same group of ladies also each have one or more sons, so in order that they wouldn't feel left out they wanted to make a similar project with boys in mind. Never one to resist a challenge, I already had an idea in mind using the new Stars Framelits - here it is:
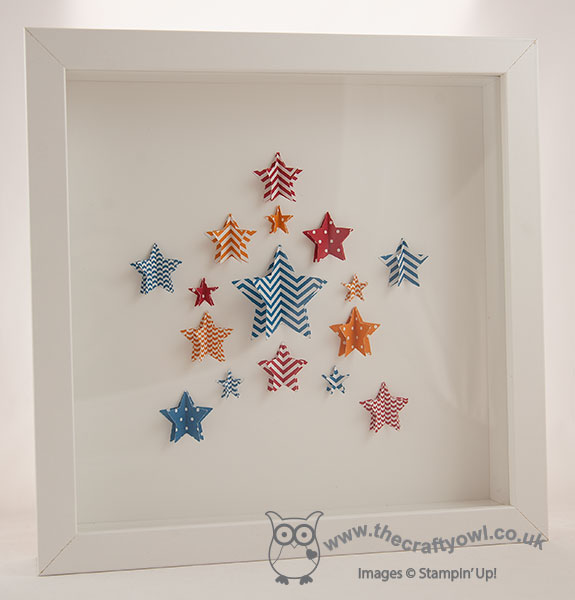
Using a combination of the two smallest star framelits and the mini star punch from the new Itty Bitty punches pack, I cut lots of stars and then having scored them down the middle, adhered them to each other on one half in groups of three and arranged them in a star shape. This close-up shot gives a better explanation of this:
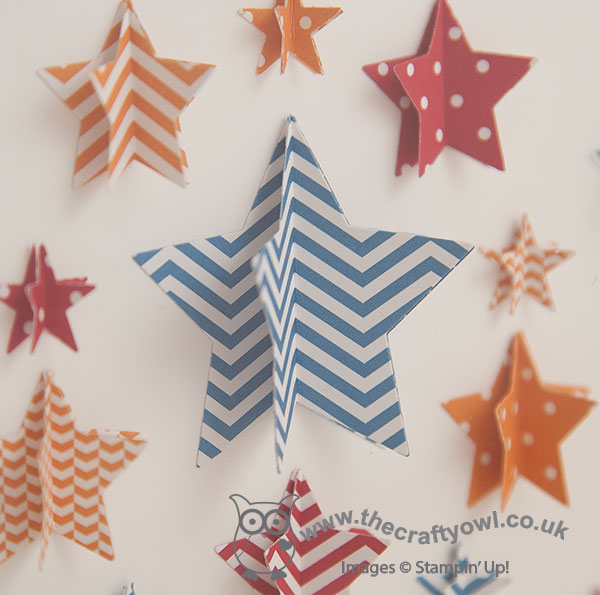
I used a combination of Pacific Point, Pumpkin Pie and Real Red patterned papers from the Brights Designer Paper Stack for my wall art as these colours will look great in Ben's Lego-inspired bedroom, however the ladies in my class used different colour combinations and even created some stunning monochrome designs. The dimensional stars really make this wall art stand out, especially in bold, bright colours. The wall art made in the class will be on my Facebook page in the morning if you would like to pop over and take a look, when I will also be updating the product links for today's post. If you live local to me in Northampton or the surrounding area and you would like to attend a class to make one of these lovely frames, then do get in touch.
This really is a quick post from me as I have a few more jobs to do before I turn in for the night, having been running a class today, sorting my school and after-school club runs and then a pleasant (if brief!) couple of hours with some of my lovely team this evening for one of our regular catch up sessions.
Back tomorrow with another project; until then, happy stampin'!
Stampin' Up Supplies Used:
by Joanne James8. July 2014 21:21I've had a fun day today with my monthly card class. Classes take a lot of thought and preparation, but I can honestly say I laugh so much with this fun bunch of ladies it so makes it all worthwhile! Today's class was all about getting to know new stamp sets, colours and tools from the new catalogue and I thought I would share one of the cards we made using the Work of Art stamp set and the new 2014-16 in-colours. Here is the card in question:
I based the design for my card on one I'd seen on Pinterest using the Gorgeous Grunge stamp set (I didn't pin it though and now can't find the link - apologies!) and coupled the stripe and heart from the Work of Art set with one of my favourite vintage 'Happy Day' stamps (I have a new catalogue 'replacement' for this on order, but I'm not ready to part with this one yet!) Quite a simple design but tricky to line up and make everything look even without loosing the natural 'swiped' look; the main reason I'm sharing it though is because of all the cards we made today, this one not only raised a smile - it had us in stitches! I wish I had taken my camera as there were some lovely variations on the basic idea and everyone using a different colour of base card.
If you live in or around Northampton and would like to join my monthly classes, do get in touch. I am currently looking at expanding my class schedule further, so would love to hear from you if this is something that interests you.
Back tomorrow with this week's Colour Me...! design team card and the Wednesday Weekly Deals; until then, happy stampin'!
Stampin' Up! Supplies Used: